

Have you ever pulled a tray of dipped strawberries from the refrigerator and wondered why some pieces look glossy and snap cleanly while others turn dull, streaky, or sticky? The difference usually isn't the chocolate recipe. It's the way cocoa butter crystals formed while the chocolate cooled.
Tempered dark chocolate is melted chocolate that has been heated, cooled, and gently reheated so its cocoa butter develops a controlled, stable crystal structure. That structure gives chocolate its sheen, firm set, audible snap, clean release from molds, and better resistance to softening at room temperature. The process is precise for the same reason bread fermentation is precise. Small changes in temperature and timing can change the final structure.
A good starting point is the best chocolate for tempering, because real chocolate containing cocoa butter behaves differently from compound coatings. Once you understand what the crystals are doing, tempering stops feeling like a mysterious pastry trick and becomes a repeatable kitchen process.
Table of Contents
- What Tempered Dark Chocolate Actually Is
- Why Cocoa Butter Crystals Matter
- The Dark Chocolate Temperature Curve
- Four Ways to Get There
- Troubleshooting Bloom and Other Setbacks
- Precision Tools for Repeatable Tempering
- Holding the Temper After You Make It
What Tempered Dark Chocolate Actually Is
Melted chocolate looks smooth, but its internal structure has been reset. Cocoa butter contains several kinds of crystals, and melting removes the organized crystal network that gave the chocolate its original firmness. If you pour that melted chocolate into a mold and let it cool, the cocoa butter can solidify in a mixed, unstable arrangement.
That batch may still become solid. It just won't necessarily become tempered dark chocolate. The surface can look cloudy, the texture can feel soft or grainy, and the chocolate may resist clean release from a mold. A bar can appear acceptable immediately and develop pale streaks later as unstable fat moves toward the surface.
Tempering in plain language
Tempering is a controlled sequence:
- Melt the chocolate fully, removing the crystals that were already present.
- Cool it deliberately, encouraging new stable crystals to begin forming.
- Rewarm it carefully, melting away weaker crystals while preserving the stable seed crystals.
The target crystal is known as Form V, also called beta V. It supports the combination pastry cooks want: shine, snap, hardness, contraction, and a smooth mouthfeel. The process doesn't make chocolate “more chocolatey.” It organizes the fat so the finished piece behaves predictably.
Practical rule: A chocolate mixture can be fully solid and still be poorly tempered.
That explains why two batches made from the same bar can look completely different the next day. One batch was cooled under conditions that favored stable crystals. The other was allowed to set without enough control, so several crystal forms competed inside the chocolate.
The visual clues are useful, but they're only the result. Work happens at the level of cocoa butter crystallization. Once the crystal population is controlled, the glossy finish and sharp break follow naturally.
Why Cocoa Butter Crystals Matter
Cocoa butter can form six recognized crystal forms, commonly identified as Forms I through VI. This behavior is called polymorphism, which means the same fat can arrange itself into different structures. Think of each form as a different key cut from the same metal. They all belong to cocoa butter, but only one fits the lock that produces the finish a chocolatier wants.
Form V is the target for most tempered dark chocolate. Its structure gives the chocolate a reflective surface, a firm bite, and the slight contraction that helps a shell pull away from a polycarbonate mold. Forms I through IV can form more readily, but they tend to produce chocolate that is softer, less glossy, streaky, or unstable.
The crystal forms are not equally useful
The early forms may help chocolate solidify, but quick setting isn't the same as good setting. A bar can harden while retaining a dull surface or a fragile internal structure. Form VI is more stable over time, but it develops slowly and can contribute to bloom as the chocolate ages.
The white or grey coating that appears on a bar is often called fat bloom. It usually reflects cocoa butter migration and recrystallization at the surface, commonly after poor tempering or temperature changes. Sugar bloom looks different. Moisture dissolves sugar at the surface, and as that moisture evaporates, the sugar can recrystallize into a rough, dusty texture.
Why tempering favors Form V
The goal isn't to keep every possible crystal. It's to create conditions in which Form V crystals can act as seeds while less desirable forms are removed during the final warm-up.
A useful way to read the finished chocolate is:
- Gloss suggests a smooth, organized surface.
- Snap suggests a firm crystal network.
- Clean release reflects contraction as the chocolate sets.
- Bloom signals that fat or sugar has moved and recrystallized.
- Graininess points to an uneven or poorly controlled structure.
A tempering manual defines chocolate as “in temper” when 2–4% of its cocoa butter is in the stable crystal form. A peer-reviewed study found under-tempered chocolate below 1.0% solid-state cocoa butter, while over-tempered chocolate occurred above 3.0%. The same study identified 4–7 CTU as the desired temper-index range, with under-tempered samples at 1–3 CTU and over-tempered samples above 7 CTU. These benchmarks connect what you see on the counter with measurable crystal behavior, rather than treating shine as a purely visual judgment (the peer-reviewed tempering study).
The Dark Chocolate Temperature Curve
Dark chocolate tempering follows one continuous rhythm, not three unrelated temperature targets. You melt high enough to erase the old crystal memory, cool far enough to encourage stable nuclei, then rewarm just enough to remove unstable crystals without destroying the useful ones.
The three-stage sequence
Stage one, melt: Bring dark chocolate to approximately 45–50°C. This temperature range clears the existing cocoa butter crystal structure so the batch can begin again from a controlled state.
Stage two, cool: Lower the chocolate to approximately 27–28°C. As the mixture cools, crystal nuclei begin to form. Some will be unstable, but this stage creates the seed population needed for the final working temperature.
Stage three, rewarm: Raise the chocolate to approximately 31–32°C. This is the dark-chocolate working range. The warmer temperature melts many unstable crystals while leaving enough stable Form V crystals to guide the set.
| Stage | Target Temperature | Job It Does |
|---|---|---|
| Melt | About 45–50°C | Erases existing crystal forms |
| Cool | About 27–28°C | Encourages stable crystal nuclei to form |
| Rewarm | About 31–32°C | Removes unstable crystals and preserves Form V seeds |
The final window is narrow. If you hold the chocolate too warm, you can melt away the stable crystals you just created. If you work below the target, the crystal network grows too quickly, viscosity rises, and the chocolate may become thick, streaky, or difficult to mold.
Dark chocolate's working range is commonly placed near 31–32°C, with some professional guidance identifying 34.5°C as a maximum working temperature. The difference between the target and the maximum matters. A batch may remain fluid above the ideal range, but fluidity alone doesn't prove that the chocolate is still in temper. See this chocolate tempering temperature chart when comparing dark, milk, and white chocolate, because milk and white varieties generally require cooler handling.
Use a calibrated thermometer and measure the chocolate itself. An oven, countertop, bowl, and room can all have different temperatures, and guessing by touch won't show whether the crystal population is still intact.
Four Ways to Get There
Different tempering methods can reach the same crystal target, but they don't offer the same level of control. Choose based on how much chocolate you're making, how often you temper, and whether you prefer tactile work or automation.
| Method | Control | Repeatability | Best Batch Size |
|---|---|---|---|
| Tabling | High tactile feedback, with fast cooling on a cool surface | Depends heavily on technique and room conditions | Small to medium batches |
| Seeding | Good control when the seed chocolate is stable and finely chopped | Strong for careful home use | Small to medium batches |
| Microwave method | Convenient but sensitive to uneven heating | Moderate, especially with frequent stirring and temperature checks | Small batches |
| Tempering machine | Automated heating and cooling curve | High once calibrated and loaded correctly | Medium to production batches |
Tabling
For tabling, pour melted chocolate onto a clean marble or granite surface and work it with scrapers until it cools and thickens, then return it to the bowl and adjust the temperature. You can feel the viscosity change and watch the chocolate develop body. The trade-off is that the counter surface, room temperature, and speed of your movements affect the result.
Seeding
Seeding uses already tempered chocolate, usually chopped finely, to introduce stable crystals into melted chocolate. It requires fewer specialized tools than tabling and gives a home baker a practical way to build a controlled seed population. The seed must itself be properly tempered, and the bowl needs steady stirring so the crystals distribute evenly.
Microwave tempering
The microwave method uses short heating intervals and frequent stirring. Stop heating before every piece has melted, then use residual heat to finish the job. This approach suits decorations, dipped fruit, and other small projects, but microwaves create hot spots, so a thermometer and patience improve the odds.
Machine-assisted tempering
A tempering machine follows the heating, cooling, and holding sequence with less manual intervention. It occupies more counter space and adds equipment cost, but it can reduce the need to monitor every change during repetitive molding or dipping.
For batches under 500 g, start with seeding. For events, repeated bars, or larger production, a machine may justify its space.
Troubleshooting Bloom and Other Setbacks
Most tempering problems leave a visible clue. Read the surface first, then connect it to temperature, moisture, movement, or storage.
Start with the symptom
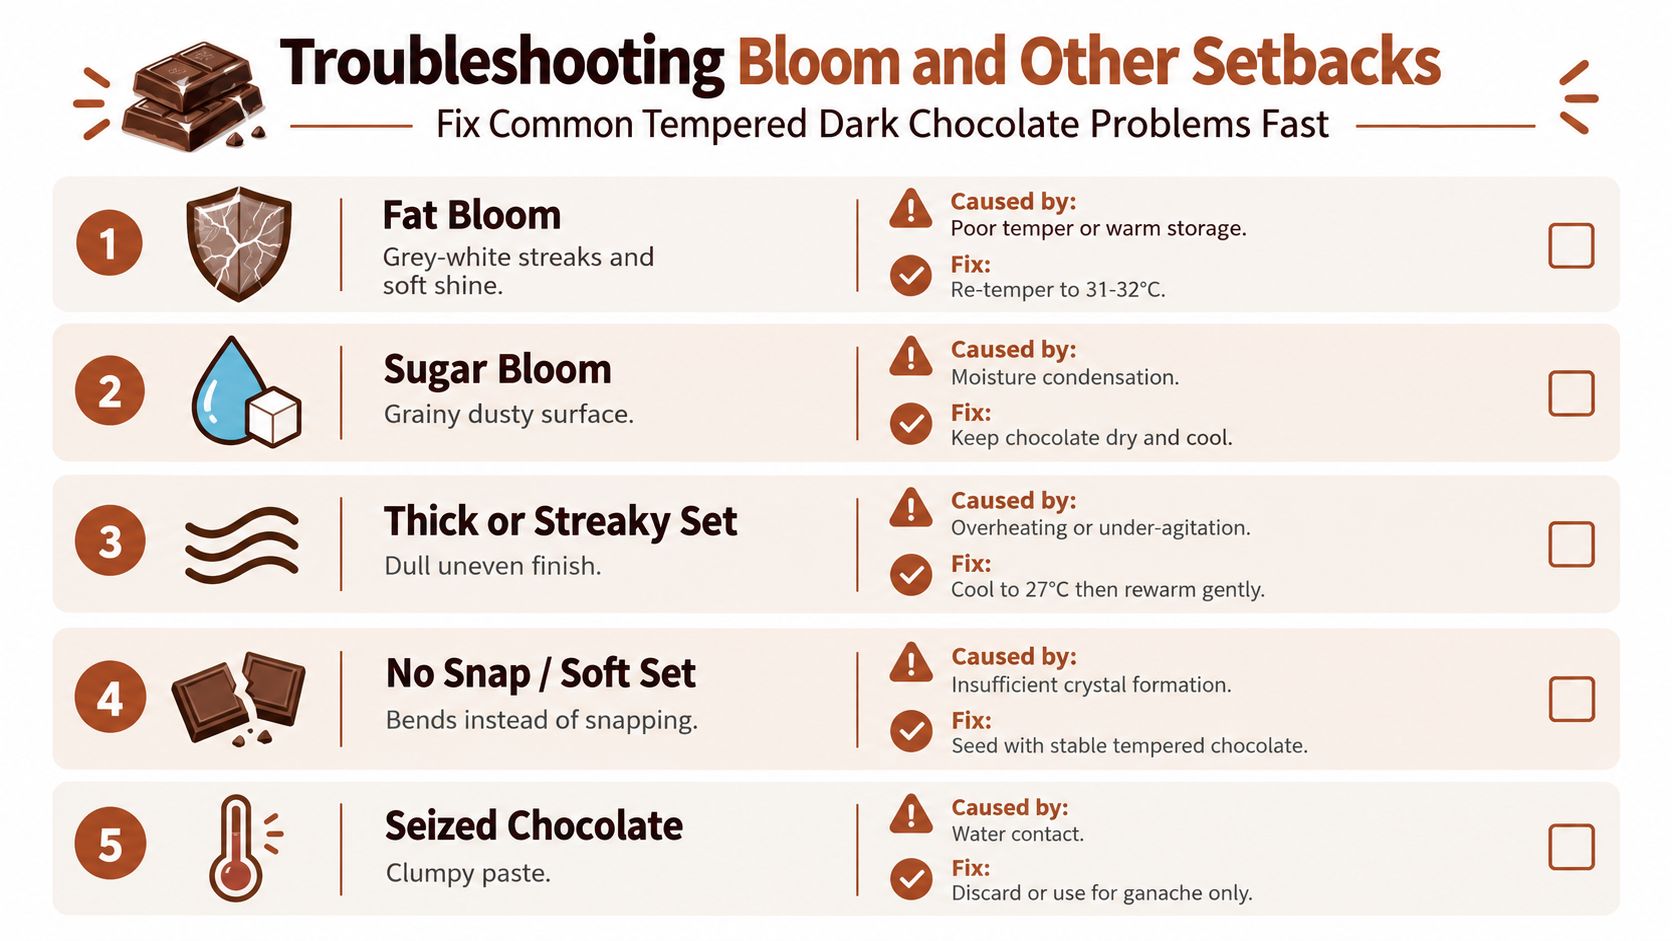
Grey-white streaks or patches usually indicate fat bloom. The chocolate may have been under-tempered, over-tempered, or exposed to warmth that encouraged cocoa butter to migrate. Re-melt and re-temper the chocolate, then keep the finished pieces away from temperature swings.
A dusty, gritty surface points more strongly toward sugar bloom. Condensation or other moisture dissolves sugar at the surface, and the sugar recrystallizes as the water disappears. Keep the chocolate dry, and avoid moving a cold piece directly into warm, humid air.
A dull, uneven finish can result from under-tempering, overheated chocolate, insufficient agitation, or a mold surface that has been scraped or contaminated. Cool the batch again, rewarm gently to the dark-chocolate working range, and make sure the mold is clean and completely dry.
Correct the process, not just the appearance
Thick shells usually mean the chocolate became too cool while molding. Rewarm it gradually and stir before pouring again. If the shell bends instead of snapping, the batch may not have developed enough stable crystal structure, so seed and repeat the cooling and rewarming sequence.
Seized chocolate is different from poor temper. A small amount of water can make melted chocolate clump into a thick paste because sugar and cocoa particles bind with the moisture. You generally can't return seized chocolate to a smooth molding consistency. Reserve it for ganache or another preparation where the texture can be rebuilt.
The storage environment also matters. Research on dark chocolate systems connects under-tempering with fat bloom and reports that over-tempering can increase hardness and stickiness while reducing gloss. Visible quality differences can develop during storage at 20°C, while storage at 30°C is described as extremely unsuitable in the cited study (research on storage and chocolate bloom).
The fix isn't always more heat. Sometimes the correct response is to dry the equipment, stabilize the room, or begin again with clean chocolate and a calibrated thermometer.
Precision Tools for Repeatable Tempering
A thermometer doesn't temper chocolate by itself. It tells you whether your process is moving through the correct curve, which lets you make the next adjustment before the batch fails.
Measure the chocolate, not the bowl
A digital probe thermometer is useful because its tip can sit in the chocolate while you stir. A clip-on dial thermometer can monitor a bowl or double boiler, but it may respond more slowly and may not reflect the temperature at the center of the mixture.
Infrared laser thermometers are convenient for surfaces, but they can miss the temperature inside a thick bowl of chocolate. Cocoa butter also reflects infrared readings differently from some other foods. For small batches, a fast, calibrated probe thermometer, such as a Thermapen-class instrument, can prevent repeated re-melting and reduce uncertainty during the narrow rewarming stage. This guide to choosing a chocolate tempering thermometer explains why instrument placement and calibration matter.
Match the machine to the workload
Entry-level tempering machines generally reduce manual heating and cooling while keeping the chocolate moving. They suit home chocolatiers who make bars, shells, or dipped pieces regularly. Larger continuous tempering and enrobing systems are designed for production, where the machine must maintain a steady flow rather than manage one bowl at a time.
A machine also changes the operator's job. Instead of manually chasing each temperature, you load the chocolate, monitor the readout, check the viscosity, and keep the working bowl supplied. That doesn't remove quality control. It makes the thermal curve easier to repeat.
Stabilize the surrounding equipment
A heated marble slab, induction surface with careful low-temperature control, or warming drawer can help maintain working temperature during molding. These supporting tools matter because chocolate often loses temper while waiting in a cold bowl or near a draft.
DBakerAid™ includes a low-temperature chocolate tempering capability in its stainless steel bowl, designed to warm and hold chocolate gently while also supporting other baking preparation. It can be considered alongside a probe thermometer, seeding setup, or dedicated tempering machine, depending on the batch size and frequency of use.
Holding the Temper After You Make It
A well-tempered bar can leave the mold glossy and firm, then lose some of that quality during storage. The crystal structure continues to respond to heat, moisture, movement, and nearby odors, so the final stage of tempering is the environment in which you hold the chocolate.
Let molded pieces set fully before wrapping. If you package chocolate while residual heat remains inside the piece, trapped warmth can soften the surface and encourage condensation later. A stable room-temperature hold is usually safer than repeated movement between a warm counter and a cold refrigerator.
Keep temperature changes gentle
A storage range of roughly 60–70°F is commonly used to help protect tempered chocolate from excessive warmth and bloom. Warm storage can encourage cocoa butter migration, while refrigeration introduces a different risk: when cold chocolate enters humid room air, condensation can form on the surface and trigger sugar bloom.
If refrigeration is unavoidable, protect the chocolate from moisture and allow it to warm gradually while still covered. Don't open the package immediately after removing it from the cold environment. The package should warm before humid air reaches the chocolate.
Choose packaging that protects the surface
Parchment or foil can protect a bar from light handling and nearby odors without trapping the same amount of residual heat as a tightly sealed plastic container. Chocolate readily picks up aromas, so store it away from strongly scented foods and ingredients.
After 24–72 hours, a properly tempered bar should still show the qualities you built into it: a reflective surface, a clean snap, firm edges, and straightforward mold release. If pale streaks appear, look first at the tempering curve and then at storage temperature and thermal cycling. The counter is often where the failure becomes visible, but the cause began earlier.
DBakerAid™ brings controlled low-temperature chocolate tempering into a broader home baking system, alongside tools for dough fermentation and proofing. Visit DBakerAid™ to see how its precision approach can support more repeatable chocolate work and bakery-style results at home.