

The difference between glossy, snappy chocolate and dull, streaky chocolate often comes down to a few degrees, and the chocolate tempering temperature chart is where that difference gets controlled on purpose. The chart isn't about melting chocolate. It's about steering cocoa butter into the right crystal form, so the finished coating sets cleanly instead of softening, blooming, or looking tired.
Table of Contents
- What Chocolate Tempering Actually Does
- The Chocolate Tempering Temperature Chart for Dark, Milk, and White
- How to Temper Chocolate by Seeding
- Tabling, Seeding, and Microwave Compared
- Equipment and Tools That Keep Tempering Honest
- Max Working Temperature and the Tolerance Band
- Troubleshooting the Four Most Common Tempering Failures
- Cooling, Unmolding, and Storing Finished Chocolate
- Quick Reference Cheat Sheet for the Bench
What Chocolate Tempering Actually Does
Chocolate is fussy because cocoa butter can set into different crystal forms depending on how you heat, cool, and agitate it. That's the whole job of tempering, to push the fat toward the stable form that gives chocolate its glossy finish, clean snap, and tidy release from molds.
Crystal control, not guesswork
When chocolate is tempered properly, the surface looks even and satin-smooth, the break sounds sharp, and the piece comes out of a mold without a fight. When it's not, you get streaks, soft edges, dull patches, and that waxy look bakers call bloom. The chocolate may still taste fine, but it won't behave like professional chocolate on the bench.
Practical rule: if the finish looks streaky before it sets, the crystal balance was off earlier, not later.
Purdue Extension explains tempering as a three-stage crystal-control process, heat to melt all crystals, cool fast enough to form many fat crystals, then rewarm to preserve the stable type V form while melting unstable ones (Purdue Extension tempering guide). That stable form is what people usually mean when they talk about good “temper.”
What failure looks like on the bench
Untempered chocolate can look convincing for the first few minutes, then turn flat, blotchy, or soft as it cools. It may stick in a mold, refuse to cleanly release, or leave greasy marks on your fingers after handling. The problem is not that the chocolate was “too cold” or “too hot” in a simple sense, it's that the crystal structure never settled into the right pattern.
Guittard's tempering graph notes that cocoa butter melts between 80 and 120°F, which is why the process starts well above the working range instead of hovering near it (Guittard tempering graph). That wide melt zone is exactly why a thermometer matters. The liquid can look smooth while the crystals underneath are still wrong.
The Chocolate Tempering Temperature Chart for Dark, Milk, and White
The chart below is the fast reference most bakers want first. It lays out the full melt, cool to, working temperature, and the often-missed max working temperature for each chocolate family, with both Celsius and Fahrenheit shown side by side.
| Chocolate Type | Full Melt | Cool To | Working Temp | Max Working Temp |
|---|---|---|---|---|
| Dark | 50–55°C, 122–131°F | 28–29°C, 82–84°F | 31–32°C, 88–90°F | 34.5°C, 94.1°F |
| Milk | 45–50°C, 113–122°F | 27–28°C, 81–82°F | 29–30°C, 84–86°F | 32.5°C, 90.5°F |
| White or Dulcey | 45–50°C, 113–122°F | 26–27°C, 79–81°F | 28–29°C, 82–84°F | 31.5°C, 88.7°F |
Dark chocolate gets the hottest melt range because it usually carries more cocoa solids and has to be fully liquefied before the stable crystal pattern can be rebuilt. Milk and white start lower, and white chocolate works at the lowest temperatures because it needs less heat headroom. Those differences are why one number for all chocolates doesn't work in the kitchen.
How to read the chart without overthinking it
The first stage, full melt, clears out the old crystals. The second stage, cool to, is where you deliberately build back a population of useful crystals. The third stage, working temp, is where the chocolate stays fluid enough to coat, mold, or drizzle, but stable enough to set properly.
The max working temperature matters because it tells you where the useful crystal structure starts to collapse. Valrhona, Purdue Extension, and King Arthur Baking all converge on the same core logic, separate melt, cool, and working phases, because the chemistry doesn't change just because the brand does (Valrhona tempering guide). In practice, a few degrees above the line can be enough to turn a promising batch dull or soft.
If you're looking for a simple topping that shows why white chocolate demands tight control, try this matcha bark recipe. It's a good reminder that white chocolate gives you very little room before the texture shifts.
How to Temper Chocolate by Seeding
Seeding is the home-kitchen method that makes the most sense for most bakers. You keep part of the chocolate unmelted, then use it to repopulate the bowl with stable crystals after the first melt. It's calm, predictable, and easier to repeat than trying to time the whole batch by eye.
The basic sequence
Start by chopping the chocolate finely so it melts evenly. Warm about two-thirds of it gently over a bain-marie, and stop well before the chocolate overheats. For dark chocolate, that means staying under the full-melt ceiling already listed in the chart, not chasing some vague “fully liquid” feel.
Keep the bowl moving. Stirring is what spreads heat and prevents hot spots from pushing one corner out of temper.
Remove the bowl from heat once the chocolate is smooth, then add the remaining one-third in two or three additions. Stir constantly as each addition softens, because every piece of seed chocolate cools the mass and brings stable crystals back into the bowl. You're not just lowering temperature, you're rebuilding structure.
What tells you the seed worked
The texture should thicken slightly, not turn pasty. The surface should regain a faint shine instead of looking oily or dull. A small smear on parchment should begin to set with a clean, even finish once the chocolate reaches the working band for its type.
If the batch cools too far, warm it in tiny increments and keep stirring. If it gets too thick, don't force it with a big heat jump, because that's how you blow past the working range and lose the temper you just built. A few gentle degrees matter more than a fast rescue.
For home bakers, seeding is the safest default because it balances control and practicality. It also gives you a clear recovery path if the bowl drifts, since you can always re-warm and re-seed instead of starting over from scratch.
Tabling, Seeding, and Microwave Compared
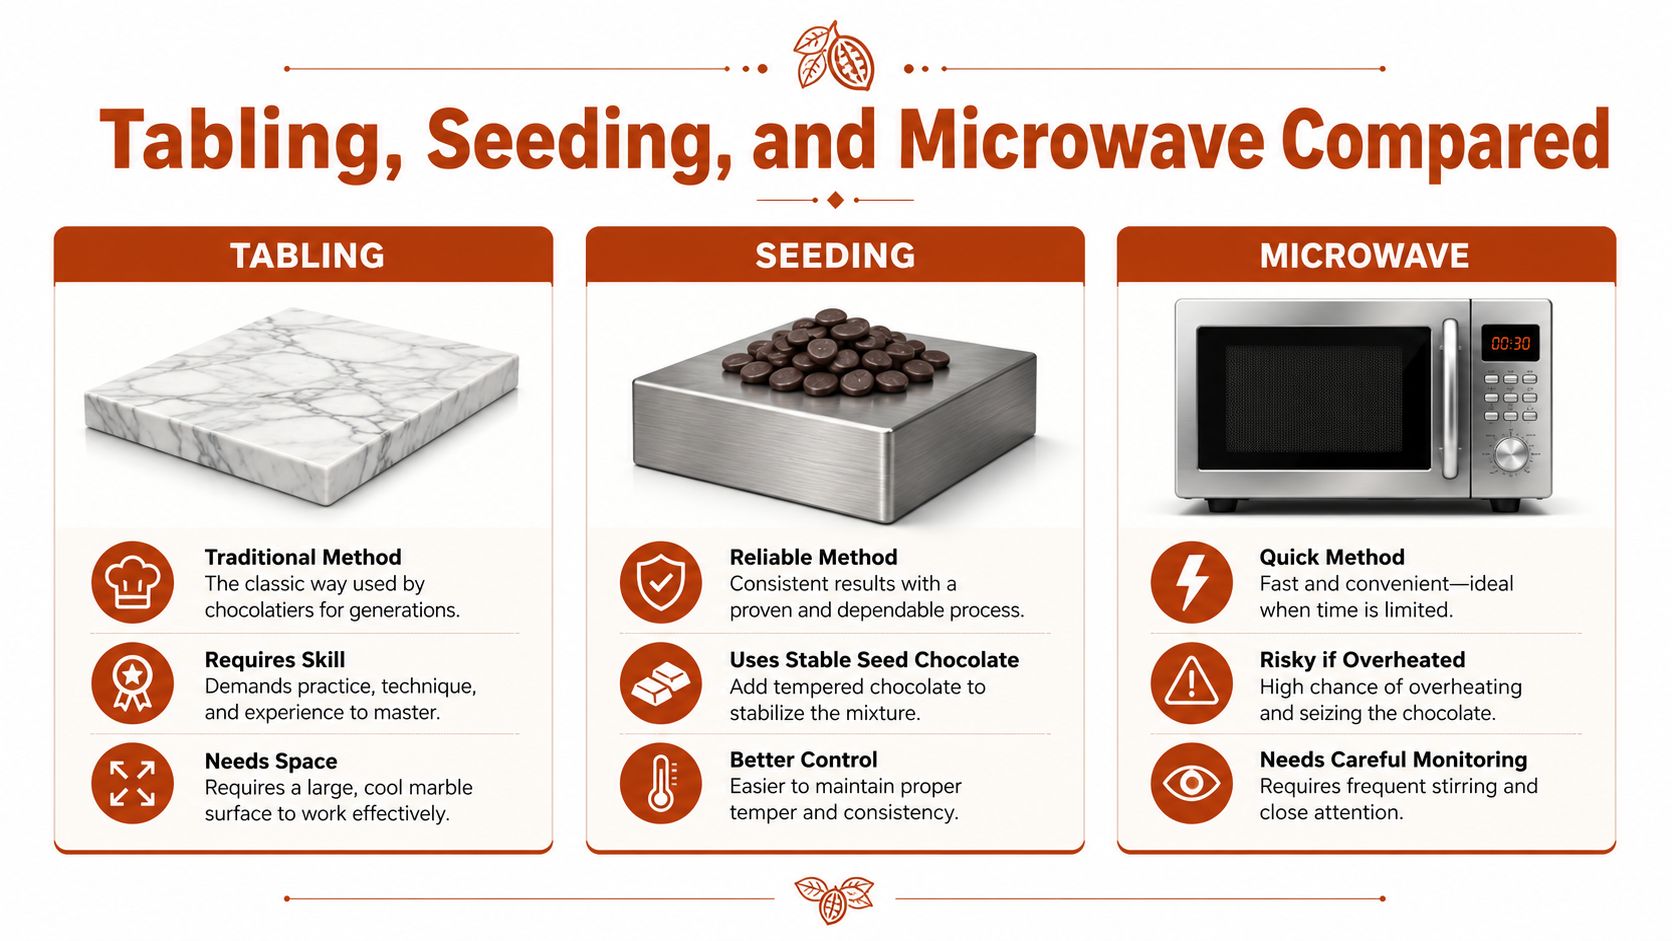
There isn't one correct way to temper chocolate. There's a method that fits the batch, the equipment, and the level of precision you need that day.
Which method fits the job
| Method | Speed | Equipment | Best batch size | Consistency |
|---|---|---|---|---|
| Tabling | Fast once you know the rhythm | Marble or granite slab, scraper, spatula | Small, precise professional batches | Very good in trained hands |
| Seeding | Moderate | Bowl, thermometer, seed chocolate | Home kitchens and small production | Reliable and forgiving |
| Microwave | Fastest for tiny jobs | Microwave-safe bowl, thermometer, stirring tool | Thin coatings, small molded pieces | Uneven if you rush it |
Tabling is the old bench method, and it works well when you have space, discipline, and a small batch that needs tight control. Seeding is the most practical all-around choice for home bakers because it doesn't require a slab and gives you room to recover if you drift. Microwave tempering can work for thin coatings or small molds, but it's the easiest to overshoot because the heat arrives in bursts and the edges warm faster than the center.
Where bakers usually go wrong
Microwave chocolate often looks fine until one hidden hot spot breaks the temper. Tabling can also fail if the slab cools too much or the batch gets spread too thin. Seeding avoids most of that because the chocolate stays in a bowl, but it still depends on careful thermometer work and steady stirring.
A practical way to choose is simple. If you're making a few dipped strawberries, microwave can be enough. If you're coating bars, molding shells, or working a batch that has to hold, seeding gives the best balance of control and speed.
Equipment and Tools That Keep Tempering Honest
A good temperature chart only works if the thermometer is reading the chocolate accurately. That's why the right tools matter as much as the method itself.
What to buy first
A digital instant-read thermometer with a thin probe is the most useful tool here because the chocolate's working windows are narrow and the reading has to be quick. ThermoWorks notes that narrow windows like milk chocolate cooling around 80–82°F demand confidence, not guesswork, and that precise temperature checks prevent bloom and streaking (ThermoWorks tempering guide). A slow dial thermometer can lag behind the bowl, and an infrared unit struggles on reflective chocolate surfaces.
A dedicated probe thermometer for chocolate work is a smarter buy than a fancy general-purpose gadget you won't trust. If you're tabling, add a marble or granite slab, plus a bench scraper and offset spatula. If you're molding, polycarbonate molds usually give a cleaner release and stronger shine than silicone.
Dry tools matter. A stray droplet in the bowl can turn a smooth batch into a seized mess before you know what happened.
What matters later
Reserve a little seed chocolate before you start. That spare portion is your correction tool if the bowl overshoots. For someone comparing gear for a broader kitchen, a stable hot box can be useful too, especially if the same setup also handles timing-sensitive jobs like hot lunch ideas for winter sport, but tempering itself still depends on precise heat control rather than general warmth.
If you're curious about a machine-assisted approach to other temperature-sensitive baking tasks, the internal guide on a chocolate tempering machine for home shows how controlled heat changes the workflow. The core lesson stays the same, though. Tempering rewards tools that let you hold a tight band, not tools that merely get “close.”
Max Working Temperature and the Tolerance Band
Most tempering mistakes happen after the chart is technically “hit.” The chocolate looked right in the bowl, then drifted too warm during use, and the stable crystals started slipping back into trouble.
The ceiling matters as much as the target
The max working temperature is the point where the chocolate still seems usable but has already started losing the structure you wanted. Callebaut lists max working temperatures of 34.5°C for dark, 32.5°C for milk, and 31.5°C for white couvertures, while Valrhona keeps the working bands tighter at roughly 31–32°C for dark, 29–30°C for milk, and 28–29°C for white or Dulcey (Callebaut tempering methods). That gap is your real working room.
Blommer adds a useful control rule, keep the chocolate at the final working temperature within about plus or minus 2°F during use (Blommer tempering chart). That isn't a casual suggestion. It's the difference between repeatable shells and batches that seem fine until bloom shows up later.
What to do at the bench
Keep the bowl over very low indirect heat or a warm water bath, not direct heat. Stir continuously so the mass stays even from edge to center. Recheck the temperature every few minutes during enrobing, especially if your room is cool or the batch is small.
If the chocolate creeps toward the ceiling, pull it off heat before it crosses over. If it drops below the target, give it a small, careful warm-up and stir again. The margin is narrow enough that “close enough” stops being useful.
Troubleshooting the Four Most Common Tempering Failures
When chocolate breaks on the bench, it usually gives a visible clue. The trick is mapping that clue back to the stage that went wrong, instead of guessing at random fixes.
Read the symptom before you touch the bowl
Fat bloom shows up as white streaks or patches after cooling. It usually means the chocolate spent time above its max working temperature, or it never cooled and rewarmed in the proper sequence. The fix is to re-melt, then temper again from the start.
Sugar bloom looks grainy and pale on the surface. That usually comes from moisture, often condensation when cold chocolate moves too quickly into a warmer, humid space. The batch is usually not worth trying to salvage once the sugar has already crystallized on the surface.
Seizing turns chocolate into a thick, clumpy paste. Water is the usual cause, though overheating can also push the system into a bad state. If the problem is a small amount of liquid contamination, you may be able to repurpose the mixture for a different use, but it won't behave like tempered chocolate anymore.
When the flow is wrong
Thick, sluggish chocolate means the working temperature has dropped below the target band. It may still be tempered, but it won't coat evenly or self-level well during enrobing. A brief, gentle warm-up and steady stirring often bring it back.
If you want a visual example of adding color to chocolate coatings, the internal guide on how do you color melting chocolate is useful context because colored cocoa butter and chocolate decorations fail for the same reason, the temperature window got ignored. That same logic applies whether you're making bars, shells, or dipped fruit.
If the bowl looks fine but the finish isn't, trust the thermometer and not the shine.
Cooling, Unmolding, and Storing Finished Chocolate
Tempering doesn't end when the last piece leaves the bowl. Cooling and storage can still undo good work if you rush them.
Let the set happen at room temperature
Finished pieces should set in a stable cool room, around 65–70°F, rather than in the refrigerator. Cold air in a fridge encourages condensation, and condensation invites sugar bloom. The sudden shock can also disturb the crystal structure you just built.
Thin molded bars usually release after 15–30 minutes, while thicker shells need more time. The signs are straightforward. The back looks matte, the edges separate cleanly, and a gentle tap gives a crisp snap instead of a soft thud.
Store for shine, not for speed
Once unmolded, keep pieces in an airtight container and separate them so they don't scuff each other. That matters more than people expect, because glossy chocolate can pick up marks even when the temper was perfect. If you're making decorative work, a neat layout is part of the finish.
The internal guide on coloured cocoa butter is a useful follow-up if you're planning decorative shells or splashes, because the same cooling discipline protects both the shine and the color. Well-tempered dark chocolate can stay glossy for months at room temperature, while milk and white usually have a shorter window because of their butterfat content.
Quick Reference Cheat Sheet for the Bench
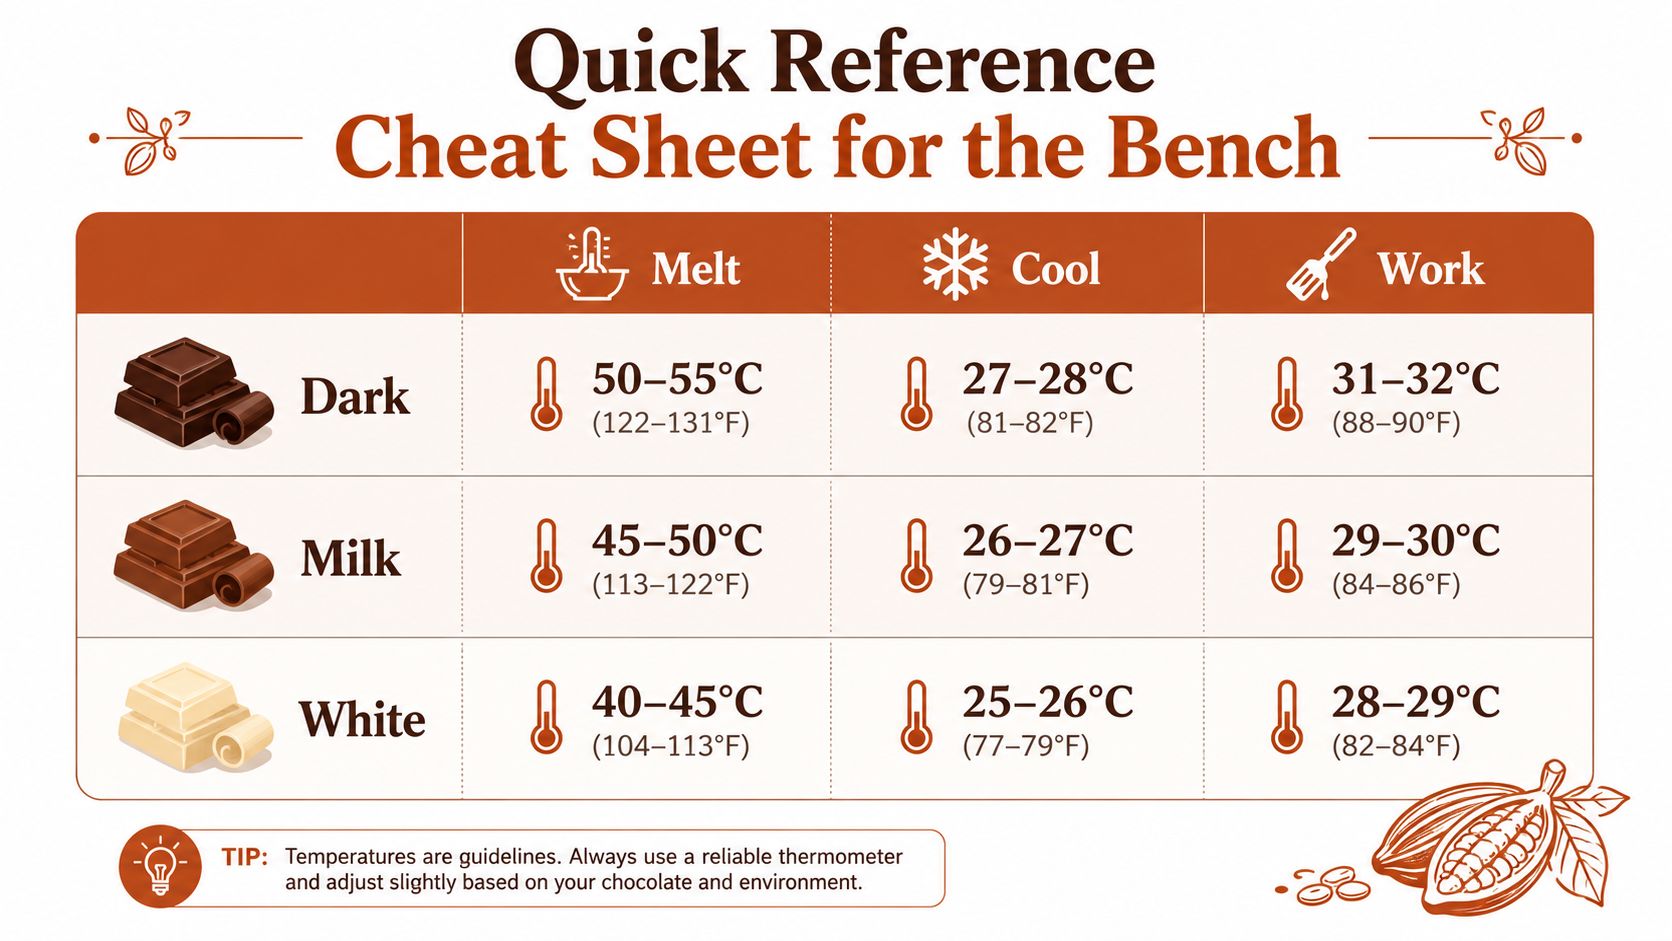
Keep this near the thermometer. It's the shortest version of the chocolate tempering temperature chart that still covers the important parts.
Bench checklist
- Calibrate the thermometer: Trust the reading before you trust the bowl.
- Chop the seed chocolate: Fine pieces melt and seed evenly.
- Set out molds or parchment: Don't hunt for tools with a live batch on the heat.
- Check the room: A cool, stable workspace makes holding the working band easier.
- Keep extra seed in reserve: That's your correction stock if the bowl drifts.
Fast chart reminder
- Dark: Melt 50–55°C, cool 28–29°C, work 31–32°C, ceiling 34.5°C.
- Milk: Melt 45–50°C, cool 27–28°C, work 29–30°C, ceiling 32.5°C.
- White or Dulcey: Melt 45–50°C, cool 26–27°C, work 28–29°C, ceiling 31.5°C.
Failure fixes in one line
- Bloom: Re-temper from the start.
- Sugar bloom: Keep moisture away.
- Seizing: Stop, dry the setup, and don't force the batch.
- Too thick: Warm gently back into range.
If you want repeatable chocolate and bread work from one kitchen setup, DBakerAid™ brings controlled temperature and timing into the same workflow. Visit DBakerAid™ to see how the system supports precision baking and tempering with a calmer bench and fewer failed batches.