

The best chocolate for tempering isn't automatically the most expensive bar on the shelf. A dramatic origin story, elegant packaging, or premium price can tell you plenty about flavor, but it won't tell you whether the chocolate will flow cleanly into a mold, form a thin shell, or release with a sharp snap.
Tempering is a crystal-control problem. Cocoa butter percentage, fluidity, particle size, emulsifier content, and the chocolate's intended use matter more than prestige alone. A dependable mid-range couverture can outperform a costly craft bar when you're making bonbons, dipping fruit, or producing decorative shards.
Table of Contents
- Why the Most Expensive Bar Is Not Always the Best Choice
- Understanding Cocoa Butter Crystals and Form V
- Comparing Couverture, Callets, Bars, and Chips for Tempering
- Choosing the Right Chocolate for Each Application
- Tempering Temperatures and Precision Control
- Buying, Storing, and Troubleshooting Your Tempered Chocolate
Why the Most Expensive Bar Is Not Always the Best Choice
A premium single-origin bar may be superb for eating out of hand and awkward for tempering. Many craft bars sit around 30–35% cocoa butter, and some use minimal lecithin. That combination can leave the melted chocolate thick and sluggish, especially when you're trying to fill fine mold details or create a thin enrobing shell.
The issue isn't poor quality. It's formulation. Chocolate designed for tasting may prioritize cocoa flavor, acidity, roast character, or a particular texture. Chocolate designed for professional production usually prioritizes flow, repeatability, and crystallization behavior. Those goals overlap, but they aren't identical.
Couverture is generally the more useful starting point because it contains at least 31–32% cocoa butter, according to Callebaut's cocoa butter guidance. Higher cocoa butter improves flow in the melted state and supports a glossier set with a cleaner snap. An industry explanation of couverture also places it at 31% or more cocoa butter in this technical overview.
Practical rule: Choose the chocolate for the work it has to do, not for the story printed on the wrapper.
A costly bar can still temper successfully, particularly if it contains enough cocoa butter and has a suitable formulation. If it feels unusually thick, you may need to adjust the formulation with cocoa butter, work more carefully, or accept a heavier shell. That adds complexity and can erase the benefit of paying more in the first place.
The better question is, what result are you trying to produce? A high-fluidity couverture may be the right choice for a molded bonbon, while a more moderately fluid chocolate may be easier for dipped fruit. For ganache, tempering performance may barely matter because the final texture comes from emulsification rather than a stable chocolate shell.
This is why the best chocolate for tempering should be selected as an engineering decision. Start with cocoa butter content and fluidity, then consider flavor, availability, and cost.
Understanding Cocoa Butter Crystals and Form V
Tempering succeeds when the cocoa butter crystal network is controlled. Cocoa butter can form six distinct crystal structures, labeled Forms I through VI. Their molecular arrangement changes with heating, cooling, and agitation, which changes the chocolate's firmness, gloss, snap, mouthfeel, and resistance to bloom. The peer-reviewed review of cocoa butter polymorphism explains this polymorphic behavior and the role of controlled reheating.
Form V, also called the beta crystal form, is the target for properly tempered chocolate. It typically melts around 33.8–34°C, or about 93°F. That melting range keeps the chocolate firm at room temperature while allowing it to melt cleanly in the mouth. Its practical advantages include a glossy surface, a firm set, a clean snap, and a smooth texture, as described in Callebaut's cocoa butter explanation.
The less desirable forms melt at lower temperatures:
- Form I melts around 17°C.
- Form II melts around 21°C.
- Form III melts around 25.5–26°C.
- Form IV melts around 27.3–28°C.
These lower-melting structures help explain dull surfaces, soft texture, and greater susceptibility to bloom in poorly tempered chocolate. Form V provides the balance a finished shell needs, but it remains sensitive to process and storage conditions.
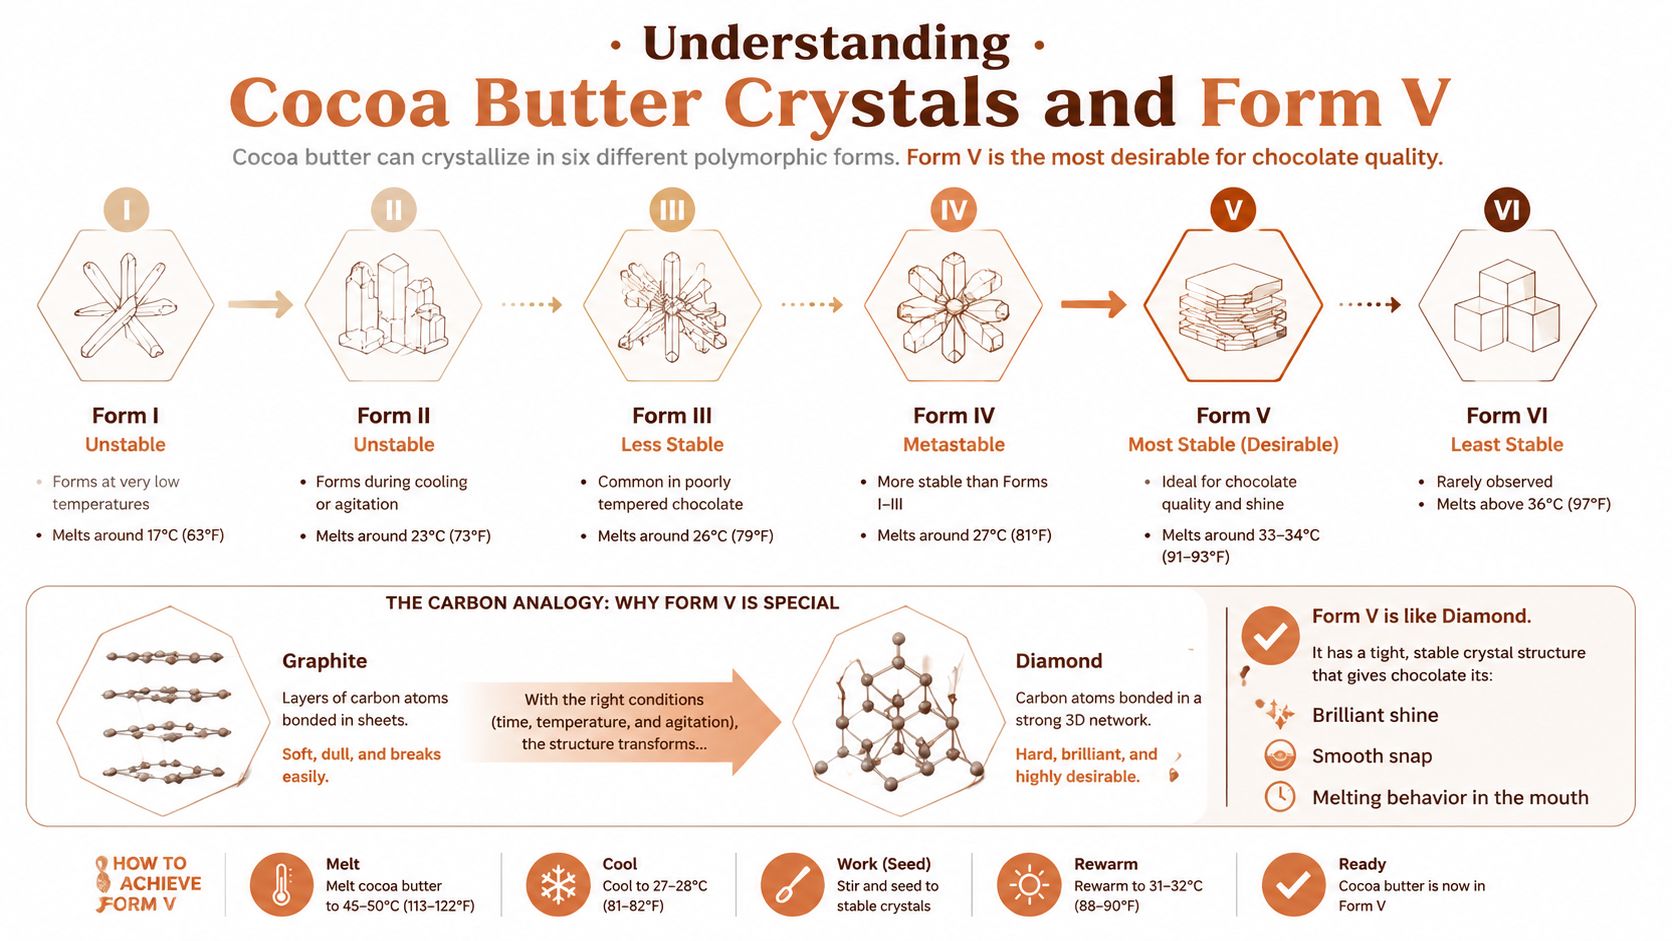
The three stages of tempering
Tempering resets the crystal network in three practical stages. First, melt the chocolate completely so existing crystals dissolve. Callebaut's dark chocolate sequence uses a melt stage around 40–45°C, cooling to 27°C, then reheating to a working range of 31–32°C, according to its tempering-method guide.
Cooling encourages multiple crystal forms to develop. Reheating then removes many unstable forms while preserving enough Form V seed crystals to guide the final set. A Purdue extension guide describes cooling to 28–29°C, reheating to 31–32°C, and holding around 29–30°C in its chocolate-tempering guide.
The finished chocolate shows whether the balance is right:
- Too little stable Form V can produce a dull finish.
- Excess unstable crystals can cause softness or streaking.
- Poor cooling or storage can encourage fat bloom, leaving pale marks on the surface.
A 2021 study found that adding 0.1% by weight of specific saturated lipids, followed by rapid cooling to 20°C, accelerated crystallization and stabilized Form V in cocoa butter or molten chocolate. The research, published through the American Chemical Society, shows how small formulation and process changes can affect the wider crystal network.
For home tempering, stirring matters as much as the thermometer reading. Agitation distributes heat, encourages suitable nuclei, and keeps the chocolate within its working range. Colored cocoa butter requires the same attention to temperature and crystal control, and this guide to colored cocoa butter covers the process for achieving color with a clean release.
Comparing Couverture, Callets, Bars, and Chips for Tempering
The form you buy affects how easily you can melt, portion, and work the chocolate. Couverture describes the formulation, while callets, blocks, and bars describe the physical format. A couverture callet is usually the most convenient home-baking option because the small pieces melt evenly and make seeding straightforward.
The numbers require some care. Couverture contains at least 31–32% cocoa butter, while independent guides commonly describe ranges above 30%, including formulations around 32–39%, as noted in this comparison of chocolate for tempering. Standard baking chocolate can work, but its lower cocoa butter content often creates thicker melted chocolate and less forgiving flow.
| Chocolate Form | Cocoa Butter % | Fluidity | Cost | Tempering Forgiveness | Best Use Case |
|---|---|---|---|---|---|
| Couverture blocks | At least 31–32% | Medium to high, depending on formulation | Moderate to premium | Good, but requires chopping | Larger batches and professional-style work |
| Couverture callets | At least 31–32% | Predictable and formulation-dependent | Moderate to premium | Best overall balance | Bonbons, shells, dipping, and decorations |
| Baking bars | Often lower than couverture | Low to medium | Budget to moderate | Moderate for simple dipping | Basic dipped items and small batches |
| Chocolate chips | Often formulated for baking stability | Low and thick | Budget to moderate | Poor | Baked applications, not serious tempering |
Why callets usually win
Callets from established manufacturers such as Callebaut or Valrhona offer practical consistency from batch to batch. Their size reduces the risk of hot spots, and the pieces are easy to weigh, melt, and reserve for seeding. You still need to check the specific product's fluidity rating because cocoa butter percentage alone doesn't describe the complete behavior.
Baking bars are a reasonable compromise when availability or budget limits your options. They can work for simple dipping, but expect thicker coverage and less elegant flow. For molded shells or detailed work, that extra viscosity becomes a real disadvantage.
Chocolate chips are the weakest choice for tempering. Manufacturers formulate them to hold their shape during baking, and added stabilizers can interfere with the crystal network. This practical comparison of chocolate types reaches the same useful conclusion: high-quality bars or couverture are preferable when the finished chocolate must set with gloss and snap.
For most home bakers, couverture callets provide the best balance of convenience, consistency, and performance. They aren't always the cheapest chocolate by weight, but they reduce chopping, waste, troubleshooting, and uneven melting.
Choosing the Right Chocolate for Each Application
The right chocolate depends on the thickness, detail, and structure your finished piece requires. “Use couverture” is a useful starting point, but it doesn't answer whether you need high fluidity for a fine mold or a slightly thicker formulation that won't pool around dipped fruit.
| Application | Cocoa Butter % | Fluidity | Key Requirement |
|---|---|---|---|
| Molded bonbons | About 33–38% | High | Flow into details and form thin shells |
| Enrobed truffles and bars | About 31–34% | Medium | Even coating without excessive thinness |
| Dipped fruit and pretzels | About 30–33% | Low to medium | Controlled coverage with less pooling |
| Decorative shards and curls | About 35% or higher | Medium to high | Strong snap and clean breaks |
| Ganache and fillings | Flexible | Not the main concern | Flavor and emulsification |
Molded bonbons
Use a high-fluidity couverture for molded bonbons, especially when the mold has narrow corners, lettering, or fine decoration. A formulation around 33–38% cocoa butter can move into those details more readily and help you produce a thinner shell without excessive tapping.
High fluidity has a cost. Very fluid chocolate, particularly formulations around 38% or higher, can demand tighter temperature control. If it gets too warm, the shell may become thinner than intended or fail to build evenly on the mold.
Enrobing and dipping
For truffles and bars, medium-fluidity chocolate around 31–34% cocoa butter is usually easier to manage. It coats evenly without running so freely that the finished layer becomes fragile. Enrobing also benefits from a stable working temperature because repeated dipping and movement can gradually cool the bowl.
Dipped fruit and pretzels often work better with slightly lower fluidity, around 30–33% cocoa butter. A thicker chocolate can cling to the surface rather than collecting in a heavy pool at the base. That doesn't mean chips are suitable. You still need real chocolate containing cocoa butter and a controlled temper.
Shards and ganache
Decorative shards and curls need a firm set and clean fracture. Prioritize a chocolate with about 35% or more cocoa butter, then temper it carefully so the finished sheet breaks sharply instead of bending or showing streaks.
Ganache is different. If chocolate will be emulsified with cream, butter, or another liquid, you don't need tempering-grade performance in the same way. A standard baking bar can work well because the final texture comes from the emulsion, not from a freestanding Form V shell.
Match viscosity to geometry. Fine molds need flow, while dipped items often benefit from controlled thickness.
Tempering Temperatures and Precision Control
Reliable tempering depends on controlled heat distribution, steady stirring, and a clear target range. The process has three stages: melt, cool, and reheat. Chocolate type determines the temperatures, so dark, milk, and white chocolate require separate targets.
For dark chocolate, use this sequence:
- Melt to 113–120°F, or 45–49°C. This dissolves existing crystal forms and resets the chocolate.
- Cool to 82–84°F, or 28–29°C. Cooling encourages crystal formation, including the nuclei needed for Form V.
- Reheat to 88–90°F, or 31–32°C. This melts unstable crystals while preserving the desired structure.
Milk chocolate generally works at 86–88°F, while white chocolate usually works at 84–86°F. Their higher milk or sugar content changes the temperature window, and their target range sits below dark chocolate's. Form V melts near 34°C, so the final working stage must remain below that point. Use this chocolate tempering temperature chart to confirm targets for a specific formulation.
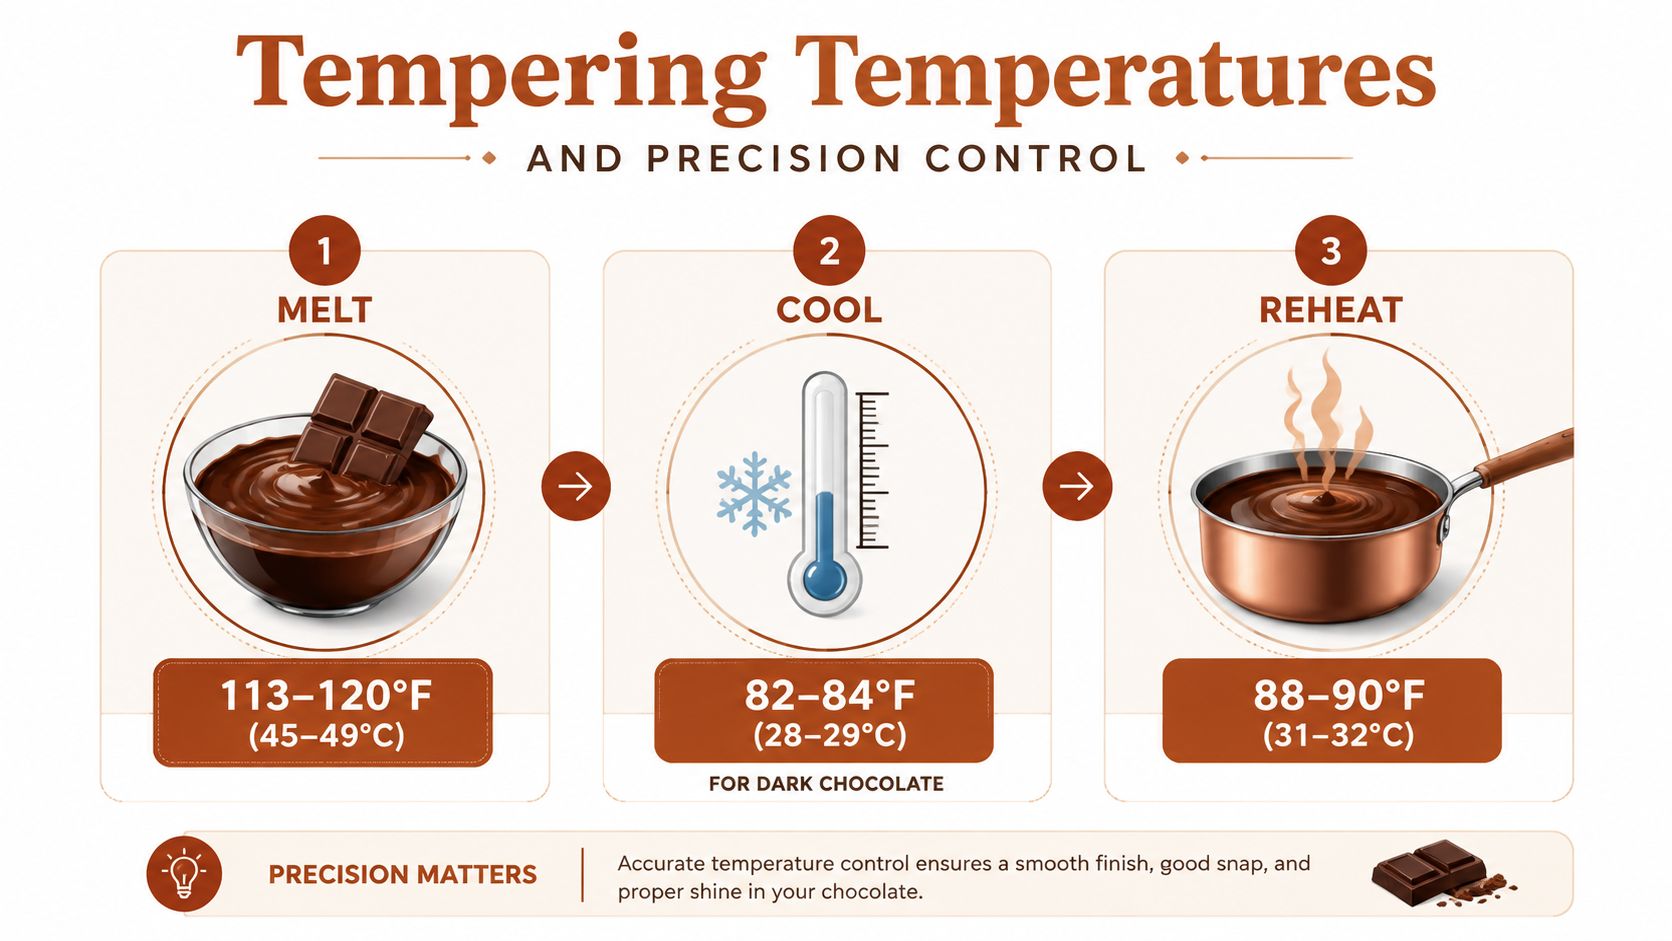
Control the process, not just the endpoint
Heat must be uniform throughout the bowl. Chocolate near the base can be warmer than chocolate at the surface, particularly in a thick batch or a poorly insulated bowl. Stirring distributes both heat and forming crystals, so agitation remains part of every reliable method.
A 2–3°F swing can move chocolate out of its useful working range and increase the risk of bloom. A double boiler, marble slab, or seed addition can produce excellent results, provided you measure accurately, stir consistently, and keep steam or water away from the chocolate.
DBakerAid™ uses a stainless steel bowl and temperature control to guide chocolate through staged heating and cooling. It can reduce temperature fluctuations compared with a basic double-boiler setup, although you still need to understand the formulation and verify the target range.
For a small batch, use a microwave with frequent stirring. Larger batches may suit seeding or controlled equipment better. The working method should match the batch size, while heat, moisture, movement, and holding temperature stay controlled throughout.
Buying, Storing, and Troubleshooting Your Tempered Chocolate
Buy real chocolate made with cocoa butter, preferably in callet form when you're learning. Check the package for cocoa butter content, fluidity information, and ingredients. Avoid products that replace cocoa butter with vegetable fats if your goal is a traditional tempered finish.
Storage can undo careful tempering. Keep chocolate cool, dry, and protected from temperature swings. Refrigeration often creates condensation, which can cause sugar bloom and leave a rough, pale surface. Seal the chocolate well and keep it away from strong odors.
Diagnose the finish before blaming the chocolate
- White streaks or bloom: The chocolate was improperly tempered or stored. Remelt it and temper again.
- Thick, sludgy texture: Overheating or moisture contamination may be responsible. Water from steam or a damp utensil can ruin the working texture.
- Dull surface: The chocolate may not contain enough Form V crystals, or the cooling stage may have been poorly controlled.
- Chocolate stuck in the mold: Under-tempering is a likely cause. Check the full melt, cool, and reheat sequence rather than only the final temperature.
Most failures come from heat management, moisture, or unsuitable formulation. Keep a simple tempering log with the chocolate type, cocoa butter information, temperatures, cooling time, and finished result. That record will tell you far more than choosing a bar based only on price.
For a practical home method, use this guide to tempering chocolate at home, then test a small piece before committing an entire batch to a mold.
DBakerAid™ brings controlled temperature management, a stainless steel bowl for chocolate work, and built-in weighing support into one home-baking system. If you want a more repeatable way to manage tempering alongside bread and pastry preparation, visit DBakerAid™ to explore the system.