

You fed your starter, marked the jar, and waited. Hours later, the line has barely moved. Maybe there's a grey liquid on top, an acetone smell, or a brief rise followed by a collapse before you can bake. That doesn't automatically mean the culture is dead. Sourdough starter troubleshooting works best as diagnosis, not repeated guesswork.
A starter is a living ecosystem. Temperature, flour type, hydration, feeding ratio, time, handling, and kitchen contamination all change how quickly it acidifies and produces gas. The practical skill is learning which variable is responsible, then changing one thing at a time. The broader biology is covered well in this guide to wild yeast in sourdough, while the same controlled-observation mindset applies to maintaining your home coffee setup, where changing several settings at once also makes the original fault harder to identify.
Table of Contents
- Why Your Sourdough Starter Is Failing
- The Five Most Common Starter Problems and Their Causes
- The Three-Jar Diagnostic Test for Sluggish Starters
- Step-by-Step Rescue Protocols for Each Problem
- Preventing Recurring Problems Through Environmental Control
- Precision Proofing Appliances for Consistent Results
Why Your Sourdough Starter Is Failing
You feed the jar, mark its level, and wait. The starter barely rises, then develops a sharp smell or separates. Before adding more flour or moving it to a warmer shelf, identify what changed. A culture can appear inactive because fermentation is slow, or because several adjustments have obscured the original cause.
Treat the jar as a small fermentation experiment. Record the flour, water, carryover amount, temperature, feeding time, and rise over a defined period. Keep those conditions steady long enough to reveal a pattern. Independent review research identifies temperature, flour type, hydration, time, and re-feeding practices as influential management factors in sourdough ecology. Inconsistent handling can therefore create more confusion than one isolated mistake.
Why “feed it more” often fails
Frequent feeding may help a hungry starter, but it can also dilute a slow culture before it has time to acidify and produce enough gas. Added warmth speeds fermentation, yet an already active jar may peak and collapse sooner in a warmer location.
Start with the question, “What changed?” A starter beside a cool window behaves differently from one in a warm cupboard. Whole-grain flour may ferment and fall faster than white flour. A stiff starter often matures more slowly while holding its structure longer.
Practical rule: Change one major variable, then observe the rise, smell, texture, and timing before changing another.
The same controlled-observation method applies to maintaining your home coffee setup, where changing several settings at once also makes the original fault harder to identify.
A sluggish culture may be adapting to a new flour ecosystem, sitting below its active temperature range, or receiving too much acidic starter at each refreshment. A mature starter is normally acidic, with summarized research reporting pH values from 3.4 to 4.9, so acidity alone does not prove failure. The useful diagnosis is whether acid production, yeast activity, available food, and fermentation time remain in balance, as described in this sourdough acidity research.
The Five Most Common Starter Problems and Their Causes
A starter can look inactive for several different reasons. Diagnose the symptom first, then change one condition at a time so temperature, food supply, flour, and timing do not get confused.
No rise or sluggish activity
Barely visible movement may come from cold conditions, excessive dilution, insufficient food, or a recent flour change. Activity often slows below 18°C, while temperatures above 30°C can make the microbial community less stable. A practical working range is around 21–26°C, but temperature alone does not establish whether the culture is failing.
Check for side bubbles, a slightly domed surface, a looser texture, and a repeatable response after feeding. A young or recently refrigerated starter may require several refresh cycles before its rise becomes consistent. Record the feeding time and room temperature before increasing the feeding frequency.
Hooch on top
Hooch is liquid separating above the starter. It generally means the culture has used much of its available food and has continued fermenting. A thin layer can appear in a recoverable starter after a long interval between feedings.
Pouring the hooch off produces a thicker, potentially less acidic mixture. Stirring it back in retains more of the liquid and acidity. Either choice can work, but use one method consistently while testing recovery, otherwise the result becomes difficult to interpret.
Acetone, alcohol, or rotten smells
A sharp acetone or solvent aroma usually indicates severe hunger and prolonged fermentation. Alcoholic notes can develop as the starter runs low on food. A putrid, rotten-food smell is a separate warning, particularly if it remains after a refreshment. Repeated feeding will not make a contaminated culture safe, and masking the smell only delays the diagnosis.
Mold or unusual surface growth
Fuzzy growth, colored patches, or visibly moldy areas are not normal maturation. Contamination can extend beyond the area you can see, so discard the culture, clean the container thoroughly, and restart with fresh flour and water.
Kitchen microbes also influence a starter. The sourdough ecology study describes how handling and the surrounding environment can introduce lactic acid bacteria and yeasts, while flour, hands, and ambient dust provide additional routes for bacterial entry. A starter is not a sealed laboratory culture. Clean jars and controlled handling therefore belong in any serious diagnosis.
Rise followed by rapid collapse
A starter that rises and falls earlier than expected has usually fermented past its peak. The culture may be active, but the feeding ratio is too small for the interval, the temperature is too warm, or the flour ferments quickly. Collapse does not automatically mean weakness. It can indicate a culture that is strong enough to peak before your schedule allows.
The Three-Jar Diagnostic Test for Sluggish Starters
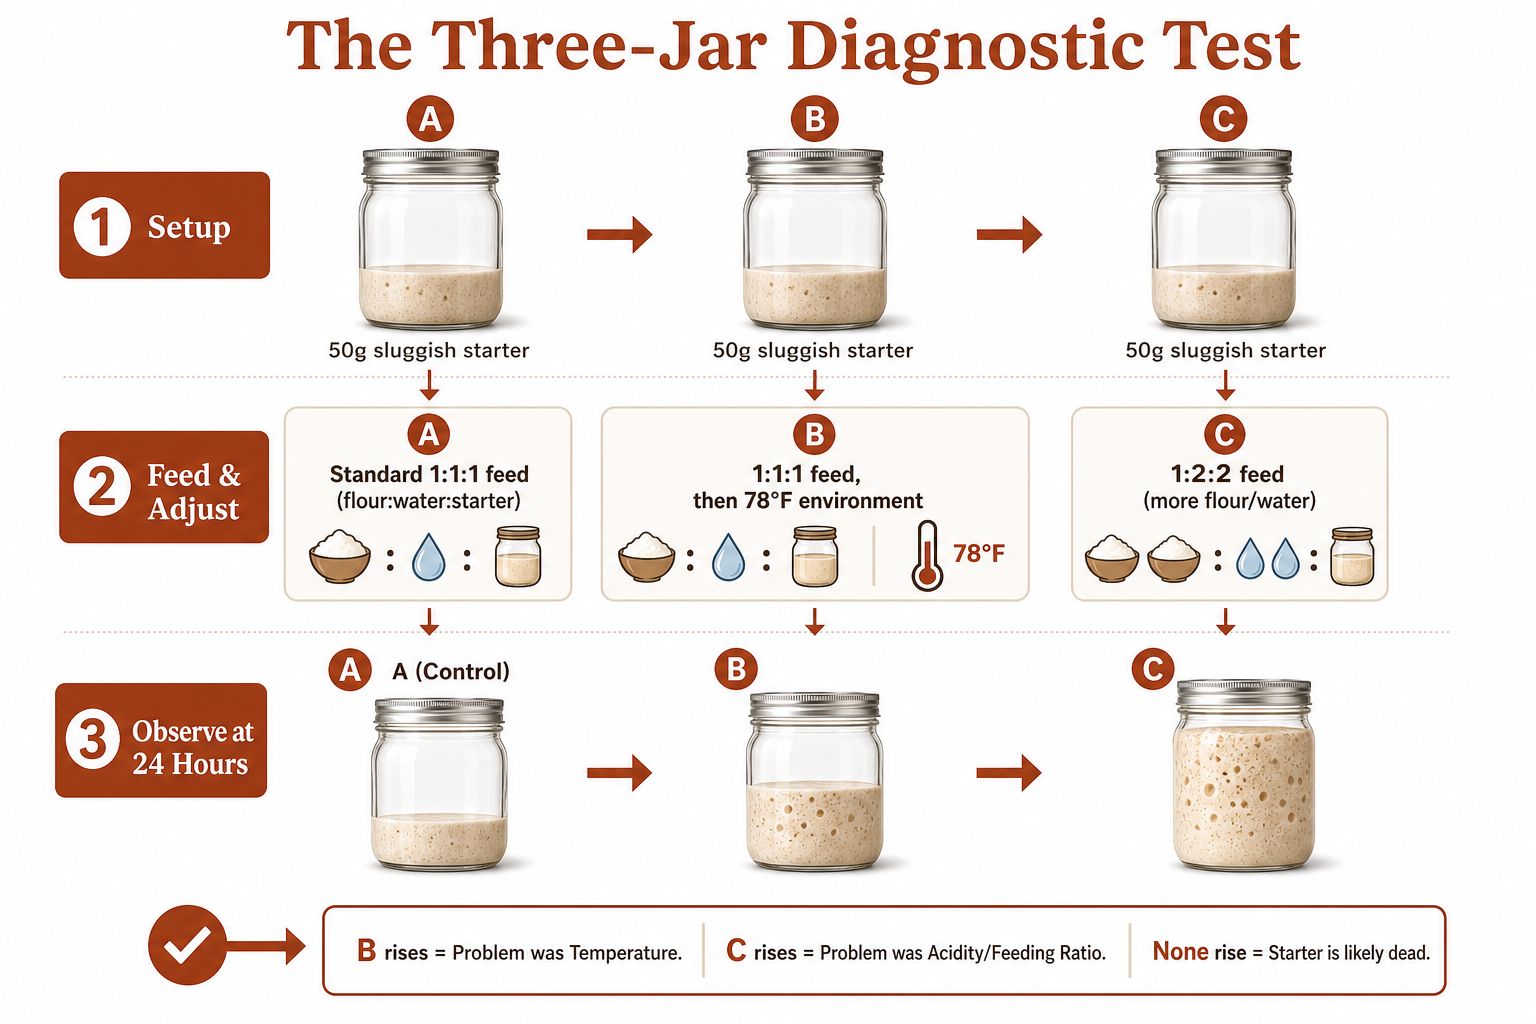
A starter that fails to rise may be weak, over-acidified, underfed, or tested under inconsistent conditions. The three-jar test isolates those variables by comparing an unfed sample, your usual feeding routine, and a small carryover given a larger supply of fresh flour and water over 24 hours (stall point test).
Use clean, identical jars labeled A, B, and C. Keep the sample amounts comparable. Mark each starting level with a rubber band or piece of tape, then place all three jars where temperature and handling remain consistent.
- Jar A, unfed discard: Set aside a sample without feeding it. This reveals whether the culture still has activity that a recent refreshment may have diluted.
- Jar B, normal control: Feed the amount and ratio used in your routine. Keep it at your usual temperature. This provides the baseline for comparison.
- Jar C, fresh carryover: Transfer a small amount of starter into fresh flour and water with a larger food supply, such as a 1:2:2 ratio by weight. Keep hydration consistent with your normal liquid starter unless stiffness is the variable being tested.
Record the time to visible expansion, bubble distribution, aroma, surface condition, and texture. One high rise does not prove that a jar is healthier if it smells harsh, separates heavily, or collapses soon after peaking.
Reading the results
If Jar A becomes more active than Jar B, your feeding interval may be too short. The culture might still be developing gas and acidity when the normal refreshment dilutes it.
If Jar C outperforms Jar B, excess acidity or insufficient fresh food is likely limiting performance. Use a higher feeding ratio or carry over less mature starter. If all three jars stay inactive, inspect temperature, flour freshness, and contamination before treating the culture as dead.
Treat the result as a working diagnosis, not a rescue by itself. Repeat the better-performing condition through several refresh cycles while changing no other variable. Consistent timing, bubbles throughout the mixture, and structure that holds near peak confirm recovery more reliably than one temporary bubble.
Step-by-Step Rescue Protocols for Each Problem
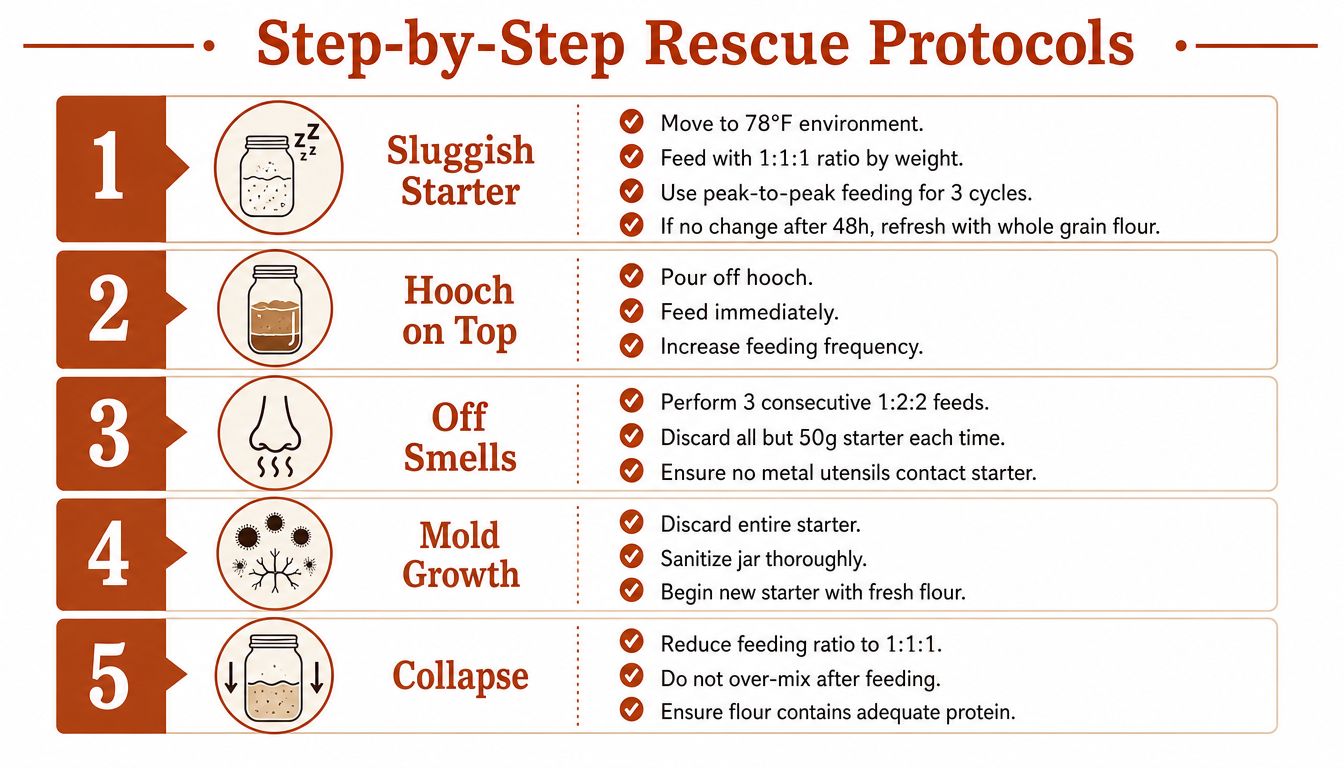
Rescue begins with a small, controlled inoculum. A large volume of weak, acidic starter makes each feeding costly and keeps the culture in the same depleted environment. Reduce the carryover, then change one variable at a time so the response remains interpretable.
For a sluggish starter
Set the jar somewhere near 78°F with minimal temperature fluctuation. Standardize the feed at 1:1:1 by weight, such as 30 g starter, 30 g flour, and 30 g water. Mix thoroughly, scrape the sides clean, mark the starting level, and leave it undisturbed. The test is the time to visible expansion, not a single bubble on the surface.
If activity returns but the structure remains weak, use peak-to-peak feeding. Refresh the starter when it reaches peak activity, then repeat three to five short-interval feedings. 1:2:2 is one workable example ratio (peak-to-peak method). Recovery means repeatable timing, a clean acidic aroma, bubbles throughout the mixture, and a structure that holds near peak.
For hooch and starvation
Pour off the hooch if you want to reduce sharp liquid acidity. Retain a small amount of starter and feed it immediately. If separation repeatedly appears before use, increase the flour and water relative to the carryover. A 1:2:2 feed supplies more food, while a much larger ratio extends the time to peak.
Hold hydration at about 100% for a standard liquid starter. Keep hydration, flour, feeding ratio, and temperature fixed while testing separation. Changing all four at once hides the cause and makes the next feeding harder to judge.
For a fast collapse
A rapid rise followed by collapse generally needs a larger feed, not more frequent small feeds. The starter troubleshooting chart gives examples such as changing from 1:5:5 to 1:10:10, or adjusting temperature when activity is excessive or sluggish.
Use a jar with adequate headroom, mark the starting line, and observe the dome. A peak that flattens and begins to recede gives more useful information than a fixed “double by” deadline. Record the elapsed time, then repeat the same ratio before making another change.
For off smells
Acetone and strong alcohol usually indicate that the starter has gone too long without enough food. Retain a small inoculum and make three consecutive 1:2:2 feeds, allowing each refreshment to ferment until clear activity appears. A pH reading around 3.8–4.5 can support the diagnosis, but interpret it with rise, aroma, and texture rather than using it alone.
A persistent rotten smell or visible mold requires disposal, not conditioning. Discard the entire culture and sanitize the jar before starting again. Clean utensils and consistent handling reduce carryover from the surrounding environment.
A downloadable artisan bread book can keep formulas and bake ideas beside your scale. Use references for repeatable procedures, then judge the starter by observed timing and structure.
For mold
Mold means discard. Clean the jar thoroughly, replace any contaminated cover or tool, and restart with fresh flour and water. Scraping away the visible patch leaves the rest of the culture uncertain.
For help deciding whether a culture is dormant or beyond recovery, see this dead sourdough starter guidance.

Preventing Recurring Problems Through Environmental Control
A starter can seem faulty when the issue is an inconsistent kitchen. Test one variable at a time. Hold the flour, water, feeding ratio, and temperature steady, then record rise, aroma, texture, and time to peak across 2–3 refresh cycles. This separates a weak culture from fermentation that is just reacting to changing conditions.
Temperature usually has the largest immediate effect. A cool kitchen extends fermentation, while a hot cupboard can push the starter past peak before you check it. Active sourdough fermentation generally performs well around 21–28°C. Activity slows below 18°C and becomes less stable above 30°C (starter culture guidance).
Hydration changes timing, texture, and acidity. A liquid starter is often kept near 100% hydration. A stiff starter around 50–60% hydration usually ferments more slowly and can develop more acetic acidity. Wetter cultures tend to move faster and show more lactic character. Choose the format according to the fermentation window and flavor profile you need, then keep it unchanged during testing.
| Variable | Controlled setting | What to observe |
|---|---|---|
| Temperature | About 21–28°C | Fermentation speed and stability |
| Hydration | About 100% liquid, 50–60% stiff | Texture, timing, and acid character |
| Feeding ratio | 1:1:1 baseline | Food supply and time to peak |
| Observation period | 24–72 hours for a reset | Whether the response repeats |
Changing flour can create a false diagnosis. Whole-grain flour may accelerate activity, while a new flour can temporarily alter the culture as its microbial community adjusts. Research on flour choice and feeding schedule supports treating these changes as controlled tests rather than immediately feeding more (flour and feeding research).
Sanitation removes another source of confusion. Use a clean jar, wipe dried starter from the rim, and keep the cover loose enough for gas release. The goal is consistent handling, not sterile equipment.
Precision Proofing Appliances for Consistent Results
Manual control works when your kitchen remains stable and you can check the starter at consistent times. Temperature swings, changing schedules, and enriched or high-protein doughs make diagnosis harder because the culture receives a different environment from one test to the next.
A proofing appliance isolates temperature as a variable. D'BakerAid™ SureDough maintains temperature control within ±0.5°C throughout fermentation and offers flour-specific proofing programs, according to the publisher's product information. It cannot correct weak feeding practices or an unhealthy starter. It can, however, provide repeatable conditions, making rise, aroma, and timing observations easier to interpret.
Use a controlled chamber if you bake often, test difficult doughs, or keep seeing inconsistent results after holding feeding and hydration steady. Manual proofing remains practical for occasional baking in a stable room. The trade-off is closer observation and less control over environmental changes.

For a practical comparison of home fermentation options, review this guide to the best bread proofing box. Choose equipment that lets you hold conditions steady, record the response, and repeat the test without constant intervention.
DBakerAid™ provides controlled temperature and timing for fermentation and proofing. Visit DBakerAid™ to review the SureDough™ system.