

You open the jar, and the smell hits first. The top's gone gray, the starter's flat, and for a second it looks like you've killed it. Most of the time, though, a dead sourdough starter isn't dead at all, it's just hungry, cold, or badly neglected, and the difference between salvageable and unsafe comes down to a few hard signs rather than age alone.
Table of Contents
- Why Your Starter Probably Is Not Dead
- Signs Your Starter Is Dead Versus Dormant
- Step-by-Step Revival Protocol for Neglected Starters
- Common Mistakes That Kill a Starter
- How to Keep Your Starter Alive Long-Term
- When to Give Up and Start Fresh
Why Your Starter Probably Is Not Dead
The jar from the back of the fridge usually looks worse than it is. A starter that has been ignored for days, or even much longer, often comes back because sourdough cultures are resilient, and “dead” usually means dormant, not biologically gone. The first move is observation, not panic.
I have revived plenty of neglected starters that looked flat, separated, and unpromising, then perked up after a few warm feedings. Practical baking guidance says to watch for bubbles and a tangy smell after feeding, because those signs show the culture is still active even if it starts slowly guide to trouble-shooting a neglected starter. Time alone does not decide the outcome.
What actually destroys a culture
The decision point is contamination or heat damage. If starter has been exposed to temperatures above 140°F, one source treats that as irreversibly dead, and another warns yeast will not survive above that point heat damage cutoff. Mold changes the call too, because once you see visible mold, the safe move is to throw it out.
Practical rule: if the jar smells sour, looks merely tired, and still responds after feeding, keep going. If it smells putrid or shows mold, stop.
Neglect, refrigeration, and a weak feeding schedule usually slow activity instead of ending it. The culture may need repeated feedings to wake back up, but a quiet starter is not the same thing as a lost one. That distinction saves a lot of unnecessary dumping.
Signs Your Starter Is Dead Versus Dormant
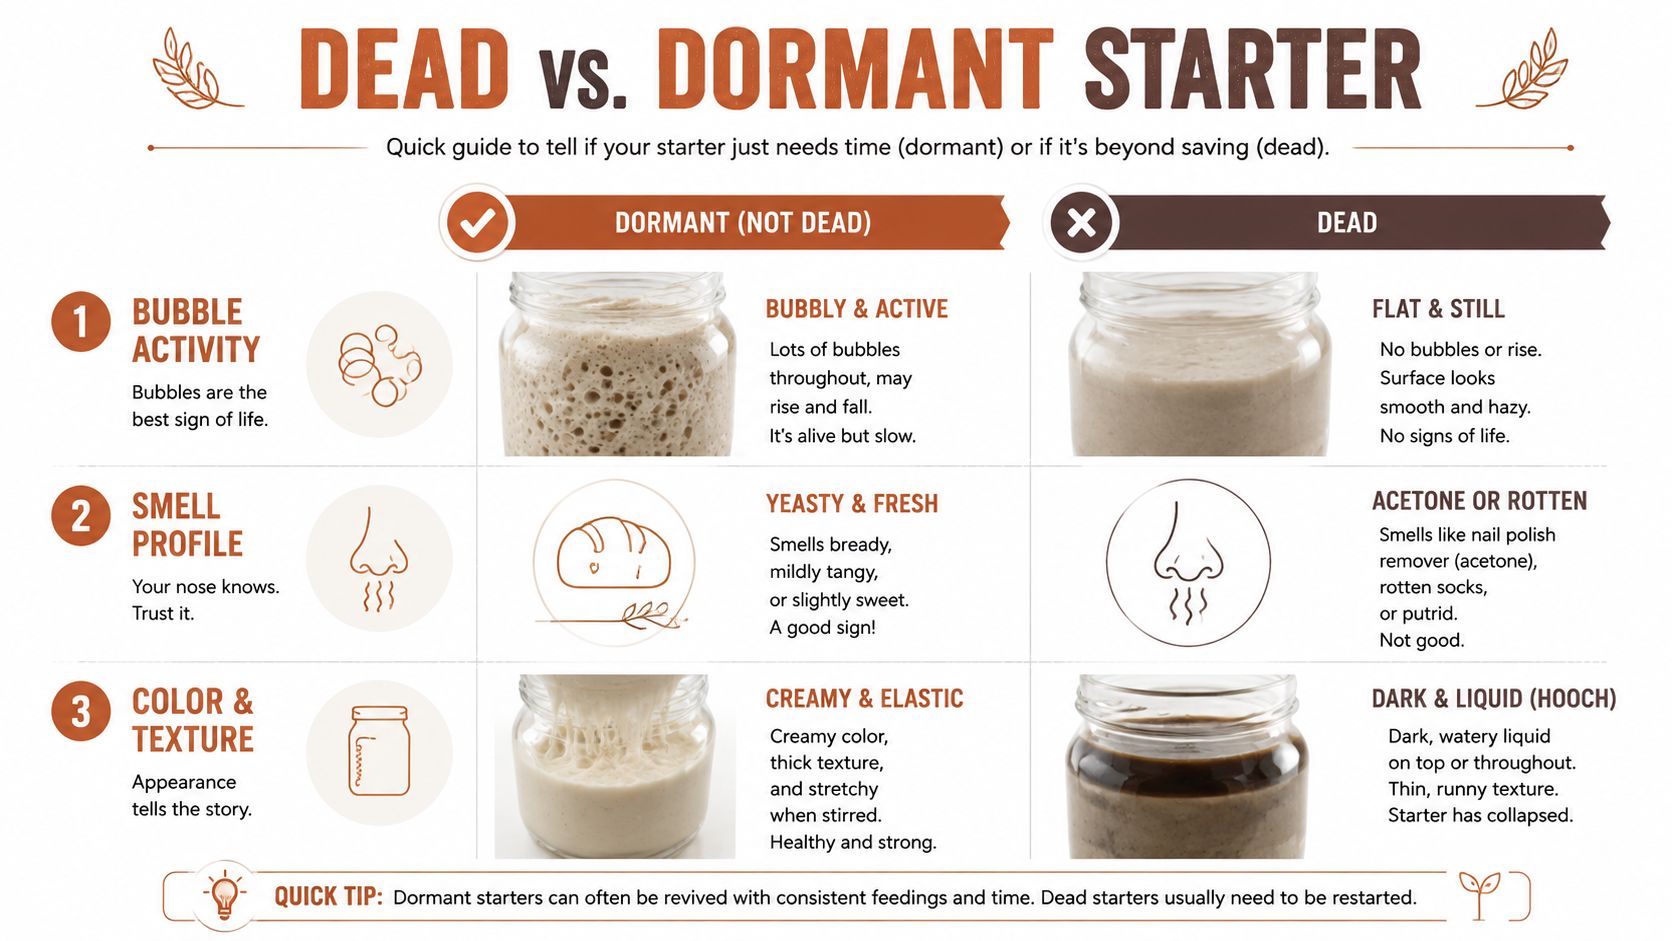
A starter gives you three kinds of evidence, and you need all three: behavior, smell, and appearance. Feed it, then watch what it does over the next half day or so. A starter that makes bubbles, smells tangy, and begins to rise is still active, even if it is slow and weak.
The signs that still point to life
Gray liquid on top, often called hooch, usually means the starter is hungry. A sluggish rise after feeding can also be normal if the culture has been cold or ignored for a while. A sharp acetone or vinegary smell can still fit a hungry starter, as long as there is no mold or rotten odor safety and revival guidance.
The most useful sign is fermentation after feeding. A healthy starter should show steady activity, and in some cases it may double in size within 5 hours after feeding before it falls back down within 12 hours starter health benchmark. That tells you more than age, color alone, or the fact that it spent too long in the fridge.
The signs that mean stop and discard
Pink, orange, or black discoloration is a hard stop. Fuzzy mold is another hard stop, and the same goes for rotten or putrid smells food safety boundary. These are not situations to test with another feeding.
Decision point: gray hooch, sour smell, and slow bubbling usually mean dormant. Pink or orange streaks, fuzzy mold, or rotten odor mean unsafe.
If the starter is merely weak, repeated feeding can rebuild it. If it shows contamination, the safer choice is to throw it out and start over.
The simplest diagnostic sequence
- Feed it first. Wait about 12 hours at warm room temperature, roughly 75°F to 78°F, and watch for bubbles or rise.
- Check the smell. Tangy, fruity, beery, or even acetone-like can still be workable. Putrid or sewage-like is not.
- Look for discoloration. Gray liquid is fine. Pink, orange, red, black, or fuzzy growth is not.
If there is still no activity after repeated feedings over a few days, you are probably no longer dealing with a dormant culture. At that point, a fresh start is usually the cleaner choice.
Step-by-Step Revival Protocol for Neglected Starters
A neglected starter usually responds best to a clean reset, not to random extra flour dumped on top. The usual recovery move is to discard down to a small amount, feed by weight, and keep the jar warm enough for fermentation to restart discard-and-feed guidance. The line between salvageable and unsafe matters here. If the starter shows contamination, throw it out. If it is just weak, temperature control and disciplined feedings can bring it back.
Start with a controlled feeding
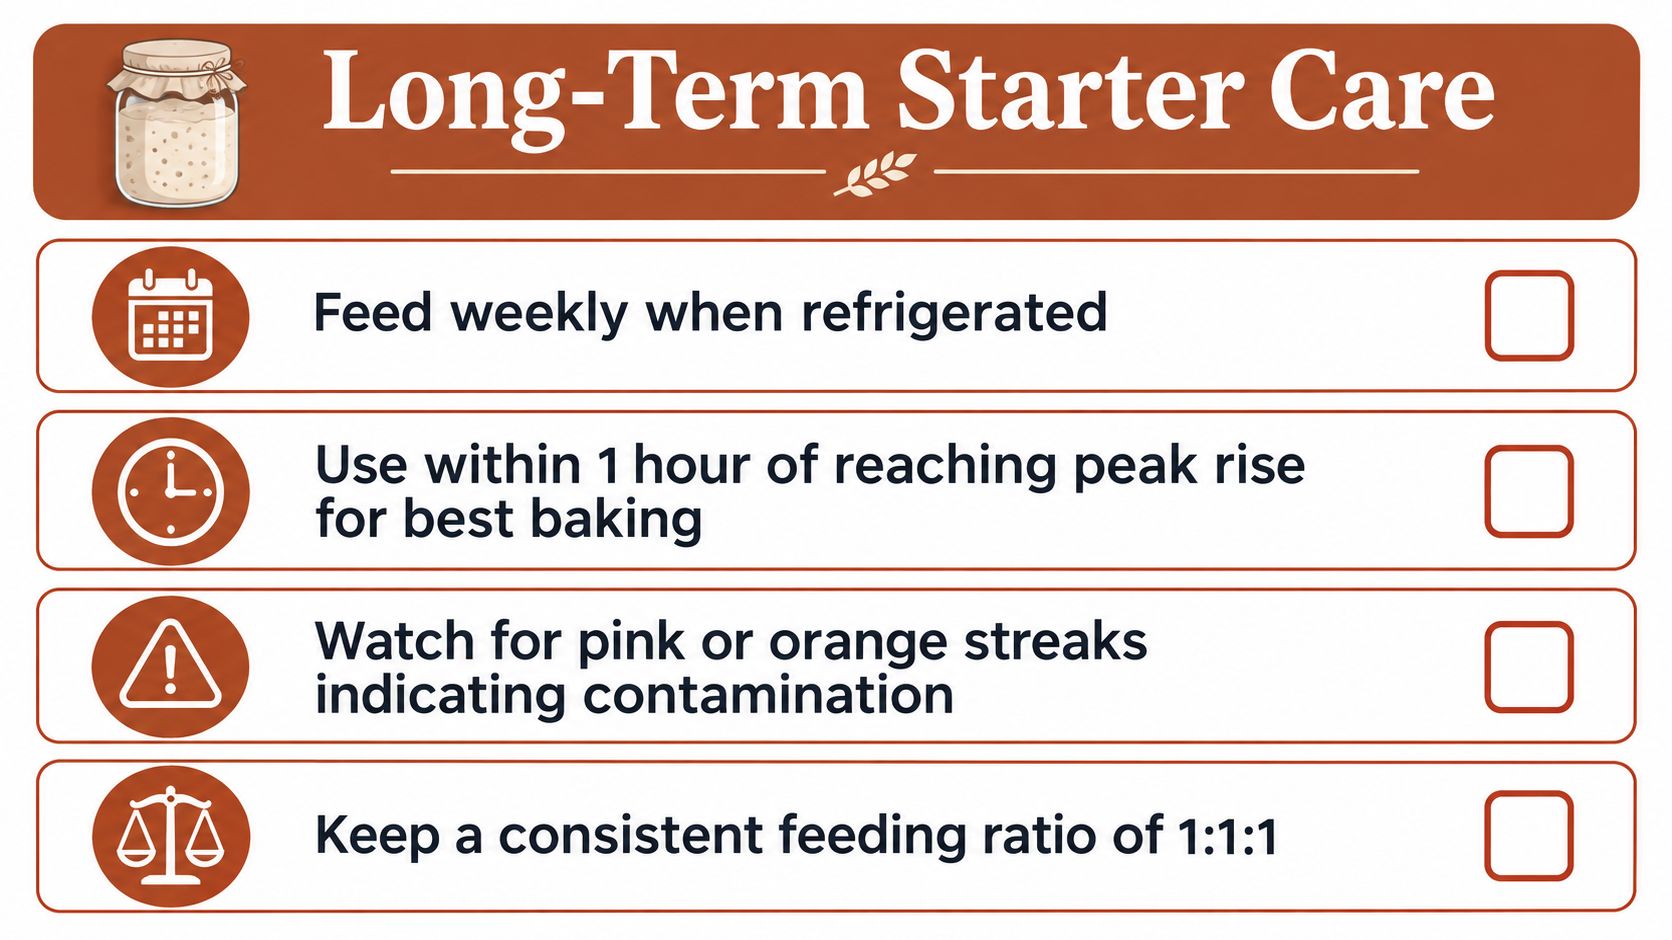
Discard down to about 15 to 30 g of starter. Then feed at either 1:1:1 or 1:2:2 by weight, meaning starter, flour, and water in balanced portions. If the starter has been neglected for a while, hold it around 70 to 80°F so the microbes wake up instead of limping along slowly revival protocol.
Feed, wait, and judge the jar by rise and bubbles rather than by guesswork. If it does not reliably double within 12 to 24 hours, repeat the discard-and-feed cycle for several days recovery window. That keeps acidity from building too high and gives the surviving culture a fair shot at recovery. I keep this stage in a steady temperature range with the DBakerAid container approach, because a stable jar and stable heat make the reading much clearer than a loose setup.
Feed by weight, not by feel. Loose, sloppy starter takes longer to recover, and over-thinning the jar slows the comeback.
What to expect during recovery
Visible bubbling often shows up within 24 to 48 hours in fast-track recovery, but that does not mean the starter is ready to bake with right away fast-track revival guidance. A starter is usually dependable again when it can double consistently in 6 to 8 hours after feeding, though recovery can take 2 days to 2 weeks depending on condition and temperature fast-track revival guidance.
That waiting period is where a lot of people get impatient and overfeed. I have better results leaving the starter alone long enough to show a clean rise, then feeding again on a steady schedule. If the jar is warm enough, active enough, and free of contamination, you are rebuilding a culture. If it stays flat and lifeless after repeated feeds, the practical answer is to stop spending flour on it.
Special case, dried starter
If the starter is dried or severely weakened, rehydrate it with 2x its weight in warm water, about 75°F to 80°F, then feed with equal flour to make a 1:2:2 ratio and hold it at room temperature for 24 hours fast-track revival guidance. Some guides also recommend keeping a neglected starter in a consistently warm 24 to 27°C environment and feeding repeatedly until bubbles return warm-feed rescue method.
This is also the point where container choice matters. A clean, simple vessel makes it easier to see bubbles, judge rise, and keep contamination out, which is why a practical container for sourdough starter setup helps more than decorative jars with tight corners.
Common Mistakes That Kill a Starter
A starter gets blamed for a lot, but heat is the cleaner kill. If it sits above 140°F, the culture is usually beyond saving, and feeding will not bring it back heat damage cutoff. A sun-baked counter, a hot oven, or an aggressive warming spot does more harm than a missed feeding.
The mistakes that really matter
Dirty jars and contaminated utensils raise the risk because they introduce the wrong microbes. When a starter has turned sticky, molded, or badly dried out, many bakers move it to a fresh container so they can see what is happening and keep things cleaner from that point on. A plain vessel with easy visibility helps more than a decorative jar with awkward corners, and this practical guide on the right container for sourdough starter is worth keeping close.
Another mistake is treating every smell as proof the starter is gone. Gray hooch, sharp vinegar notes, or an acetone-like smell usually mean the culture is hungry, not spoiled. The red flags are mold, pink or orange streaks, and a rotten odor, because those signs point to contamination rather than a starter that needs food starter safety guidance.
Useful comparison: sourdough rescue and common mushroom growing errors both punish sloppy contamination control. The lesson in common mushroom growing errors carries over well, keep the environment clean, do not invite mold, and do not assume a strange smell is harmless.
What does not help
Overfeeding a weak starter before it has time to ferment can leave you with a thin, sluggish culture that still will not rise. Underfeeding does the opposite, it keeps the jar acidic and stressed. The fix is balance, not force.
Metal utensils are not the enemy some bakers make them out to be. Clean tools are fine, and the problem is residue or contamination, not the material itself. A starter reacts far more to temperature, food, and hygiene than to superstition.
A better habit is to ask what changed. If the jar got too hot, too dirty, or too neglected, those are the clues that matter. Fix the cause, and the culture often recovers.
How to Keep Your Starter Alive Long-Term
A revived starter needs a routine, or it slides back into the same tired pattern. Not whether it smells sour. It is whether it still behaves like a healthy culture after feeding. A starter that doubles after feeding on a steady schedule is much easier to trust than one that only looks active for a day and then falls flat.
A maintenance rhythm that fits real life
If you bake often, keep the starter active at room temperature and feed it regularly. If you bake only now and then, refrigeration slows metabolism without killing the culture, and weekly feeding is a common way to keep it healthy once it has settled back in. The aim is simple, keep the jar stable without turning maintenance into a chore. For a practical sourdough starter maintenance routine, match the schedule to how often you bake and how warm your kitchen runs.
Use the starter when it is near peak, not after it has collapsed. Feed it, wait for the rise, and mix your dough while the culture still has energy left. That gives you better fermentation than relying on aroma alone. A starter that rises predictably is more useful than one that just smells tangy.
Warning signs to watch for
- Pink or orange streaks: treat these as contamination, not a feeding problem.
- No doubling after repeated feeds: that is a sign the culture is losing strength.
- Rotten or putrid odor: discard rather than trying to out-feed it.
If you are going to take a break, refrigerate the starter once it is healthy and then resume feeding when you are ready to bake again. That keeps the microbes in a slowed state instead of pushing them through repeated starvation. A starter maintained this way is much easier to bring back later because you are not starting from near zero.
Practical rule: do not wait until the jar looks bad. Feed before the starter gets weak enough to lose momentum.
The goal is not perfection. The goal is a repeatable rhythm that keeps the culture predictable, clean, and strong enough to bake with when you need it.
When to Give Up and Start Fresh
There's a point where rescue stops being sensible. If you've fed a starter several times over a couple of days and it still shows no response, the question is whether the culture is lagging or whether the jar has crossed into dead territory. Cold room temperature, weak flour, and a very thirsty starter can all slow recovery, but a starter that never shows any rise, bubbles, or lift after repeated care is usually telling you it is not worth another round of feeding. A whole wheat sourdough starter can also behave differently from a white-flour starter, so the ingredients you use can change how quickly you see life.
Safety sets the hard boundary. Visible mold, pink or orange discoloration, or a rotten odor mean discard the starter, clean the container, and start over with fresh flour and water. If you are hovering between maybe and no, that uncertainty matters. Peace of mind is a better guide than forcing a rescue that leaves you guessing about whether the culture is safe to use.
A clean restart is not a failure
Starting over is normal. A fresh starter is often easier to manage than trying to revive a culture that has already gone too far, and the reset teaches you how your flour, temperature, and feeding routine behave in your own kitchen. It also gives you a cleaner baseline, which matters if you are trying to figure out whether the problem was the starter itself or the conditions around it.
Discard the dead starter, wash the jar well, and begin again with clean flour and water. Do not keep feeding a starter that stays flat, smells worse, or develops discoloration after repeated feedings. That is not a culture that needs more patience, it is a culture that has given you a clear answer.
A starter that will not bubble, will not rise, and will not smell clean after repeated care is done. When that happens, stopping the rescue effort saves time, flour, and frustration.