

You've got the burgers planned, but the buns are the uncertain part. You want something soft enough to bite cleanly, sturdy enough for sauce, and still pleasant after a trip through the freezer. Adding potato can help, but pouring extra water into an unfamiliar flour can leave you with dough that spreads instead of rising.
Good potato hamburger buns start with a weighed formula, a little reserved water, and a record of what happened. Treat the cooled and reheated bun as part of the test, not just the one that looks good coming out of the oven.
Table of Contents
- Potato Hamburger Bun Size and Starting Formula
- How to Mix Potato Bun Dough
- Shape Proof and Bake the Buns
- Fixes for Slack Dense or Gummy Buns
- Freeze and Reheat Without Drying Them
- Repeat the Batch on a Set Proof
Potato Hamburger Bun Size and Starting Formula
A 90 g dough piece bakes into a bun that fits the patty without turning the burger into mostly bread. For this worked batch, 720 g of dough divided into eight pieces gives 90 g per bun before baking. Finished buns weigh less because they lose moisture in the oven.
Commercial sizes give useful context, though they are not interchangeable with homemade dough weights. US Foods lists Hilltop Hearth potato hamburger buns at 2.6 ounces, with a listed metric weight of 77 grams. Use that as a shopping reference, not a prediction of your homemade bun's finished weight.
Starting formula for one 720 g dough with eight buns
This is a worked starting formula, not a promise that every potato-flour brand needs the same water. Baker's percentages use bread flour as the base; the gram weights are rounded to make a practical batch.
| Ingredient | Baker's % | Grams |
|---|---|---|
| Bread flour | 100% | 393 g |
| Potato flour | 6% (keep 5–8%) | 24 g |
| Water (hold back about 24 g) | 62% | 243 g |
| Sugar | 6% | 24 g |
| Fat, such as butter or oil | 6% | 24 g |
| Salt | 2% | 8 g |
| Instant yeast | 1% | 4 g |
| Total dough | 183% before rounding | 720 g |
The percentages describe the intended proportions, while the rounded weights make the batch practical to scale. If you change the batch size, multiply each ingredient's baker's percentage by the new flour weight; a baker's percentage calculator can handle the arithmetic while the flour-weight check keeps the formula honest.
Buy potato flour, not potato starch, for this version. Avoid substituting mashed potatoes or flakes by equal weight: mash brings its own water, and flakes differ in texture and absorption. Use a formula designed for those ingredients instead of correcting everything during kneading.
The held-back water is your adjustment range. Potato flour brands absorb differently, so keep about 24 g aside and add it only if the dough needs it. Record the brand, how much reserved water you used, the dough's feel, the baked weight, and how the bun eats after freezing and reheating. That note turns the next batch into a small adjustment instead of a fresh guess.
Keep the gluten boundary clear
These are wheat buns with potato, not gluten-free buns. Wheat supplies the gluten structure that holds fermentation gas. A study of gluten-free potato bread examined formulations containing at least 50% potato by dry mass, a different approach from adding a little potato flour to wheat dough.
Store-bought prices can help you decide whether to bake for freshness, size, or convenience. In its 2026 listing, Dierbergs Markets priced Pepperidge Farm Golden Potato Hamburger Buns at $4.80 for a 15-ounce, eight-count package, or $0.32 per ounce.
Choose your burger toppings before settling on sweetness and bun size. If drinks are part of the plan, this guide can help you match your burger with a beer.
How to Mix Potato Bun Dough
Potato flour needs water, but that doesn't mean the dough benefits from receiving all of it immediately. You need enough wheat-gluten development to support the hydrated potato ingredient without turning the mixture into paste.
A controlled bread study published in the International Journal of Food Science & Technology found that measured water absorption increased from 62% for all-wheat flour to 79% at 8% potato flour, alongside changes in dough development and weakening. Those are study measurements, not a hydration prescription for this enriched bun formula.
The mixing sequence keeps water adjustment inside gluten development rather than treating it as a rescue operation afterward.
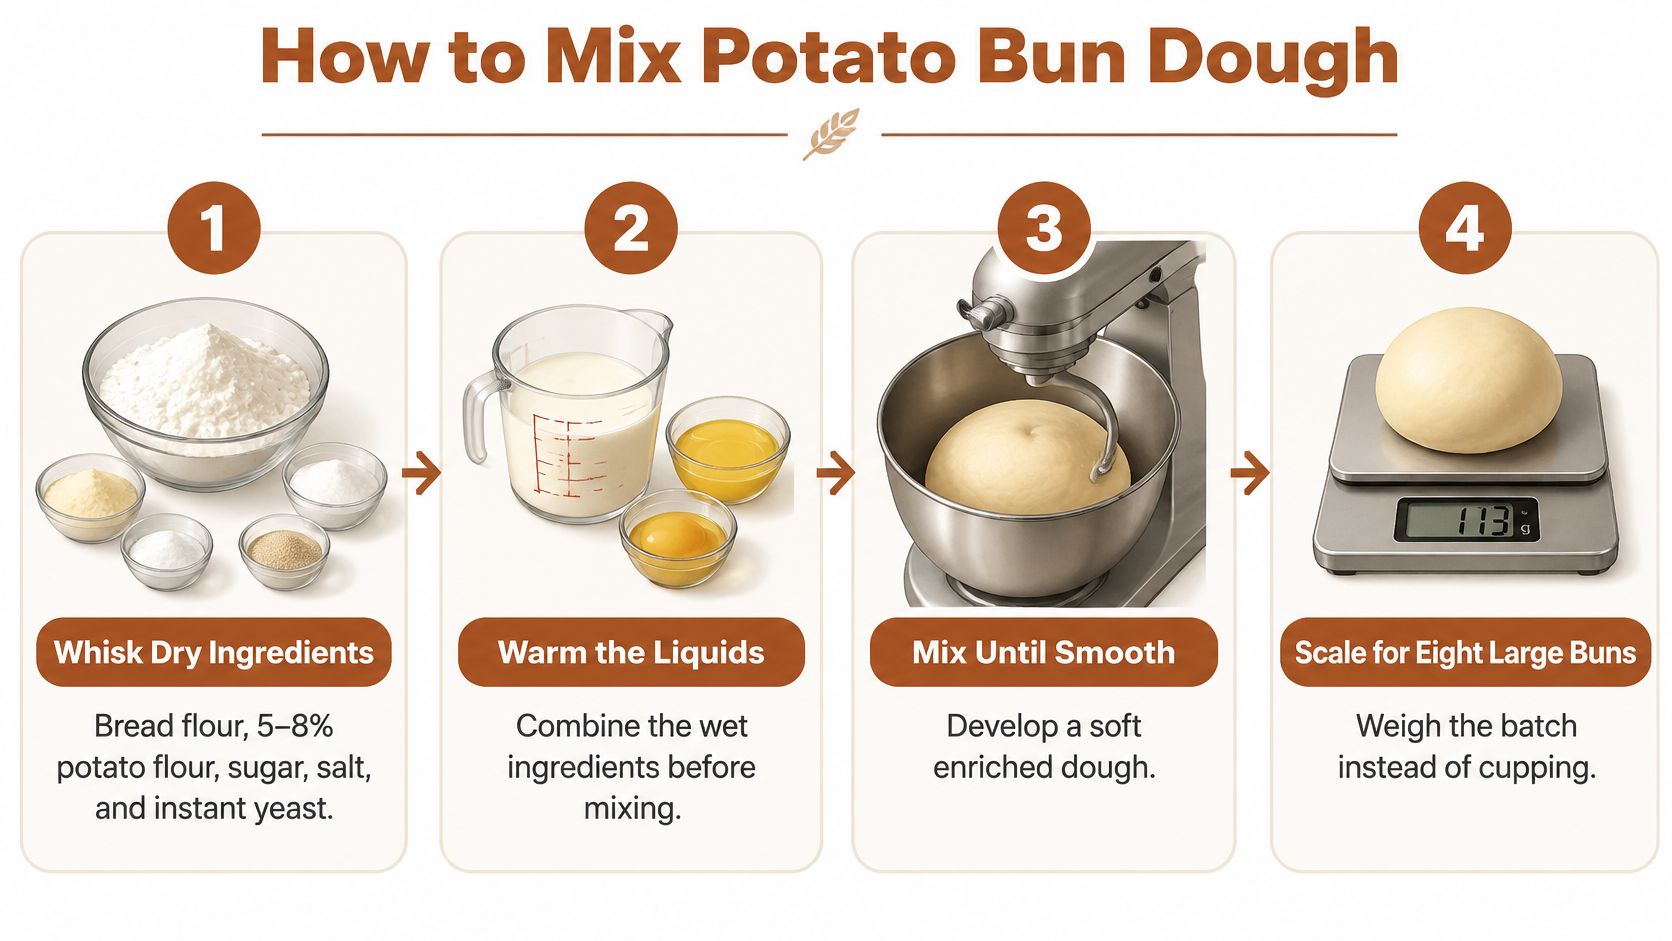
Mix by weight and finish by feel
- Weigh and whisk the dry ingredients. Combine the bread flour, potato flour, sugar, salt, and instant yeast thoroughly. Distributing everything evenly prevents concentrated pockets of salt or yeast and makes the initial hydration more uniform.
- Gently warm the water until it feels barely warm, not hot. Put the reserved portion in a separate cup before you begin. For the first batch, use water rather than changing to milk or potato-cooking water, so you can judge the flour without another variable.
- Add the main water portion and fat. Mix on low speed with a dough hook until no dry flour remains, scraping the bowl as needed. An egg can enrich a dedicated variation, but it isn't what makes this a potato bun; adding one to this weighed batch changes both the dough weight and liquid balance.
- Increase the mixer speed moderately and watch the dough gather. It should become smoother and pull away from much of the bowl, although the bottom may remain attached. Stretch a small piece gently: you're looking for the beginning of a thin membrane, not a perfectly transparent sheet.
- Add reserved water during kneading, only while the dough remains strong. Drizzle in a little, let it disappear, then assess again. Stop adding water if the dough smears around the bowl or loses its ability to gather around the hook; you don't have to use the whole reserve.
- If kneading by hand, use a bench scraper to lift and fold the dough rather than burying it in flour. Pause when it resists stretching, then continue after it relaxes. A little tackiness is acceptable; a coating of wet paste on your fingers is a different condition.
- Transfer the dough to a lightly greased container and cover it. Let it ferment until clearly expanded and aerated, rather than insisting that it double. Marking the starting level on a straight-sided container makes that change easier to see.
Record the dough you actually made
Write down the potato-flour brand, dough temperature, water used, and bulk-fermentation duration. A formula's planned water amount isn't useful evidence if some remained in the cup.
Practical rule: Record what went into the dough, not just what the recipe allowed.
At the end of bulk fermentation, the dough should feel lighter and show internal aeration. A gentle press should recover gradually, and a folded piece should hold a rounded shape instead of immediately puddling.
Shape Proof and Bake the Buns
Evenly mixed dough can still produce uneven buns if the pieces differ in weight or the surface is poorly shaped. Keep a digital scale and bench scraper beside the tray so you can portion without repeatedly stretching and tearing the dough.
The important shaping work happens at the bench, where each piece receives a smooth, tensioned surface.
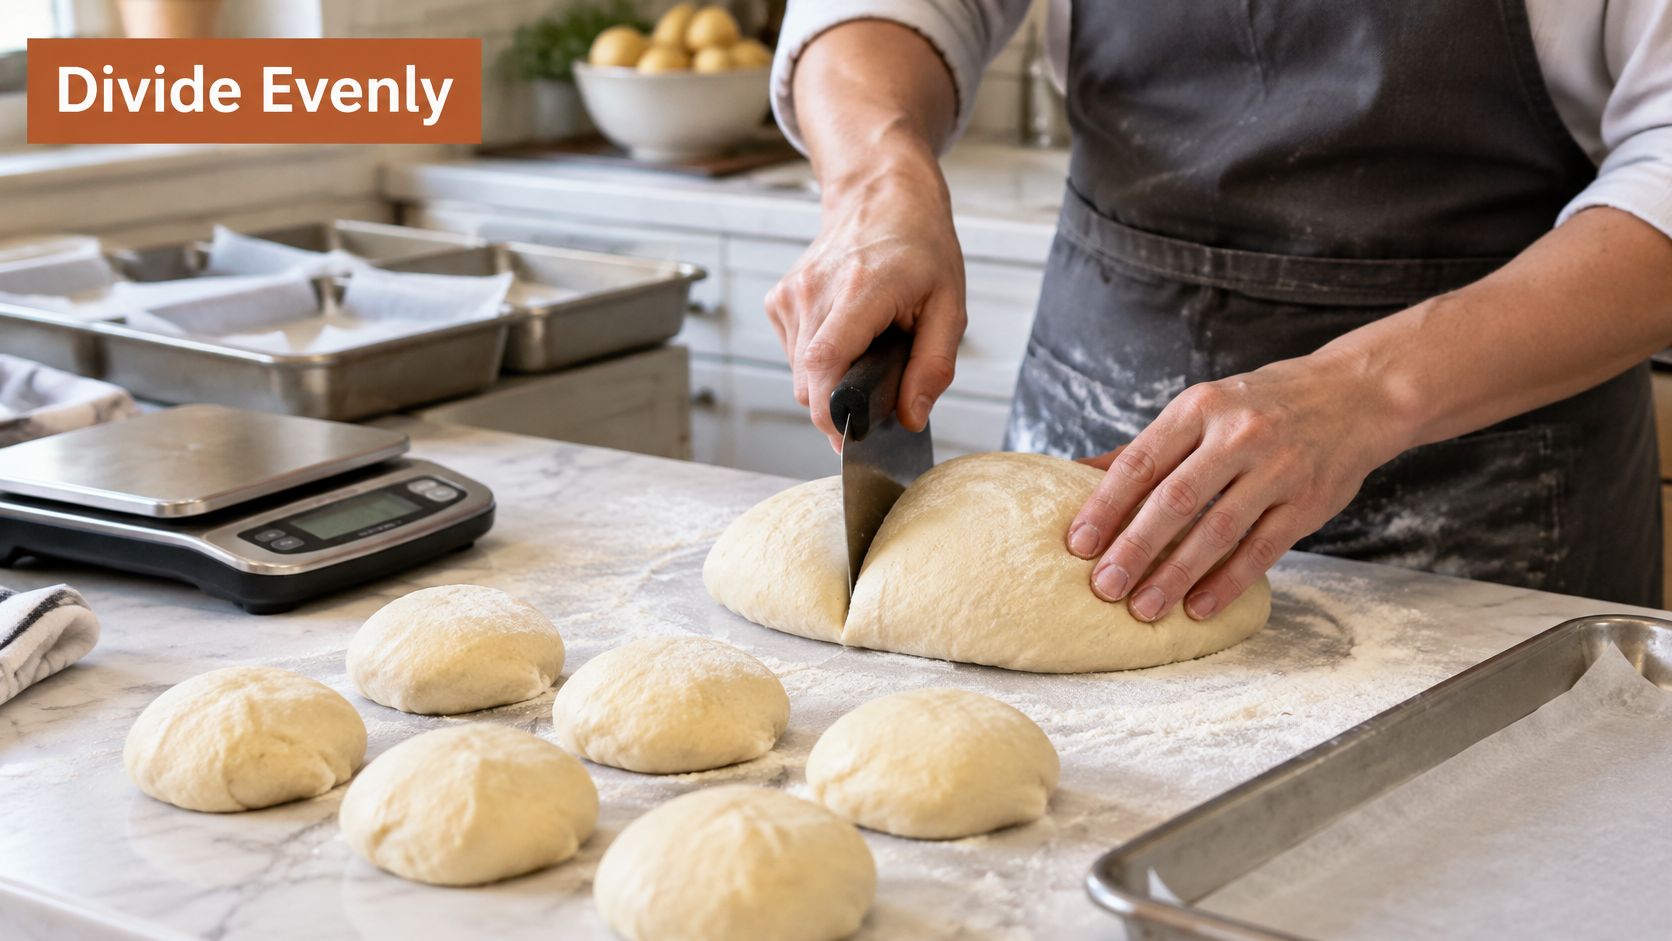
Build shape before adding height
- Weigh the fermented dough and divide evenly. Use the actual batch weight, especially if you left water unused or lost dough on the mixer. Cut portions with the scraper instead of pulling them apart, which makes accurate weighing and neat shaping harder.
- Preshape each piece into a ball by bringing the edges toward the center. Turn it seam-side down and draw it gently against the bench to tighten the surface. Cover and rest until the dough relaxes, then repeat the tightening without tearing the skin.
- Arrange on a lined baking tray. Leave room for expansion, or position the pieces closer if you want soft, touching sides. Flatten very tall balls gently so the finished bun suits a burger rather than resembling a dinner roll.
- Final-proof under cover in a warm, humid environment. A review of wheat–potato bread and bun processing gives a bakery reference of approximately 28–30°C and 75–80% relative humidity for 60–70 minutes, followed by initial-steam baking at about 220–240°C for roughly seven minutes. Treat those as process references, not a universal home-oven schedule.
A cover prevents the surface from drying while the center expands. Keep it from touching the buns, and don't assume that visible condensation proves you've achieved a particular humidity.
Use a lightly floured fingertip to assess readiness. Our bread poke-test guide explains the difference between a dent that rebounds promptly and one that remains in fragile dough.
Bake for a set interior
- Apply a thin egg or milk wash only if you want added color. Brush gently so you don't deflate the proofed dough, and avoid leaving puddles around the base.
- Use opening steam only with an oven-safe method. Follow your oven manufacturer's guidance; don't throw water onto the oven floor or glass. A hot, steamy start can support expansion, but move to a gentler, dry finish if the tops color before the center has set.
- Transfer baked buns to a rack and cool before cutting. Check the underside, sidewalls, and cooled crumb rather than judging the batch from its glossy top. The crumb should be soft and cohesive, without a compressed, wet band.
Watch the handling and shaping movements alongside your own bench work.
Keep formulation experiments separate from process corrections. The review's higher-potato test formulations aren't a reason to increase potato flour while you're still learning your oven.
Finish the batch record with proof duration, tray position, and cooled bun weight. Cut a representative bun only after cooling so you can assess the crumb without mistaking trapped warmth for underbaking.
Fixes for Slack Dense or Gummy Buns
If the dough puddles and won't hold a ball, stop adding water. First let the mixer work briefly, or let hand-kneaded dough rest, then reassess whether it has developed enough strength. Don't assume that a thirsty potato flour caused the puddle: a less absorbent ingredient, excess liquid, or weak gluten development can all leave more water unbound.
The useful correction is usually smaller than the tempting one. Dumping in flour may make the dough easier to touch while producing a much heavier bun.
Potato bun faults and the next-batch change
| What you see | Likely cause | Change next batch |
|---|---|---|
| Dough puddles and will not ball | Water added before strength developed, excess liquid, or lower absorption | Reserve water and add it only after gluten starts developing |
| Tight crumb and a split top | Under-proofed or stiffened with extra flour | Proof to a slow dent in a warm, humid environment |
| Wrinkled buns that fall when moved | Over-proofed | Bake while expanded but still resilient |
| Brown crust, gummy center | Surface colored before the moist crumb set | Reduce the finishing heat and continue until the center sets |
| Flat disks | Loose shaping or insufficient dough strength | Tighten the skin after allowing the preshape to relax |
| Dry, pale crumb | Excessive baking, weak fermentation, or unsuitable heat and steam | Check oven performance before extending the bake |
Change one thing per test batch. If the dough handled well but the buns split, adjust proofing before changing hydration. If every piece spread before proofing began, work on dough strength or shaping rather than adding more yeast.
Separate baking faults from ingredient choices
A brown outside with a gummy center needs more effective interior baking, not a shorter bake. Shield the tops or reduce the finishing temperature while allowing the crumb to set. Cutting a hot bun can also compress and smear its crumb, so assess a fully cooled sample before rewriting the formula.
Wrinkling needs context. A bun that collapses when you move the tray suggests excessive proofing or rough handling; a thin wrinkle appearing during cooling doesn't establish the same cause on its own.
Don't change the flour, water, yeast, and proof together. You'll get a different bun without learning why.
An unusually strong potato or pasty flavor is a reason to inspect the ingredient and how much you used. Check whether you bought plain potato flour, seasoned flakes, or a product with added milk or flavorings. More potato isn't automatically an improvement.
A request for gluten-free buns calls for a separate formulation, not a starch adjustment to this wheat dough. Keep the troubleshooting focused on the bread you're making.
Our homemade bread troubleshooting guide can help distinguish fermentation problems from shaping and baking problems. For your next comparison, keep the record focused on water used, dough temperature, proof duration, and cooled bun weight, then note the single adjustment you tested.
Freeze and Reheat Without Drying Them
A batch isn't successful only because the first bun feels soft. It should also suit the way your household eats: a burger tonight, another meal later, and no need to thaw the entire batch.
Baking Business's coverage of buns and rolls identifies smaller portions and clear freezing and reheating guidance as useful considerations for households buying larger packs. The same logic applies to homemade bread.
Cool and pack for the next meal
- Cool completely. Move buns to a rack with space underneath. Bagging them while warm traps condensation, which can leave the surface leathery and the crumb damp.
- Keep today's buns covered. Store them in a bag at room temperature, away from direct heat. Leave them whole unless you specifically want sliced buns ready for toasting.
- Freeze the remainder promptly. Pack cooled buns in meal-sized portions and press excess air from the freezer bag without crushing them. Label the bag so you can compare batches instead of guessing which one you're eating.
The storage sequence matters more than adding extra fat to compensate for poor handling.
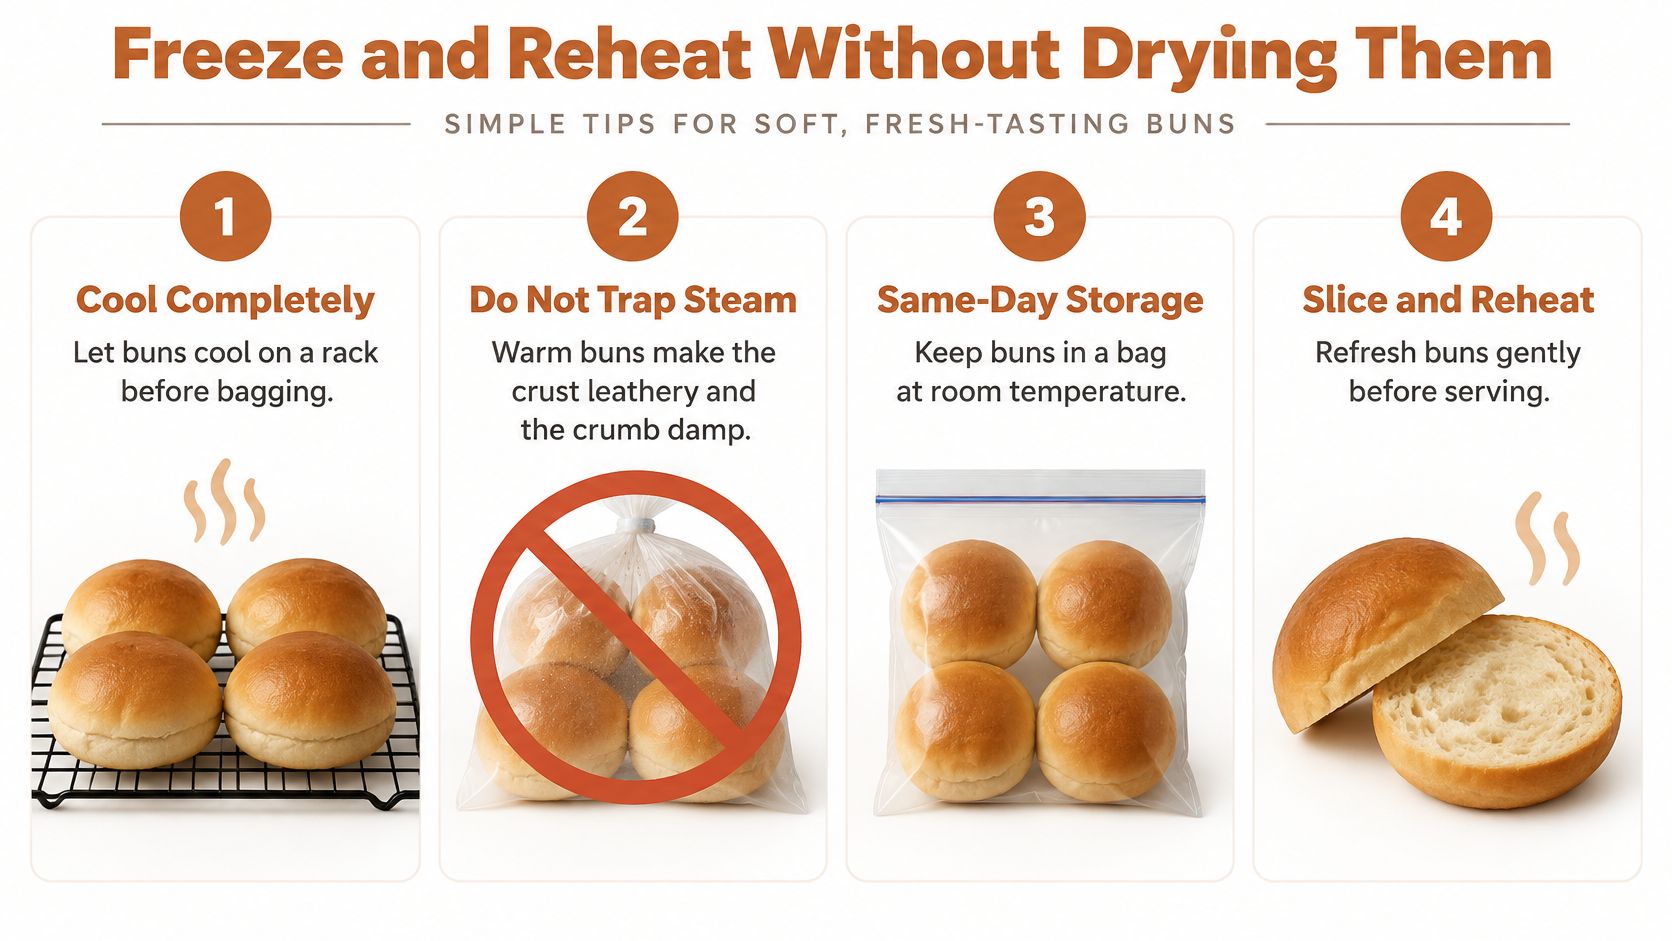
Thaw covered and refresh gently
Thaw whole buns inside their bag so their surfaces aren't exposed to drying air. Remove the packaging before heating.
For a soft whole bun, wrap it loosely in foil and warm gently, checking until the center yields when pressed. Open the foil afterward if the surface feels damp. You're restoring warmth, not trying to bake a second crust.
For sliced buns, warm the cut faces briefly in a skillet or toaster. Stop while the interior remains flexible, especially if the burger itself will add heat.
Freezer check: Compare a reheated bun with your original crumb notes. A dry edge is useful feedback about packing and reheating, not just the dough.
Avoid repeated thawing and refreezing for quality. Don't freeze an underbaked batch as though freezing will finish the cooking; return underbaked buns to the oven where practical, then cool and reassess before storing.
Repeat the Batch on a Set Proof
A batch that already gives you the shape, softness, and reheating performance you want is worth more than a new recipe. Before you change anything, write down what worked: the same potato flour brand, the same ingredient weights, the same mixing method, the same tray arrangement. Hold back the same amount of water you held back last time instead of pouring in the full allowance by habit.
The finished bun is your acceptance test. It should support the filling, compress comfortably when bitten, and spring back enough that it doesn't eat like damp paste.
Keep the successful conditions
A short record you complete beats a detailed one you abandon. Three lines are enough:
- Ingredients and mixing. Flour and potato flour brands, the liquid used, and the exact point where you stopped adding reserved water. Potato flour brands absorb differently, so the brand name is part of the formula.
- Fermentation conditions. Dough temperature, room conditions, bulk development, and how the dough looked and felt at final-proof readiness.
- Baked result. Cooled weight, crumb texture, crust color, and how a packed, reheated bun compared with a fresh one.
A cooler kitchen can lengthen fermentation even when the weights haven't changed. Check whether the dough needs steadier conditions before reaching for extra flour or yeast, since both change the formula you were trying to repeat.
D'BakerAid is not a bread machine. Our system controls yeast activation and dough proofing. The oven still bakes the bread, and the companion D'Steamer provides real steam during the opening stage. What it gives a repeat batch is consistency: the same proofing conditions your log recorded, held steady from one bake to the next.
D'BakerAid™ bread can be bake-ready in about 80 minutes, but don't turn that capability into a fixed deadline for every potato-bun variation. Ingredient choice, dough condition, and the result you're after still matter. Temperature control helps you repeat a formula; it doesn't judge the crumb for you.
Change only what needs changing
Keep your preferred bun size and judge every trial against the same cooled and reheated standard. If the crumb is right but the color runs too dark, adjust the oven finish rather than swapping the potato ingredient. One variable at a time keeps the log readable. Two changes at once, and you no longer know which one fixed the batch.
If you also bake separate high-protein loaves, a free 30g-protein loaf recipe is available in the D'BakerAid app. Don't carry those loaves' protein figures over to these potato hamburger buns: a different formula and a different serving weight need their own calculation.
DBakerAid™ offers controlled yeast activation and dough proofing so you can repeat the conditions behind a successful batch of potato hamburger buns. Visit DBakerAid™ to explore the system and shop D'BakerAid if steady temperature and timing are the missing pieces in your routine.