

The ricotta is already out, the mushrooms are still shiny in the pan, and the last calzone split along the curve so cheese hit the tray. A reliable pizza calzones recipe treats the fold as a sealed steam vessel. How dry the filling is, and how firmly the rim closes, decide the result. Extra cheese does not fix a wet center.
Table of Contents
- Dough Ingredients for Four Calzones
- How to Mix, Rest and Ferment the Dough
- Filling Ideas That Stay Dry Inside the Seal
- How to Fold, Seal and Vent Each Calzone
- Bake Times and Oven Settings That Work
- Make Ahead and Freeze
- Fix Problems and Test Your First Calzone
Dough Ingredients for Four Calzones
A calzone is pizza dough filled and sealed before baking, not a pizza folded afterward. That is why the dough has to stretch without tearing and the rim has to close tightly. Wikipedia's calzone entry places the half-moon turnover in Naples, where the sealed edge kept cheese, meat, and vegetables inside so it could be eaten without a plate. Marinara usually stays on the side for dipping.
Weigh 600 g flour, then the rest of this batch. Grams beat cups because the water ratio decides whether the dough is stiff enough to hold a filling or so wet it tears at the seam.
| Ingredient | Amount | Notes |
|---|---|---|
| Lukewarm water | 360 g | 60% hydration; tacky but workable |
| Fine salt | 12 g | Add after flour and water have combined |
| Instant yeast | 4 g | Use 6 g fresh yeast if that is what you have |
| Olive oil | 20 g | Optional; softens the dough and the crust |
| Total dough | about 996 g | Four portions of about 250 g each |
60% hydration (360 g water on 600 g flour) is a starting point, not a law. The dough should feel slightly tacky and still hold its shape when you round it. Bread flour adds chew and keeps the rim from slumping. 00 flour bakes softer and tears sooner if you roll it thin. The bread flour versus 00 flour comparison is worth reading before you pick a bag. Weigh four portions of about 250 g and move on to fermentation.
How to Mix, Rest and Ferment the Dough
Dinner is four hours away and the dough is still a tight ball. Leave it overnight and the skin can go slack, full of gas, and likely to split when you pinch the seam. A calzone is a sealed steam vessel. Fermentation decides whether that skin holds moisture and stays closed, or opens in the oven.
A controlled pizza-dough study compared fermentation of 0, 4, 8, 16, 24, and 48 hours. Those times change flavor and gas strength, not only when the calzones reach the table.
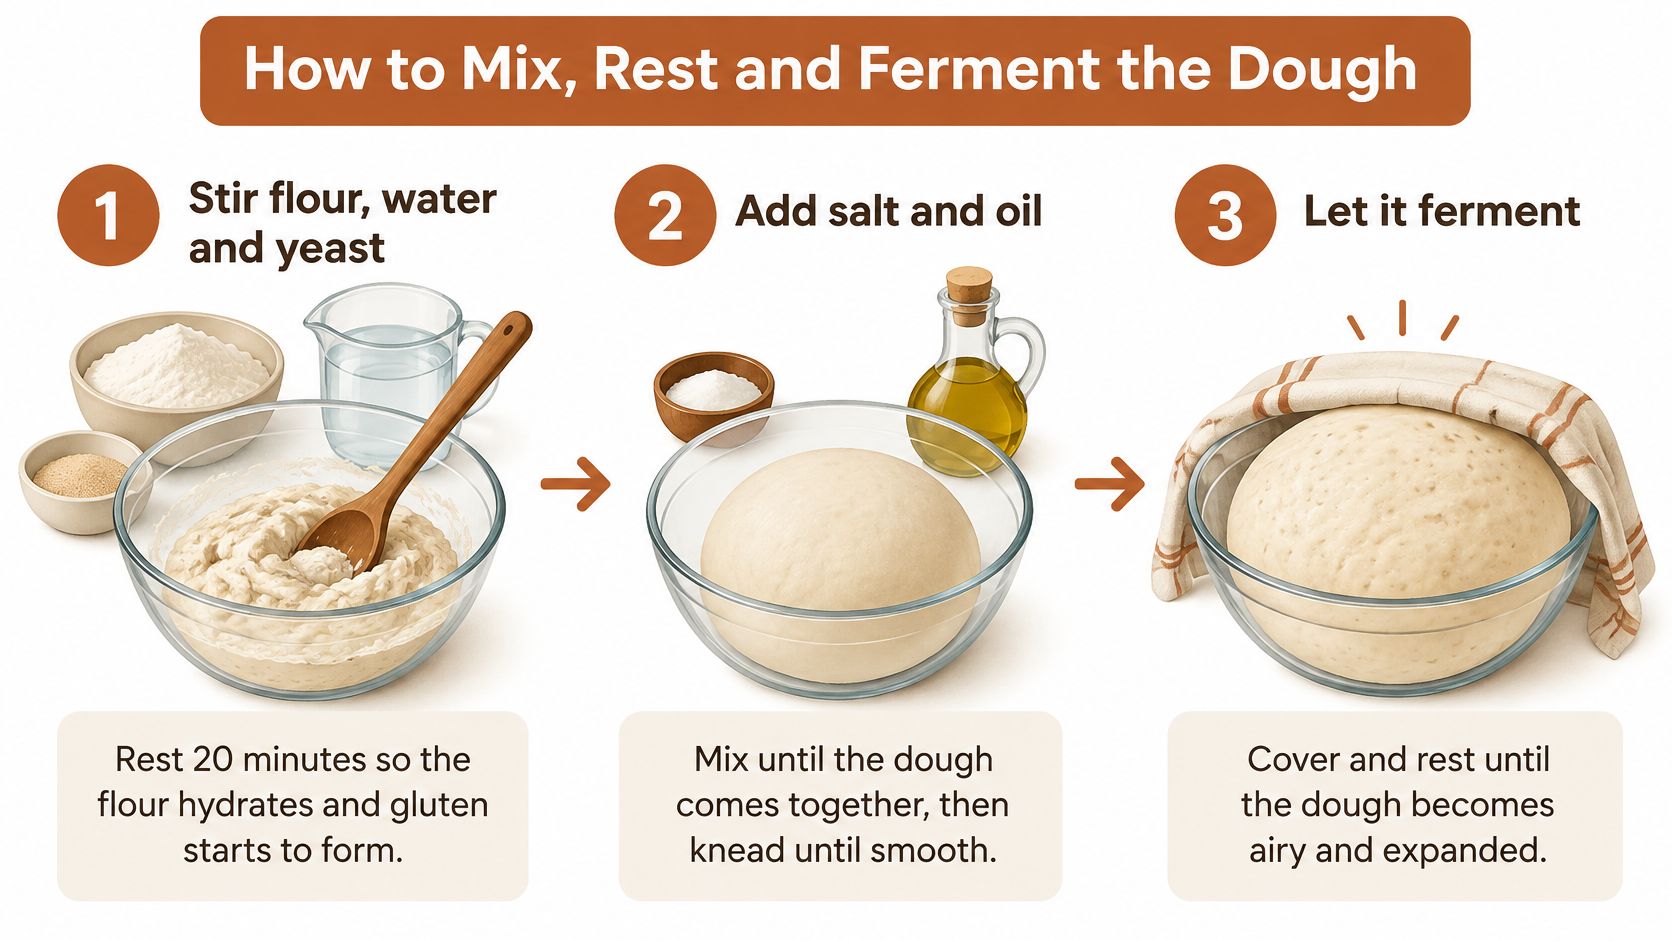
- Stir flour, water, and yeast until no dry flour remains, then rest about 20 minutes. The flour hydrates and gluten starts before salt tightens the mix.
- Add the salt and olive oil, then knead 8 to 10 minutes until the dough is smooth and elastic. Salt too early slows that first hydration.
- Divide into four roughly 250 g portions and ball them tightly. Surface tension is what keeps filling from pushing through the seam later.
- Cover and ferment at about 22°C and 80% relative humidity. That covered rest is a set sequence, not a guess based only on doubling.
While the dough rests, salty snacks disappear fast in a house that is waiting on dinner. If you want something crunchy that isn't another slice of dough, find parmesan garlic snack pretzels and keep them for the gap between shaping and the oven.
Pick the route before you walk away. Same-day fermentation, 4 to 8 hours at room temperature, gives a quicker, softer dough. Overnight refrigeration, 16 to 24 hours, then 1 to 2 hours covered at room temperature, gives deeper flavor and a dough that is easier to stretch without tearing. I use the cold route when the seam has to survive a heavier filling. Same-day dough is the better trade when you need speed and a lighter load.
Practical rule: Good dough rises by about half to double, feels smooth, and a poked dimple springs back slowly. If it collapses, it has gone too far for a tight seal. A weak skin cannot hold the steam that builds inside a closed calzone.
If you want the timing taken off your hands, knead the dough your way, then place it in the device for fermentation and proofing and bake it in your own oven. Pizza dough takes about 80 minutes total in Yeast mode with the White proofing program. The longer cold path is still the one to use when you want more flavor. The pizza dough fermentation guide walks through both clocks.
Filling Ideas That Stay Dry Inside the Seal
Filling moisture is the failure that ruins an otherwise good crust. Calzones trap steam inside the folded shell, so the filling has to be substantially drier than pizza toppings. Pastry Wiz is blunt about it: excess liquid condenses on the inner crust, makes a gummy layer, weakens the seal, and slows browning.
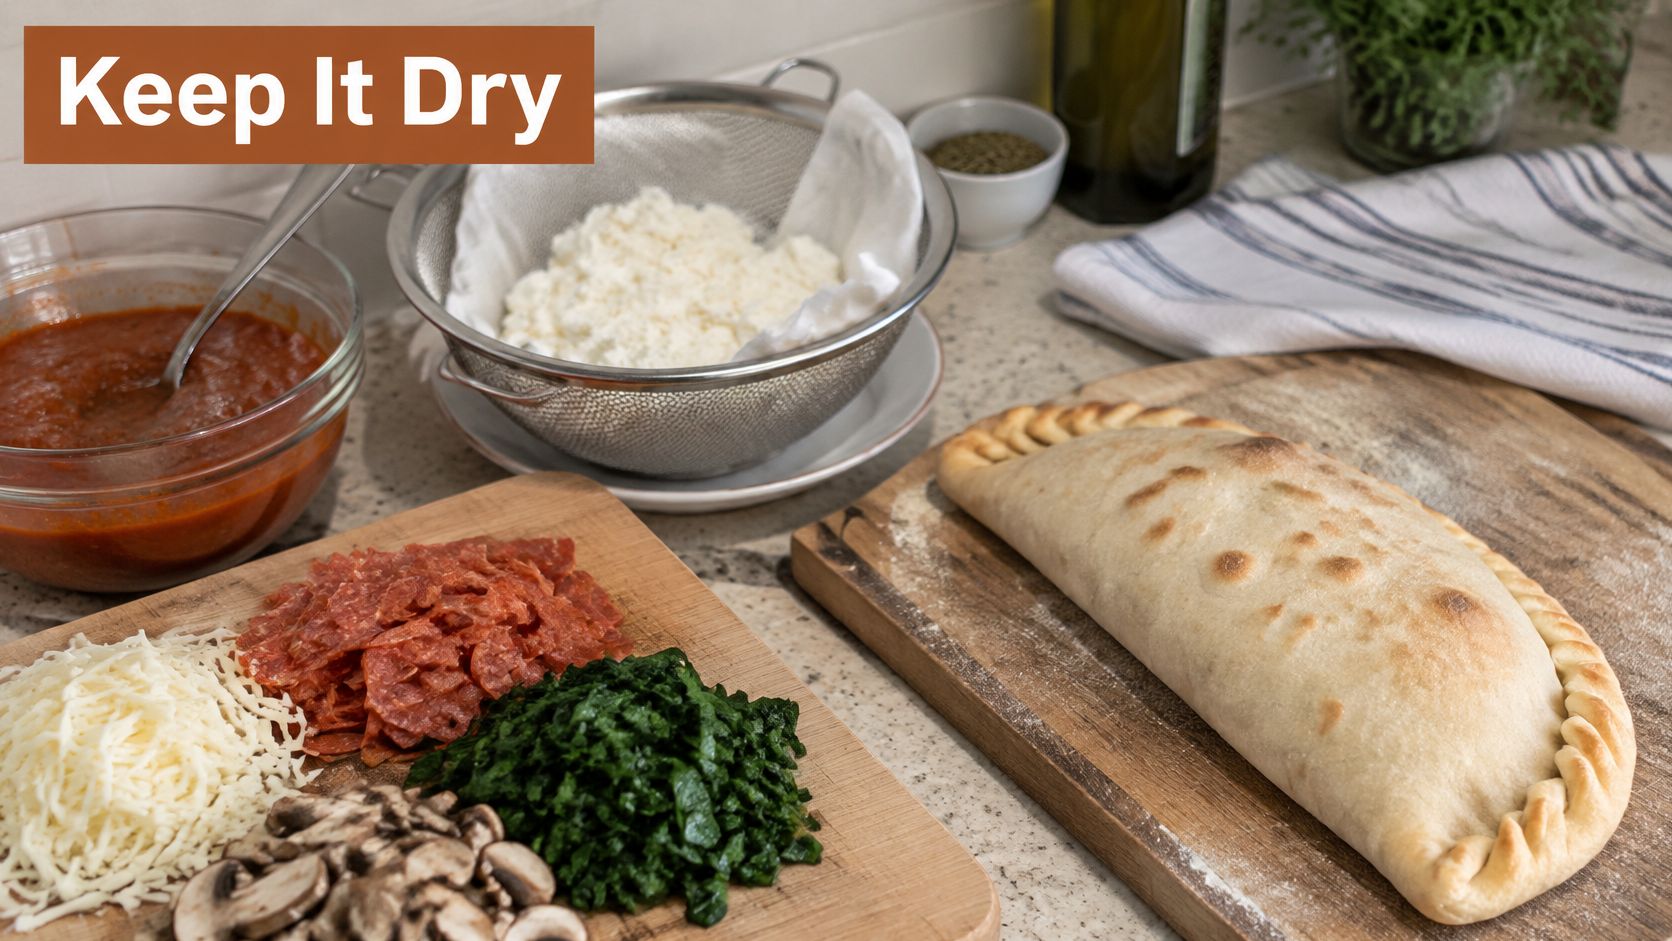
Pick one filling and stop there for the first bake.
- Ricotta, low-moisture mozzarella, and salami: salty, firm, and the easiest to keep dry.
- Spinach, mushrooms, and mozzarella: only after the vegetables have given up their water.
- Sausage with peppers and onions: cook the meat and the vegetables, then cool both.
| Filling | Prep before assembly | Why it matters |
|---|---|---|
| Ricotta | Strain in a sieve for at least 1 hour, then stir in seasoning | Free liquid softens the seam and the crust |
| Mozzarella | Use low-moisture block cheese, cut into small cubes, pat dry | Fresh mozzarella releases water as it heats |
| Mushrooms, peppers, spinach | Cook until no free water pools in the pan; cool fully | Steam condenses against the crust |
| Cooked sausage or meatballs | Drain off the fat and cool before assembly | Warm fat loosens the seal |
| Tomato sauce | One or two spoons per calzone, kept off the edge | Sauce left in the shell makes a gummy layer |
Over-drained ricotta turns chalky. Ricotta you only tip in a colander stays wet, gums the crumb, and weakens the crimp. Strain it for at least an hour. Cook vegetables until no water pools, then cool them. Keep roughly 120–150 g of filling on each 250 g portion. Overfilling raises seam stress and blowout risk.
More cheese is not an upgrade inside a closed shell. Moisture control beats abundance.
Prepare every filling before you shape, so the dough isn't sitting out while you chop.
How to Fold, Seal and Vent Each Calzone
Assembly is where a dry filling still fails if air or a thin rim does the damage.
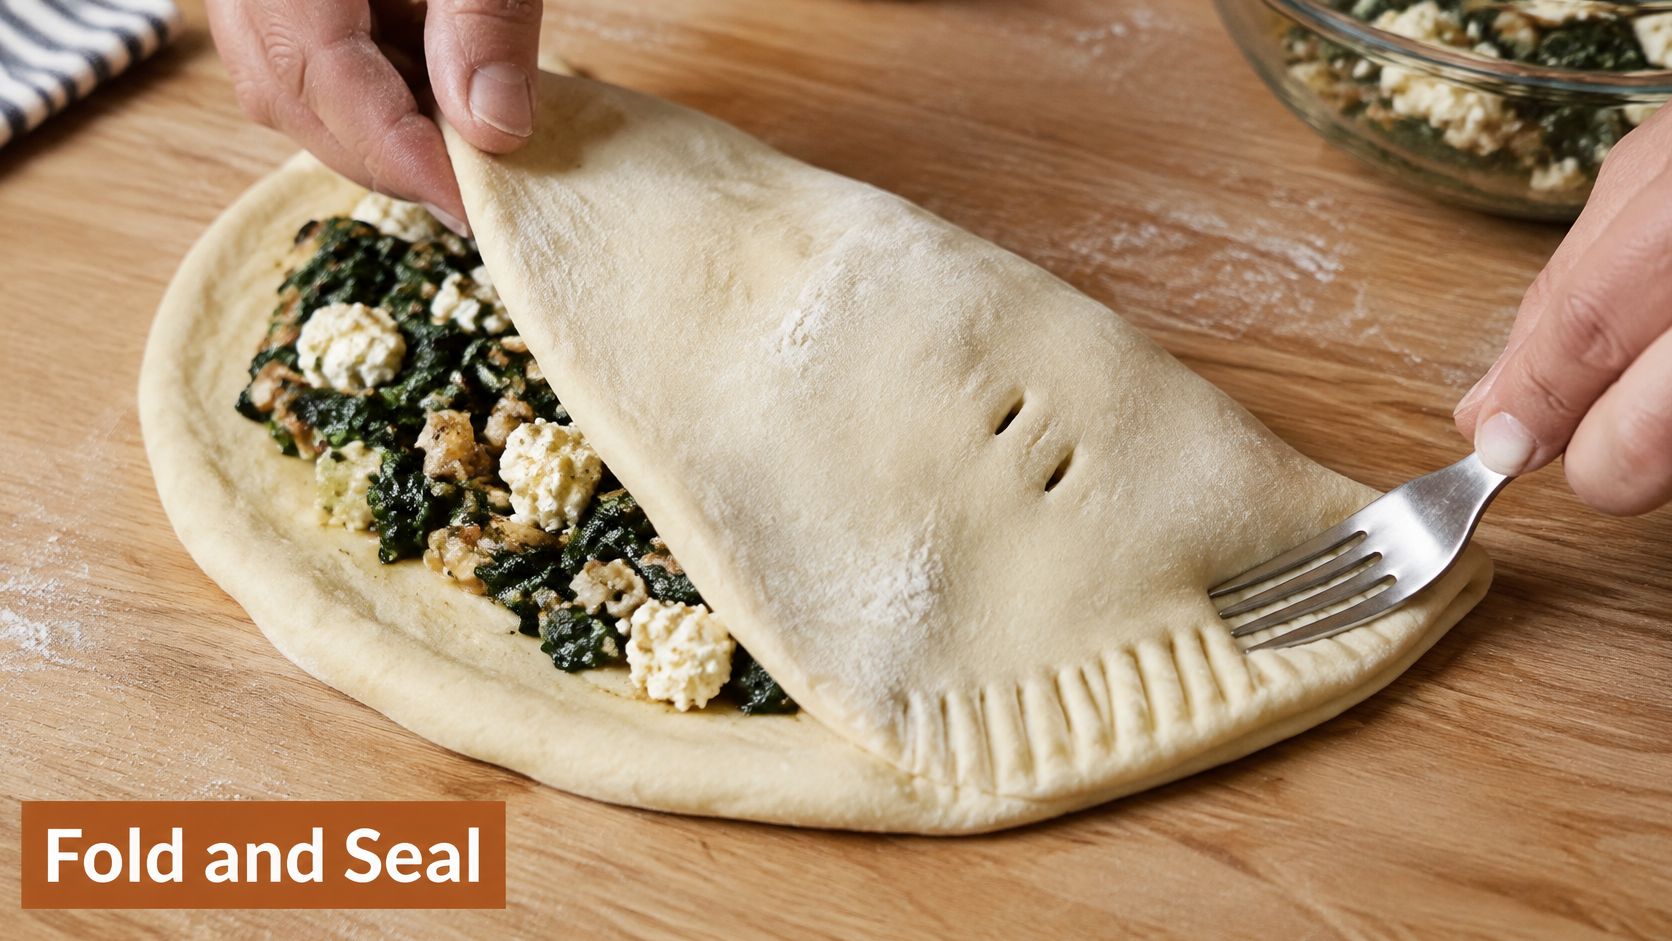
- Roll each 250 g portion into a disk about 25 cm across. Leave the rim a little thicker than the middle so you have dough to seal, not a paper edge that splits.
- Spoon the cooled filling onto one half only. Leave a border of about 2.5 cm. Filling on the rim is the usual reason a crimp looks closed and isn't.
- Fold the empty half over and press air out from the center toward the edge. Trapped air expands in the oven and shoves the seam open from the inside.
- Crimp firmly, either in a rope pinch or with a fork. If the seam feels thin, fold it under once so the join has two layers.
- Cut two or three small slits on top. Steam needs a way out that isn't a burst along the curve.
- Brush the top with a little olive oil. That is for color, not for sealing. Oil on the crimp makes the edge slip.
A vent lowers pressure. It cannot rescue a calzone that is overfilled or still wet. If you are unsure, lift the calzone by the crimped edge. No gap should open along the join. If one does, recrimp that spot before it ever sees the oven.
Work one portion at a time and keep the other balls covered. A dried skin will not stick to itself, no matter how hard you pinch.
Bake Times and Oven Settings That Work
A calzone is a sealed steam vessel. Heat raises pressure inside the fold, and the seam holds only if the crust sets before that steam forces a split. Pizza Tech HQ notes that traditional Neapolitan ovens commonly run above 300°C, so a calzone can cook in only a few minutes, while a home oven needs a longer bake. The crust still has to brown, and the enclosed filling still has to heat through, without the seam opening.
| Method | Oven setting | Bake time | Done when |
|---|---|---|---|
| Pizza oven, Neapolitan style | above 300°C | a few minutes; a specialist recipe reports 10 to 15 min | deep brown outside, hot center |
| Home oven, hot | 450°F (about 232°C) | 15 to 22 min | deeply golden crust, cheese fully melted |
| Home oven, moderate-high | 425°F (about 218°C) | 15 to 17 min | firm, golden crust |
| Home oven, short hot bake | 450°F (about 232°C) | 12 to 14 min | smaller calzones, filling already warm |
| Home oven, long bake | about 220 to 230°C | about 25 min | dense or large calzones, hot center |
Those rows are starting points. A smaller calzone with warm filling can finish in the short hot window. A dense, full one needs the longer, gentler bake, because folded dough insulates the center and holds steam against the seam. Too hot, and the top colors while the middle is still cool and the join is soft. Too cool, and the crust stays pale while moisture soaks the base.
The pizza dough temperature and oven notes are useful when your oven runs hot or cool.
Judge doneness by three signs together: a browned exterior, a firm crust with a browned underside, and a hot center. Time alone lies. If the top colors before the middle is hot, drop the heat a little and keep baking. Don't add moisture, and don't seal the vents. A closed vent leaves the steam with nowhere to go except through the crimp.
Preheat the stone, steel, or tray fully, then rest the baked calzone a few minutes so the steam inside settles before you cut. Cutting into live steam dumps the filling even when the seam survived the oven. For leftovers, reheat in a moderate oven long enough to crisp the crust again rather than steaming it soft.
Make Ahead and Freeze
Three holds cover a weeknight without a last-minute dough.
Dough. After fermentation, wrap the portions and refrigerate them for about a day. Bring them back to room temperature, covered, for 1 to 2 hours before you roll. Cold dough tears at the rim.
Filling. Cooked, drained, and fully cooled fillings keep covered in the refrigerator for about 2 days. Baking day is then only shaping and sealing. Warm filling loosens the seal, so chill it all the way before it goes inside the dough.
Unbaked calzones. Shape, crimp, and vent, then freeze on a tray until firm. Wrap and keep them for up to about a month. Bake from frozen on the same oven setting you already chose, and add about 5 to 10 minutes. Don't serve until the center is hot.
Reheating already-baked leftovers belongs with the oven method above. Don't invent a second routine here.
Fix Problems and Test Your First Calzone
Run one test bake before you change three things at once. Use one dough route, one filling from the prep table, and one oven setting. Write the bake time and what the center looked like. That note is worth more than a second guess.
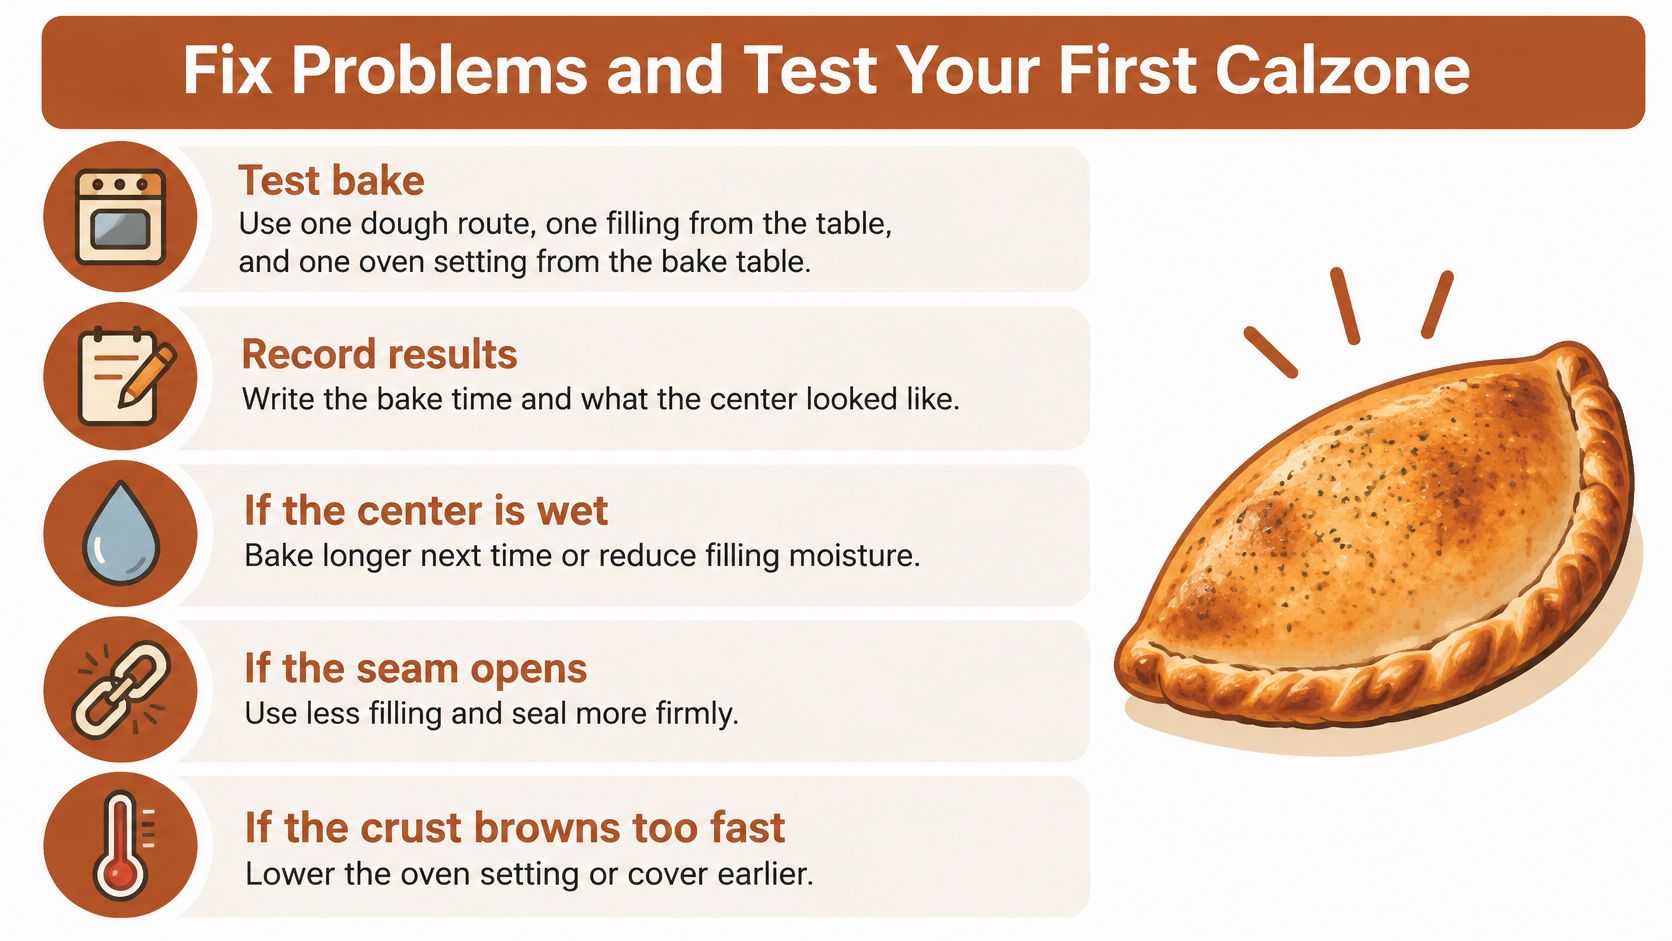
- Seam splits. The rim was too thin or the filling too full. Thicken the rim next time and take out a spoonful. That fix is the next bake, not a new dough day.
- Gummy inner layer. The filling was wet or the sauce was heavy. Strain the ricotta longer and cut the sauce to one spoon.
- Crust browns before the middle is hot. The oven ran too hot or the calzone was too thick. Lower the heat by about 15°C and extend the bake. Don't add moisture.
- Pale, flabby bottom. The stone wasn't hot or the dough went in cold. Preheat fully and let the portion sit about 20 minutes before you shape.
- Top bursts or bulges. There were no vents, or the slits were pinched shut. Add two or three cuts before the next bake.
- Dense, tough crust. The dough was under-fermented. Lengthen the ferment. That one needs a schedule change, not a hotter oven.
The same controlled ferment helps more than pizza. D'BakerAid can be used for pizza, baguette, focaccia, brioche, boule, bâtard, naan, and sourdough, in any shape, size, or oven. You still seal and bake the calzone yourself.
Repeat three checks every time: dough that holds its shape, filling kept dry and inside the border, and a calzone judged by color plus a hot center.
DBakerAid™ holds yeast activation and proofing at a steady temperature so pizza dough for calzones is ready to shape without a guessed rise. You still knead, fill, seal, and bake in your own oven. See how the programs fit your dough at DBakerAid™.