

“Crank the oven to maximum” is useful advice only after you've handled the dough. Pizza dough temperature and oven temperature are different controls, and they solve different problems. One governs yeast activity, gas production, extensibility, and fermentation timing. The other governs heat transfer, moisture loss, browning, and crust structure.
That distinction matters whether you're making a thin Neapolitan-style pizza, a foldable New York slice, or a thicker pan pizza. A very hot oven can brown the rim quickly, but it can't rescue dough that's under-fermented, over-proofed, too cold, or carrying more moisture than the bake can remove. Consistent pizza comes from managing the dough's complete thermal history, from mixing through the final bake.
Table of Contents
- The Two Different Temperatures Every Baker Must Control
- How Heat Drives Fermentation and Crust Aeration
- Targeting the Right Proofing Environment
- Matching Oven Heat to Your Favorite Pizza Style
- Setting Up Baking Stones and Steels for Maximum Spring
- Troubleshooting Common Thermal Baking Failures
- Achieving Bakery Consistency with Precision Proofing
The Two Different Temperatures Every Baker Must Control
The phrase pizza dough temperature oven often gets treated as one problem, but it describes two separate environments. Finished dough temperature determines how quickly yeast produces carbon dioxide and how long the dough remains strong enough to hold that gas. Oven temperature determines how quickly the shaped dough receives radiant heat from above and conductive heat from the baking surface.
A conventional direct-process pizza dough is commonly fermented at 23–26°C until its volume increases two- to fivefold, according to published pizza-dough fermentation research. Other documented programs include 35°C for 60 minutes, 25°C for 6–8 hours, and 25°C for 40 minutes. Those aren't interchangeable recipes. They pair different temperatures with different durations.
Practical rule: A hotter dough usually needs less time, not the same proofing time in a warmer room.
The oven creates a separate set of trade-offs. Traditional Neapolitan baking uses an oven floor around 380–430°C, a dome near 485°C, and a bake of roughly 60–90 seconds, as reported in a 2024 review of Neapolitan pizza ovens. A domestic oven set to its highest thermostat setting may provide strong top heat but a cooler stone, steel, or tray.
For useful recipe inspiration that also considers appliance-based preparation, Thermomix recipe ideas can help you compare mixing and fermentation workflows. The key lesson remains the same: don't copy a bake temperature without also matching the dough's condition, thickness, and timing.
How Heat Drives Fermentation and Crust Aeration
Yeast consumes available sugars and releases carbon dioxide. The dough's gluten network must then stretch around that gas and retain it long enough to create a light, aerated rim. Temperature affects the rate of that activity, so the number on the room thermometer isn't enough. Mixing friction, flour temperature, water temperature, and the container all influence the temperature of the dough itself.
A controlled factorial pizza-dough study tested fermentation at 27°C, 30°C, and 33°C for 30, 36, and 42 minutes. Both temperature and time had a statistically significant linear effect on carbon-dioxide release, even though they weren't significant for the measured dough-development height under those conditions. In practical terms, more gas can be produced without a proportional change in the dough's visible height, which is why volume alone isn't a reliable readiness test. The study's full findings give useful context for judging fermentation by structure as well as appearance.
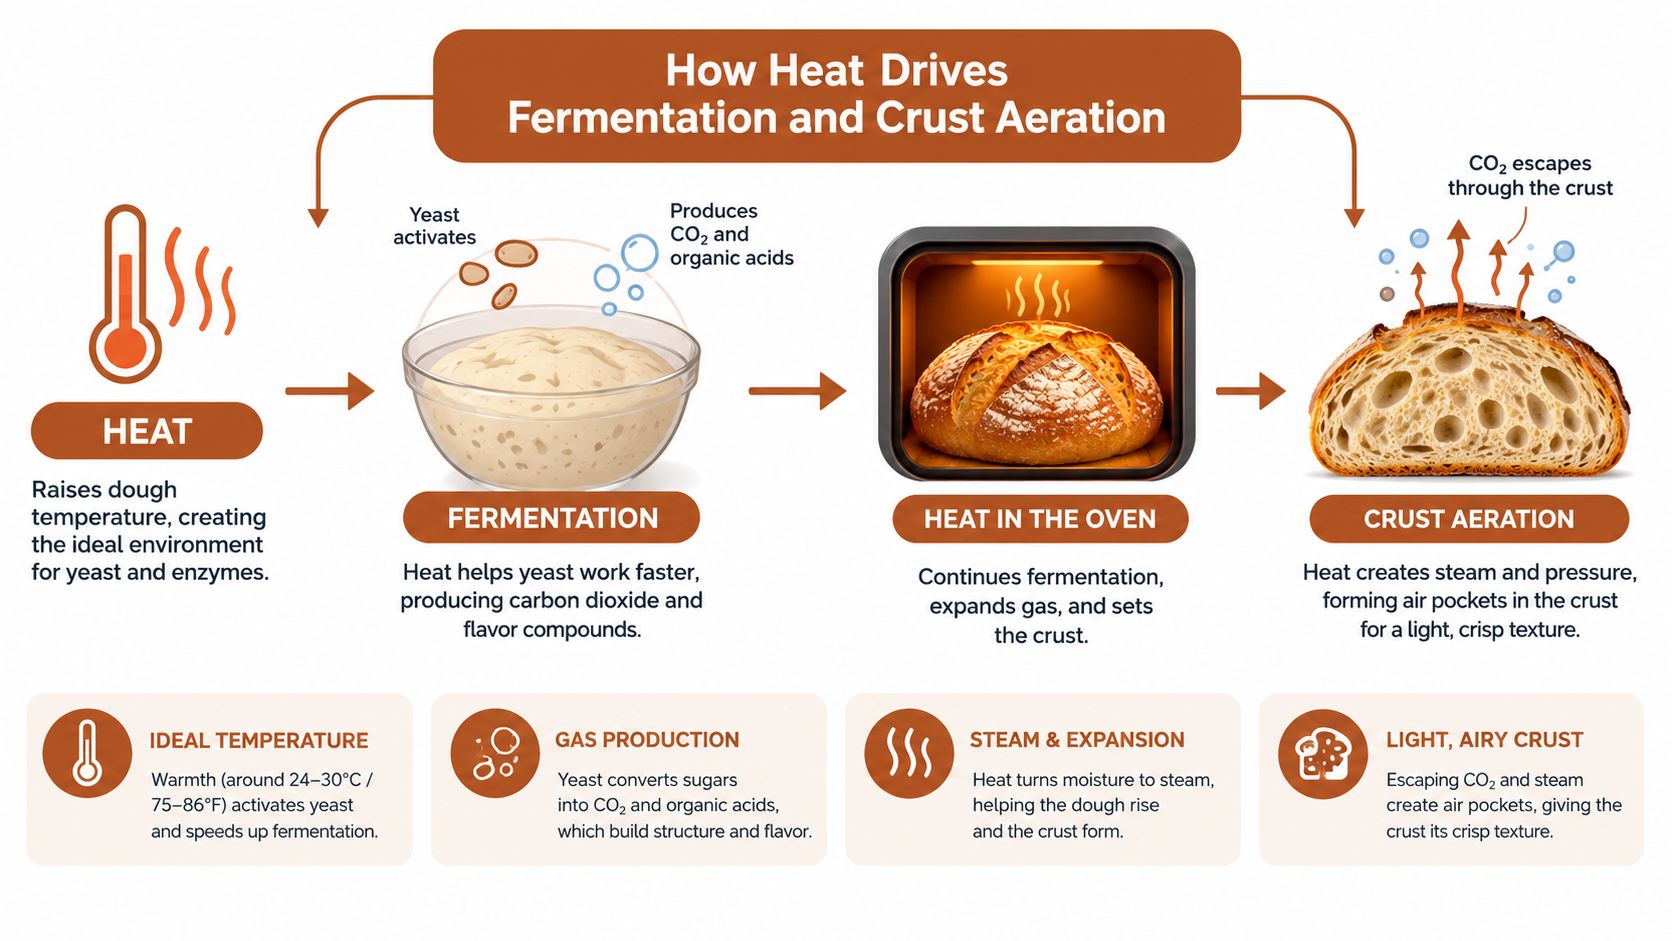
The strongest sensory results in that experiment came from approximately 30°C for 36 minutes and 33°C for 42 minutes, with desirable bubble size, aroma, flavor, and crisp edges. Those are benchmarks, not universal instructions. Flour strength, yeast quantity, salt, hydration, and dough size still change the result.
Why dough temperature matters more than room temperature
A technical guide from General Mills Foodservice states that each 15°F increase in dough temperature, up to 140°F, approximately doubles fermentation rate. The same guide gives 78–82°F, or 26–28°C, as an ideal range for refrigerated pizza dough. That relationship explains why a dough mixed with warm water can run ahead of schedule even when the kitchen feels comfortable.
Measure the dough immediately after mixing, then record the fermentation duration beside it. If the dough is warmer than planned, shorten the fermentation or use cooler water next time. If it's cooler, allow more time rather than forcing the dough into a hot environment without monitoring its structure. For more process detail, compare this approach with the pizza dough fermentation guide.
Targeting the Right Proofing Environment
Start with the dough, not the room. After mixing, insert a reliable probe into the center of the dough, avoiding contact with the bowl. Write down the reading and the time. This simple record turns a vague instruction such as “proof until ready” into a repeatable process.
A practical control routine
- Set the water temperature deliberately. Cooler water offsets warm flour, mixer friction, and a hot kitchen. Warmer water can help a cold kitchen, but it also narrows the window before over-fermentation.
- Use the dough as the reference point. Air temperature can differ substantially from the temperature inside a covered bowl. The dough's reading determines yeast activity, so it's the value that belongs in your notes.
- Watch the structure. Look for increased volume, elastic extensibility, and gas that remains distributed when you handle the dough. A properly fermented dough should stretch without tearing immediately and shouldn't collapse as soon as you shape it.
- Adjust time before making several changes. If the dough is warm but still strong, reduce the remaining fermentation time. If it's cool and tight, extend the schedule. Changing yeast, water, temperature, and timing all at once makes the next batch impossible to diagnose.
A warm oven can speed the rise, but it removes scheduling flexibility. The dough may reach a visibly expanded state quickly while the gluten structure is still developing unevenly, and the warmer environment increases the risk of passing the useful fermentation window before you're ready to bake.
Look for retained gas, not just a larger dough ball. A dough that rises rapidly but feels weak can produce a broad, dense crust rather than a well-aerated rim.
The pizza dough proofing temperature guide is a useful additional reference when you're comparing room-temperature, refrigerated, and controlled proofing methods. Keep the decision grounded in the dough's measured temperature and physical behavior rather than a single fixed clock time.
Matching Oven Heat to Your Favorite Pizza Style
Pizza style determines how aggressively heat should enter the dough. A thin Neapolitan-style base can tolerate intense radiant and conductive heat because the center is thin and the bake is short. A thicker New York-style crust needs more time to set. Detroit-style dough needs still longer exposure because the pan, crumb thickness, and toppings hold more moisture.
| Pizza Style | Oven Temperature | Bake Time |
|---|---|---|
| Neapolitan | Approximately 850–950°F, 454–510°C | 60–90 seconds |
| New York-style | Approximately 525–550°F, 274–288°C | 6–10 minutes |
| Detroit-style | Approximately 500°F, 260°C | 12–15 minutes |
These benchmarks come from technical pizza-oven guidance. They describe different heat-transfer strategies, not interchangeable thermostat settings.
Neapolitan
Traditional Neapolitan pizza uses a floor around 380–430°C and a dome near 485°C, with a finished pizza in roughly 60–90 seconds, according to the Neapolitan oven review. The rim browns and blisters quickly while the center stays moist. Dough that's too cold, too weak, or under-fermented won't suddenly become light because the oven is hotter.
New York-style
At approximately 525–550°F, a New York-style pizza has more time to set its thicker, chewier crust. The longer bake drives additional moisture from the crumb, so a stone or steel must be fully heated before launch. Excessive toppings can push the center past the point where the rim is already dark.
Detroit-style
Detroit-style pizza is thicker and usually baked around 500°F for 12–15 minutes. The pan changes how heat reaches the base, while the deeper dough requires time for the interior to cook and the sides to caramelize. A maximum-temperature bake can scorch the cheese and edges before the center sets.
If your oven temperature display seems unreliable, use a measured process rather than guessing. This oven temperature testing guide can help you identify whether the displayed air temperature matches the conditions your pizza experiences.
Setting Up Baking Stones and Steels for Maximum Spring
A preheated stone or steel supplies the first major burst of conductive heat. The oven's air may have reached its target while the baking surface is still recovering from the previous bake or has never absorbed enough energy in the first place. That mismatch produces a pale, soft base beneath a well-browned top.
Place the stone or steel where it supports the style you're baking. A surface closer to the top element receives more radiant heat, while a lower position can emphasize base browning. Preheat until the surface has thermally saturated, then verify the surface with an infrared thermometer if you have one. The oven display tells you about the air near its sensor, not the temperature of the stone or steel.
Launching and recovering heat
Shape and top the pizza quickly. A loaded peel gives you little time before moisture makes the dough stick, so use a light dusting of flour or semolina and perform a slide check before launching. Once the pizza is on the surface, close the door immediately.
After launch, the stone or steel loses heat where the dough sits. Recovery matters more when you're baking several pizzas in succession. Give the surface time to regain heat, and avoid judging the second pizza by the first pizza's timing unless the oven and surface have recovered similarly.
The bread-baking steel guide offers useful background on how steel changes conductive heat transfer in a home oven. It won't turn a conventional oven into a wood-fired deck oven, but it can make the bottom heat more decisive and repeatable.
A practical setup sequence looks like this:
- Preheat the surface fully: Don't launch as soon as the air display reaches its target.
- Measure the surface when possible: Confirm the floor rather than relying only on the thermostat.
- Match the position to the problem: Move upward for more top browning, downward for more base heat.
- Allow recovery: Reheat the surface between pizzas when the bottom is losing color or crispness.
Here's a visual demonstration of loading technique and surface contact:
Troubleshooting Common Thermal Baking Failures
A browned rim with a gummy center means heat is arriving faster at the outside than it can travel through the dough. Lowering the temperature may help, but it isn't always the first fix. Start by checking geometry and load.
Match the symptom to the adjustment
- Dark rim, wet center: Reduce topping load, stretch the center more evenly, or extend the bake at a lower temperature if the crust is already coloring too quickly.
- Pale, soft base, cooked top: Preheat the stone or steel longer, move the pizza closer to the lower heat source, or improve surface recovery.
- Dense rim with little spring: Review dough temperature and fermentation. A hot oven can't compensate for dough that hasn't retained enough gas.
- Scorched underside, pale top: Reduce conductive heat or raise the pizza, then add more upper radiant heat if your oven allows it.
- Uneven browning: Rotate during the bake when the heat source is directional, and avoid assuming one oven position behaves uniformly.
A heavier pizza can require more time to reach the same internal rim temperature than a lighter one. The 2024 Neapolitan review reports an average rim temperature of 150 ± 13°C after 80 seconds, while a heavier Margherita required about 100 seconds to reach that rim temperature, reinforcing the importance of pizza mass as well as oven heat. For a deeper look at reading hot and cold zones, a thermal camera for device diagnostics explains the broader principle of thermal mapping.
Food safety also depends on the complete bake, not just surface color. A validated conventional-oven process used 500°F, or 260°C, for 12 minutes and identified an internal pizza temperature of about 209°F as sufficient for a 5-log reduction in Shiga-toxin-producing E. coli, according to published validation research. That doesn't make every pizza at the same setting automatically safe. Dough thickness, toppings, and heat delivery still determine the internal result.
Achieving Bakery Consistency with Precision Proofing
The oven is only the final stage of the process. Seasonal flour temperature, water temperature, mixer friction, room conditions, and proofing duration all alter the dough before it reaches the stone. If those variables drift, the same recipe can produce a tight crust one day and a weak, over-expanded crust the next.
A controlled proofing system can remove much of that guesswork by holding the fermentation environment steady and coordinating temperature with time. DBakerAid™ is one option in this category. Its SureDough™ system activates yeast at controlled biological temperatures and maintains approximately ±0.5°C control throughout fermentation, with flour-specific programs for doughs including pizza. That doesn't replace measuring the dough or judging readiness, but it reduces the environmental swings that make those judgments harder.
What consistency actually looks like
Repeatability isn't identical pizza under every condition. It means the dough reaches the oven with a predictable strength, gas level, and extensibility, so your chosen surface temperature and bake time remain useful. You can then change one variable at a time, such as topping weight, dough thickness, or oven position, and understand the result.
The best workflow is simple:
- Record finished dough temperature after mixing.
- Control proofing time and environment.
- Preheat and measure the baking surface.
- Match oven heat to dough thickness and pizza style.
- Judge the finished pizza by crumb, underside, and moisture, not color alone.

The point isn't to chase the highest available temperature. It's to control the dough before baking, saturate the surface, and give the pizza the right combination of heat intensity and time.
DBakerAid™ controls fermentation and proofing temperature and time so pizza dough reaches the oven in a more repeatable condition, even when the kitchen changes. Visit DBakerAid™ to see the precision system and explore recipes built around controlled dough preparation.