

Why do recipes give a dough weight for a pain de mie pan without checking how deep the pan is? A shallow sandwich tin and a tall Pullman can look similar from above, yet they need different dough loads to bake properly.
The useful starting point is internal volume, followed by a lid-rim test with your actual dough. That combination gets you closer to a square, evenly filled loaf than copying a recipe's pan length and hoping the lid will sort everything out.
Table of Contents
- Pan Sizes and Dough Weights at a Glance
- What a Pain de Mie Pan Is and How the Lid Shapes the Loaf
- Materials and Coatings Compared
- How to Grease, Season and Clean Your Pan
- Fixing Common Shape and Crumb Problems
- Choosing a Pan and Your First Loaf
Pan Sizes and Dough Weights at a Glance
Start with the pan's internal volume, then choose a dough weight that leaves room for proofing under the lid. For a 9 × 4 × 4-inch Pullman pan, about 800–900 g is a useful starting range; for a 13 × 4 × 4-inch pan, start around 1,100–1,200 g. These ranges are given in The Perfect Loaf's pain de mie guidance. Adjust for your dough and pan rather than treating either range as a fixed capacity.
Dough weight by pan size
| Pan size | Dough weight | Loaf and notes |
|---|---|---|
| Small pan, 8.5 × 4.5 × 2.5 in | About 600–700 g | Small sandwich or toast loaf |
| Standard Pullman, 9 × 4 × 4 in | About 800–900 g | Everyday sandwich loaf |
| Bakery-size, 13 × 4 × 4 in | About 1,100–1,200 g | Large family loaf |
| Long pan, 13 in | About 1,100–1,200 g | Starting estimate; confirm with the lid-rim test |
| Rule of thumb, any pan | About 100 g per linear inch | Rough cross-check; volume gives a better starting point |
Scale the formula by internal volume
Measure the pan inside, avoiding the rolled outer edges. Multiply internal length by width by usable height, using the same units for each measurement. For a tapered pan, this rectangular calculation will be approximate; use the manufacturer's stated capacity if available.
To adapt a successful formula to a similarly shaped pan, scale its total dough weight in proportion to the two pan volumes:
New dough weight = successful dough weight × new pan volume ÷ original pan volume
Keep the ingredients in the same proportions. A baker's percentage calculator can help preserve hydration, salt and enrichment when changing batch size.
Confirm the load with a lid-rim test
Shape the weighed dough into a level cylinder that fits the pan's length, then place it seam side down. At the start of final proof, the dough's highest point should be below the lid's path. Slide the lid briefly to check clearance, then remove it so you can monitor the rise.
The check is only a starting point. Dough that clears the lid early in proof may still press too hard against it later, while an underfilled pan can leave the upper corners short of dough. Adjust the next batch according to the proofed dough and the baked loaf.
Practical rule: Use volume to choose a starting weight. Use the lid-rim test and the baked corners to refine it.
Record the pan's internal dimensions, dough weight, flour, hydration and final proof position. Once the loaf fills the pan evenly without forcing the lid, keep that combination as your reference.
Consistent measurements also help when comparing other bakeware. Use this guide to find cake tins for consistent baking, comparing dimensions and construction rather than relying on a product photograph.
What a Pain de Mie Pan Is and How the Lid Shapes the Loaf
A pain de mie pan is a straight-sided rectangular bread tin with a sliding lid, designed to produce a fine-crumb sandwich loaf with a restrained crust. Mie means the interior crumb, so the name puts the emphasis on the part you slice rather than a thick, rustic exterior.
The same equipment is commonly sold as a Pullman loaf pan. Pullman describes the familiar lidded format, not a particular manufacturer.
Square lidded bread pans predate their railway association: Epicurious's Pullman pan guide places them in European baking practice as early as the 18th century. Their lasting value is practical: regular slices make sandwiches, toast and canapés easier to portion, while trimmings work well for croutons and breadcrumbs.
The lid controls expansion
Think of the lid as the top of a mould, not a loose cover. Once the rising dough meets it, further expansion must fill the available space, including the upper corners, instead of forming a rounded crown.
Cuisinopedia's Pullman pan explanation describes the lid as a mechanical control on oven spring and notes that the enclosed space retains moisture near the dough surface. In practice, that gives you a flatter top, a more regular cross-section and a thinner, softer crust than an uncovered loaf.
The trade-off is reduced tolerance for poor loading and mistimed proofing. An open loaf can grow upward; a closed loaf has nowhere to put excessive expansion except against the lid and through any gaps.
A lid also can't repair weak dough. Poor mixing, inadequate gluten development or a badly depleted sourdough will still produce disappointing bread, just inside a rectangular container.
Read proofing against the lid position
Watch the highest part of the dough, not just its ends. A sloping shape can touch the lid in the middle while leaving substantial empty space elsewhere.
Close the lid while it can still travel without scraping the dough. The useful endpoint is close to the underside of the lid, with enough remaining expansion to finish the shape during baking. Don't wait for dough to bulge through the rails.
- Keep the shape level. An evenly tensioned cylinder fills more predictably than a log with a thick centre and thin ends.
- Protect the rails. Dough smeared into the sliding channel can bake into a stubborn obstruction.
- Adjust the schedule. A warmer kitchen calls for earlier checks, not an automatic change in dough weight.
- Use the intended dough. Changing from white sandwich dough to whole-grain or protein-enriched dough requires fresh calibration.
A square loaf is the result of matching dough expansion to available space. The lid supplies the boundary, not the judgement.
Without a fitted lid, you can loosely cover the pan with foil or an oven-safe sheet pan to shelter the surface. Neither is a reliable substitute for a secured sliding lid, and you should expect a rounded top and a less constrained crumb.
Don't improvise a clamped or heavily weighted cover. Bake it as an open sandwich loaf instead of trying to force an unsuitable pan into becoming a pressure-resistant mould.
Materials and Coatings Compared
| Material | Heat and crust | Release and cleaning | Best for |
|---|---|---|---|
| Uncoated aluminum | Heats quickly and evenly; often gives a pale-to-golden crust | Needs thorough greasing; hand wash | Bakers who want precise control |
| Nonstick-coated aluminum | Conductive body supports even baking; finish affects browning | Releases easily; coating wears over time | Easy demolding and quick cleanup |
| Carbon steel | Responsive heating; dark finishes encourage a darker, crisper crust | Bare steel needs seasoning and full drying | Bakers who want more colour |
| Tinned steel | Thinner steel heats quickly and browns lightly; heavier steel moderates heat for a gentler, more even crust | Hand wash; grease well | Bakers who want traditional metal bakeware |
Material, finish and wall thickness all affect browning. Carbon steel isn't automatically dark, and a coated aluminum pan isn't automatically gentle on crust colour.
Uncoated aluminum is a useful baseline: grease controls release, while the lighter exterior is less likely to accelerate browning than a dark finish. Missed patches, especially around corners, can make demolding difficult.
Nonstick-coated aluminum releases dough readily, which is convenient for regular sandwich loaves. The trade-off is coating wear, so avoid scraping the surface with hard utensils.
Choose for the crust you actually want
Bare carbon steel suits bakers willing to maintain a seasoned surface. Some steel pans have a factory coating, so identify the finish before deciding how to care for it.
Tinned steel combines a steel body with a tin surface layer. Its thickness affects how quickly it heats: thinner pans tend to brown sooner, while heavier ones heat more steadily. Follow the maker's care directions to protect the finish.
A useful way to compare pans is by the dough volume they can hold, then test the fit with the lid rim. That gives you a starting point for your own pan rather than a weight to copy from another size or material.
- For a soft sandwich crust: Start with a lighter finish and a formula suited to lidded baking.
- For stronger browning: A darker finish can help; check the loaf earlier because the same schedule may brown it too much.
- For easy release: Look for an intact coating and lid channels that are easy to access.
A heavier pan can moderate heating, but weight alone doesn't guarantee even baking. Wall thickness, a flat base and a well-fitting lid also affect how the loaf bakes.
Ceramic-coated metal and clay bakeware are different categories. The clay loaf pan guide covers clay vessels, which shouldn't be treated as interchangeable with a thin metal Pullman pan.
How to Grease, Season and Clean Your Pan
Good maintenance starts with identifying the surface. Bare carbon steel, factory-coated steel and ceramic-coated metal don't all need the same treatment.
Use this maintenance sequence for the cleaning and drying habits that protect the pan.
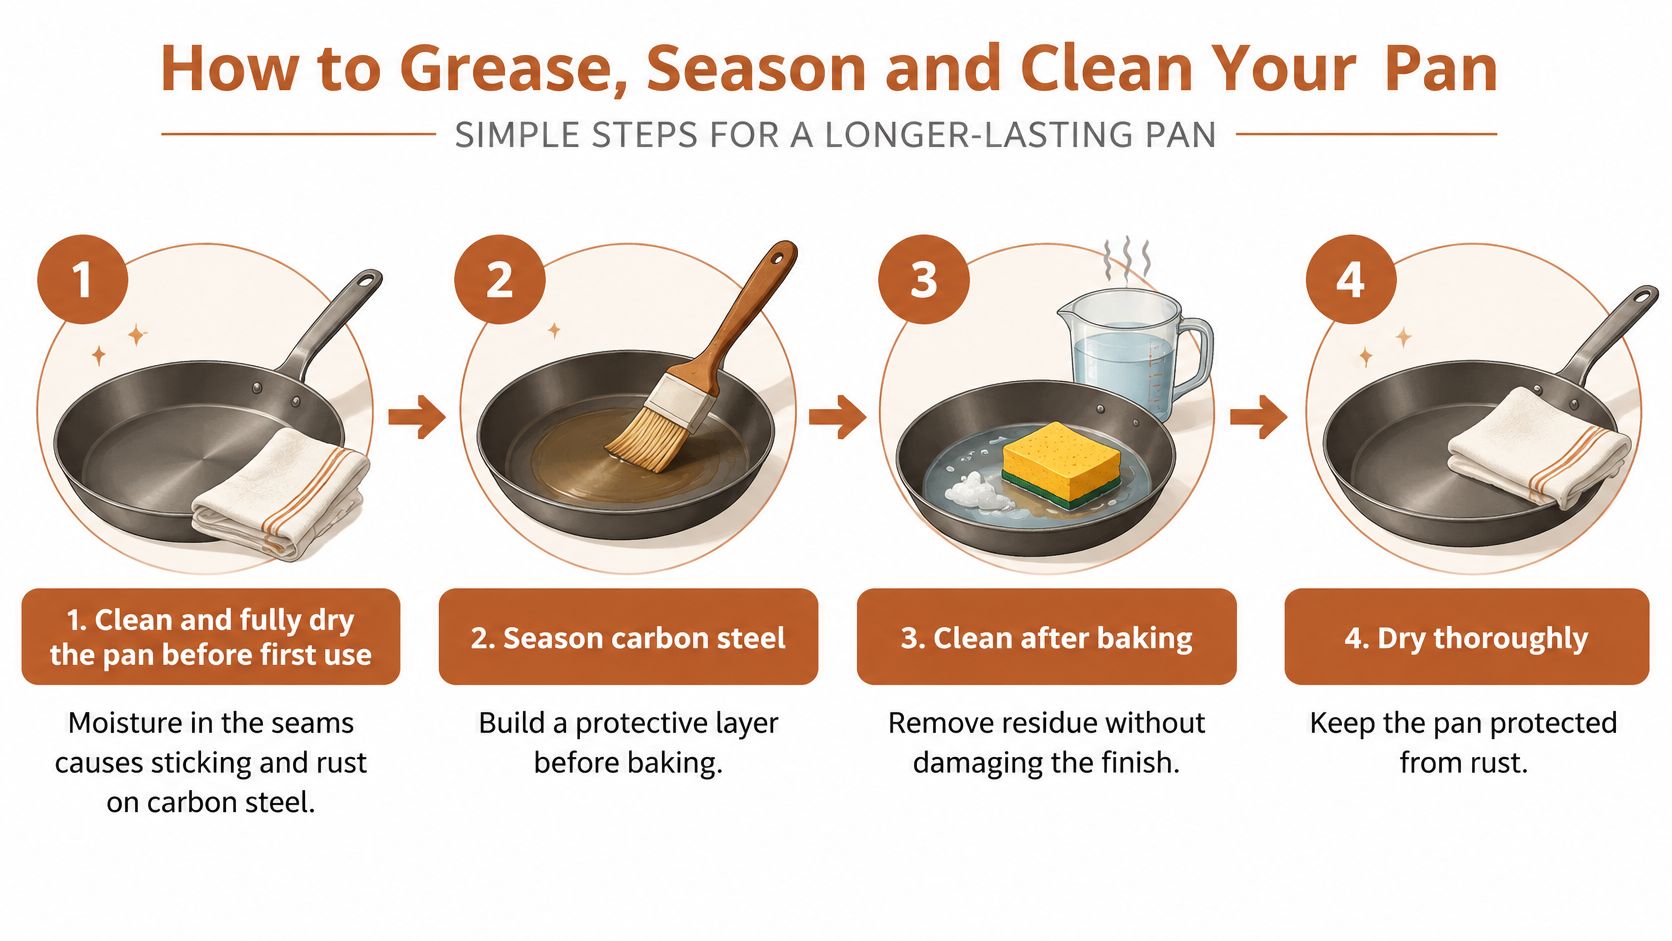
Prepare the surface and load the pan
- Wash and dry before first use. Remove packing residue with mild detergent and a soft cloth, then dry the seams and lid channels thoroughly. Moisture left in bare-steel joints encourages rust.
- Season bare carbon steel when the manufacturer calls for it. Wipe on a very thin coat of neutral oil and heat the empty pan using the maker's seasoning procedure, which establishes the protective layer. Don't season a nonstick or ceramic coating unless its instructions explicitly permit it.
- Grease the contact surfaces. Spread a thin, continuous layer of softened butter, shortening or suitable release fat over the base, walls and lid underside. Avoid thick deposits that collect in corners or gum up the sliding rails.
- Set the shaped dough seam side down. Keep the top level and clear of the lid path. A loose seam can open during expansion and leave an irregular base.
- Finish proofing with the lid position in mind. Slide the greased lid into place before the dough obstructs it. Forcing it across risen dough damages the surface and makes your proof endpoint harder to judge.
Unmould and store without damage
- Bake using the formula's schedule, then unmould carefully. Allow a brief settling period if the recipe calls for it, remove the lid without levering against the coating, and transfer the loaf to a rack. Cool the bread fully before slicing; prolonged cooling inside the pan can soften the sides with condensation.
- Clean while the pan is comfortably warm, not hot. Use a soft brush or sponge, avoid abrasive pads, and dry completely before storage. Don't soak bare steel or put it away with water trapped beneath the lid rails.
Storage check: Run a dry cloth along the seams and slide the lid once before putting the pan away. Damp joints and trapped crumbs are easy to miss.
Watch the accompanying demonstration alongside the written care routine, while following the instructions for your pan's particular finish.
Fixing Common Shape and Crumb Problems
Dough that rises into the lid track is the most obvious warning: the pan is overloaded, proofing has run too far, or both. Don't press it down with the lid and expect an even crumb.
Most shape faults are worth checking against dough weight, proof endpoint and release preparation before changing the recipe. Those checks are cheaper and more informative than immediately replacing flour or adding extra yeast.
Loaf symptoms, causes and fixes
| Symptom | Likely cause | Fix |
|---|---|---|
| Dough domes over the lid position | Too much dough or final proof too long | Reduce dough weight or close the lid earlier, according to when the problem appears |
| Voids near the top corners | Underproofed dough | Extend final proof toward the lid-contact point without allowing overflow |
| Dense, compressed upper crumb | Overproofed dough or overfilled pan | Shorten final proof or reduce dough weight |
| Dough tears on demolding | Lid underside not greased | Grease the lid underside and walls |
| Loaf leaks past the lid | Pan overfilled | Weigh dough precisely and reduce the load |
| Crust too dark | Dark pan or excessive baking | Lower oven temperature or check the loaf earlier |
Separate loading faults from timing faults
Ask when the problem first appeared. If the shaped dough already crowds the lid path, loading is the first suspect. If it begins with comfortable clearance but swells into the rails while you wait for the oven, scheduling is the more useful correction.
Empty upper corners don't always mean the pan needs more dough. Examine the rest of the loaf: a tight crumb and signs of strong tearing can point toward insufficient proofing, while a reasonably developed crumb inside an undersized loaf makes low loading more plausible.
Likewise, a compressed band at the top deserves a look at both proofing and capacity. Adding flour to stiffen the next batch may hide the symptom while changing the bread you intended to make.
Change a single variable per trial. Keep the formula and shaping method steady while adjusting either the load or the proof endpoint, then compare the results after the loaf has cooled.
Judge specialty dough on its own terms
High-protein bread dough won't necessarily look like ordinary white sandwich dough. Protein isolates alter water absorption, and the dough may feel denser, stiffer or tackier even when it's correctly mixed.
A properly made loaf can have a tight, uniform crumb and still feel heavier than an airy white loaf. Don't diagnose that expected texture as failed fermentation solely because it doesn't resemble supermarket sandwich bread.
Whey and collagen tend to preserve a cream-coloured interior; pea can introduce a grey-green cast and beany flavour, while soy and whole grains can darken the crumb. These are ingredient characteristics, not reasons to keep proofing until the loaf becomes fragile.
For faults that extend beyond pan shape, use the homemade bread troubleshooting guide to assess mixing, fermentation and baking separately. Cutting into hot bread, for example, can produce a gummy-looking crumb even when pan loading was correct.
Keep a photograph of the cooled cross-section beside your bake notes. Written observations such as “upper corners unfilled” are more useful than “needs improvement,” particularly when you're comparing different flours.
Choosing a Pan and Your First Loaf
What pan will suit your oven, your dough, and the amount of bread you use? Start with those practical limits rather than choosing the largest pan available. A large loaf only helps if you can eat it fresh or slice and freeze it promptly.
Check the details before buying
- Measure the pan and lid together. Check their exterior dimensions against your oven, and leave room to grip the hot pan safely. A projecting lid handle also affects storage.
- Choose by internal capacity. Match the pan's interior and intended dough load to your formula, rather than relying on the word “standard.”
- Consider how you divide dough. A matching pair makes it easier to split a batch evenly. Different sizes offer flexibility, but each needs its own loading record.
- Check the lid's movement. It should sit flush and slide smoothly. Look for a bowed panel, sharp burrs or distorted rails.
- Inspect the construction. Check for consistent wall thickness, a stable base and a clearly identified coating with care instructions.
The D'BakerAid™ Pullman Loaf Pan set includes two ceramic-coated pans and costs $49.95. Judge it by the same measures as any other pan: usable capacity, lid fit and whether a pair suits your baking routine.
Make the first bake a calibration loaf
Use a familiar sandwich dough for your first bake. Keep the flour, enrichment and shaping method steady so the loaf gives you a useful baseline. Measure the pan's interior, estimate a starting dough load from its volume, and weigh the shaped dough before placing it in the prepared pan.
Grease the lid and check that it moves freely. As the dough proofs, note its position relative to the pan rim. After baking and cooling, inspect the corners, top band and side crust. Underfilled corners suggest the load may be too small; dough pressed hard against the lid points to excess load or proofing.
A clean record makes the next adjustment clearer. Change either the dough load or the proof endpoint, not both, and compare the cooled loaf.
DBakerAid™ offers Pullman pans, recipe guides and a temperature-controlled fermentation and proofing system. You knead your dough, use the system for fermentation and proofing, then bake in your own oven. Visit DBakerAid™ to explore the equipment, or see the sourdough, pizza and brioche recipe guides for dough ideas to calibrate in your pan.