

Laminated dough recipes often reduce success to “fold, chill, repeat.” That sequence is incomplete. Temperature and butter plasticity determine whether folds stay distinct or collapse into dense, greasy dough. Before the first turn, the détrempe must be cool and workable, while the butter should bend under pressure rather than crack or smear. Controlled proofing can later reduce room-temperature swings, making the process more repeatable.
Laminated dough forms when butter is enclosed in yeast dough and folded repeatedly. In a commonly cited croissant formula, three turns create 27 alternating layers of dough and butter. The count describes the combined laminated structure, not 27 butter layers plus a separate set of 28 dough layers. A precise fold matters, but it cannot rescue butter with the wrong plasticity.
The method belongs to a long baking tradition. The BBC's history of the croissant traces croissant history through earlier pastries and roots linked to the Arab world by the 13th century, while describing the development of the modern French version. The technique became closely associated with early 20th-century French baking, including Sylvain Claudius Goy's 1915 recipe using laminated yeast dough. The Institute of Culinary Education's history places that milestone in the transition toward the light, flaky croissant familiar today.
Table of Contents
- Why Temperature Matters More Than Folding Technique
- Building the Détrempe and Butter Block
- Mastering the Butter Plasticity Window
- Executing the Turns and Resting Cycles
- Precision Proofing and Oven Spring Dynamics
- Troubleshooting Common Lamination Failures
Why Temperature Matters More Than Folding Technique
Keeping the dough and butter in a rollable physical state is harder than folding a rectangle accurately. Every turn depends on both materials deforming together. A precise fold cannot repair butter that cracks, smears, or disappears into the dough.
Start with the détrempe at about 22–25°C, then assess the butter by plasticity rather than by refrigerator temperature alone. The laminated dough formulas from Domson emphasizes that dough and fat need compatible working qualities. A cold butter block may still be too brittle. If the dough bends while the butter snaps, the first roll will split the layers before the lamination has a chance to develop.
Practical rule: Match butter flexibility to the dough, not just the temperature on the thermometer.
Use your hands and the rolling pin as measuring tools. Properly tempered butter compresses under pressure and rolls into a continuous sheet without splintering. The dough should feel cool and supple, with enough resistance to hold its shape. Shards of butter can puncture the détrempe and create leakage paths. Butter that smears coats the dough unevenly, reducing separation and producing a heavy pastry.
A simple “fold and chill” schedule cannot account for those changes. Refrigeration may firm the butter while leaving the gluten tense, or relax the dough while making the fat too hard for the next roll. Judge the package as a whole before continuing. If the surface feels greasy, chill it. If the butter fractures at the edges, allow it to temper before applying more pressure.
Precision proofing equipment helps reduce the environmental swings that make this judgment harder. A controlled chamber can hold the set temperature and humidity more consistently than a warm kitchen or a drafty oven, giving the dough a narrower, repeatable range through fermentation and proofing. It does not correct poor butter plasticity, but it removes one major source of variation.
Croissant dough is a yeast-leavened laminated dough, with fermentation and lamination influencing each other. The folds must preserve distinct fat barriers, while fermentation must generate gas without warming the butter beyond its workable range.
Building the Détrempe and Butter Block
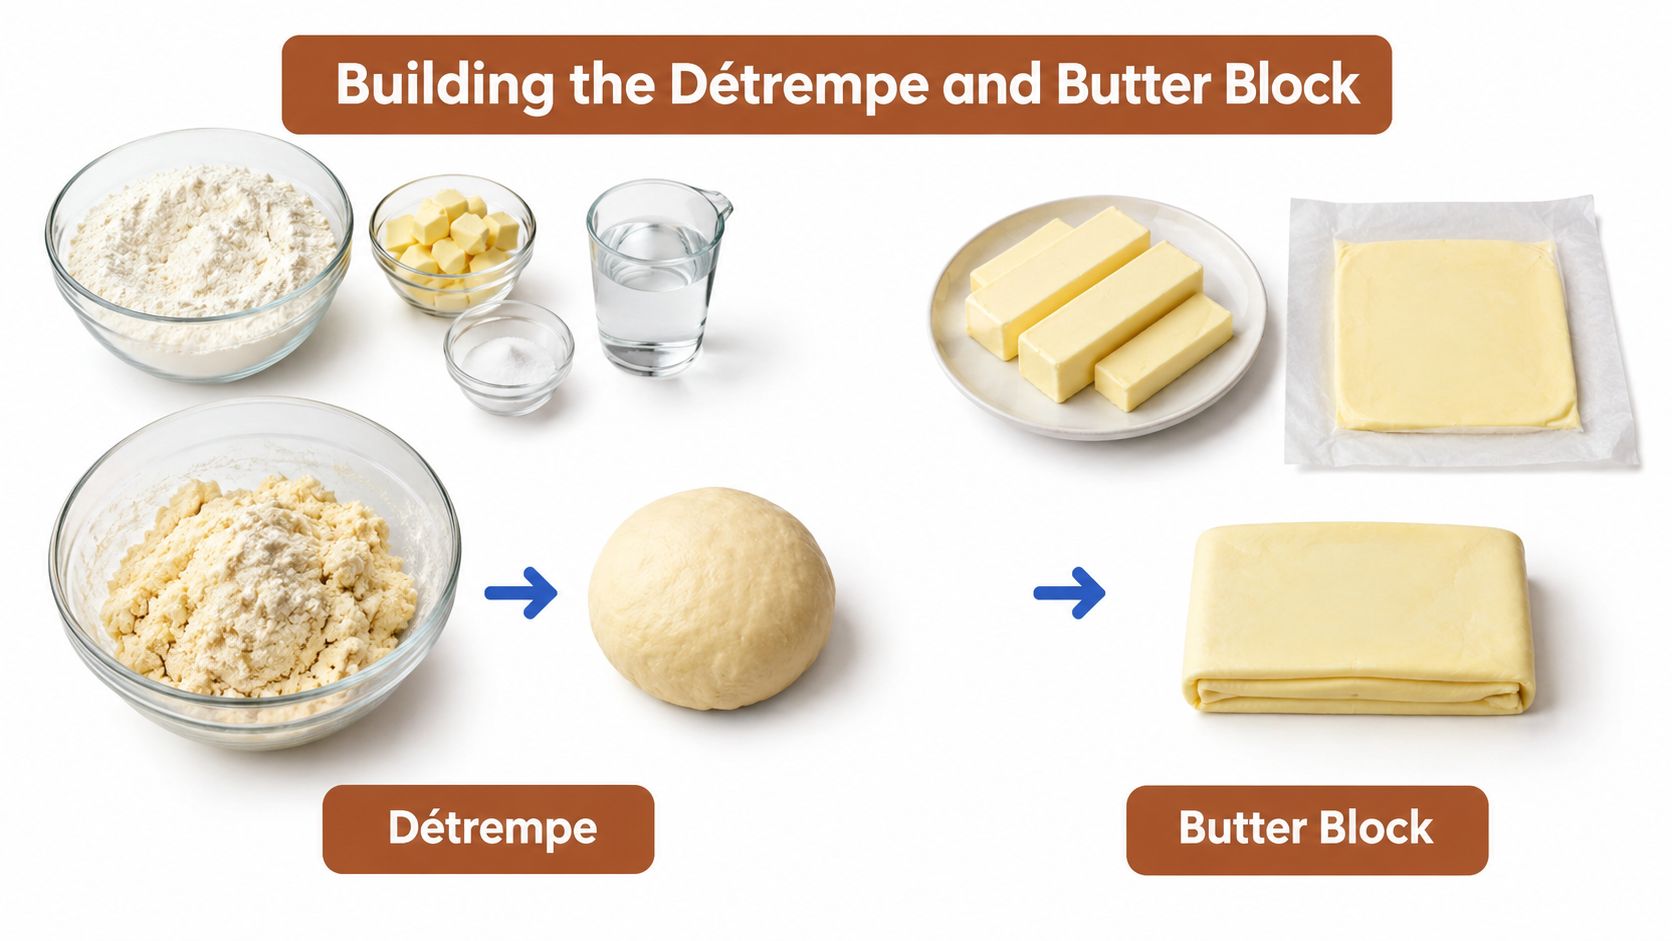
The first turn succeeds or fails before the butter enters the dough. A détrempe that is too warm, too elastic, or poorly shaped leaves little room to correct the package later. Choose flour with enough gluten-forming capacity to hold its shape through repeated rolling, then stop mixing once the dough is cohesive and moderately developed. Excessive gluten development makes the dough spring back and pulls the rectangle out of alignment.
Keep the détrempe near 22–25°C before enclosure. This gives the dough enough strength to support the butter while preserving the extensibility needed for the first roll. Dough that leaves the mixer warm and sticky has already reduced your working margin. Precision proofing equipment can help control the surrounding temperature and humidity later, but it cannot repair dough that was mixed too warm.
Prepare the two components separately
Shape the détrempe into a compact rectangle, wrap it, and cool it before enclosure. Make the butter block, or beurrage, even in thickness with clean edges. Thick areas resist the rolling pin, while thin areas leave sections of dough with little fat protection. Both defects disturb the layer pattern from the first turn.
Butter plasticity matters more than surface firmness. A plastic butter slab deforms under pressure instead of cracking or flowing. Work the butter until its texture is consistent and bendable, then shape it to match the dough's geometry. A slab that is cold but brittle will fracture during rolling. A slab that is warm and greasy will smear into the détrempe.
Enclose the butter completely. Seal the seams carefully, keeping thick folds of dough out of the corners. Uneven corners make the first turn harder and create local areas where the dough and butter roll at different rates.
For a clear explanation of the components and terminology, consult this guide to what laminated dough is. Knowing the distinction between détrempe, beurrage, and the enclosed package makes later diagnosis easier. An enclosure defect behaves differently from a problem caused by rolling temperature.
Start the first roll with controlled pressure. Press the package gently to distribute the butter, then lengthen it through progressive passes. Keep the pressure even and avoid repeatedly attacking one spot. The target is a straight, consistent band of dough and butter, with enough thickness to protect the layers.
A short visual demonstration can help you compare the dough's resistance with the movement of the rolling pin.
Cracked butter requires a pause. Check whether the détrempe has split, then cool the package until the butter can be pressed and rolled rather than shattered. If the butter has started to smear, chill it before the layers blend into a single greasy sheet.
Mastering the Butter Plasticity Window
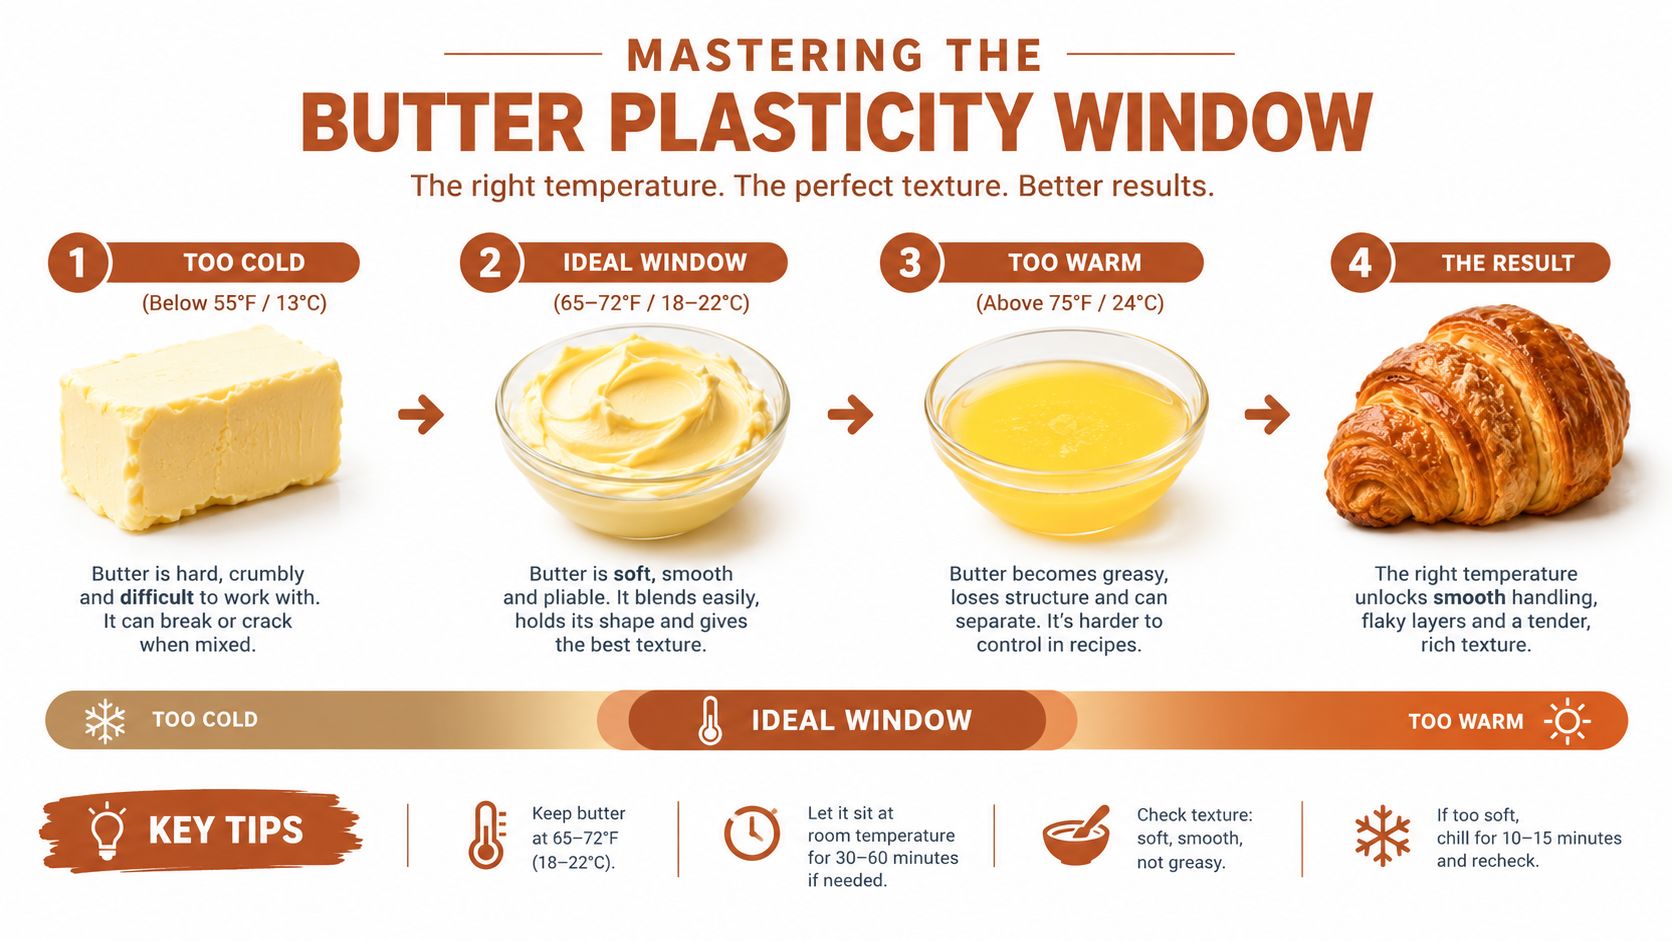
Perfect folds cannot rescue butter that is outside its working range. In laminated dough, butter plasticity often determines whether the layers stay distinct more than the appearance of the fold itself. Practical guidance and controlled technical work place butter-based tourage around 12–15°C, with some industry guidance describing workable conditions around 13–15°C or 14–17°C, depending on the fat and process. Domson's explanation of how fats work in baking connects this range to butter's behavior under the rolling pin.
Below roughly 10–12°C, butter becomes brittle enough to crack and shatter. Above roughly 18–20°C, it softens and smears into the dough. Treat these figures as warning boundaries, not permission to work casually at room temperature. The goal is a fat sheet that bends and spreads under pressure while remaining separate from the dough.
Read the failure before it spreads
Cold butter makes the rolling pin compress the dough around rigid fragments. Those fragments may puncture the dough, especially at corners and seams. Once butter breaks through, flour and moisture enter the opening, and a later turn will not restore one continuous fat layer.
Warm butter produces a different failure. It smears instead of forming a defined sheet, coats the dough, shortens the gluten surface, and removes the separation needed for lift. The pastry may show layers around the edges while staying dense through the center.
Use touch, sight, and resistance together:
- Cracking: White fractures or a snapping sensation means the butter needs to temper before rolling continues.
- Smearing: Greasy marks on the bench or butter dragged into the dough mean the package needs cooling.
- Elastic resistance: Repeated contraction after rolling shows that the gluten needs more relaxation time.
- Clean extension: A cool, even package that lengthens without tearing is ready for the next turn.
Match the correction to the defect. Fractured butter needs gentle tempering and less pressure. Smeared butter needs refrigeration, not extra flour. Flour can hide grease temporarily, but it cannot rebuild the lost layer geometry.
Resting between turns lets the fat re-crystallize and the gluten relax. Technical guidance recommends a refrigeration rest of 15–30 minutes between folds for butter-based doughs. This pause belongs in the workflow because the fat needs time to regain a workable structure before the next reduction.
Use a temperature-controlled proofing cabinet or another controlled environment during rests when room conditions fluctuate. It reduces ambient variables, but it does not replace checking the dough itself. Abort the session if the butter reaches the warm boundary and leaves a greasy film on the bench. If the package feels rigid and fractures under light pressure, let it temper before applying the rolling pin.
Executing the Turns and Resting Cycles
Once the butter is enclosed, the fold pattern determines how the dough will handle and how the baked crumb will develop. Croissant-style dough commonly uses three single folds. A combination of one letter fold and one book fold can also suit the dough and product style. Domson's laminated dough fundamentals explains how fold count affects layering, handling, and finished texture.
A single fold adds layers at a measured rate. A book fold creates more internal divisions in one operation, while placing greater stress on the dough and making even rolling harder. Choose the fold pattern before starting, then follow it consistently. Extra folds increase handling and can compress the butter, weakening the layer geometry.
Roll in controlled reductions
Roll from the center outward, keeping the ends squared. A single large-diameter sheeting roll should achieve only about a 2:1 or 4:1 reduction, according to baking-industry guidance. Baking Business's theory and practice guidance warns that tighter settings can disturb the dough structure.
At home, avoid forcing a thick package through a narrow gap in one pass. Roll gradually, rotate or reposition the dough when needed, and brush away loose flour without drying the surface. If the dough contracts after rolling, pause and let it relax. Continued pressure stretches the gluten and makes the butter layers thinner and less even.
Use this sequence:
- Roll the enclosed package into a long, even rectangle.
- Complete the chosen single or book fold, keeping loose flour out of the layers.
- Wrap the dough and refrigerate until the butter is stable and the dough has relaxed.
- Rotate the package consistently before the next turn so the layers develop in an organized direction.
- Stop immediately if butter cracks, leaks, or starts to smear.
A turn is complete when a cut edge shows clean, alternating dough and butter layers.
The final rest needs more time than the short pauses between turns. Plan the final rest at roughly 3°C for two or more hours so the gluten relaxes and the fat re-crystallizes before sheeting. This longer pause reduces tearing and smearing during the next handling stage.
A controlled proofing cabinet can hold the resting temperature steady when room conditions fluctuate. It reduces environmental variation, while the dough still requires direct inspection. If butter leaves a greasy film on the bench, stop and cool the package. If the dough feels rigid and fractures under light pressure, allow it to temper before rolling.
For a related explanation of how folds create flaky structure, see this guide to making puff pastry from scratch. Yeast-leavened croissant dough follows different fermentation and proofing requirements, so apply the folding principles with care.
Precision Proofing and Oven Spring Dynamics
Proofing can ruin sound lamination faster than an imperfect fold. Croissants are commonly proofed around 25–28°C, while butter's approximate melting range is 30–34°C. Domson's guide to roll-in fat selection explains why the proofing environment must stay below the fat's melting range. The dough needs warmth for expansion, while the butter must remain firm enough to support distinct layers.
Kitchen conditions change constantly. A draft, oven light, patch of sunlight, or nearby appliance can push dough from slow fermentation toward softened butter before the change is obvious. A precision proofing system such as D'BakerAid controls fermentation and proofing time and temperature, reducing those environmental swings during difficult dough work. Its companion recipes also include laminated preparations, making it useful when repeatability matters more than just following a folding sequence.
Judge readiness by the dough's condition. Shaped croissants should look expanded and feel light, with defined layers still visible. Butter that glistens or pools signals excessive warmth. Dough that feels tight and heavy may need more fermentation, but increasing the temperature beyond the fat's safe range will trade proofing speed for damaged lamination. For a full walkthrough of readiness cues and timing, see this guide to how to proof croissants.
Corman's professional instructions specify 95–100 minutes in a proofing oven at 26 and 31°C, depending on the butter used. Corman's croissant dough instructions demonstrate why a single timer or temperature cannot suit every lamination fat. Use the dough's expansion and the butter's behavior together.
Protect the first minutes of the bake
Oven spring usually takes place during the first 10–15 minutes, as expanding gases and steam press against the layered structure. Domson's oven-science guidance notes that steam is vented after oven spring so the crust can dry quickly. For crusty products, steam injection is typically vented around 8–12 minutes for most rolls and small loaves.
Laminated pastries need enough moisture for lift without a damp crust. A controlled bake lets the layers expand before the exterior sets, then dries the surface until crisp. Opening the oven too early can release heat and steam before the structure stabilizes. Excess humidity held too long softens the finish.
Proofing and baking work as one temperature sequence. Cold, intact layers need a controlled warm-up, while the oven must deliver early heat and moisture without allowing the butter to run ahead of the dough.
Troubleshooting Common Lamination Failures
Lamination problems are easier to correct when you identify the first visible symptom rather than judging the finished croissant alone. Butter leaking during rolling points to a different cause from butter leaking during proofing. A dense center may reflect smeared fat, overworked dough, insufficient fermentation, or a combination of those problems.
| Visual Symptom | Root Cause | Corrective Action |
|---|---|---|
| Butter cracks through the surface during rolling | The butter is too cold or the dough and butter have mismatched plasticity | Pause and temper the package until the butter bends instead of shattering. Patch small breaks with dough and chill before continuing |
| Greasy streaks appear on the bench | The butter is too warm and is smearing into the détrempe | Refrigerate the package. Don't add flour to hide the grease, because flour won't rebuild separated layers |
| The rectangle contracts after every pass | Gluten is too tense or the dough has been worked too aggressively | Stop rolling and give the package a refrigeration rest so the gluten can relax |
| Croissants spread or collapse during proofing | The proofing environment is too warm, allowing the fat to soften or melt | Lower the proofing temperature and watch the dough rather than relying on a fixed timer |
| The baked crumb is dense and bread-like | Butter layers merged, the dough was rolled too aggressively, or the package warmed during handling | Protect the butter window, use controlled reductions, and chill whenever the dough becomes soft or greasy |
| The crust colors faster than expected | Protein-rich or enriched dough can brown quickly, especially when the surface dries early | Monitor the bake closely and protect the surface if needed without extending heat exposure unnecessarily |
A professional reference gives a useful benchmark for the relationship between proofing conditions and the butter used. Corman's instructions use 95–100 minutes at 26–31°C, depending on the butter. That range isn't a universal command for every laminated dough, but it confirms the practical principle: proofing time and temperature must be adjusted to the fat and the dough, not copied blindly from another recipe.
If butter breaks through during a turn, the safest rescue is to stop before the breach expands. Chill the package, brush away loose flour, and continue with lighter pressure only when the butter has recovered its plasticity. If the layers have already smeared across a large area, the bake may still be edible, but it won't have the lift of properly separated lamination.
Diagnostic habit: Record the dough temperature, butter behavior, rest length, and proofing condition after every failed bake. The pattern will usually reveal whether the problem was thermal or mechanical.
The most repeatable laminated dough recipe is not the one with the most elaborate fold sequence. It's the one that tells you when to roll, when to stop, and when the dough needs more time before the next decision.
DBakerAid™ brings controlled fermentation and proofing to home baking, which directly addresses the temperature swings that can damage laminated dough between turns and during final proofing. Visit DBakerAid™ to explore the system and use its recipe guidance for more repeatable pastry results.