

You can follow a puff pastry recipe to the letter and still end up with a flat, greasy sheet that looks nothing like the photo. That usually isn't a talent problem. It's a temperature problem, a timing problem, or both, and home bakers feel it most when the kitchen is warm, the butter softens too fast, or the dough fights back during rolling.
Puff pastry from scratch rewards patience more than force. The dough only rises properly when butter stays in separate layers, gluten stays relaxed, and the oven gives the layers a fast burst of steam before the structure sets. That's why the same recipe can produce crisp shattering pastry one day and dense disappointment the next.
Table of Contents
- What Puff Pastry Actually Is and What You Need
- Making the Dough and the Butter Block
- Folding, Resting, and Building the Layers
- Shaping, Baking, and Finishing the Pastry
- Why Homemade Puff Pastry Fails and How to Fix It
- Rough Puff vs Full Puff and When to Use Each
- Storage, Scaling, and a Repeatable Workflow
What Puff Pastry Actually Is and What You Need
Puff pastry is a laminated dough, which means dough and fat are stacked into thin alternating sheets so water in the dough and butter can turn to steam in the oven and push those layers apart. That principle shows up in the history of the pastry itself, with references reaching back to at least 1311 in France, an early Spanish description by 1607, and François Pierre de la Varenne's explicit French tourage method in 1651 as documented in the pastry's history.
The ingredients that matter
You do not need a long ingredient list, but the ingredients you choose matter. High-protein bread flour gives the dough enough structure to hold the layers, European-style butter gives you better plasticity, and cold water keeps the whole system from turning greasy too early. Salt sharpens flavor, while a small amount of acid or vodka can help keep gluten from tightening too fast.
Practical rule: treat the dough like a temperature-sensitive project, not a casual mix-and-roll job.
The technical target is a lean dough with a butter block enclosed inside it, then folded repeatedly until you've created many alternating fat-and-dough layers. In professional baking, the butter's working range matters a lot, because one source notes that the butter block should sit around 14 to 16°C, since it can fracture below 12°C and smear above 18°C according to laminated-dough guidance. That range is why a cool room, cold ingredients, and fast hands matter so much.
The tools that save you from trouble
A digital scale keeps the dough consistent, a rolling pin gives you even pressure, and a bench scraper helps keep edges square without warming the dough with your hands. A ruler is more useful than most bakers expect, because uneven thickness leads to uneven rise. A probe thermometer helps you check whether the dough is drifting out of its safe range.
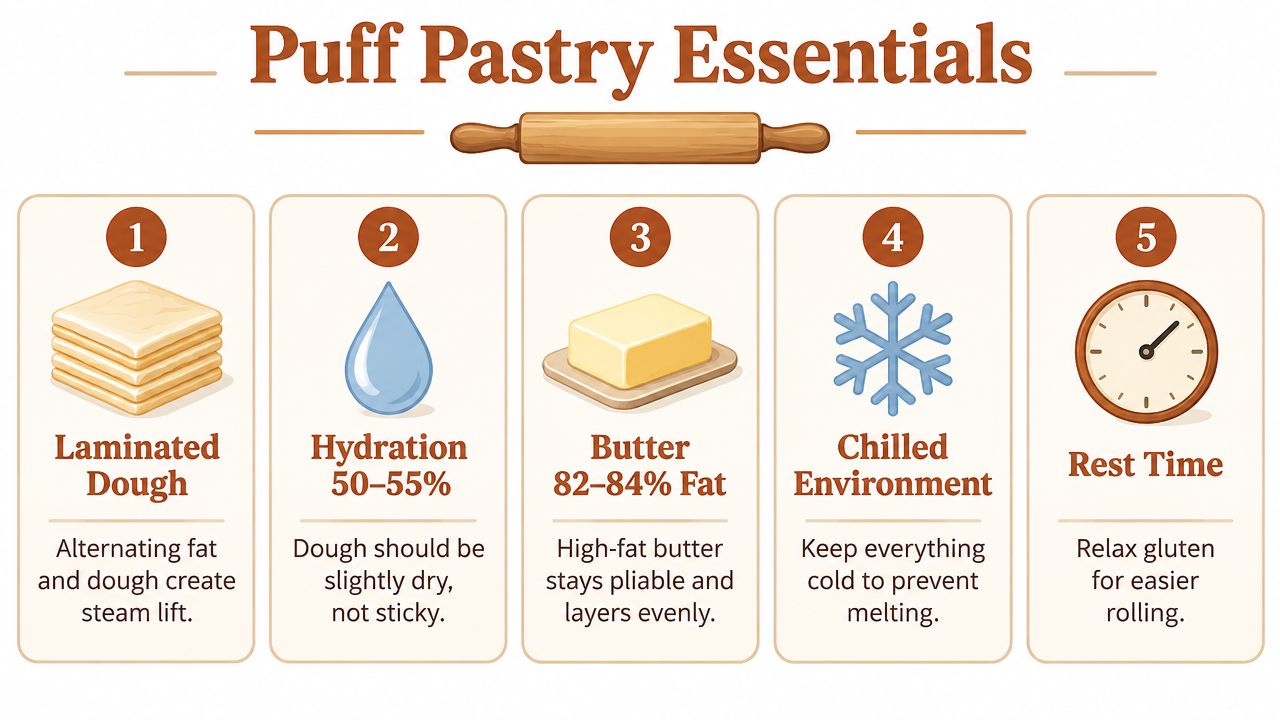
Keep the dough around 55 to 60°F, the butter around 60 to 65°F, and the work surface near 68°F if you can. If your kitchen won't cooperate, a precision proofing system with stable temperature and humidity can hold those targets without a dedicated cool room, and that matters more than pretending every home kitchen behaves the same.
Making the Dough and the Butter Block
Start with the détrempe, the base dough that will eventually wrap the butter. Whisk the flour and salt together, then add cold water gradually until you get a shaggy mass that just holds together. Knead only briefly, just enough to make it smooth and elastic, because extra kneading strengthens gluten and makes the dough resist the folds later.
Wrap the dough tightly and rest it at least an hour. Overnight in the fridge is even better if you want the gluten to fully relax, because tense dough shrinks back when you try to roll it. The dough should feel cool and calm, not bouncy and springy like bread dough.
Build the butter block to match the dough
Place cold butter between parchment sheets and pound it into a flat square, roughly 7 to 8 inches across if that fits your recipe shape. You want it cold, but not brittle. When you press it, it should bend without cracking, because a cracked butter block tears the dough and a soft, smeary block disappears into it.
Here is the practical cue most home bakers can trust. If you poke the dough, it should bounce back slowly. If you lift the butter sheet, it should flex instead of snapping. When both pieces feel close in firmness, the first lock-in fold goes much more smoothly.
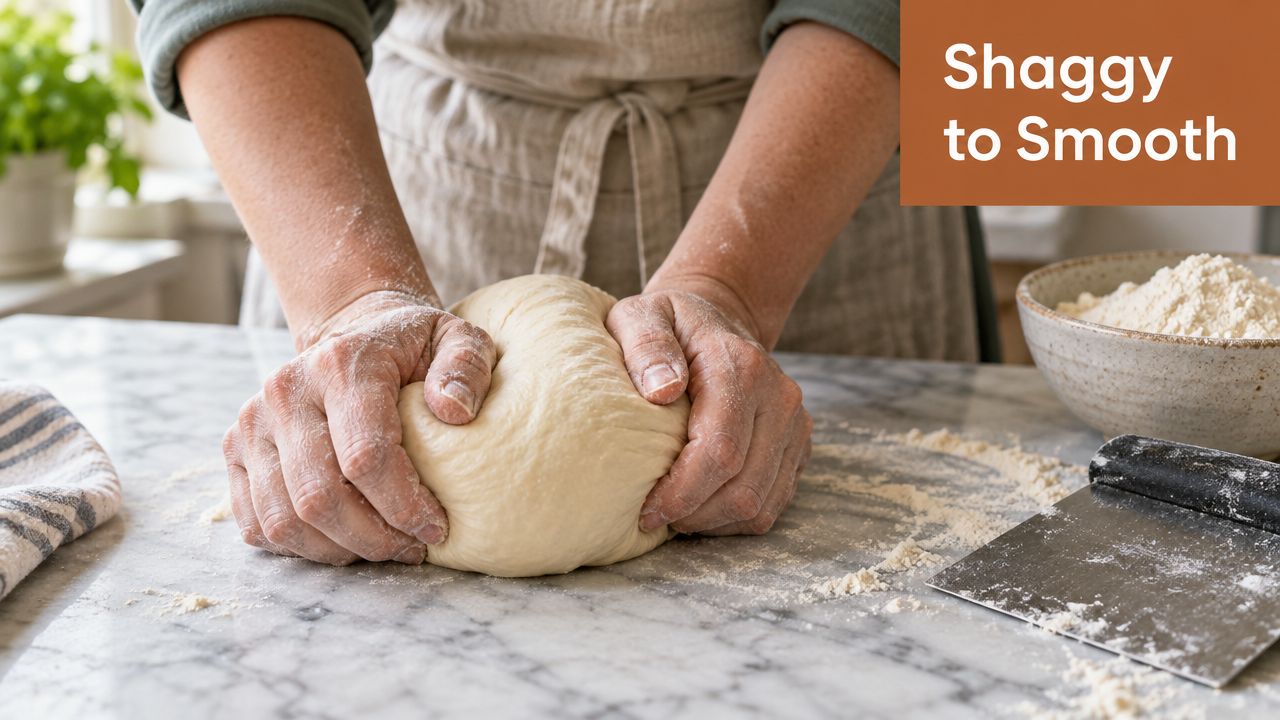
A temperature-stable environment helps here because the dough can sit at a calm working firmness while you shape the butter block. That matters more than rushing. A chilled dough that stays pliable is easier to seal around the butter, and a butter block that holds its shape stays in discrete layers instead of bleeding into the flour.
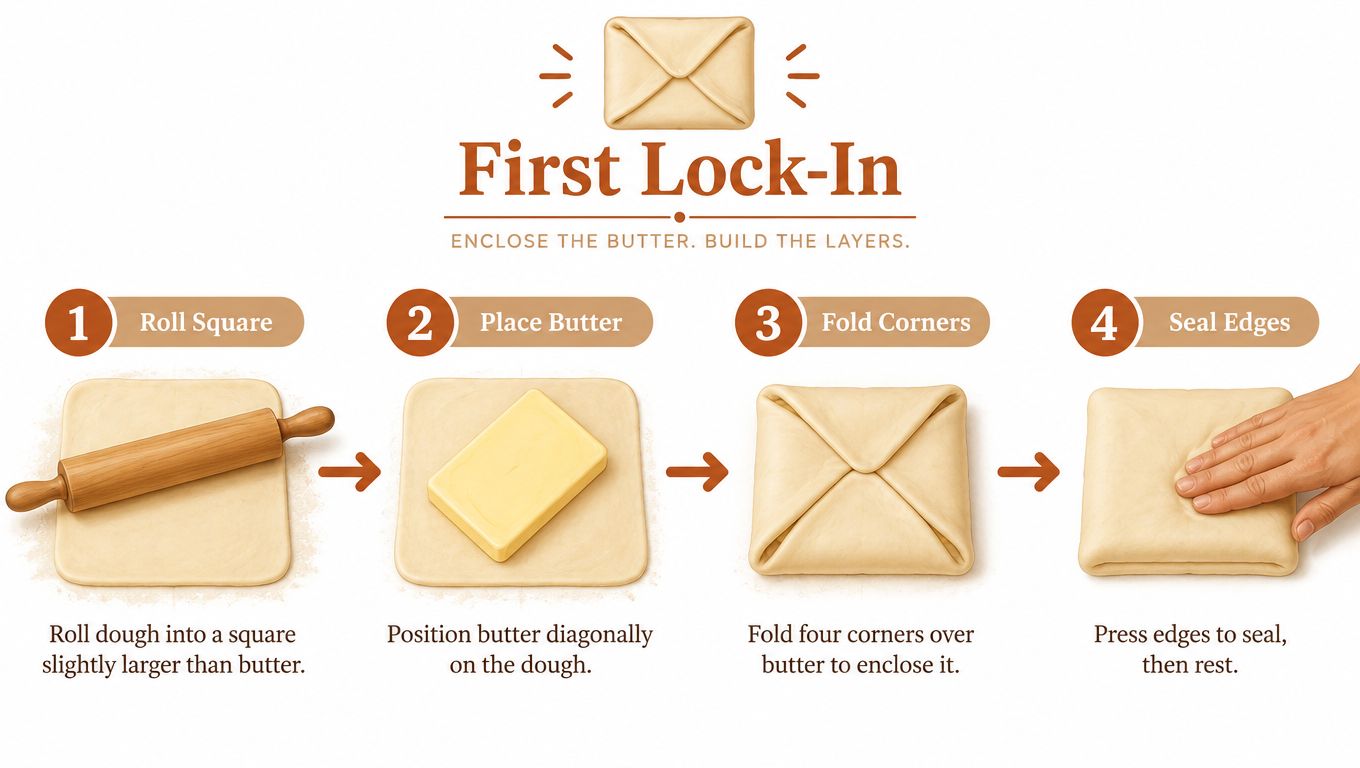
After the dough rests, roll it out just enough to match the butter. Place the butter in the center, fold the dough around it like an envelope, and pinch the seams shut. The goal is not beauty at this stage. The goal is keeping the butter fully enclosed so the first turn starts with clean edges.
Folding, Resting, and Building the Layers
The first turn is where the pastry starts becoming puff pastry. Roll the parcel into a rectangle, keep the edges straight, and use steady pressure rather than hard pressure. If the butter starts to slip or the dough feels sticky, stop and chill it before going any farther.
The fold pattern that actually works
A single fold or letter fold is the classic workhorse because it multiplies layers cleanly. In the technical notes behind laminated dough, a single letter fold triples the layer count per turn, so 3 turns can theoretically create about 27 layers before further subdivision and oven expansion as explained in the lamination guidance. That math is useful, but the job is keeping the layers distinct enough to survive the oven.
Clean edges matter. If you press a dull blade into laminated dough, you can pinch the layers shut and lose rise.
After each fold, turn the dough 90° so you keep the shape rectangular and the layers even. Chill between turns, because the rest is not downtime. It lets the gluten relax and gives the butter time to firm back up so the next roll doesn't smear everything together. Home bakers commonly use multiple folding cycles, and methods often recommend four to six turns depending on the dough's handling tolerance as noted in practical baking guidance.
Use the dough's feel as your guide between turns. It should be cool, pliable, and slightly tacky, not oozing. If butter appears at the surface, chill the sheet for 10 to 15 minutes and come back when it firms up again.
The schedule matters because the pastry only stays cooperative when the layers remain separate. A controlled rest at roughly 40°F removes a lot of guesswork, especially at home where room temperature drifts all day. That is the part many recipes gloss over, even though it's the difference between crisp lift and a sealed lump of dough.
Shaping, Baking, and Finishing the Pastry
Once the pastry has rested after its final turn, roll it to the thickness your application needs. Around 3 mm works for croissants, while 4 to 5 mm is more common for tart shells. Keep the sheet even, because thick and thin patches bake at different speeds and rise unevenly.
Cut cleanly, then chill again
Use a sharp blade when you cut shapes. Clean cuts help the layers rise straight up instead of sealing together at the edge. If you're making a base that needs to stay flat, dock the surface where needed so steam can escape in controlled spots instead of ballooning the wrong section.
Egg wash should be light and only on exposed surfaces, not dripped onto cut edges where it can glue layers shut. Shape the pieces, then chill them for 15 to 20 minutes before baking. That final rest firms the butter and relaxes any tension from shaping, which helps the pastry enter the oven in a stable state.
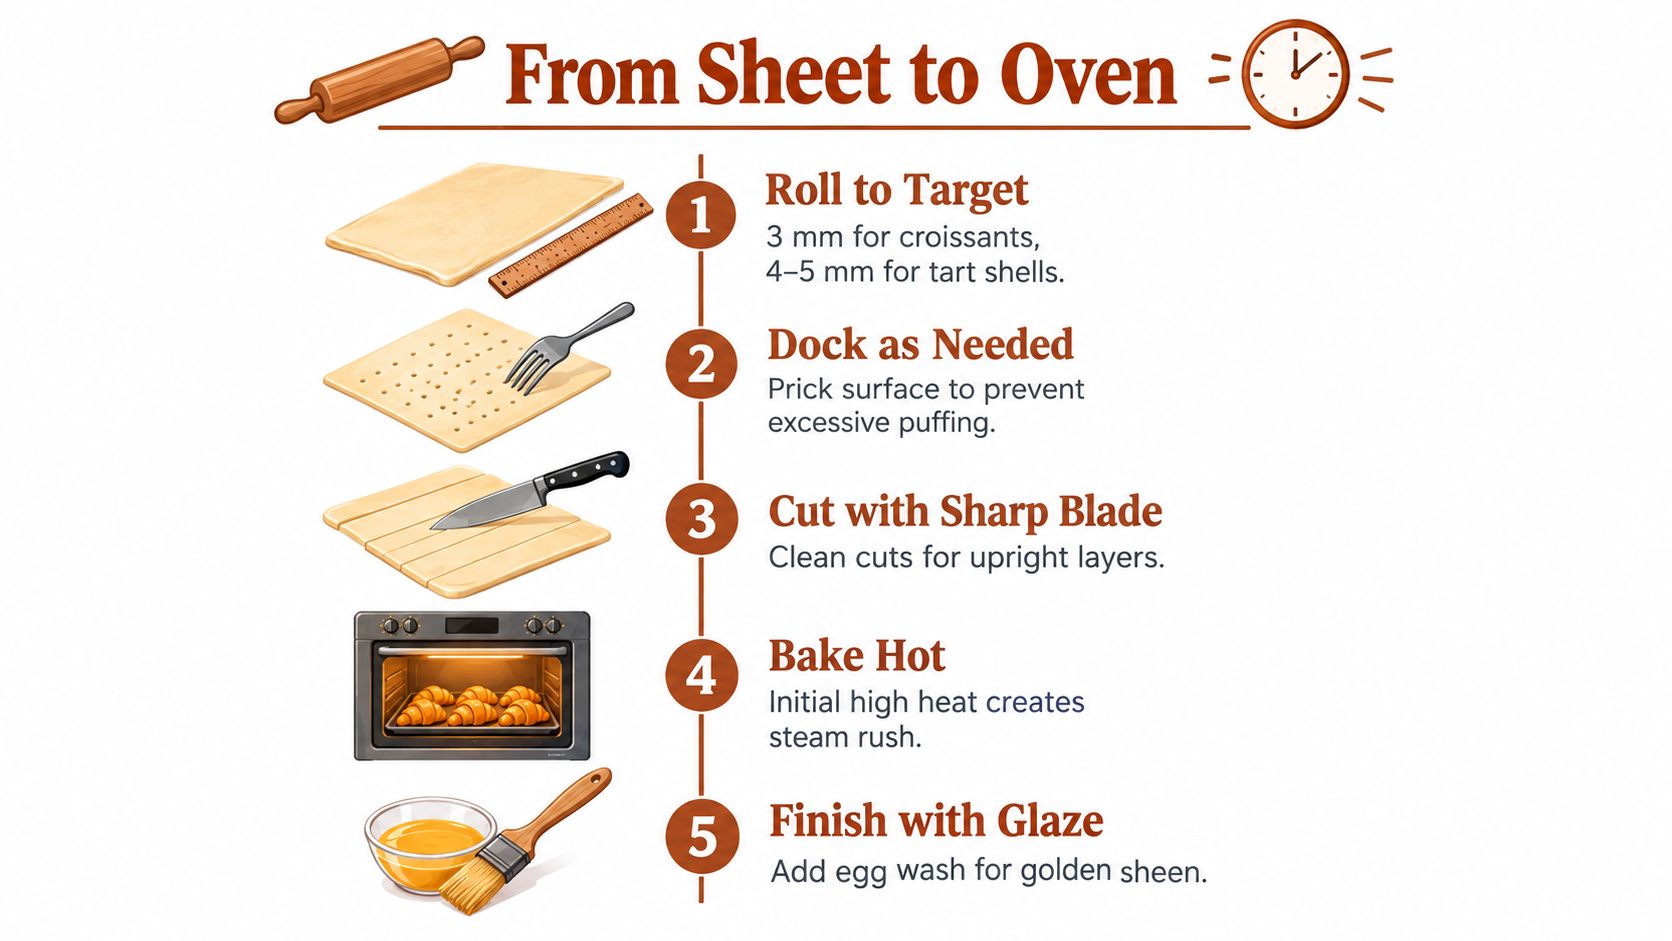
Bake hot at 220°C at first so the butter flashes to steam fast, then reduce to 190°C and let the pastry finish to a deep golden color. The first burst of heat is what drives lift before the structure sets, which is why a timid oven often gives flat pastry instead of crisp layers as described in laminated-dough science. If you can, keep the oven environment moist at the start, then let it dry out as the pastry finishes.
The finished pastry should rise evenly, smell buttery, and sound hollow when tapped. On cooling, it should give a crisp shatter, not a soft collapse. For tart shells, blind baking with weights like rice helps protect the base, and a final glaze can add shine without drowning the layers.
Why Homemade Puff Pastry Fails and How to Fix It
A sheet can look perfect on the bench and still bake flat, greasy, or uneven. In most cases, puff pastry is a temperature-and-timing problem first, and a technique problem second. The dough and butter must reach each stage with the right firmness, while rests give gluten and fat time to settle.
Diagnose the failure by its timing
Butter breaking through usually means the dough and butter were not equally firm, or the sheet was rolled unevenly. Stop before repairing it with extra flour. Wrap the pastry and return it to a stable 40°F rest for 15 minutes, then resume with lighter, centered strokes.
No rise can follow overworking, insufficient resting, or a bake that starts too gently. Uneven puff often begins with inconsistent thickness or a cold spot created during handling. Turn the dough 90° between folds and check the sheet by touch and sight before continuing. Shrinking signals that the gluten needs more time to relax, especially after shaping.
Greasy layers show that butter melted before the oven could convert its water into steam and separate the sheets. Timing matters here: a controlled pause is more reliable than repeated rolling. For a controlled proofing workflow that prevents butter melt-out, see how to proof croissants consistently.
A recent evidence-focused summary identifies soggy bottoms as a possible result of condensation reabsorption during cooling, not only underbaking as noted in the puff pastry dough summary. Let baked pastry release steam on a rack rather than trapping moisture beneath it.
Read the pastry before choosing the fix
A tight dough needs rest. Butter that smears needs chill time. A lopsided sheet needs correction during rolling, because the oven cannot repair uneven layers.
Home bakers often keep working through these warnings, then create more damage with pressure and flour. Pause as soon as the pastry feels too warm or too tense. Stable conditions, held for the planned time, remove more failure points than force does. A precision proofing or fermentation system can help maintain that repeatable timing and temperature at home, particularly when room conditions change.
Rough Puff vs Full Puff and When to Use Each
Rough puff and full puff are cousins, but they behave differently in the kitchen. Rough puff mixes the butter into the dough earlier, then relies on a few folds to create flakiness. Full puff builds a separate butter block first, then lamination does the rest.
Choose the method based on the job
| Factor | Rough Puff | Full Puff |
|---|---|---|
| Time | Faster | Slower |
| Technique | More forgiving | More precise |
| Layer quality | Flaky and irregular | More uniform and taller |
| Best use | Rustic galettes, sausage rolls, quick tarts | Millefeuille, vol-au-vents, elegant pastry shells |
Rough puff suits you when the filling and the shape matter more than perfect height. It's the practical choice when you want something flaky without committing a whole day to chilling and folding. Full puff is the right call when you want clean lift, crisp strata, and a pastry that looks engineered.
The ingredient overlap is part of what makes this comparison so useful. You're still using flour, fat, water, and salt. What changes is the way the fat enters the dough and how carefully you manage the layers.
If you want a faster route to laminated pastry, one practical option is DBakerAid™, which provides controlled dough conditions and humidity support for baking workflows that need steadier temperature management. It won't replace technique, but it can reduce the kind of drift that makes layered dough harder to handle at home.
Storage, Scaling, and a Repeatable Workflow
Puff pastry keeps best when you respect every stage separately. Raw laminated dough can stay in the fridge for 2 to 3 days and in the freezer for 2 months. Pre-baked shells hold at room temperature for 24 hours in an airtight container, while fully baked pieces keep at room temperature for 2 days and in the freezer for 1 month.
Make the workflow repeatable
Use a simple sequence every time. Weigh the ingredients, set your target temperatures, chill between each turn, shape while cold, bake hot, and cool on a rack so steam can leave instead of condensing underneath. That routine matters more than trying to rush through with extra flour or extra pressure.
When you scale the recipe, keep the ratios steady and extend the rests slightly for larger batches. Bigger masses warm more slowly in the center, but they also hold heat longer once they've been handled. That means the same amount of effort has more chance to drift out of range.
| Batch Size | Dough Weight | Butter Block | Hydration % | Chill Between Turns |
|---|---|---|---|---|
| Base batch | 1x recipe | 1x recipe | around 50 to 55 | about 20 to 30 minutes |
| Double batch | 2x recipe | 2x recipe | around 50 to 55 | slightly longer than base |
| Quadruple batch | 4x recipe | 4x recipe | around 50 to 55 | longer still, especially in warm rooms |
If the kitchen runs warm, the chill windows matter even more. If the room is cool, the dough may stay workable longer, but you still should not skip the rest. The goal is consistent layer behavior, not just getting through the recipe once.
For more laminated-dough technique details, you can also review what laminated dough is and how it works and compare it with croissant lamination guidance if you're moving between pastry styles. If you're trying to get the process steady at home, that's exactly where controlled heat and timing help more than guesswork.
DBakerAid™ helps home bakers hold dough conditions steady when laminated pastry is sensitive to temperature drift. If you want to make puff pastry from scratch with less guesswork around proofing, chilling, and humidity control, visit DBakerAid™ and compare how its dough-handling system fits your kitchen.