

You've fed your sourdough starter, watched it rise, and now you're wondering whether those bubbles mean it's ready. Later, the dough may sit stubbornly flat, race past its ideal texture, or produce a loaf that tastes sharper than expected. The problem usually isn't a missing magic timetable. It's that the fermentation process of sourdough bread is controlled by several interacting variables, including microbes, acidity, temperature, hydration, and dough strength.
Sourdough is a living ecosystem, not a timer with flour added to it. Wild yeast creates much of the gas that lifts the dough, while lactic acid bacteria, or LAB, acidify it and shape its flavor. Once you learn to read those signals, you can troubleshoot fermentation with far more confidence.
Table of Contents
- What Happens When a Starter Begins to Bubble
- The Microbial Partnership Behind Every Loaf
- How Enzymes Set the Stage Before Microbes Take Over
- Bulk Fermentation and Final Proofing Explained
- Why Temperature Is the Most Powerful Fermentation Lever
- How Hydration Reshapes Acid Balance and Texture
- Troubleshooting Fermentation by Reading the Dough
- A Repeatable Fermentation Checklist for Home Bakers
What Happens When a Starter Begins to Bubble
A freshly fed starter may look unchanged in its jar. Then tiny bubbles appear along the glass, the mixture loosens, and its volume begins to increase. Its aroma can move from sweet and floury toward fruity, yeasty, or lightly tangy.
Those bubbles are visible evidence of microbial metabolism. Wild yeast consumes available sugars and releases carbon dioxide, while the starter traps part of that gas in small pockets. Like air caught in a sponge, these pockets make the culture expand. Yeast also produces ethanol during fermentation, though much of it evaporates or changes during baking.
A starter is a community
The rise shows gas production, but more than one group is active. Lactic acid bacteria produce lactic and acetic acids, lowering the starter's pH and creating its sour aroma and taste. The falling pH also changes the habitat. Conditions become more suitable for organisms adapted to sourdough and less comfortable for many competitors.
A mature starter commonly contains far more LAB than wild yeast. Reported LAB-to-yeast ratios range from roughly 15:1 to 600:1, depending on flour, hydration, and process conditions (sourdough fermentation research). Yeast may provide much of the lift, while bacteria can dominate the population and strongly influence acidity.
Refreshing a starter adds fresh flour and water. That refresh changes nutrient availability, dilution, acidity, and hydration, so the colony's balance shifts rather than just providing yeast more food.
Practical rule: A bubbling starter is active, but bubbles alone do not identify its peak. Peak activity is a balance among gas production, acid development, and remaining food.
A starter that has risen and still holds a rounded surface usually retains useful gas-producing capacity. A collapsed starter may remain acidic and active, but its strongest expansion stage has passed. The right point to use it depends on the loaf's desired flavor and the fermentation conditions that follow.
A similar principle appears in another naturally fermented culture. Shopifarm's guide to a sparkling ginger probiotic drink also uses bubbles as visible evidence of invisible biological activity, even though its ingredients and organisms differ.
For a closer explanation of sourdough wild yeast, follow how yeast activity affects a starter's expansion.
The Microbial Partnership Behind Every Loaf
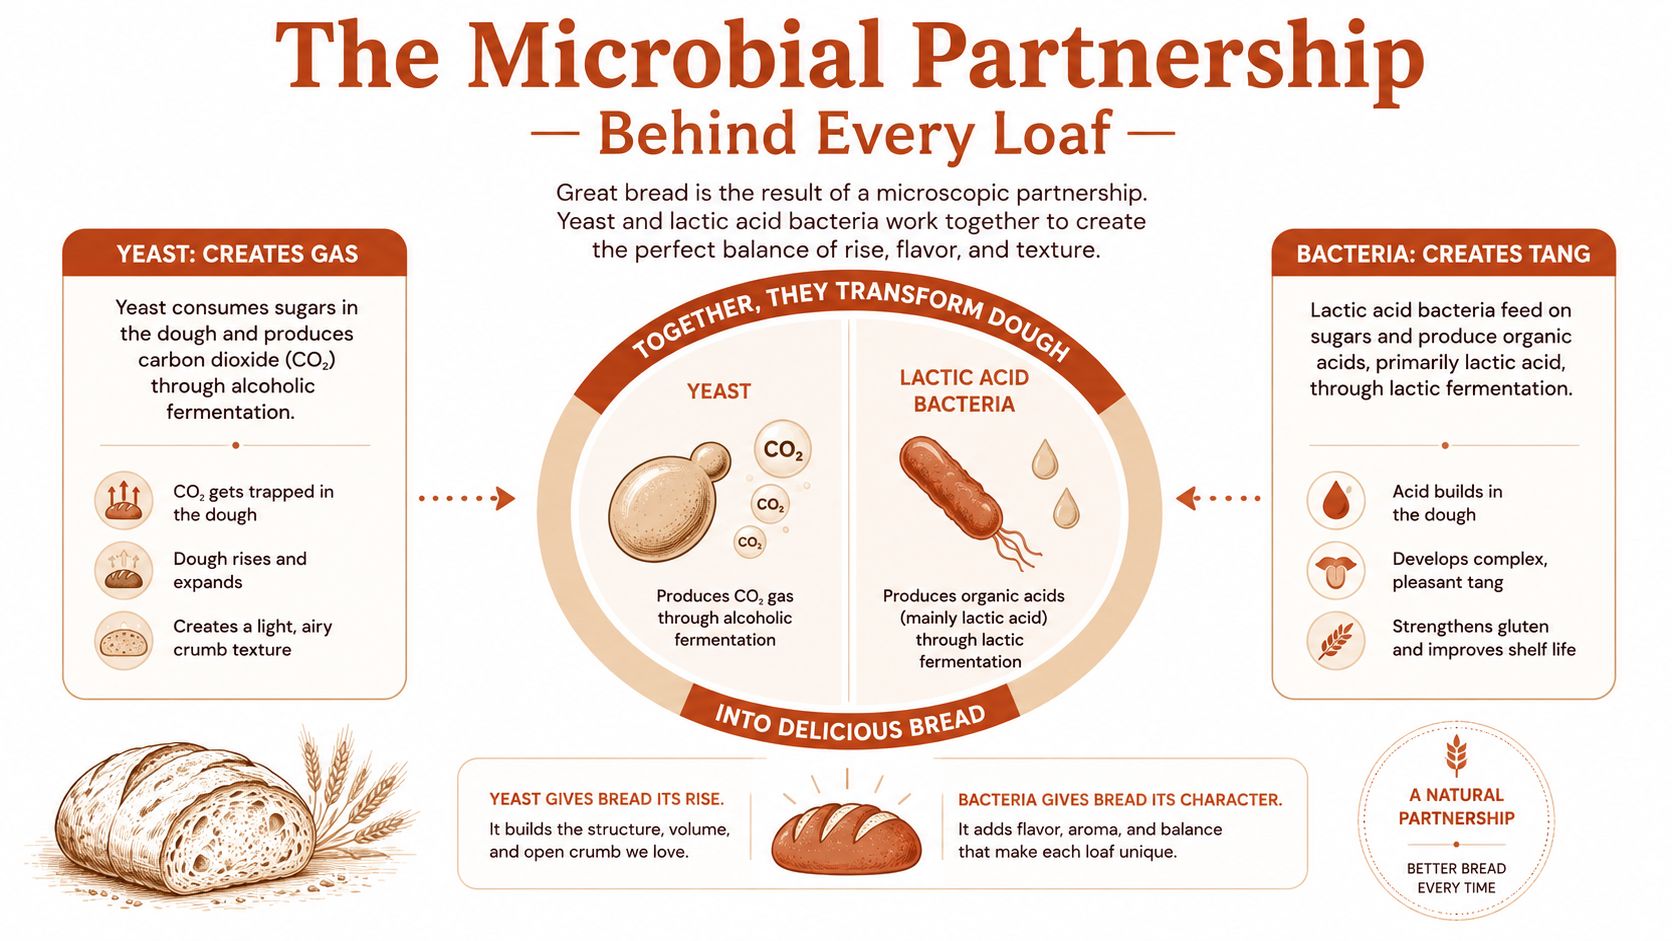
A sourdough culture is a working community, not a single organism. Wild yeast and lactic acid bacteria share the dough, yet they contribute different outputs. Yeast supplies much of the lift, while LAB, short for lactic acid bacteria, produce most of the acidity that shapes flavor and dough behavior.
Wild yeasts, including strains related to Saccharomyces cerevisiae, consume fermentable sugars and release carbon dioxide and ethanol through alcoholic fermentation. The carbon dioxide collects inside the developing gluten network, like air caught in a flexible net. A strong, extensible network retains more gas and supports greater expansion.
LAB use available carbohydrates to form organic acids. Lactic acid tends to create a smoother, yogurt-like tang, whereas acetic acid brings a sharper, more vinegary character. The balance depends on the organisms present and on feeding conditions, hydration, temperature, and fermentation time. These are practical levers, not merely background details.
Why acid changes the dough
As LAB release acids, the dough's pH falls. Classic sourdough systems often settle near pH 4.0, while many sourdough-associated LAB grow well around pH 4.2 to 5.5. A species such as Fructilactobacillus sanfranciscensis approaches a boundary near pH 4.0, leaving an increasingly selective environment (NCBI sourdough microbiology reference).
Lower pH limits many competing organisms and helps stabilize the sourdough community. It also changes gluten behavior. Moderate acidification can support strength and extensibility, while excessive acidification may leave dough slack, sticky, and difficult to shape.
LAB groups produce different acid patterns. Homofermentative LAB primarily produce lactic acid, supporting a rounder acidity. Heterofermentative LAB produce lactic acid along with other compounds, including acetic acid and carbon dioxide, which can create a sharper, more layered flavor. Bakers do not need to identify every strain. They need to recognize how the LAB-to-yeast balance affects both taste and structure.
Decades of research, including the review “Thirty years of knowledge on sourdough fermentation”, support a useful kitchen model: fermentation is a managed relationship between gas production and acid production. A baker can adjust the temperature, hydration, feeding conditions, or fermentation time instead of relying on a fixed timing rule.
For a clearer connection between these microbial changes and what appears in the bowl, read about the fermentation science behind bread.
How Enzymes Set the Stage Before Microbes Take Over
Microbes need food before they can ferment. Flour contains starch, proteins, minerals, and other compounds, but yeast and LAB can't use all of those components in their original form. Enzymes begin preparing the ingredients.
Amylase enzymes break starch into smaller sugars. Those sugars become available to yeast and bacteria, giving fermentation something to work with. If the flour releases sugars efficiently, the microbial community has more accessible fuel. If sugar release is slower, gas and acid development may also proceed differently.
Proteases work on proteins, including the proteins that later form gluten. Their action doesn't “destroy” gluten. It helps loosen and reorganize the developing network, making the dough more extensible. That extensibility matters because a dough that can stretch without tearing can accommodate the carbon dioxide produced during fermentation.
Autolyse changes the starting conditions
An autolyse is a rest in which flour and water are mixed before the remaining ingredients are added. During this period, flour hydrates, enzymes begin acting, and gluten-forming proteins start organizing. Microbial fermentation may be limited or absent if the starter and salt aren't included yet, so the baker can improve dough handling before asking the microbes to produce gas and acid.
Higher-ash flours generally carry more of the grain's outer layers and can deliver more enzymatic activity. Whole-grain and darker flours may therefore behave differently from refined white flour. They can absorb water differently, release flavor precursors, and alter the pace at which microbes receive usable sugars.
The enzymes don't create the final sour flavor by themselves. They prepare the raw materials. Yeast and LAB later convert those materials into gases, acids, alcohols, and aromatic compounds that shape the baked loaf.
This is why a flour change can alter more than color. It can affect dough strength, starter activity, aroma, and the point at which fermentation appears complete. Treat the flour as part of the fermentation system, not as a neutral background ingredient.
Bulk Fermentation and Final Proofing Explained
Bulk fermentation and final proofing are two different stages with two different jobs. Confusing them is one of the fastest ways to misread a dough.
Bulk fermentation begins after mixing, when the dough is still one mass. Yeast produces carbon dioxide, LAB continue acidifying the dough, enzymes keep changing starches and proteins, and folds help organize the gluten network. The baker is building both flavor and structure at this stage.
During bulk fermentation, repeated folds redistribute temperature, nutrients, and gas. They also strengthen the dough without requiring aggressive kneading. As the dough develops, it should become smoother, more elastic, and better able to hold its shape.
Bulk fermentation readiness
Look for several signals together rather than relying on one clock time:
- Surface: The top becomes slightly domed rather than completely flat.
- Bubbles: You can see bubbles along the sides or edges of the container.
- Movement: The dough has a light jiggle when the container moves.
- Volume: A typical practical target is a 50% to 75% increase, not necessarily a doubling.
- Poke response: A finger indent returns slowly rather than snapping back immediately.
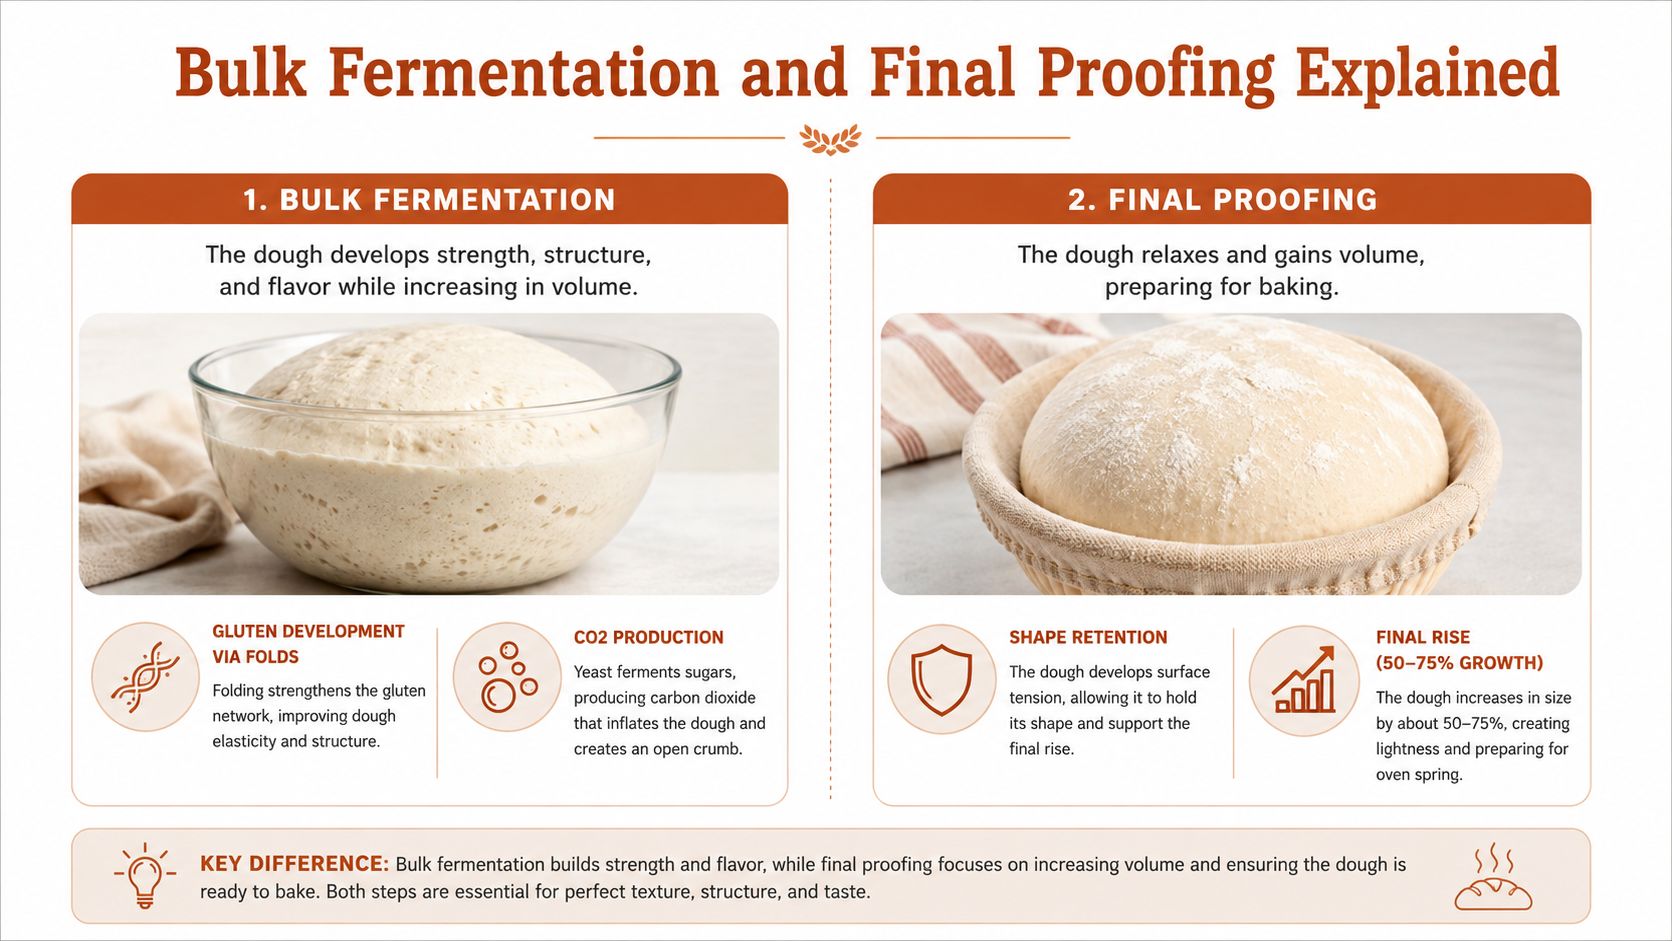
Final proofing begins after dividing and shaping. The dough is no longer developing as one undifferentiated mass. Instead, it is building enough internal gas and surface tension to retain its intended shape and expand in the oven. The shaped dough develops a thin, gas-rich skin that helps direct oven spring.
Under-fermented bulk dough often feels tight and resists shaping. Under-proofed shaped dough may tear during scoring or spring back aggressively. Over-fermented bulk dough can become weak and collapse when handled, while over-proofed shaped dough may feel slack and fail to rise significantly in the oven.
The practical distinction is simple. Bulk fermentation builds the dough's internal system. Final proofing prepares the shaped dough for expansion. A cold-retarded sourdough process may last from about 1 hour for yeasted dough at 24°C to 12 to 16 hours for sourdough at 3°C, but those are examples of different process conditions, not universal targets (bread proofing and fermentation guidance).
The video below demonstrates the physical handling that supports these stages.
Why Temperature Is the Most Powerful Fermentation Lever
Your starter may bubble on schedule, yet the dough can still ferment too quickly, too slowly, or develop the wrong acidity. The missing variable is often temperature. It changes fermentation speed, acid production, microbial balance, and dough strength together, making it a practical control point rather than a calendar guess.
A typical sourdough dough ferments around 24 to 26°C. Many lactic acid bacteria, or LAB, grow strongly at warmer temperatures, near 30 to 40°C (technical sourdough review). The same review describes about 30°C as a common fermentation temperature, with working conditions from 22 to 40°C and a median final pH near 4.1. pH measures acidity, so it gives you a second signal alongside dough volume and texture.
What warmer and cooler conditions do
At cooler temperatures, the microbes work more slowly. Gas builds gradually, the dough may need more time, and the flavor can develop a sharper, more acetic character. At warmer temperatures, acidification usually moves faster and often produces a milder, more lactic profile.
Temperature also changes the balance between LAB and yeast. Yeast mainly produces carbon dioxide for lift, while LAB produces acids and flavor compounds. A warmer dough can reach its target acidity sooner, but that does not automatically mean it has developed enough strength or gas retention.
One comparison reached an ideal pH in about 11 hours at 25°C and about 9 hours at 35°C, a 2-hour difference after raising the temperature by 10°C. These figures describe one set of conditions, not a universal schedule.
Temperature is an ingredient. Changing dough temperature changes how quickly the microbes work and which acids become most noticeable.
For balanced fermentation, begin near 24 to 26°C, then adjust according to the dough's response. Choose a cooler range for a slower schedule and sharper acidity. Choose a warmer range when speed matters, while checking pH, rise, and structure before the dough weakens. A homebrewing temperature control guide explains the same control principle in another fermentation system.
How Hydration Reshapes Acid Balance and Texture
Hydration is the amount of water relative to flour, but its effect goes beyond dough softness. Water changes microbial access to nutrients, acid production, gluten movement, and the texture of the finished crumb.
A stiff starter, commonly around 50% to 60% hydration, tends to favor acetic acid. A more liquid starter, around 100% to 125% hydration, tends to favor lactic acid (sourdough technique reference). The result isn't just a different flavor. The starter may also rise, spread, and mature differently.
The table below translates hydration into kitchen expectations.
| Hydration level | LAB vs yeast balance | Acid profile | Fermentation speed | Crumb outcome |
|---|---|---|---|---|
| Around 50% to 60% | Stiffer environment, with acid balance often more acetic | Sharper, more pronounced character | More controlled and less fluid | Firmer starter and tighter dough behavior |
| Around 75% to 100% | More available water for microbial activity | Balanced to more lactic acidity | More active and faster to change | Softer dough with greater extensibility |
| Around 100% to 125% | Liquid starter, often LAB-leaning in flavor | Rounder lactic notes | Fast-moving and spread-prone | Looser starter and more open dough potential |
In the dough itself, lower hydration often produces a tighter crumb and a slower-feeling fermentation because water limits microbial movement. Higher hydration can accelerate fermentation and create a more extensible dough, but it gives the baker a narrower window between properly developed and over-fermented.
Acids interact with gluten as they accumulate. Moderate lactic acidity can improve extensibility and tenderness, while excessive acetic acidity may tighten the dough and reduce the perception of sweetness.
For a beginner, a stiff starter paired with a cool fermentation can provide a more controlled starting point. It won't eliminate the need to observe the dough, but it can reduce the speed at which small timing errors become major structural changes.
Troubleshooting Fermentation by Reading the Dough
A recipe clock describes what happened under one set of conditions. In your kitchen, flour, starter strength, inoculation, hydration, and temperature can differ, so the same elapsed time may produce very different dough. Read the dough as a microbial ecosystem, using its gas production, acidification, and structure together.
Start with three signals: the surface, the bubble pattern, and the response to a gentle poke. Under-fermented dough stays tight, shows few bubbles, and springs back quickly. Over-fermented dough feels slack, develops large fragile alveoli, and may deflate when moved. Properly fermented dough holds its shape while yielding slowly.
A visual diagnosis
| Signal | Under-fermented | Properly fermented | Over-fermented |
|---|---|---|---|
| Surface | Flat and tight | Slightly domed and elastic | Slack, wrinkled, or collapsing |
| Bubbles | Few visible bubbles | Distributed bubbles at the edges and within the dough | Large, fragile, uneven alveoli |
| Poke response | Springs back quickly | Indent returns slowly | Indent remains or dough deflates |
| Handling | Resists shaping and may tear | Holds shape with controlled elasticity | Spreads and feels weak |
| Likely process issue | Insufficient gas and acid development | Balanced gas, acid, and structure | Excessive fermentation relative to dough strength |
pH strips add an objective check. Finished sourdough commonly sits near pH 4.0 to 4.5, a range that can indicate that acidification has progressed. The reading does not replace sensory judgment: dough strength and gas retention still determine whether the loaf can rise. Use pH as a compass, not a finish line, and compare it with the dough's texture and expansion.
Don't ask only, “How long has it fermented?” Ask, “What has the dough become?”
Common defects usually reflect more than one process variable:
- Gummy crumb: Fermentation may be incomplete, or the dough may lack enough strength to retain gas.
- Blistered or fragile crust: Extended fermentation can weaken the dough and change its surface structure.
- Excessively sour flavor: Long fermentation, cooler conditions, or an acid-heavy starter may have shifted the balance between LAB and yeast.
- Flat loaf: The dough may be under-fermented, over-fermented, or too weak to support the gas it produced.
For a practical decision guide when a loaf goes wrong, use this sourdough bread troubleshooting resource. Compare its suggestions with your dough's visible evidence, then adjust one lever at a time, such as temperature, starter maturity, or fermentation endpoint.
A Repeatable Fermentation Checklist for Home Bakers
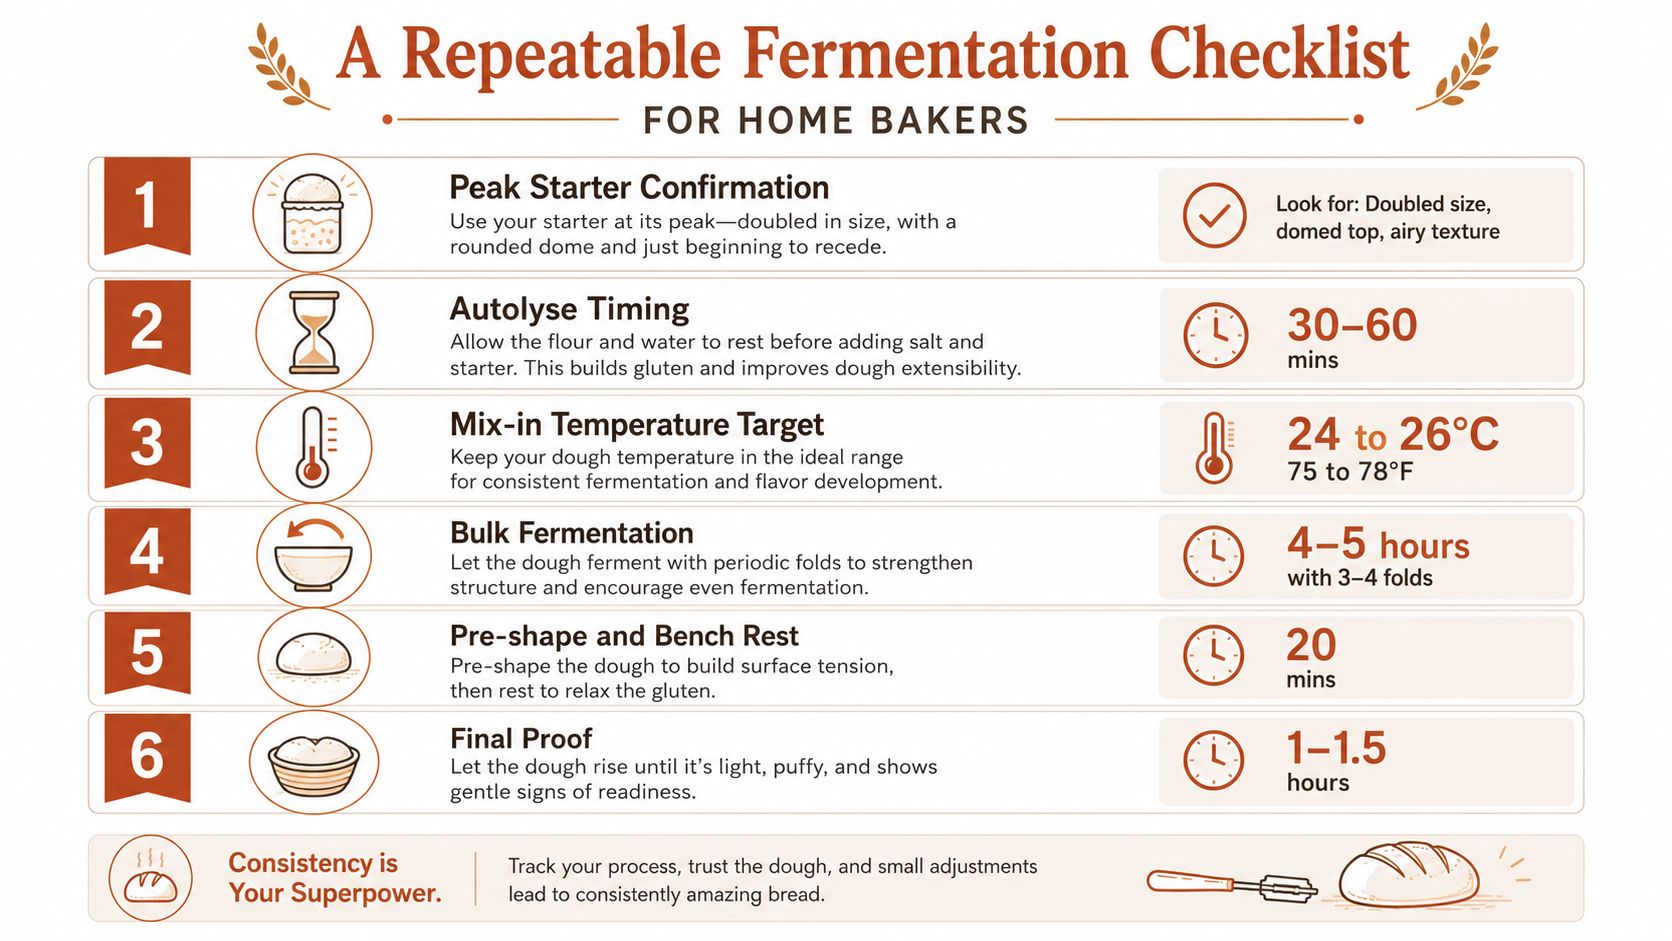
Use these checkpoints as decisions, not rigid promises.
- Confirm the starter peak. Look for expansion, a rounded surface, and visible bubbles. Use it before it collapses completely.
- Allow flour and water to hydrate. An autolyse gives enzymes and gluten-forming proteins time to begin their work before full fermentation.
- Measure the mixed dough temperature. Aim for 24 to 26°C, a commonly useful balance point for yeast and LAB activity.
- Fold during bulk fermentation. Build strength early, then stop folding once the dough holds its structure and shows fermentation bubbles.
- Proof by response. Press gently. A properly proofed dough should respond slowly, not snap back immediately or collapse under pressure.
- Use pH as a supporting check. A finished dough target near pH 4.0 to 4.5 can help confirm that acidification has progressed.
Keep a small fermentation log. Record the room temperature, dough temperature, flour blend, hydration, starter condition, and the visual signs at each stage. Photographing the dough after mixing, during bulk fermentation, and before baking will build a personal reference library that becomes more useful than a generic timetable.
A controlled fermentation appliance can also reduce temperature swings and monitor time across separate fermentation and proofing stages. DBakerAid™ offers a precision bread-making system with a yeast fermentation bowl, a dough proofing bowl, and a hub that controls temperature and time, along with a companion recipe app and optional steaming equipment. Visit DBakerAid™ to see how its controlled process can help you apply the same fermentation principles more consistently at home.