

Optimal dough fermentation requires a narrow window of about 30–38°C with 70–85% relative humidity for steady yeast activity and repeatable results. That controlled environment matters even more for high-protein dough, where small changes can produce a loaf that rises unevenly, feels dense, or collapses.
You follow the same recipe, measure the flour carefully, and use the same yeast. One loaf rises beautifully. The next stays tight and heavy. In winter, your kitchen is cool and dry. In summer, the dough races ahead before you're ready to shape it. The recipe hasn't necessarily failed. The fermentation environment changed.
Fermentation control turns that hidden variation into something you can observe and manage. It explains why time on a recipe card is only a starting point, why humidity matters as much as warmth, and why high-protein bread benefits from a controlled system rather than a hopeful wait beside the oven.
Table of Contents
- The Hidden Variable Behind Inconsistent Bread
- How Temperature, Time, and Humidity Drive Yeast Activity
- Diagnosing Common Fermentation Problems
- Manual Proofing vs Precision Appliance Systems
- How D'BakerAid Applies Fermentation Control Science
- Why Fermentation Control Is Your Greatest Baking Advantage
The Hidden Variable Behind Inconsistent Bread
A baker can make two batches with identical ingredients and still get different bread. The dough may spend one morning in a cool kitchen and another afternoon near a warm stovetop. One batch develops a dry skin while the other remains supple. One reaches the oven under-proofed, while the other has already exhausted much of its expansion capacity.
The visible symptom is usually “the bread didn't rise,” but the underlying problem may be temperature, humidity, yeast quantity, dough strength, or the stage of fermentation when the dough entered proofing. The reasons bread may not be rising often become easier to diagnose once you stop treating fermentation as a timer and start treating it as a biological process.
Fermentation is active, not passive
Yeast consumes available sugars and produces carbon dioxide. That gas stretches the dough's gluten network, creating volume and the internal structure you later see as crumb. Yeast activity changes with temperature and moisture, so the dough doesn't just “wait” for a fixed number of minutes. It changes continuously in response to its surroundings.
Published bread references place normal proofing around 30–35°C and 70–85% relative humidity, while other guidance gives an ideal final proof around 35–38°C and 80–85% relative humidity. Industrial proofing cabinets are also described around 32 ± 2°C and 75 ± 5% relative humidity in the bread fermentation and proofing literature. These ranges aren't arbitrary. They keep yeast active while limiting surface drying.
Time varies because the dough itself varies. Final proofing commonly spans 15–60 minutes, depending on loaf weight, dough consistency, yeast quantity, and the condition of the dough after bulk fermentation, as the same published reference explains. A clock can tell you how long the dough has been in the bowl. It can't tell you whether the dough has reached the right state.
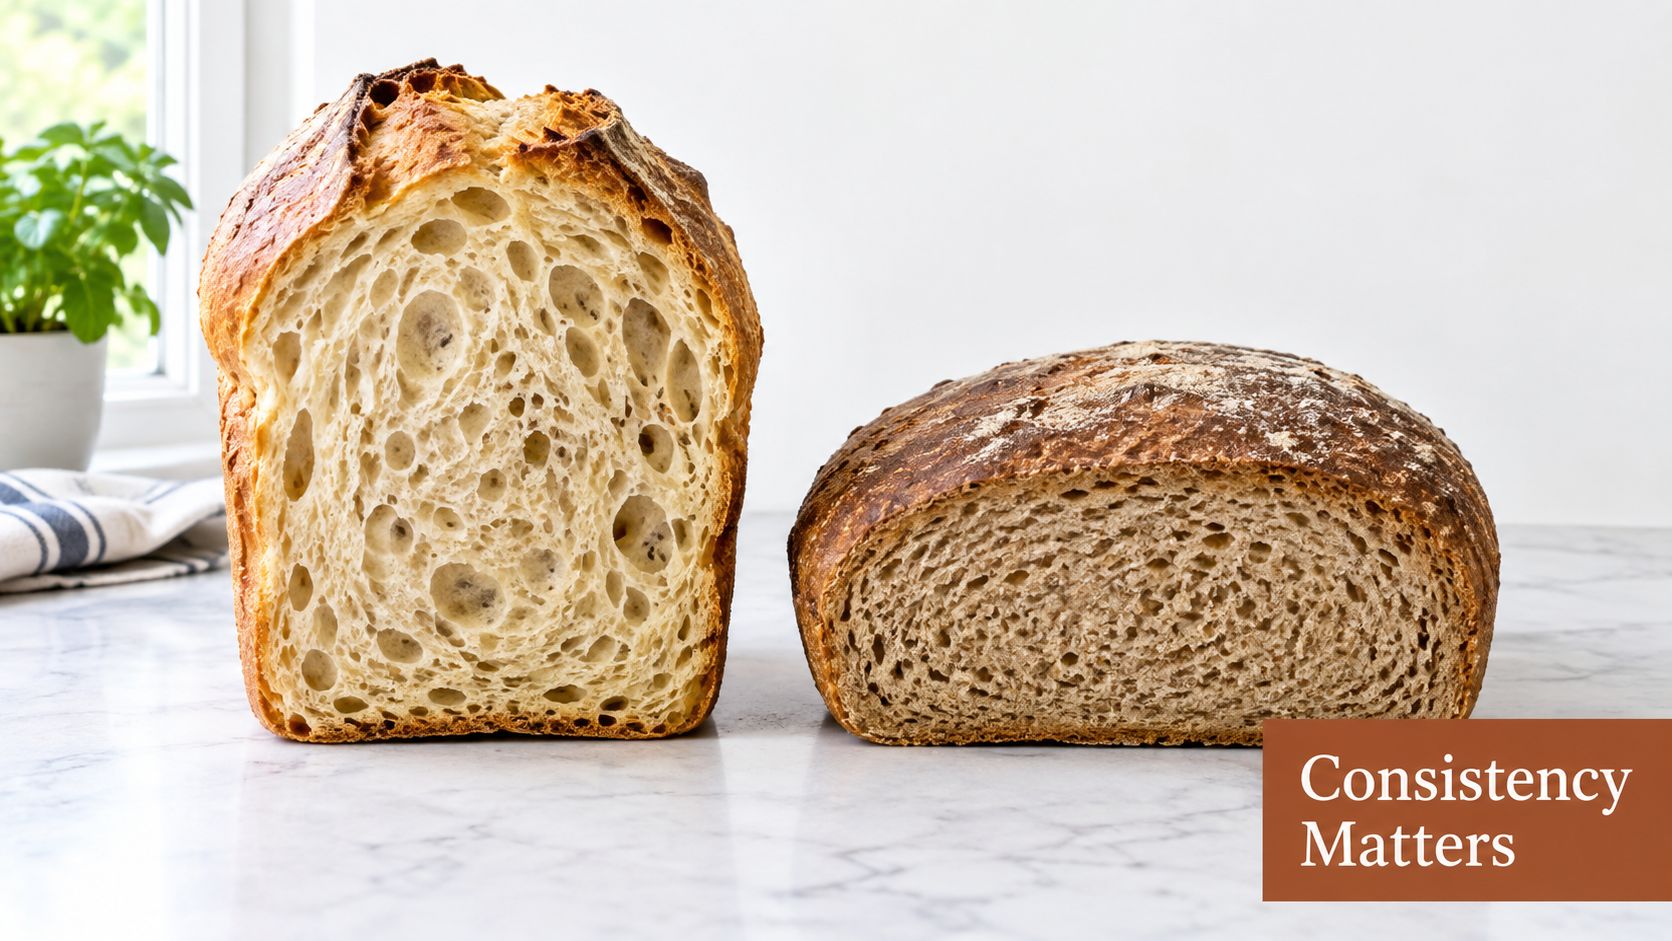
High-protein dough narrows the margin
High-protein bread makes this challenge more obvious. Whey, pea, soy, or collagen isolate adds protein, while vital wheat gluten and bread or whole-wheat flour provide the structure needed to hold gas. The resulting dough is often stiffer, denser, and slightly tacky compared with a standard white-bread dough.
That structure can produce a satisfying sandwich loaf, but it won't behave exactly like an airy white loaf. High-protein dough commonly rises about 50–75% rather than doubling, and it needs a controlled environment to expand without drying or losing strength. A classic milk-protein bread study also found that adding milk solids increased buffering capacity, which can mean longer fermentation is needed in higher-protein doughs. The study's findings on protein enrichment and fermentation behavior90524-7/pdf) show why adding protein to an ordinary recipe can upset the original timing.
Practical rule: Judge fermentation by the dough's condition, not by the recipe's clock alone.
How Temperature, Time, and Humidity Drive Yeast Activity
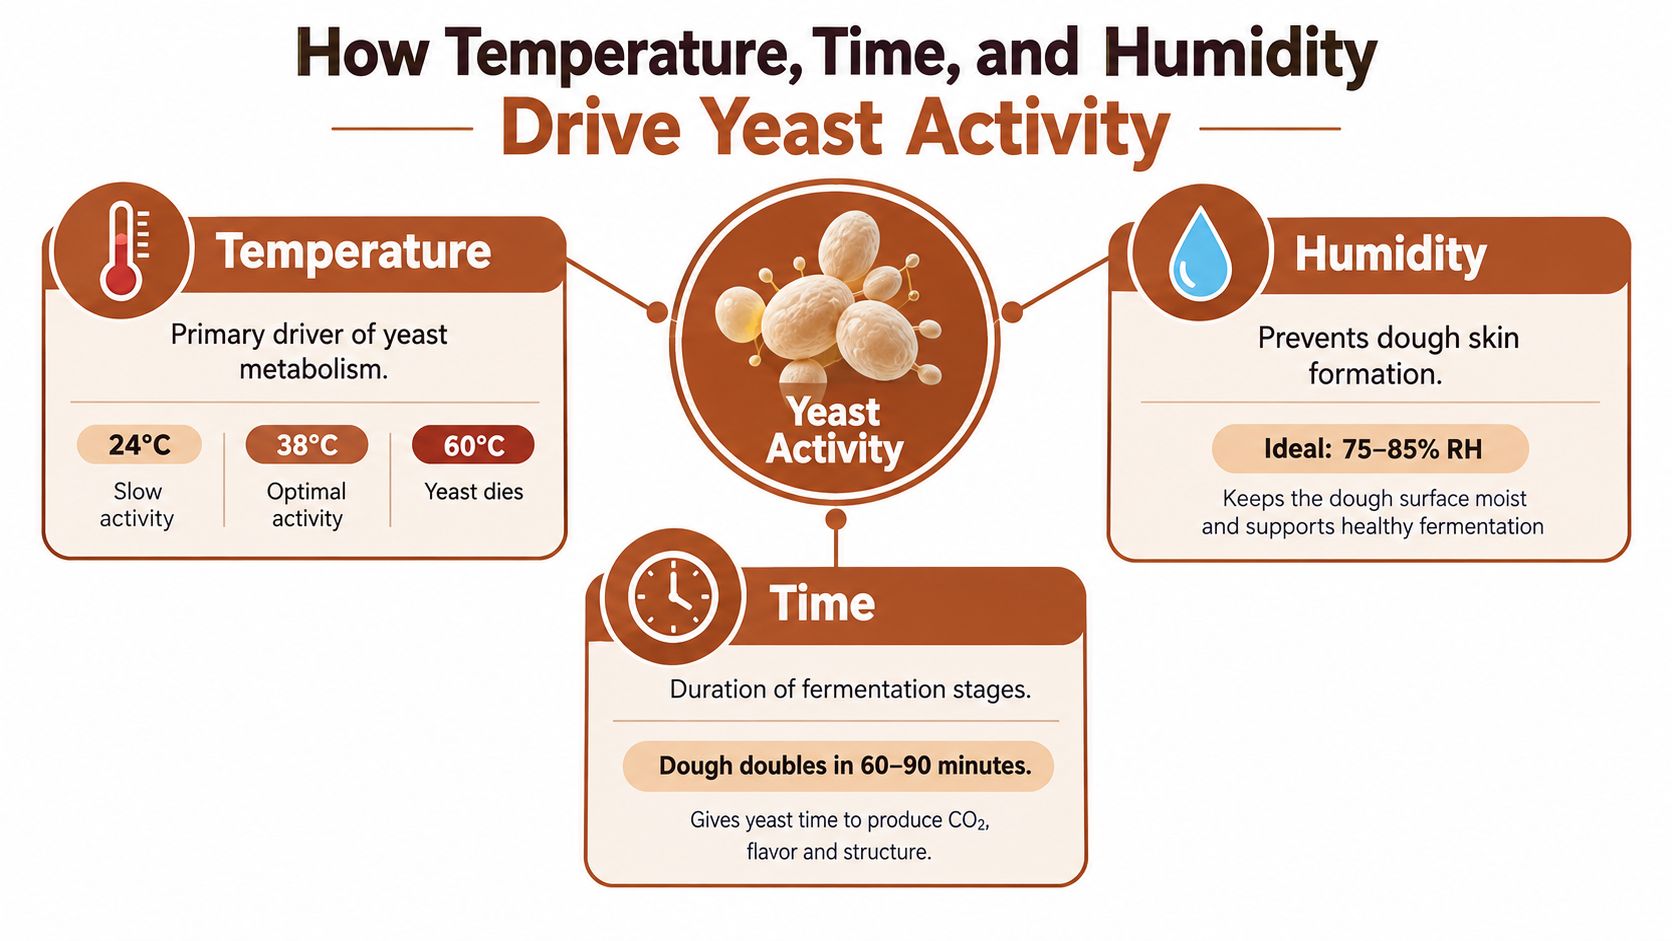
Yeast behaves like a small biological engine. Warmth can increase its activity, cool conditions slow it, and excessive heat or insufficient moisture can damage the process. The baker's job isn't to make the dough as warm as possible. It's to keep the dough inside a useful operating window for long enough to develop the desired volume and structure.
Temperature sets the pace
FAO guidance describes active yeast function across roughly 0–50°C, with an optimum around 20–30°C, while bread fermentation and proofing use higher dough temperatures in specific stages. A bread-production review places a favorable yeast-fermentation range around 27–38°C, with an optimal range of 34–38°C and a pH range of 4.0–5.2. Those ranges don't conflict once you distinguish general yeast performance from the conditions used for dough fermentation and final proofing. The bread-production review treats fermentation as a process shaped by several biological variables, not temperature alone.
In practical terms, a cool dough produces carbon dioxide more slowly. The dough may remain tight for longer, and a recipe that worked in a warm kitchen can appear stalled. A warmer environment accelerates activity, but too much speed can leave less time for the dough to develop evenly. The correct question isn't “How fast can I make it rise?” It's “What temperature gives this dough enough activity to reach the right structure?”
Small thermal changes can have a surprisingly large effect in industrial fermentation. A beer-fermentation study reported that a 0.5°C change produced a 38% reduction in fermentation hours and a 66.3% reduction in vicinal diketones. An additional 0.5°C adjustment lowered the diketone peak from 0.87 ppm to 0.67 ppm and reduced fermentation time from 174 to 165 hours. The study on process variables in beer fermentation illustrates a principle that applies to bread: a small temperature change can alter both process speed and final quality.
Time is an output of the conditions
A recipe may say to proof until doubled, or to wait for a particular number of minutes. Those directions are useful, but they describe an expected result under assumed conditions. If the dough is colder, drier, more heavily enriched, or higher in protein, the same duration may produce a different outcome.
Time also interacts with yeast quantity and the stage of bulk fermentation. A dough that has already developed substantial gas during bulk fermentation needs a different final-proof window from dough that entered shaping early. Loaf weight matters too. A small roll and a large Pullman loaf won't warm or expand at exactly the same rate.
Humidity protects the dough surface
Humidity prevents the outside of the dough from drying before the inside has finished expanding. FAO notes that normal yeast requires at least about 0.85 water activity or approximately 88% relative humidity to remain effective, while bread proofing references commonly use a lower chamber range around 70–85% relative humidity to prevent surface drying during the process. The FAO guidance on yeast and water availability helps explain why a dry kitchen can create problems even when its temperature looks acceptable.
A dry surface forms a skin. That skin resists expansion, tears as the interior grows, or creates an uneven outer layer that traps gas poorly. The center may continue fermenting while the outside becomes stiff. You then get uneven rise, a thick crust, or a crumb that looks tighter near the surface.
Temperature and humidity work together. Warm, dry air can push yeast activity forward while simultaneously creating a restrictive skin. Cool, humid air may protect the surface but slow gas production. Reliable fermentation control manages both variables instead of adjusting time after the problem has already appeared.
Diagnosing Common Fermentation Problems
The dough usually tells you what happened before the loaf reaches the oven. Look at its shape, feel the surface, and observe how quickly it responds to a gentle press. These signals are more useful than forcing every batch to follow the same timetable.
Under-proofing and over-proofing feel different
Under-proofed dough often feels tight and springs back quickly when pressed. It may resist shaping, show limited expansion, and produce a dense loaf with a compact crumb. The correction is usually more fermentation time under suitable conditions, not just more warmth. If the dough is already in a dry environment, increasing humidity may matter as much as extending the clock.
Over-proofed dough has the opposite problem. It may feel fragile, lose tension, or collapse when handled. The baked loaf can be flat with a gummy or poorly supported crumb, and the dough may develop a noticeably sour aroma. Once the gluten structure has been stretched beyond its ability to hold gas, additional waiting won't restore it.
Use the symptom to find the variable
| Fermentation problem | Symptom | Likely cause | Correction |
|---|---|---|---|
| Under-proofed dough | Tight dough, quick spring-back, dense baked crumb | Cool conditions, short fermentation, or insufficient yeast activity | Give the dough more time in a stable warm environment and check surface humidity |
| Over-proofed dough | Weak dough, collapse, flat loaf, gummy crumb | Excessive time or overly warm fermentation | Shorten the next fermentation cycle and reduce uncontrolled heat |
| Dry outer skin | Cracked surface or restricted expansion | Low humidity, drafts, or uncovered dough | Cover the bowl or raise humidity around the dough |
| Uneven crumb | Dense areas beside large gaps or irregular rise | Uneven temperature, inconsistent shaping, or localized drying | Keep the dough environment stable and shape with consistent tension |
| Fast rise followed by collapse | Early expansion, weak final structure | Excessive warmth or fermentation that ran too far | Use a lower, steadier temperature and rely on dough condition |
Separate dough problems from ingredient problems
Not every failed loaf is caused by proofing. Weak flour, inaccurate hydration, inactive yeast, or a formula with too much added protein can also affect structure. Still, fermentation control gives you a cleaner way to investigate. If the same ingredients produce different results under different kitchen conditions, the environment becomes a strong suspect.
For sourdough, the starter adds another layer of variation. Feeding history, temperature, acidity, and maturity all influence the dough's behavior. A useful sourdough starter troubleshooting guide can help separate starter weakness from proofing problems.
A useful diagnostic habit: Change one variable at a time. If you increase yeast, raise temperature, and extend the proof simultaneously, you won't know which adjustment solved the problem.
Keep notes on dough temperature, room conditions, fermentation duration, and the finished crumb. Over several bakes, those observations become more valuable than a generic instruction to “proof until doubled.” You'll learn what your dough looks like when it's ready, and you'll recognize when an unusual result came from the environment rather than your mixing technique.
Manual Proofing vs Precision Appliance Systems
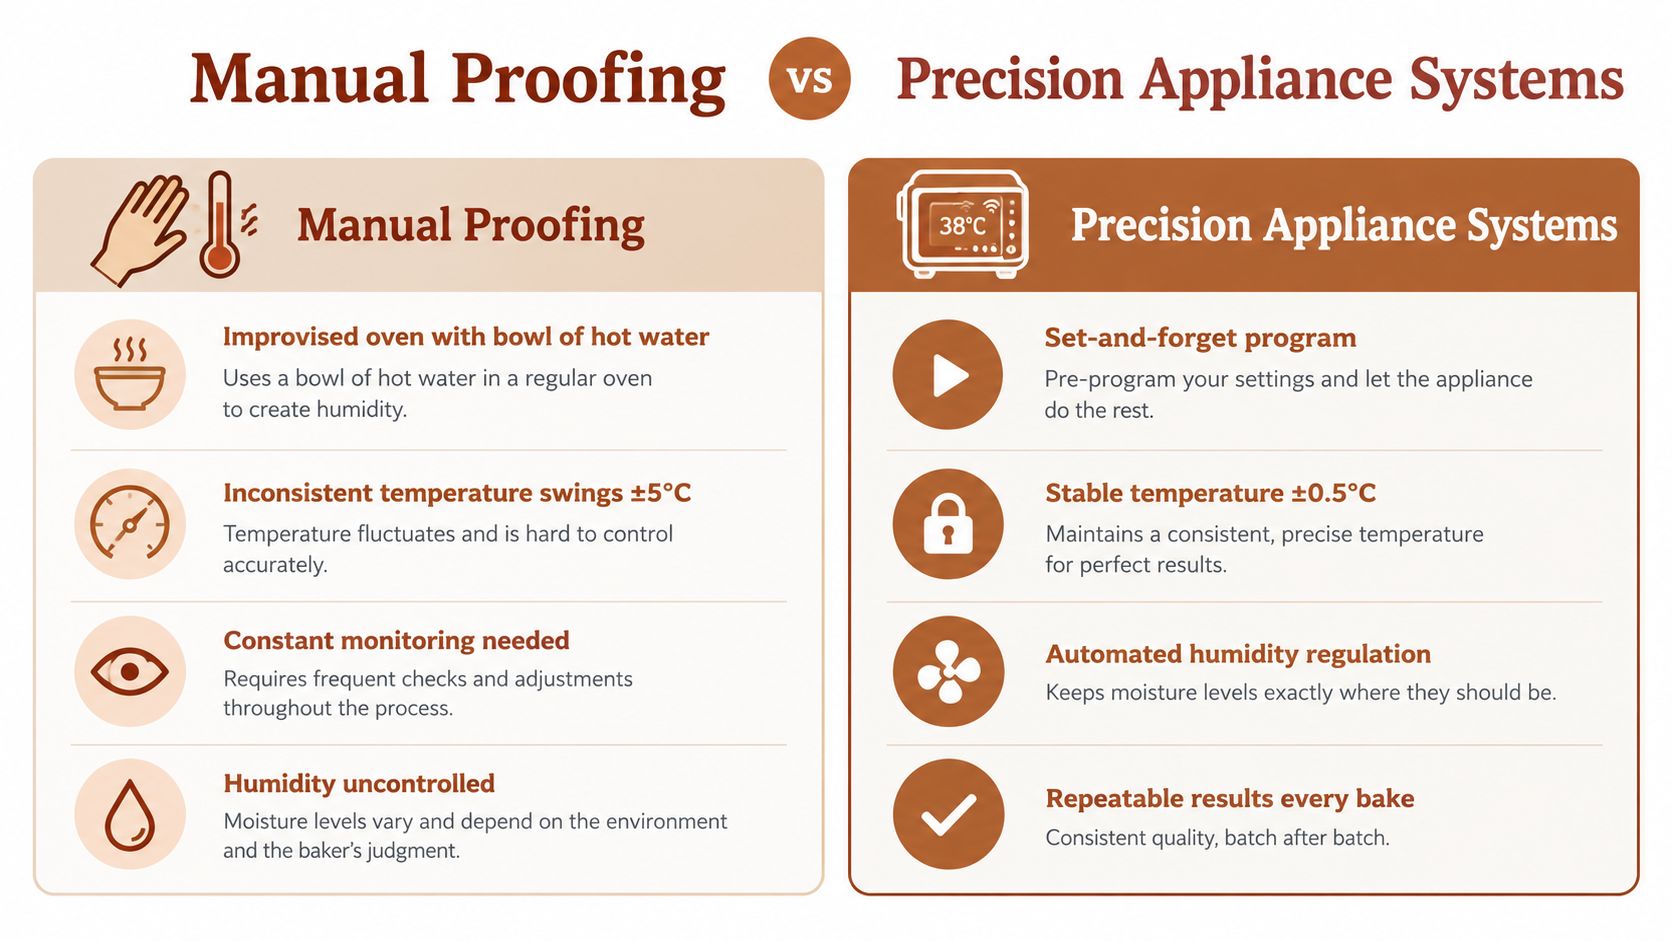
Manual proofing can work well. A turned-off oven with a bowl of warm water, a covered container on a counter, or a proofing drawer adjusted by hand may provide a suitable environment. The method costs little, and experienced bakers can compensate by watching the dough closely.
The weakness is that the environment keeps moving. Water cools. The oven retains heat unevenly. A draft reaches one side of the bowl. The kitchen changes while the dough ferments, and the baker has to compensate through observation.
The manual approach
Manual proofing gives you flexibility, but it transfers responsibility to the baker.
- Improvised warmth: A warm oven or water bowl can raise the surrounding temperature, but the actual dough temperature may differ from the air.
- Visual judgment: Experienced bakers can assess volume and feel, though those judgments become harder with stiff, enriched, or high-protein dough.
- Unmanaged moisture: A lid or cover helps, but it doesn't create a measured humidity environment.
- Active supervision: You need to check the dough and adjust the process when the room changes.
This approach is especially workable when the climate is stable and the recipe is familiar. It becomes less predictable when you bake different formulas, switch between seasons, or work with doughs that ferment slowly.
The precision approach
A precision system separates fermentation stages and gives each one a defined environment. Instead of asking a warm room to perform the same way every day, the appliance provides a controlled setting and lets the baker follow a programmed process.
D'BakerAid is one example of this approach. Its Stage 1 yeast fermentation bowl, Stage 2 dough proofing bowl, and central hub coordinate temperature and time, while the optional D'Steamer addresses humidity during the early oven phase. The system is designed to make fermentation and proofing more repeatable for standard, high-protein, and specialty doughs, with recipes available through the companion app at dbakeraid.app.
The trade-off is straightforward. Manual proofing avoids an appliance purchase but demands attention and adaptation. A controlled appliance requires an investment, yet it reduces the number of environmental variables you need to monitor. That difference matters most when the dough itself is less forgiving.
The same logic appears outside bread. If you're interested in another home fermentation process, this guide to making ginger bug soda at home also shows why temperature, time, sugar availability, and cleanliness shape the result.
Precision doesn't replace judgment. You still need to identify the dough, choose an appropriate program, and recognize when a formula needs adjustment. It gives you a steadier platform from which to make those decisions.
How D'BakerAid Applies Fermentation Control Science
The most useful appliance design follows the biology of the dough. Yeast activation and final proofing aren't identical stages, so treating them as one undifferentiated warm-up can create inconsistent results. A dual-stage system gives each part of the process a clearer job.
Stage 1 is the yeast fermentation bowl. It provides a controlled space for yeast activation and early fermentation, when temperature influences how quickly the dough begins producing carbon dioxide. Stage 2 is the dough proofing bowl, where the shaped or partially developed dough continues expanding under a program suited to the formula.
Two stages solve two different problems
The first stage answers, “Has the yeast become active under suitable conditions?” The second asks, “Can this dough expand evenly and hold the structure it has developed?” Keeping those stages distinct helps the baker avoid using one generic warm setting for every formula.
The hub coordinates temperature and time across the process. That matters because high-protein dough often needs more than warmth. It needs enough time for gas production and expansion, while its stiffer structure remains protected from surface drying and uncontrolled acceleration.
The approach resembles the logic used in commercial proofing environments. Industrial fermentation systems regulate multiple variables through feedback loops, including temperature and pH, while dissolved oxygen, aeration, agitation, and antifoam dosing can matter in larger microbial processes. Fermentation engineering research consistently treats control as a sensor-driven, multivariable task rather than a single temperature setting.

High-protein recipes need process consistency
The D'BakerAid high-protein recipe range uses whey, pea, soy, or collagen isolate with vital wheat gluten and bread or whole-wheat flour. These loaves are not gluten-free. They are high-gluten formulas designed to build enough structure for added protein.
The recipe data gives a useful picture of the intended result:
| Recipe | Protein per loaf | Protein per 100g | Protein per slice | Three-slice meal |
|---|---|---|---|---|
| Whey and Sprouted Wheat | ~170g | ~24g | ~10.6g | ~32g |
| Vegan Pea and Whole Grain | ~171g | ~24g | ~10.7g | ~32g |
| Soy Multigrain Fitness | ~170g | ~24g | ~10.7g | ~32g |
| Seeded Whey and Flax | ~163g | ~23g | ~10.2g | ~31g |
| Collagen and Whole Wheat | ~184g | ~26g | ~11.5g | ~34g |
These figures are based on loaves of about 800g dough, about 704g baked weight, and approximately 16 slices, so the result depends on the recipe, protein brand, moisture loss, and slice thickness. The D'BakerAid recipe collection provides the recipe-specific basis for these estimates.
The sensory trade-offs are clear. Whey and collagen versions stay closer to a normal cream-colored loaf, pea can look slightly grey-green and taste mildly beany, soy tends to be darker or tan, and whole-grain formulas are browner. The finished bread has a tight, uniform crumb that remains soft but feels heavier than airy white bread. It also browns somewhat faster and slices cleanly.
A separate gluten-free recipe range may exist for bakers who need rice, tapioca, or potato-starch formulas, but those are not the same as these high-protein loaves. People with celiac disease or those avoiding gluten shouldn't treat the high-protein recipes as suitable substitutes.
Why Fermentation Control Is Your Greatest Baking Advantage
A precise recipe can't compensate for uncontrolled fermentation. You can weigh every ingredient correctly and still get a disappointing loaf if yeast activity slows, the dough surface dries, or proofing runs beyond the strength of the gluten network.
Fermentation control gives you the highest-return improvement because it addresses the conditions that determine whether the recipe can work as intended. Flour choice affects flavor and structure. Mixing affects gluten development. Shaping affects the final form. But those decisions only pay off when the dough receives enough controlled time to expand and organize itself.
The principle applies beyond ordinary sandwich bread. High-protein doughs expose it because added isolates and vital wheat gluten change stiffness, water handling, color, and fermentation behavior. A machine doesn't make those trade-offs disappear. It makes them easier to manage consistently.
Control the environment, then judge the dough
The strongest workflow combines measurement with observation:
- Keep temperature inside an appropriate range for the stage.
- Protect the surface from drying with sufficient humidity.
- Treat time as an adjustable result, not an absolute command.
- Check the dough's feel and expansion before baking.
- Record what changed when the crumb or rise changes.
Advanced fermentation engineering is moving toward fuzzy logic, neural networks, cloud control, and digital twins, but a significant research gap remains in automatically controlling the final sensory profile of fermented products. The 2026 review on automatic fermentation control identifies taste, aroma, and texture as outcomes that still require more than basic environmental control. For the home baker, that means the most useful system combines stable conditions with informed sensory judgment.
Fermentation control won't replace baking knowledge. It removes enough environmental noise that your knowledge becomes easier to apply. Once the dough behaves consistently, you can adjust hydration, flour, protein source, and flavor with a clearer understanding of cause and effect.
DBakerAid™ brings controlled yeast fermentation and dough proofing into a home-kitchen workflow, with separate bowls and a hub that manages temperature and time. Visit DBakerAid™ to explore the system, then start with the high-protein recipes if you want fresh bread that fits a higher-protein meal.