

You lift the towel and find the same dense puck of dough you left hours ago. Before you throw it out, check the conditions around it. Bread not rising is often a temperature and structure problem, not proof that the yeast is dead. Cold water, a chilly bowl, a winter draft, or a stiff high-protein dough can slow fermentation until the rise looks completely stalled.
That distinction matters. A little more time and controlled warmth can rescue viable dough, while overheated water can destroy yeast before fermentation begins. The bench-side approach is simple: measure the dough, inspect its texture, verify the yeast, and change one variable at a time.
Table of Contents
- Why Your Bread Dough Refuses to Rise
- Diagnosing Yeast Viability and Temperature Shocks
- Fixing Hydration and Flour Imbalances
- Adjusting Proofing Environments for High-Protein Doughs
- Corrective Actions to Rescue a Flat Loaf
- Achieving Repeatable Results with Precision Proofing
Why Your Bread Dough Refuses to Rise
The most common mistake is treating fermentation as if only the yeast matters. In a home kitchen, the dough travels through a thermal chain. The room has one temperature, the bowl has another, and the water may be colder or hotter still. Once those temperatures meet, the dough can land far outside the range where yeast produces gas efficiently.
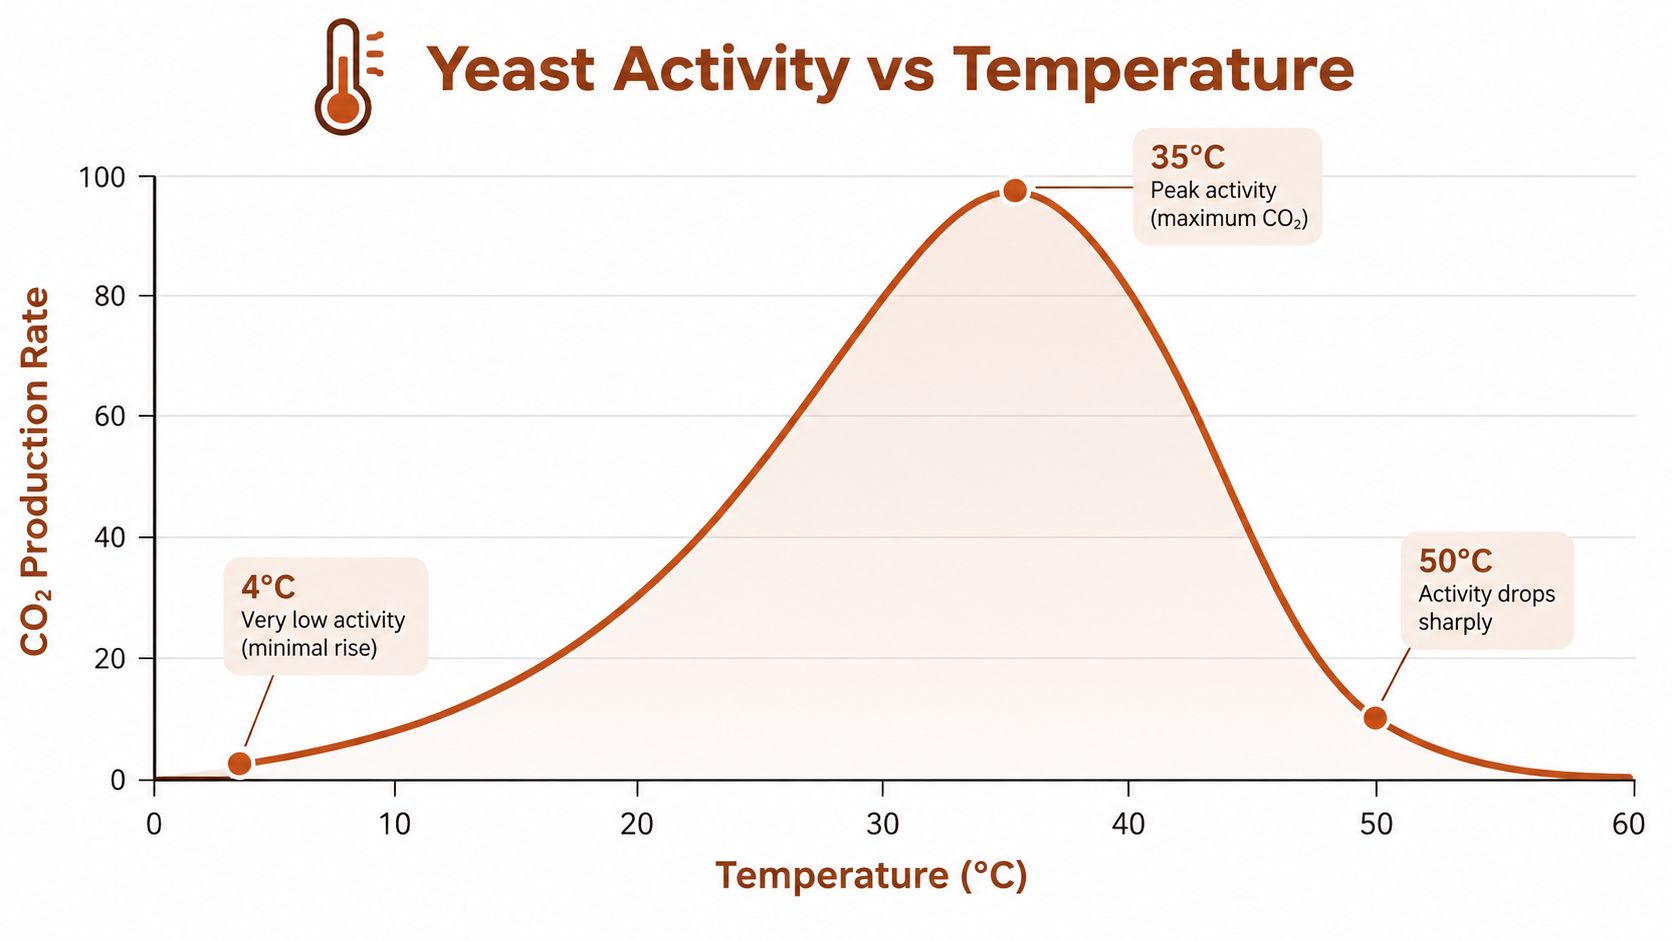
Yeast activity is strongest in a relatively narrow warm range, commonly around 75–85°F (24–29°C), while performance drops sharply below about 60°F (16°C). Water above roughly 130°F (54°C) can kill yeast outright, so a baker can create a flat loaf in two opposite ways, by chilling the dough or scalding the leavening agent before mixing. This baking-science reference explains the temperature relationship behind stalled dough.
The hidden cold spots
A stainless-steel bowl stored in a cool pantry can pull heat from freshly mixed dough. Cold tap water can do the same, and a bowl placed beside an exterior door or air-conditioning vent may lose warmth throughout bulk fermentation. The room can feel comfortable to you while the dough remains too cold for an efficient rise.
At around 68°F (20°C), bulk fermentation may take 4–6 hours, according to baking guidance collected in this troubleshooting reference for dough that fails to rise. That isn't a defect by itself. It means the clock has to match the dough's actual temperature.
Bench rule: If the dough is unchanged, don't add more flour or yeast immediately. First check whether the dough is cold.
High-protein dough adds another complication. Whey, pea, soy, collagen isolate, vital wheat gluten, and whole-grain flour create a denser, stiffer mass than ordinary white bread. That dough may ferment normally yet show a smaller volume increase, so judging success only by whether it doubles will send you in the wrong direction.
Diagnosing Yeast Viability and Temperature Shocks
Yeast needs warmth, moisture, and time to generate carbon dioxide and inflate the gluten network. Its practical working zone is roughly 75–82°F (24–28°C), while peak carbon dioxide production in bread dough is commonly placed around 32–38°C. Activity falls sharply above 40–43°C, and yeast can be inactivated around 54–56°C. The proofing-science guidance from Domson outlines these temperature limits.
Test the dough before blaming the packet
Activation water near 100–110°F (38–43°C) can stimulate yeast without exposing it to damaging heat, as described in this yeast-fermentation temperature guide. Use a thermometer rather than your hand. “Warm” is too vague when a few degrees can change the fermentation schedule.
If you're using a yeast that requires activation, combine it with the recipe liquid and wait for clear signs of activity before committing the rest of the ingredients. If it doesn't foam or develop a fresh bread-like aroma, replace it. Instant yeast can often go directly into the dry ingredients, but it still needs to be viable and protected from excessive heat.
Trace the temperature loss
Check three points:
- Water temperature: Measure it before mixing, especially when using water straight from a cold tap.
- Bowl temperature: Warm a cold metal or glass bowl before adding the ingredients.
- Dough temperature: Measure the mixed dough, not just the room. The dough is the process you need to control.
A cold dough doesn't always need more yeast. It may only need a warmer, humid environment and additional time. Conversely, dough that was mixed with overheated liquid may never recover because the yeast was damaged before fermentation began.
A proofing study found that proof times changed with dough temperature, proofer temperature, and yeast concentration with very high correlation, reported as R = 0.96–0.99 in the published research record. The practical lesson is that repeatable bread requires repeatable conditions. Measure first, then decide whether to wait, warm, or restart.
Fixing Hydration and Flour Imbalances
A dough can contain active yeast and still appear not to rise because its structure is too stiff to expand. Gas forms inside the dough, but a dry, heavily enriched, or overloaded dough resists stretching. The result is a dense mass with little visible lift.
Start by watching the dough during mixing. It should become cohesive and elastic rather than sandy or crumbly. A high-protein formula may feel tackier and firmer than standard sandwich dough, but it shouldn't feel like modeling clay.
Use texture as the first diagnostic
If the dough tears immediately when stretched, give it a short rest before adding anything. Resting lets flour hydrate and can make the dough more extensible without adding excess liquid. If it remains rigid after resting, add liquid gradually, working it in before deciding whether more is needed.
For a dough that's clearly too dry, use a small amount of warm liquid and incorporate it patiently. Avoid pouring a large quantity into the center of an already developed dough. That creates a slippery exterior and a dry core, making the gluten network harder to rebuild.
Whole wheat, rye, protein powder, and vital wheat gluten also change how the dough handles water. They can absorb liquid differently from ordinary bread flour, so a recipe that works with white flour may produce a much stiffer mixture after substitutions.
A dough that cannot stretch cannot hold the gas yeast produces.
High-protein bread demands particular care because protein ingredients increase nutritional density without automatically creating the same extensible network as flour. Vital wheat gluten contributes wheat-based structure, while whey, pea, soy, and collagen isolates alter stiffness, tackiness, and water demand. Make adjustments during mixing, not after the dough has sat for hours.
For a deeper look at handling wetter mixtures, use this guide to high-hydration dough technique. The objective isn't to make every dough loose. It's to make the dough supple enough to expand while retaining enough strength to hold its shape.
Adjusting Proofing Environments for High-Protein Doughs
A bowl left against a cold counter can stall dough before the yeast is at fault. Winter drafts, chilled mixing bowls, and a cool work surface all pull heat from the dough. High-protein formulas feel this effect more strongly because their tighter, denser structure expands slowly and may show less visible activity than a white sandwich dough.
Judge the dough by its formula, not by a fixed doubling rule. A high-protein loaf may be ready after a 50–75% increase. Look for a fuller shape, a lighter feel, and a smooth, slightly domed surface. Pushing it to double can overextend the structure, producing a weak or gummy loaf.
Keep the surface flexible
Dry air creates a skin on uncovered dough. That skin restricts expansion while fermentation continues underneath. Seal the bowl with a cover, oil plastic wrap if it touches the dough, and keep the container away from drafts.
Aim for moderate-to-high humidity, often near 75% relative humidity, with some guidance placing the working range at 70–80% humidity. Proofing commonly speeds up around 80–90°F (27–32°C). Temperatures above roughly 95–104°F (35–40°C) may damage yeast or introduce unwanted flavors.
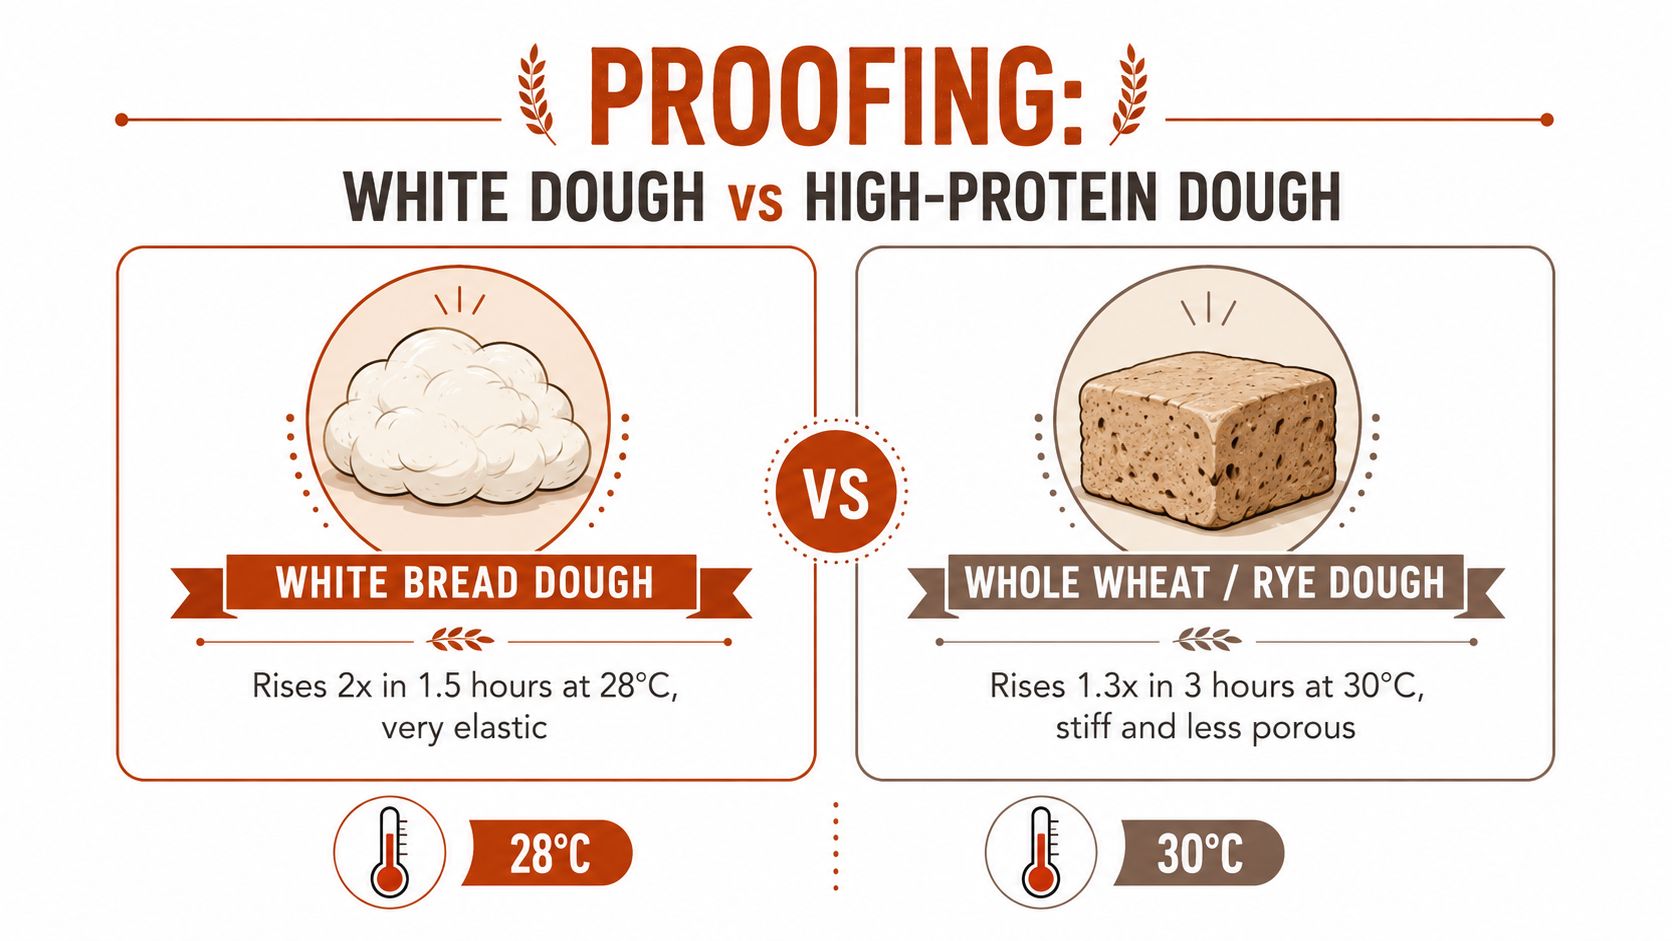
Warmth must reach the dough itself. Preheat a bowl with warm water, dry it thoroughly, then mix the dough, or place the covered bowl in a sheltered, mildly warm spot. A hot environment may accelerate fermentation at the surface while leaving the center dense, especially in a stiff, protein-rich dough.
Check the dough rather than relying only on the clock. Whey and collagen formulas can stay close to a normal cream color. Pea protein may look slightly grey-green and beany, soy can create a darker tan dough, and whole-grain formulas are browner. These color changes alone do not show fermentation failure.
Corrective Actions to Rescue a Flat Loaf
A flat bowl of dough needs triage, not panic. Start by checking whether the dough feels cold, whether the surface has dried, and whether there are any signs of fermentation such as small bubbles, a softened texture, or slight expansion.
Warm it without cooking it
Create gentle warmth rather than placing the bowl in a hot oven. A turned-off microwave with a mug of hot water can provide a sheltered environment, but keep the dough away from direct heat. A bowl set in a larger vessel of warm water can also help, provided water stays out of the dough and the temperature doesn't climb into the yeast-damaging range.
An improvised proofing box should feel comfortably warm, never hot. Recheck the dough after a period of warming rather than repeatedly opening the cover and losing humidity. If the dough begins to soften and expand, leave it alone and let fermentation catch up.
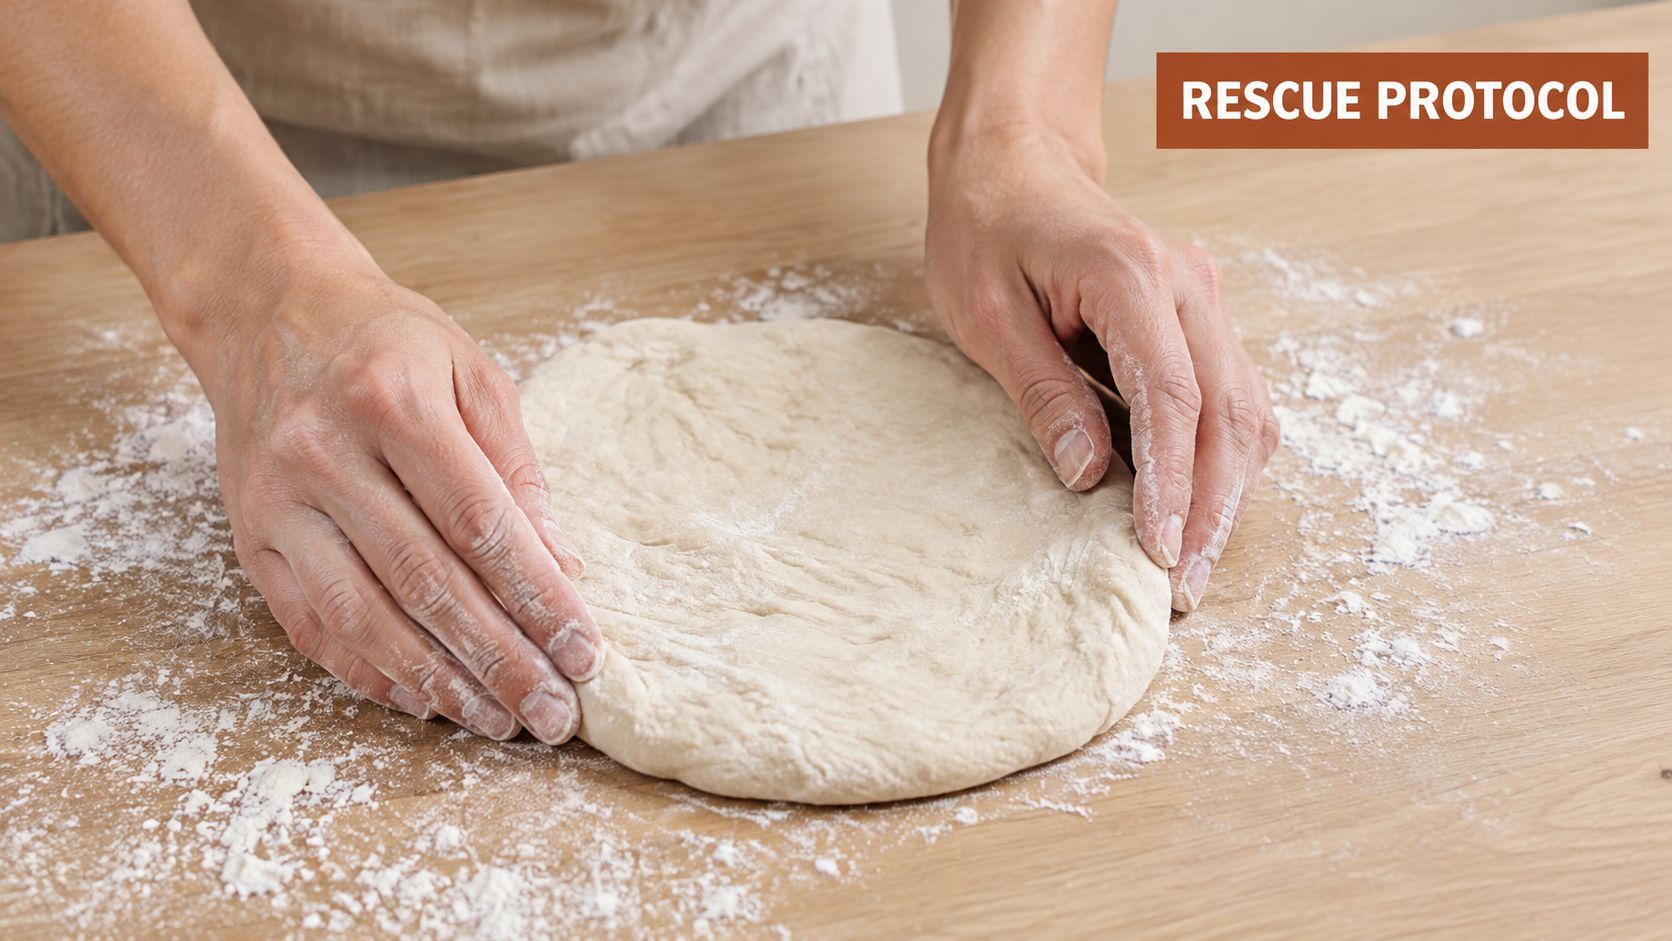
Shape is part of the rescue. Once the dough has become active, gently degas only as much as necessary, rebuild surface tension, and return it to a covered proof. Do not knead aggressively after a long fermentation, especially if the dough contains fragile protein additions.
This demonstration can help you review the hand movements for shaping before you handle the batch:
Know when to stop rescuing
If the dough is dry and cracked, incorporate warm liquid in a controlled slurry, a little at a time, using gentle folds. If the yeast was exposed to excessive heat, warming won't restore it. In that case, the practical choice is to restart rather than bake a loaf that has no leavening power.
Avoid baking a completely flat dough in the hope that the oven will create the missing fermentation. Oven spring can expand existing gas and active dough structure, but it can't replace a failed rise. For more guidance on preserving expansion during baking, consult this oven-spring bread guide.
Achieving Repeatable Results with Precision Proofing
Manual fixes work when you can measure and monitor the batch. A thermometer, covered bowl, warm water bath, and careful timing can bring a cold dough back into range. The weakness is repeatability. Every bowl, room, liquid, and draft becomes another variable.
A precision bread-making appliance addresses that chain directly. D'BakerAid is a system with a Stage 1 yeast fermentation bowl, a Stage 2 dough proofing bowl, and a hub that controls temperature and time, with an optional D'Steamer. It is designed to manage fermentation and proofing for difficult doughs, including high-protein and specialty formulas, rather than leaving the baker to approximate warmth with an oven light or hot-water mug.
That matters especially for protein bread. The five D'BakerAid formulas produce roughly 163–184g of protein per loaf, or about 10–11.5g per slice, depending on the recipe and slice thickness, based on the brand's ingredient-verified recipe data. The loaves are not gluten-free. They use wheat flour and vital wheat gluten, and the finished bread is typically softer but heavier, with a tight uniform crumb and a rise of about 50–75% rather than a full doubling.
If your priority is a dependable homemade protein bread recipe, precision proofing removes the most difficult variable. You can then choose whey, pea, soy, or collagen according to your diet and accept the trade-off, a denser loaf that delivers substantially more protein per slice than ordinary bread. General nutrition references place regular bread around 2–5g of protein per slice, while high-protein bread commonly provides about 5–12g per slice, depending on the product and formula, as summarized by Prevention's high-protein bread overview and this protein-per-slice comparison.
D'BakerAid™ gives home bakers controlled fermentation and proofing for bread that otherwise stalls, including dense high-protein doughs. Visit DBakerAid™ to review the system, then see the high-protein recipes at D'BakerAid Recipes and choose a formula that fits your kitchen and eating style.