

You've melted a bowl of chocolate, stirred it carefully, and waited for the surface to set. Instead, it turns dull, streaky, or soft. The thermometer says you hit the target, so the failure feels mysterious. It isn't. Chocolate tempering depends on the entire crystallization process, including temperature, time, agitation, composition, and cooling conditions.
The right chocolate tempering tools don't merely heat chocolate. They help you manage the thermal history of the batch, distribute developing crystals, and avoid overshooting the narrow working window. That's the difference between chocolate with gloss, snap, and a smooth mouthfeel and chocolate that looks acceptable for a moment before showing bloom.
Table of Contents
- Introduction to Professional Tempering Tools
- Understanding Temperature Dynamics in Chocolate
- Essential Thermometers for Precision Tempering
- Choosing the Right Tempering Machine
- Selecting Quality Bowls and Work Surfaces
- Using Spatulas and Scrapers Effectively
- Exploring D'BakerAid Tempering Capability
- Troubleshooting Common Tempering Issues
Introduction to Professional Tempering Tools
A batch can look perfectly melted and still set with gray streaks, a dull surface, or a weak snap. The problem often appears after the chocolate leaves the bowl, because crystallization reflects more than the final temperature. Cocoa butter can form several crystal structures, a behavior called polymorphism. Professional tempering favors Form V, the stable structure linked with gloss, clean snap, smooth texture, and greater resistance to fat bloom. A 2025 scientific review describes Form V as a well-ordered triclinic structure with a melting range of approximately 30.0–34.5°C. The review of cocoa-butter crystallization explains why tempering is controlled crystallization, not just melting followed by cooling.
At the bench, composition, shear, and thermal history all shape the result. Chocolate with different cocoa-butter levels will respond differently, while additions such as milkfat can alter crystallization. A batch cooled too quickly at the edges, stirred unevenly, or reheated after partial setting may contain an inconsistent crystal population. The visible symptoms include matte patches, streaking, uneven texture, and bloom.
Practical rule: A correct temperature reading does not prove a correct temper. Check the mixing pattern and the batch's cooling history as well.
For small batches, start with a focused setup:
- A fast immersion thermometer measuring the chocolate itself.
- A responsive bowl and heat source that stops transferring excess heat promptly.
- A flexible spatula that reaches the sides and base.
- A cool work surface for tabling or rapid corrective cooling.
- A quick temper test before molding, dipping, or enrobing the full batch.
A machine earns its place by controlling more than heat. Rheological experiments examined cocoa-butter crystallization at 22, 24, 26, 28, and 30°C, using strain levels of 0.1%, 1%, and 5%. The test at 26°C with 1% strain produced the highest growth rate, shortest lag time, and βV polymorph formation. The result shows why controlled shear can matter alongside temperature.
Professional equipment therefore treats stirring as a process variable. Consistent agitation distributes developing crystals through the mass, while reducing hot spots, cold pockets, and oversized clusters. Manual tabling can achieve the same control, but only when the operator manages movement and heat with discipline.
Understanding Temperature Dynamics in Chocolate
Successful tempering follows a staged thermal profile. You first melt the existing crystal structures, then cool the chocolate to encourage new nuclei, and finally reheat it to remove less-stable forms while preserving the desirable seeds. For dark chocolate, a practical reference sequence is 40–45°C for melting, 28–29°C for cooling, and 31–32°C for working. Purdue Extension's chocolate guidance also specifies a controlled crystallization period at approximately 18–20°C for up to 24 hours, with those temperatures applying to dark chocolate without added milkfat or other fats.
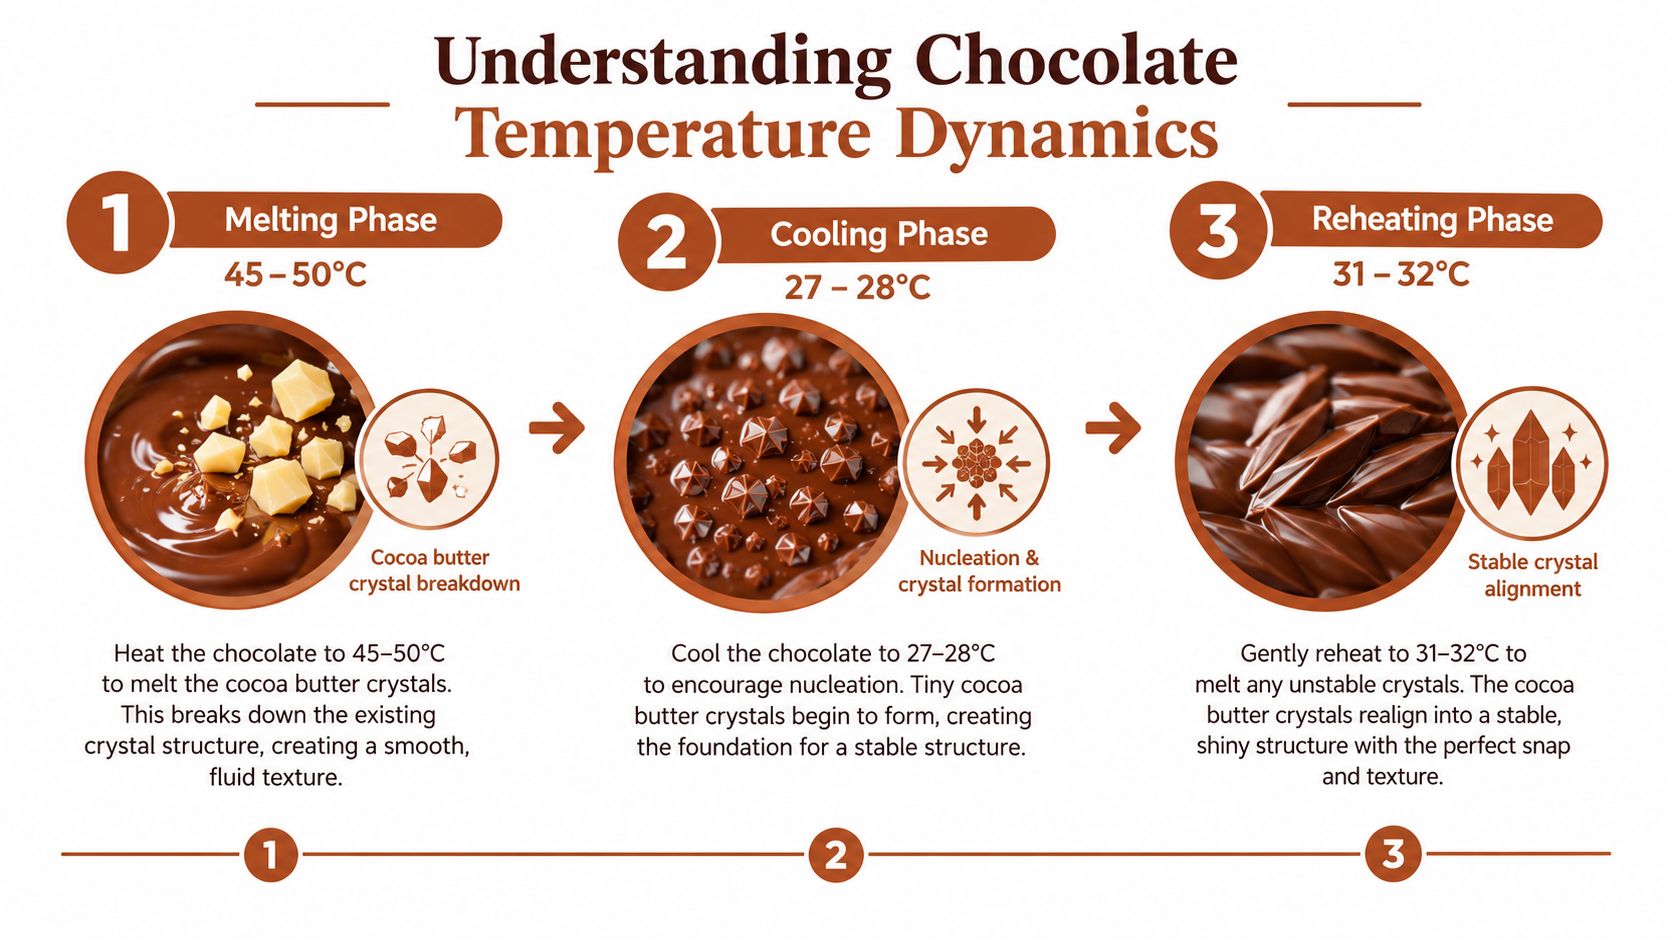
The three stages
Melting must eliminate the existing crystal memory. For dark chocolate, bring the mass to approximately 40–45°C, checking the center rather than trusting the vessel temperature. Incomplete melting leaves an uncontrolled seed population behind.
Cooling creates supersaturation and encourages nuclei to form. Stirring matters here because the chocolate needs even heat distribution and consistent shear. Letting the outside cool while the center remains warm creates a misleading reading and uneven crystallization.
Reheating brings the chocolate back into its working window. The purpose isn't to warm it casually. You're removing unstable polymorphs while retaining the stable Form V seeds that support the finished texture.
A basic melting pot often handles only the first stage. It can warm chocolate, but it may not cool quickly or evenly enough, and it may have no mechanism for continuous agitation. A better setup combines a responsive heat source, cooling control, and a probe placed directly in the chocolate mass.
Watch the probe position: If the sensor touches the bowl wall or base, it may report the vessel's temperature instead of the chocolate's actual temperature.
Milk and white chocolate generally require lower working temperatures than dark chocolate, and the precise profile changes with the recipe and fat composition. Use the couverture manufacturer's guidance as the starting point, then validate the batch with an independent thermometer and a small test piece. For a more detailed reference, use this chocolate tempering temperature chart.
Essential Thermometers for Precision Tempering
A thermometer is the first serious investment in a manual tempering setup. Chocolate can look melted while retaining solid pieces, and it can feel fluid while a hot pocket sits near the bowl wall. Surface appearance isn't a reliable temperature measurement.
An immersion probe is usually the most useful format because it measures the chocolate directly. Professional models may offer resolution to 0.1°C and response times under two seconds, features that help when the batch is moving through a narrow cooling or working window. These specifications are useful only when the probe is positioned correctly and kept moving through the mass.
Comparing thermometer types
| Thermometer type | Where it helps | Where it falls short |
|---|---|---|
| Infrared thermometer | Fast surface checks and noncontact readings | It doesn't reliably measure the temperature inside a deep chocolate mass |
| Instant-read immersion probe | Direct readings during melting, cooling, and reheating | It requires careful placement and regular cleaning |
| Logging thermometer | Recording the thermal history of repeat batches | It adds complexity that occasional users may not need |
| Built-in machine probe | Automated feedback during a programmed cycle | It should still be checked against an independent reference |
Use an infrared thermometer as a supplementary tool, not your only instrument. The surface can cool faster than the center, especially in a wide bowl or during tabling. An immersion probe gives you the more relevant reading, provided it doesn't rest against metal.
A reliable workflow includes calibration checks. Compare the machine or primary thermometer with an independent reference thermometer, record the melt, cool, and working temperatures, and repeat the check when changing couverture. A recipe containing different cocoa butter, milkfat, sugar, or inclusions may not behave exactly like the previous batch, even when the displayed temperature matches.
A thermometer tells you where the chocolate is. Stirring and observation tell you how the chocolate got there.
For a focused guide to probe selection and placement, see this chocolate tempering thermometer guide.
Before committing a full batch, spread a thin strip on a cool surface or mold a small test piece. A glossy appearance, firm set, and clean release indicate that the crystal population is behaving as intended. If the test remains soft, streaky, or dull, correct the process before wasting couverture and labor.
Choosing the Right Tempering Machine
A dedicated tempering machine earns its space when you need repeatability. Manual seeding and tabling can produce excellent chocolate, but they require the operator to control several variables at once: vessel temperature, cooling speed, mixing pattern, batch depth, and working temperature. A machine can reduce those variations by coordinating heat, cooling, and agitation in one system.
The historical progression is clear. Early industrial systems used water-jacketed kettles with mechanical stirrers. Baker Perkins records describe kettle capacities of 300, 600, 1,000, and 2,000 pounds, with paired kettles used to temper chocolate for enrobers and molding plants. Their process used three temperature stages, moving from storage at about 115°F, cooling to approximately 85°F for crystal-nuclei formation, and reheating to finishing temperatures of about 90–91°F for dark chocolate and roughly 87°F for milk chocolate. The Baker Perkins historical record shows the same principle used by modern compact machines, even though the scale is different.

What separates useful machines from heated bowls
Look for low thermal lag. If the heating element continues transferring energy after the chocolate reaches the set point, the batch can overshoot and destroy the seed population you were trying to preserve.
Look for even heat distribution. A hot wall or base can locally melt stable crystals while the probe reports a safer average temperature. Rounded vessels and controlled circulation reduce that risk.
Look for adjustable stages, not a single temperature button. You should be able to melt, cool, and reheat according to the chocolate formulation, with enough control to pause or adjust the cycle.
Finally, test the batch. Spread a small sample on a cool surface or mold a small piece before filling molds or starting an enrobing run. A machine that reaches the programmed temperature but produces poor gloss or weak snap still needs adjustment, cleaning, or independent calibration.
A manual setup remains sensible for occasional work and small quantities. A dedicated machine becomes more attractive when you repeat the same product, need both hands for production, or can't afford to discover a tempering failure after the chocolate has already covered the molds. Compare the control features and workflow requirements in this guide to chocolate tempering machines for home use.
Selecting Quality Bowls and Work Surfaces
The vessel changes how quickly you can correct a temperature error. A thin, conductive metal bowl responds faster than a heavy vessel that stores heat, which makes metals such as aluminum or copper useful for manual tempering. The point isn't that one material guarantees a temper. The point is that responsive equipment gives you a better chance to stop heating or accelerate cooling before the chocolate crosses its working limit.
A rounded bowl is easier to manage than one with sharp internal corners. Chocolate circulates more cleanly, and a flexible spatula can scrape the base and sides without leaving unmixed pockets. The bowl should also be food-safe, free of scratches that trap residue, and completely dry. A small amount of water can make chocolate seize, while condensation can interfere with a clean set.
Why the work surface matters
Tabling relies on a cool, dense surface that pulls heat from a thin layer of chocolate. Marble and granite are traditional choices because they provide a stable, smooth plane for spreading, scraping, and folding. The surface must be clean and dry, with enough room to work without pushing chocolate over the edge.
Quartz can also be practical when you need a smooth, nonporous surface for bench work. Review quartz slab options with attention to the specific material, finish, cleanliness, and suitability for food-contact preparation rather than choosing on appearance alone.
A cold slab isn't a substitute for a thermometer. It changes the cooling rate, but you still need to know the chocolate's actual temperature.
For machine use, inspect the internal vessel and lid as carefully as the controls. The material should tolerate repeated thermal cycling without affecting flavor or shedding residue. A removable bowl is helpful because chocolate collects in seams, around paddles, and under lids. If cleaning is awkward, operators tend to rush it, and old chocolate becomes a source of contamination in the next batch.
Using Spatulas and Scrapers Effectively
Agitation is not decoration. Stirring distributes heat, disperses developing nuclei, and prevents one part of the mass from crystallizing differently from another. Research on cocoa-butter crystallization shows that shear influences nucleation and crystal growth, so the way you move the chocolate matters alongside the temperature reading.
Choose a flexible silicone spatula for bowl work. It should bend enough to follow the curve of the vessel, reach the base, and wipe the sides without leaving a film behind. A blade that's too stiff skips across the bowl, while one that's too soft folds chocolate without moving the colder or warmer layers effectively.
Use a metal scraper on a marble or granite slab. Its straight edge spreads chocolate into a thin layer and gathers it back efficiently. The edge should be smooth, free from burrs, and appropriate for the work surface. A damaged scraper can scratch the slab and create places where residue accumulates.
A controlled stirring pattern
During cooling, scrape the sides and base, then fold the chocolate through the center. During reheating, keep the mass moving so the warmer regions blend with the cooler regions. Don't whip air into the batch. The aim is even circulation, not volume.
A practical sequence looks like this:
- Sweep the perimeter to remove chocolate that has cooled against the bowl.
- Draw through the center to blend the temperature gradient.
- Scrape the base so settled chocolate doesn't overheat or form an isolated crystal population.
- Pause briefly for a reading, keeping the probe in the mass rather than against the vessel.
If chocolate thickens unexpectedly, don't immediately add heat. First check whether the batch cooled too far, whether the bowl is colder than expected, or whether excessive agitation has changed the apparent viscosity. Tool control helps you diagnose the process instead of masking the symptom.
Exploring D'BakerAid Tempering Capability
D'BakerAid is primarily a bread fermentation and proofing system, with a Stage 1 yeast fermentation bowl, a Stage 2 dough proofing bowl, and a hub that controls temperature and time. Its precision-baking approach is relevant to chocolate work because tempering also depends on controlling a narrow thermal profile rather than relying on ambient conditions.
The platform includes a low-temperature chocolate mode with adjustable temperature and duration controls. Its manual specifies a default chocolate setting of 50°C for 90 minutes and a temperature range of 24–50°C. That makes it a candidate for controlled low-temperature treatment, but it doesn't remove the need to use the chocolate formulation's own tempering profile, verify the actual mass temperature, and test a sample before production.
The important limitation is functional. A temperature-controlled bowl can provide a stable environment, but temperature stability alone isn't the whole temper. You still need appropriate agitation and a staged sequence that suits dark, milk, or white chocolate. Form V is the desired temper-stable polymorph, and Cargill places its melting point at approximately 34–35°C, while process guidance uses cooling near 27–29°C and reheating to roughly 30–33°C to favor it. Cargill's tempering instructions also emphasize avoiding unstable forms associated with bloom.
Use D'BakerAid once in this article as one option within a broader toolkit, not as a replacement for a probe thermometer, suitable spatula, or quick temper test. Its value lies in giving the operator more consistent environmental control during a process that otherwise depends heavily on heat loss, vessel behavior, and timing.
Troubleshooting Common Tempering Issues
A dull finish usually means the crystal population wasn't stabilized correctly. The batch may not have cooled enough to form useful nuclei, it may have been overheated during reheating, or the chocolate may have cooled unevenly. Streaks and gray bloom point toward the same larger problem, but composition, contamination, and storage conditions can also redirect crystallization.
A soft center or weak snap often indicates that the working temperature or agitation was wrong. Check the actual chocolate temperature with the probe, then review whether the mass was stirred throughout cooling and reheating. If the chocolate becomes grainy or unusually thick, investigate rapid cooling and moisture before increasing the heat.
Diagnose the process, not just the number
Cocoa butter develops through more than a heat target. Its crystal structures are affected by time, shear, pressure, composition, and cooling conditions, and small changes in minor fat composition can accelerate, delay, or misdirect crystallization. The research review on cocoa-butter structure supports the practical distinction between temperature error and crystallization-process error.
Use this diagnostic sequence:
- Verify the instrument: Compare the displayed temperature with an independent thermometer.
- Check the probe: Make sure it was immersed in the mass, not touching the bowl wall.
- Review agitation: Confirm that the spatula or paddle distributed the chocolate during every stage.
- Inspect the formulation: Different couvertures and added fats may require different working behavior.
- Run a test strip: Check gloss, set, snap, and release before using the full batch.
If the test fails, re-melt and repeat the appropriate profile rather than trying to rescue a visibly unstable batch with random heating. Good chocolate tempering tools reduce uncertainty, but they can't compensate for moisture, an unsuitable formulation, or a skipped validation step.
D'BakerAid™ offers controlled temperature and timing through a home baking system that also includes a low-temperature chocolate mode, making it useful for bakers who want more repeatable conditions than a saucepan and bowl provide. Visit DBakerAid™ to review the system and choose the chocolate and bread recipes that fit your kitchen.