

Preservative-free bread is often visibly moldy in about 5–6 days, so the working prevention sequence is to cool it completely, avoid trapped humidity, keep short-term loaves dry at room temperature, and freeze anything you won't eat within a few days. Bread mold prevention is mostly a matter of managing moisture, spores, and storage time, not finding a wrapper that keeps every loaf fresh indefinitely.
The familiar advice to never refrigerate bread leaves out an important distinction: mold growth and staling aren't the same problem. You can accept a firmer slice to reduce spoilage risk, or freeze portions before either problem becomes noticeable.
Table of Contents
- Which Storage Method Slows Mold
- How to Cool Wrap and Store a Loaf
- When Visible Mold Means the Whole Loaf Goes
- Why Bread Molds After It Cools
- Formula and Loaf Hurdles That Add Days
- Set the Next Loaf Up to Last
Which Storage Method Slows Mold
Choose storage according to when you'll eat the loaf and how humid your kitchen is. Start with the table, then adjust for the bread's moisture and your tolerance for a firmer crumb.
Bread storage choices for mold versus texture
| Method | Use when | Mold effect | Texture trade-off |
|---|---|---|---|
| Room temperature, dry, after full cool | You'll finish the loaf promptly, rather than keep it through the week | No cold-temperature protection against mold | Best crumb if humidity stays low |
| Plastic bag at room temperature | Avoid for moist homemade loaves when moisture accumulates inside | A 2021 bread-storage study found Penicillium on sourdough-containing bread after 10 days in a plastic bag; 89.9% relative humidity dramatically accelerated mold growth | Soft at first, but vulnerable to dampness |
| Refrigerator | The kitchen is hot or humid and mold risk matters more than firmness | Slows fungi; doesn't make mold impossible | Crumb firms faster and can seem drier |
| Freezer, sliced and sealed | You won't eat the bread within a few days | Suppresses mold growth while frozen | Lets you thaw only what you need and preserve the surplus |
Room temperature protects texture, not a schedule
A dry bread box or paper bag is a reasonable choice for a fully cooled loaf you'll eat soon. Neither is a preservation system, and neither makes a damp kitchen dry.
Keep the container away from the dishwasher, stovetop, and other sources of steam. Don't place a freshly washed bread box back into service until its interior and lid are dry.
Plastic isn't automatically wrong for all bread. The problem is moisture accumulation, especially when a moist homemade loaf enters the bag while it's still warm. A wrapper that works for a commercially formulated sandwich loaf may perform poorly around a wetter artisan loaf.
Refrigeration is a deliberate compromise
Cold storage slows fungal growth, but it also speeds the crumb changes we recognize as staling. A refrigerated slice can feel firm even when it hasn't developed mold.
Practical rule: Never refrigerate bread is a texture rule, not a universal food-safety rule.
If your kitchen is persistently humid, accepting toast-friendly bread from the refrigerator may be more sensible than losing a soft loaf on the counter. Cool it before refrigerating, keep the package free of condensation, and continue checking it before eating.
A cheap digital hygrometer can help you recognize a humid kitchen. Don't treat the study's humidity level as a household cutoff, though. You don't need to reach that extreme before changing your storage plan, and the air inside a damp bag can differ from the surrounding room.
For longer storage, choose the freezer rather than trying to stretch countertop freshness. The simplest decision is: eat soon in a dry kitchen, room temperature; humid conditions, refrigerator; later meals, freezer.
How to Cool Wrap and Store a Loaf
A loaf's storage life depends on two things you can control: how much moisture stays around it and how soon you plan to eat it. Set out a clean cooling rack, a dry knife and board, and the packaging you'll need before the loaf leaves the oven.
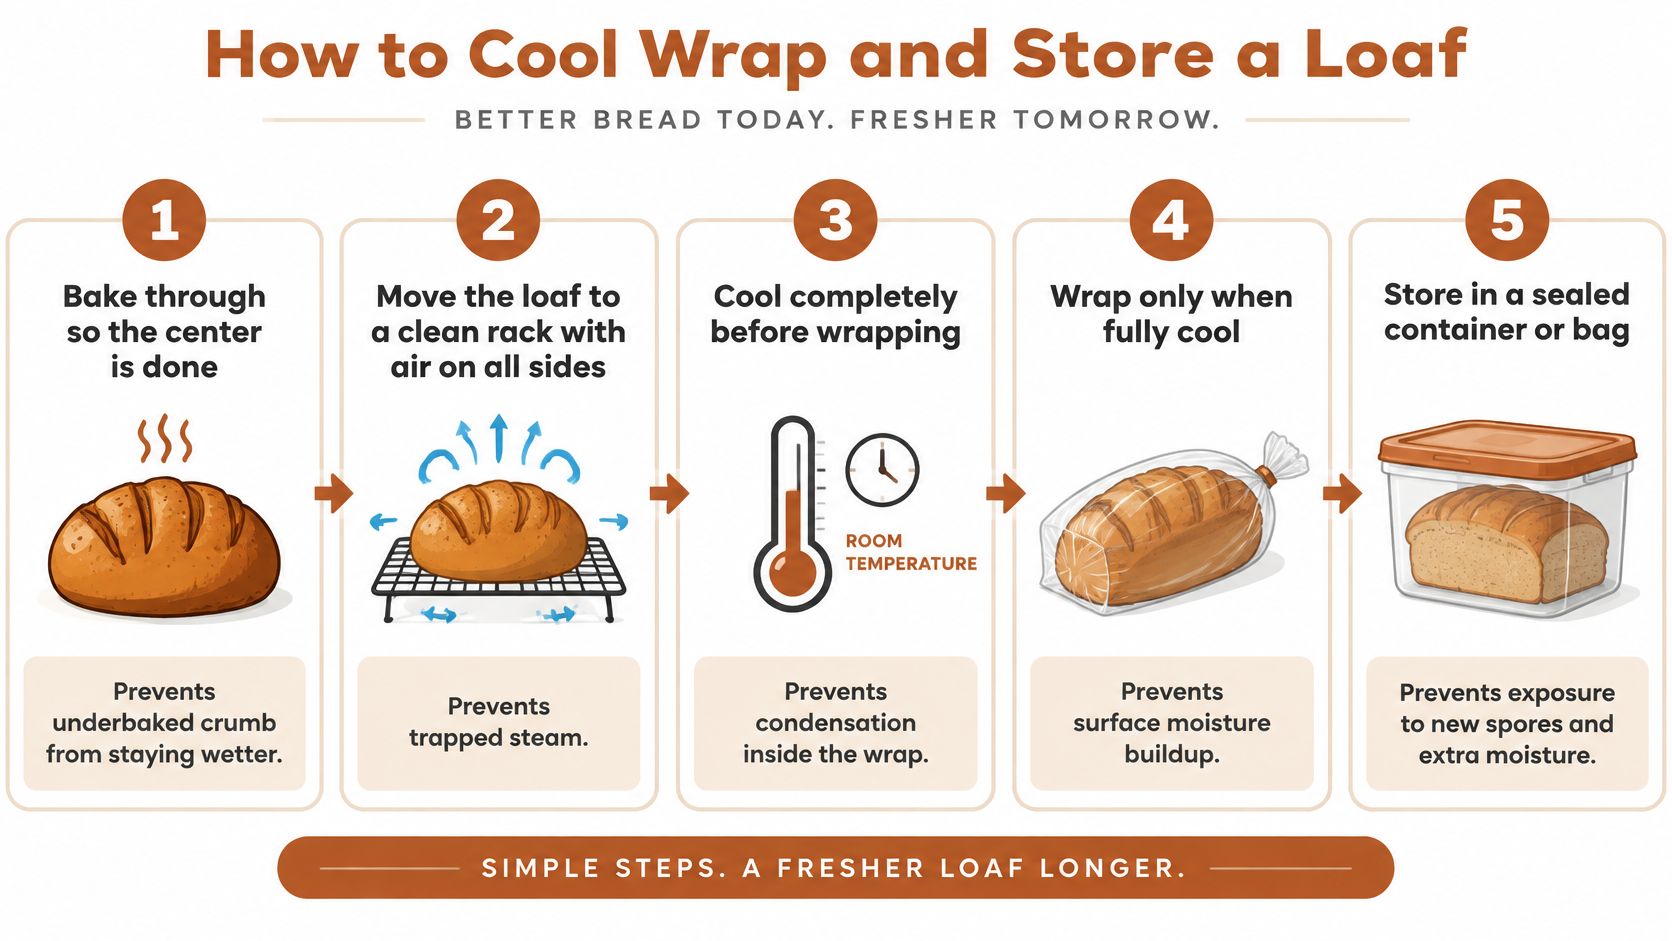
- Bake through to the center. Follow the recipe's doneness checks. An underbaked, gummy center won't be fixed by changing the bag.
- Move the loaf to a clean rack. Remove it from the pan when the recipe directs. Air needs to circulate underneath and around the bread so steam can escape.
- Cool it completely before wrapping. Check the sides and underside, too. A cool crust can cover a center that is still releasing heat.
- Slice with clean, dry tools. Use a board washed since its last use, especially if it held spoiled food. Handle only the slices you need.
- Choose packaging for the next few days. For a loaf you'll eat soon, use clean paper, a cotton bag, or a ventilated bread box. Keep airtight wrapping away from warm bread, which can create condensation.
- Refrigerate only when the conditions call for it. If your kitchen is persistently humid and countertop bread spoils quickly, a clean bag in the refrigerator may be the better safety choice. Make sure the loaf is cool and check for moisture inside the bag. The trade-off is a firmer crumb: refrigeration speeds staling, so “never refrigerate bread” is a texture rule, not a universal food-safety rule.
- Freeze what you'll eat later. Slice the loaf first, wrap portions well against air and freezer moisture, and label the package. You can take out only what you need.
- Clean up before the next loaf. Remove crumbs, then wash and dry the board, knife, rack, and bread box.
Portion before the loaf becomes a storage problem
Health's dietitian guidance on bread storage recommends freezing bread you won't consume soon and slicing it beforehand. That way, you thaw only the amount needed rather than repeatedly thawing the whole loaf.
For an enriched loaf such as this challah bread recipe, set aside breakfast slices and freeze portions for later meals. Use a well-sealed freezer bag for those portions, not the breathable packaging suited to short countertop storage.
The infographic's sealed-storage step applies after the loaf has cooled completely. A warm loaf sealed in a bag can leave water droplets inside, so let the center cool before wrapping.
For a visual baking companion, use the video below alongside the handling checklist.
Keep cooling racks away from returned or spoiled bread, and don't reuse an old bread bag with crumbs in it. Freezer storage times vary by bread and packaging, so date every package and use the oldest portions first rather than treating frozen bread as undated inventory. Before storing, check that the loaf is cool and the bag is dry inside.
When Visible Mold Means the Whole Loaf Goes
Discard the whole loaf when you see mold, not just the affected slice. The USDA Food Safety and Inspection Service's mold guidance explains that bread and baked goods are porous, so contamination can extend below the visible surface.
Cutting away a patch doesn't establish a safe boundary. A clean-looking slice beside a moldy one isn't proof that the remaining bread is suitable to eat.
Verdict by what you see, smell, and feel
| Sign | Verdict |
|---|---|
| Fuzzy green, blue, white, black, or pink growth | Discard the whole loaf |
| Damp slime, or a stringy, fruity-smelling crumb in an underbaked loaf | Discard the whole loaf |
| Visible spot cut away from the rest | Still discard; mold can penetrate below the surface |
| Sour or stale smell with no spots | Not automatic evidence of mold; consider the loaf's normal aroma and any other changes |
| Firm slice after refrigeration | Consistent with staling; still check the bread for spoilage |
Don't use your nose as a mold test
Don't bring a fuzzy loaf close to your face to identify its smell. Avoid disturbing the growth, contain the bread in a bag, and put it in a covered trash container.
Sourdough can smell pleasantly sour without being spoiled. Conversely, bread doesn't become safe just because it lacks an unpleasant odor. Smell alone can neither confirm nor rule out mold.
A stringy crumb or unusual slime also deserves a discard decision, not an attempt to dry or toast the loaf back into use. You don't need to identify the organism in your kitchen before deciding not to eat visibly spoiled bread.
Don't turn visibly moldy bread into toast, crumbs, or croutons. The decision is disposal, not a different recipe.
Clean the place the loaf occupied
After disposal, wash the bread board, knife, and washable bread-box surfaces with hot, soapy water, then dry them thoroughly. Clean the pantry area or refrigerator shelf where the loaf sat, including crumbs caught in corners.
Don't put a new loaf into the old bag. If the container has seams or a lid groove, inspect those areas rather than only wiping the flat base.
If every bake spoils unusually quickly, investigate warm wrapping, a damp container, and dirty slicing equipment before changing flour or adding preservatives. Check whether someone is returning handled slices to the bag, too.
Start the next loaf on clean, dry tools. Disposal protects the current meal; cleanup reduces opportunities to contaminate the next bake.
Why Bread Molds After It Cools
Think of the crumb as a damp sponge inside a closed box. It doesn't need to drip to provide usable water, and a spore doesn't need a visible puddle before it can grow.
Say you bake a sandwich loaf, cool it until the crust feels comfortable to touch, and slide it into a bag. The center may still be releasing moisture, so the sealed space becomes wetter even though the loaf looked dry when you packed it.
Available water matters more than appearances
Water activity describes how available water is for microbial growth, rather than how much water a food contains. A 2024 food-science review reports that most molds grow above 0.80 water activity, while some dry-tolerant molds can grow as low as 0.65.
The same review places commercial and homemade bread at approximately 0.75–0.90 water activity, reports crust moisture at about 16%, and describes preservative-free bread becoming visibly moldy after 5–6 days under ordinary storage conditions. Those figures describe susceptibility, not an expiry date for every loaf.
Water activity isn't the same measurement as kitchen relative humidity. A household hygrometer can describe the room, but it can't certify that the inside of your bread is unable to support mold.
This concept map shows how available water and contamination work together.
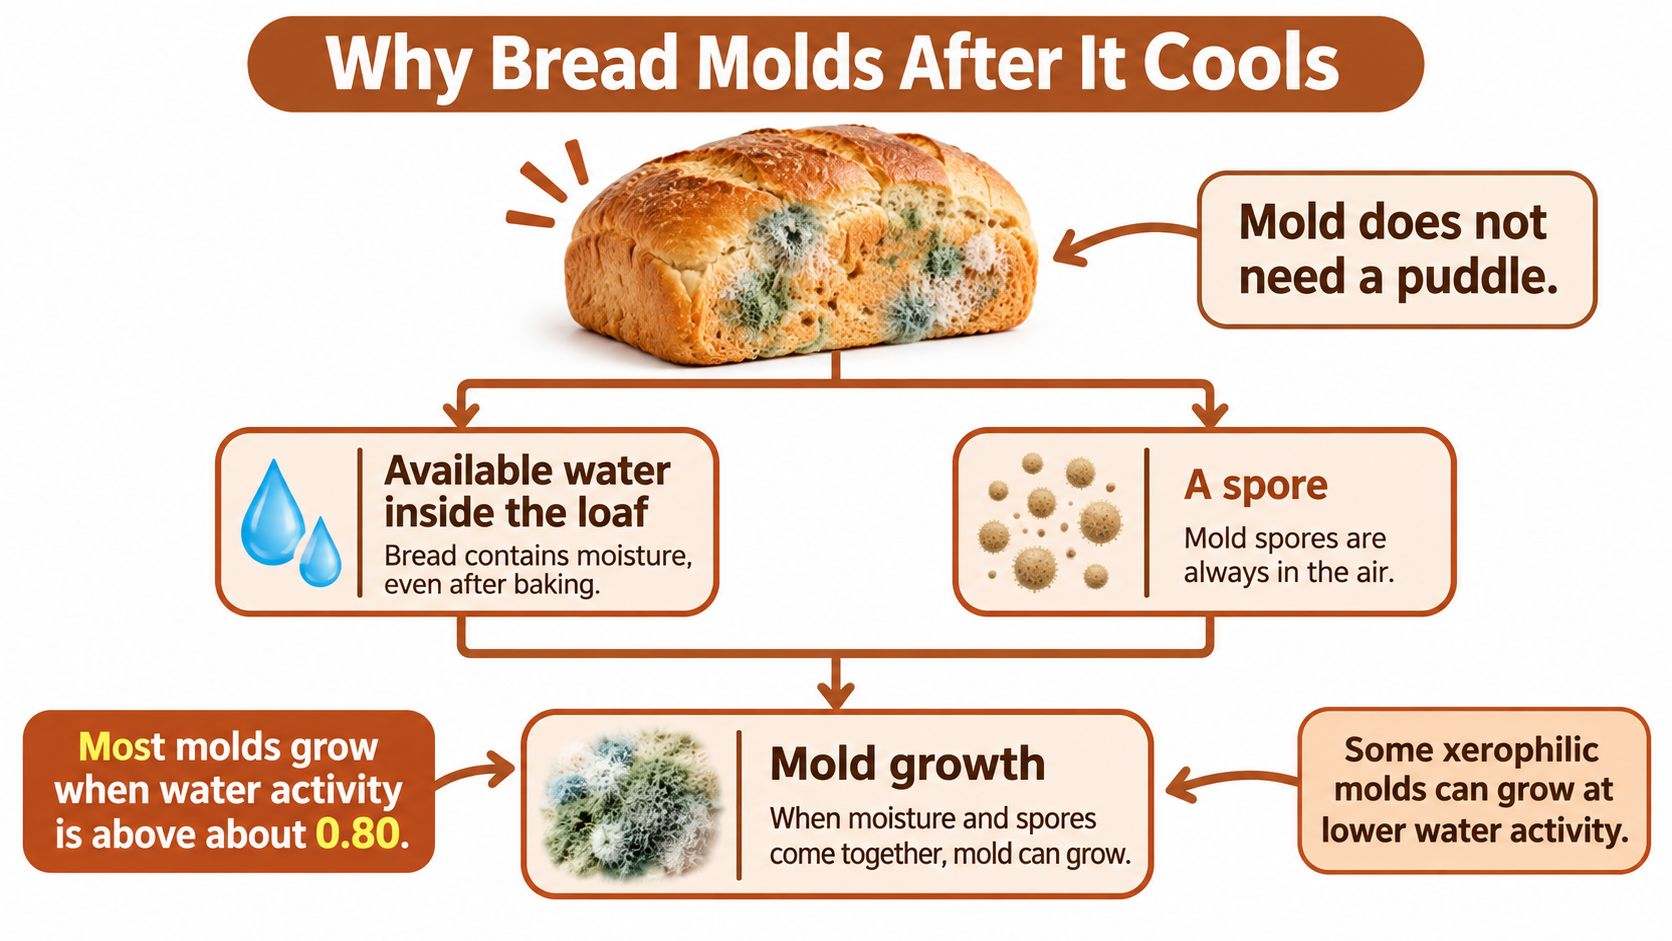
A baked loaf can pick up new spores
Baking isn't the end of contamination control. After the loaf leaves the oven, spores can arrive through air, hands, knives, boards, racks, and slicers.
That explains why a well-baked loaf can still develop mold during storage. The baker may have handled fermentation and baking correctly, then exposed the finished bread to a contaminated surface.
The crust initially offers a drier exterior than the crumb, but moisture moves during storage. A crisp shell can soften in a package, so its condition at oven exit doesn't predict its condition later.
For sourdough, the fermentation process shapes the dough before baking. It doesn't prevent fresh contamination when someone cuts the finished loaf on a dirty board.
- Reduce damp pockets. Don't press a cooling loaf against a solid surface or close it in a steamy container.
- Limit handling. Take out the slices you need without touching the rest.
- Keep equipment dry. A washed but wet bread box still creates an avoidable moisture problem.
The practical aim isn't a sterile kitchen. It's to avoid giving ordinary airborne spores a warm, wet package and contaminated tools.
Formula and Loaf Hurdles That Add Days
A preservation hurdle makes fungal growth harder without sterilizing the loaf. Acidity, permitted preservatives, packaging, and cold storage can work together, but none excuses poor handling.
For home bakers, rank these options by practicality first, not by the largest laboratory shelf-life gain. Cooling, sanitation, and portion freezing require less formulation knowledge than botanical extracts or preservative systems.
Natural ingredients have limits
A 2025 review of botanical bread preservation describes essential oils extending mold-free life by about 5–7 days, encapsulated plant extracts adding about 2–3 days, and sourdough levels around 30% producing mold-free shelf life of as much as 10 days in reported work. These are formulation-specific outcomes, not interchangeable promises.
In particular, reaching a total mold-free life is different from adding that many extra days. A sourdough percentage also needs a defined recipe basis; don't convert a reported inclusion level into a flour-weight calculation without checking the formulation.
Preservation hurdles ranked by days gained
| Hurdle | Days gained | Home use |
|---|---|---|
| Sourdough at about the reported inclusion level | Extended total mold-free life in tested formulations, not a fixed bonus | Yes, if the recipe allows |
| Essential oils added to dough | Additional mold-free time, with a sensory trade-off | Flavor cost; avoid guesswork |
| Encapsulated plant extracts | Modest additional time in tested systems | Not a practical routine home method |
| Propionate at a permitted level | No universal day gain established here | Only where the formulation is validated |
| Modified atmosphere, carbon dioxide and nitrogen | A percentage extension rather than a fixed number of days | Industrial only |
| Cooling, dry packaging, and freezing | No fixed day gain; freezing suppresses growth during frozen storage | Yes, the core home controls |
Thyme, oregano, cinnamon, and clove oils can change flavor enough to reduce acceptance. Don't casually dose essential oils into dough, and don't assume a culinary herb has the same effect as a tested extract or active package.
Industrial packaging isn't a home recipe
A bread-packaging study and preservation review describes contact films containing 2% or 4% sodium propionate, tested with bread slices for 15 days at 25 ± 2°C, with greater mold reduction at the higher concentration. It also reports that atmospheres containing 50% carbon dioxide and 50% nitrogen extended shelf life by about 117% at 22–25°C and 158% at 15–20°C in cited studies.
Those film concentrations are not dough-addition instructions. Likewise, industrial gas packaging isn't a reason to attempt home gas flushing.
Calcium or sodium propionate belongs in an authorized, validated formulation. A home baker shouldn't improvise the dose or assume that more preservative compensates for a wet package.
Match handling to the loaf
- High-hydration artisan bread and focaccia. Allow the substantial interior to cool fully, and portion early when the kitchen is humid.
- Whole-grain and seeded loaves. Keep cutting equipment and storage boxes free of accumulated crumbs; don't assume their appearance makes small changes easy to spot.
- Starch-based gluten-free bread. Portion for the freezer when texture deteriorates quickly. This gluten-free bread-baking guide addresses a separate style of formulation.
- Homemade high-protein bread. Whey, pea, soy, or collagen recipes containing wheat flour and vital wheat gluten are high-gluten, not gluten-free. Their denser crumb needs careful cooling, not an assumption that protein enrichment preserves the loaf.
Package check: A fogged bag is a reason to reassess cooling and moisture management, not a sign that the wrapper is keeping bread fresh.
Set the Next Loaf Up to Last
Start tonight with three actions: finish cooling the current loaf on a rack, freeze the portions you won't eat soon, and clean the knife and rack before the next mix. Choose tomorrow's breakfast portion now so you don't have to thaw the whole loaf.
For your next bake, prepare the storage space before preparing the dough. Put out a clean rack, clear a dry place for cooling, and have freezer bags ready. This small setup makes the preservation routine part of baking rather than an afterthought.
Put precision in the right part of the process
Our D'BakerAid system controls yeast activation in the Stage 1 bowl and dough proofing in the Stage 2 bowl, with the hub managing temperature and time; you knead your way and bake in your home oven, with real steam available from the optional D'Steamer. That supports repeatable dough preparation, not a mold-free shelf-life guarantee.
The recommended first bake is a classic white sandwich loaf using white flour, instant yeast, Yeast mode, and the White proofing program, with about 80 minutes of prep and 30 minutes of baking. Establish a reliable bake and storage routine before moving to wetter or protein-enriched doughs.
- Finish the bake properly. Don't package a loaf with an underdone center.
- Keep cleanup straightforward. The D'Yeast and D'Dough bowls are top-rack dishwasher-safe; wipe the D'Steamer with a damp cloth.
- Choose the recipe deliberately. High-protein wheat-and-gluten loaves and the separate gluten-free range serve different baking needs.
Explore the high-protein recipes when you're ready for a denser sandwich loaf. Whatever you bake, plan the portions before you put the bread away.
DBakerAid™ offers controlled yeast activation and dough proofing to help you prepare bread more consistently at home. Visit DBakerAid™ to explore the system, then pair your next bake with complete cooling, clean handling, and freezer-ready portions.