

You pull the loaf from the oven, wait as long as you can, and cut into the center. The crust looks convincing, but the crumb is gummy, the corners have collapsed, or the whole slice feels like chalk. I've made all three versions, often after following a recipe carefully, because gluten free bread baking doesn't respond well to wheat-bread instincts.
The reliable approach is to treat the loaf as a small engineering project. You're building a flour blend for flavor and bulk, a hydrated network for gas retention, and a baked structure that can set without gluten. Once you know which stage failed, you can adjust one variable instead of throwing more flour or water at the bowl.
Table of Contents
- Why Gluten Free Bread Fails and What Changes When You Understand the Science
- Choosing the Right Flour Blend for Flavor, Structure, and Crust
- Getting Hydration Right Without a Soupy or Stiff Batter
- Binding Agents That Replace Gluten's Elasticity
- Mixing, Proofing, and Baking the Loaf Step by Step
- Fixing Dense Crumb, Collapse, and Gumminess
- Storing, Freezing, and Refreshing Gluten Free Bread
Why Gluten Free Bread Fails and What Changes When You Understand the Science
A loaf can look promising in the pan and still fail at the knife. The crumb may be gummy, the corners may sink, or the slice may crumble like chalk. I have made all three mistakes, often while following a wheat-bread method carefully. Wheat dough gets strength from gluten, a protein network that forms as flour hydrates and mixes. Gluten free bread must assign those jobs to starches, hydrocolloids, and proteins instead.
That change affects the dough you should expect. A properly hydrated mixture may look like thick pancake batter rather than a smooth, elastic ball, so a stretchy windowpane test tells you very little. Judge the mixture by three questions: can it bind water evenly, retain fermentation gas, and set into a firm crumb in the oven?
A systematic review of 259 gluten free bread studies reported specific volumes ranging from 1.3 to 7.58 cm³/g, with a mean of 4.42 ± 1.06 cm³/g. The spread shows how strongly flour balance and processing affect the finished loaf (Glutafin's history of gluten free bread). Volume does not describe every quality problem, but it makes the structural challenge easier to see.
The three jobs your formula must perform
Water-binding comes first. Flour, starch, and binders need enough liquid to hydrate fully. Too little creates a stiff, gritty mixture that cannot expand. Too much leaves a loose batter whose bubbles escape before the loaf can support them.
Gas-retention follows during fermentation and proofing. Yeast supplies the gas, but the batter must hold those bubbles as they enlarge. Hydrocolloids raise viscosity and help stabilize the bubbles, while proteins support the crumb network that develops later (a scientific review of gluten free bread formulation).
Bake-set completes the handoff. Heat gelatinizes starches and coagulates proteins, changing the wet interior into a sliceable crumb. If the crust firms before the center has developed enough structure, the loaf may collapse. Cutting it while hot can also make a properly baked center seem gummy.
Practical rule: Diagnose the stage before changing an ingredient. Density usually points to water-binding or structure. Collapse points to gas-retention. Gumminess points to bake-set or insufficient cooling.
A controlled fermentation and proofing system can reduce temperature and timing variation, but it cannot correct a poorly balanced formula. For a separate appliance workflow, see this guide to gluten free bread methods.
Choosing the Right Flour Blend for Flavor, Structure, and Crust
A single gluten free flour rarely gives you everything a loaf needs. Brown rice flour contributes a mild whole-grain base, sorghum adds a gently sweet, earthy note, and starches lighten the crumb. The blend has to balance flavor with a matrix that can hold fermentation gases.
| Flour or Starch | Structural Role | Flavor | Suggested Blend % |
|---|---|---|---|
| Brown rice flour | Main flour body, moderate density | Mild, nutty, whole-grain | 40% |
| White rice flour | Lighter flour base | Neutral | Adjust to replace part of brown rice |
| Sorghum flour | Adds body and flour protein | Mildly sweet, earthy | 20% |
| Tapioca starch | Stretch, chew, and lighter crumb | Neutral, slightly sweet | 30% |
| Potato starch | Softness and moisture contribution | Neutral | 10% |
| Corn starch | Lightness and crust browning | Neutral, faintly sweet | Small substitution for part of the starch |
A practical starting blend is about 40% brown rice flour, 30% tapioca starch, 20% sorghum flour, and 10% potato starch by weight. This isn't a universal formula. It's a useful baseline because brown rice and sorghum provide flavor and body, while tapioca and potato starch keep the loaf from becoming heavy.
Whole-grain flours bring more character, but their bran can interrupt crumb continuity. Refined starches usually make a loaf lighter and help the crust brown, but they need a binder and enough protein support to prevent a fragile or gummy interior. Corn starch can brighten the texture, although too much refined starch can make the bread taste flat.
Match the blend to the loaf you want
For sandwich bread, keep enough rice and sorghum in the formula to produce a mild, familiar slice. For rolls or hearth-style loaves, a little more whole-grain flour can add flavor, provided the binder and hydration are adjusted. Pizza dough benefits from starches that provide flexibility, but an excess of tapioca can make the baked base sticky.
Commercial flour mixes are convenient for a weeknight loaf, especially when you're learning how your oven behaves. The trade-off is control. A custom blend lets you reduce brown rice if the crumb feels gritty, lower tapioca if the center is gummy, or replace some potato starch when the crust is too soft.
Avoid recipes built around one flour alone. Single-flour formulas amplify that flour's weaknesses, whether that's heaviness, brittleness, blandness, or excessive gumminess. A blend gives each ingredient a narrower job, which makes troubleshooting far easier.
For another flour-based variation, compare the structure and flavor considerations in this guide to chickpea flour bread.
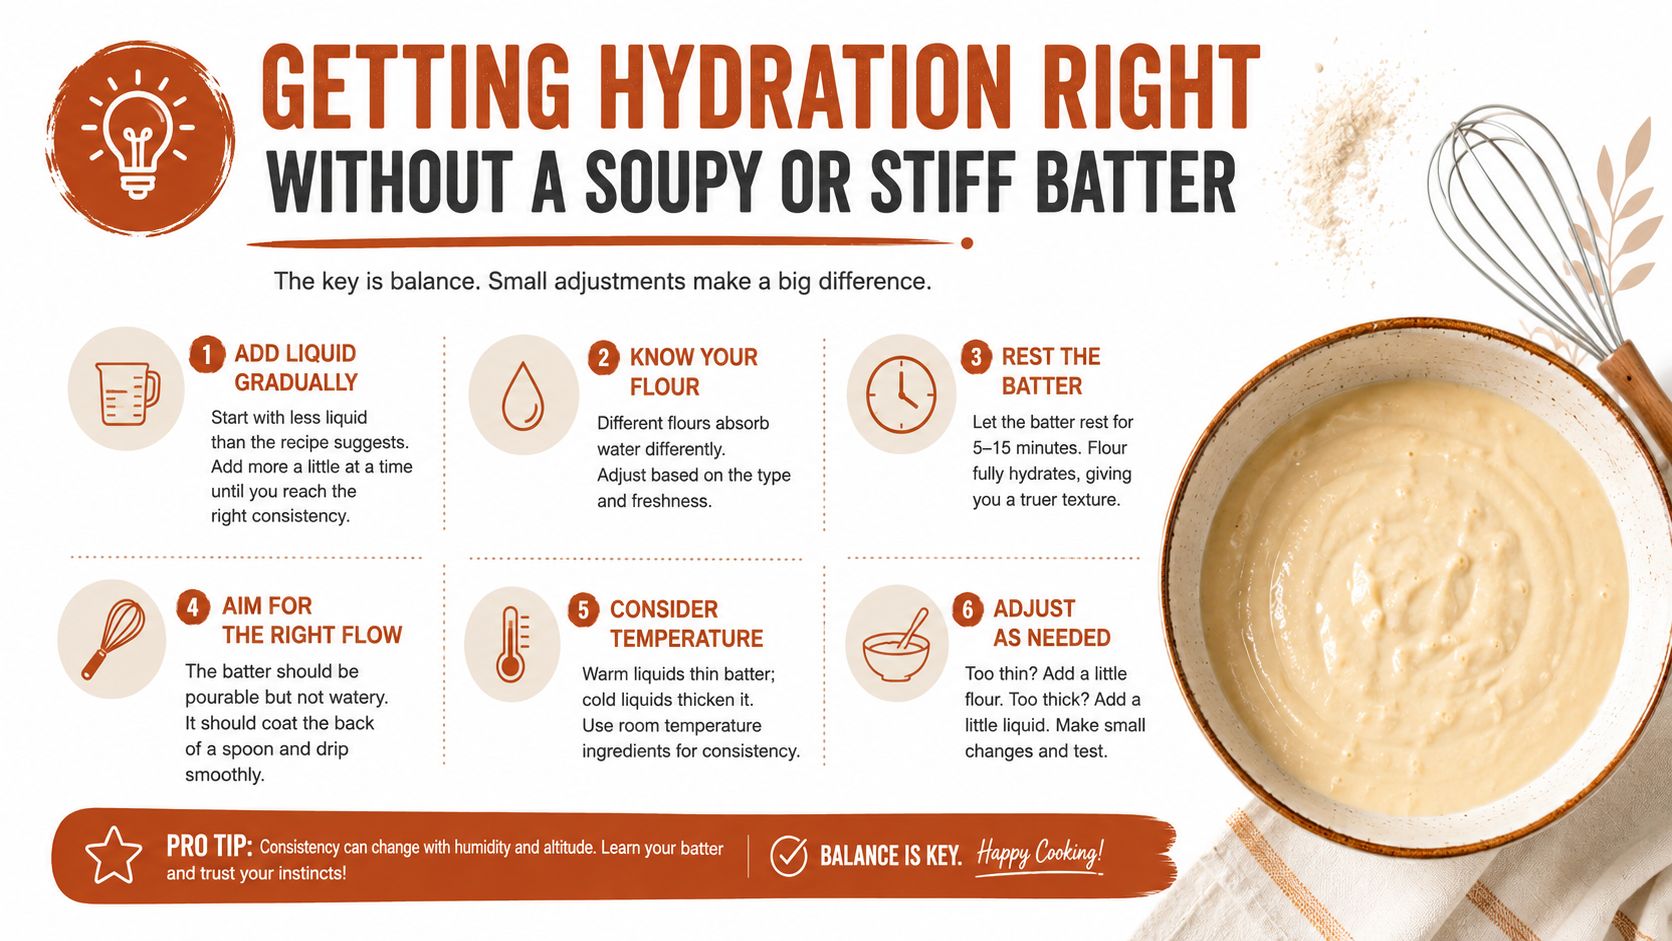
Getting Hydration Right Without a Soupy or Stiff Batter
A gluten free loaf can look perfect in the bowl, then bake into a dense brick or collapse around a gummy center. Water-binding is the first engineering decision. Gluten free batters often need about 75% to 95% hydration, compared with 60% to 70% for wheat dough, because starches absorb water differently and binders need enough liquid to form their network. The RSC Food & Function research on gluten free bread processing explains why hydration must be tuned to the formula rather than copied from wheat bread.
Baker's percentage gives you a workable starting point. With 500 grams of flour blend, 80% hydration means 400 grams of water. Treat that figure as a trial setting, since brown rice, sorghum, tapioca, and potato starch absorb water at different rates. Your target is a thick, spoonable batter, not a kneadable wheat-style dough.
Add liquid in stages
Hold back about 15% of the total water. Dissolve the hydrocolloid and sugar in that portion, then add the rest after the dry ingredients begin absorbing liquid. This staged approach gives the binder time to develop before you decide whether the batter needs more water.
Mix the first addition until no dry pockets remain. Add the reserved liquid gradually, pausing to assess the texture. A workable batter should slowly level itself in about five to eight seconds, closer to thick pancake batter than drop-cookie dough.
Use the furrow test. Drag a wet finger across the surface. The groove should remain visible briefly, without filling at once. A sharp ridge signals a stiff batter. Soup-like flow signals excess liquid, although the mixture may thicken as the binder hydrates. Wait before adding flour.
A slightly wet batter can become workable with time. Patience is cheaper than repairing a fully mixed bowl.
Binding Agents That Replace Gluten's Elasticity
A gluten-free batter can look perfect in the bowl and still collapse in the oven. The missing piece is gluten's elastic network, which normally stretches around gas bubbles, holds water, and helps the crumb set. Hydrocolloids do these jobs differently, so “just add xanthan” gives unreliable results. Psyllium husk, xanthan gum, HPMC, and egg white powder each alter viscosity, elasticity, water retention, and crumb development.
Choose the binder according to the loaf's engineering needs. Psyllium is often the most forgiving starting point for yeasted bread. It absorbs about five to ten times its weight in water, forming a flexible gel that lets the batter stretch without turning brittle. It brings a faint nutty note and suits hearth loaves and rolls.
Xanthan gum thickens quickly and helps bind bubbles, which can benefit quickbreads and formulas needing firm control. Used alone, though, it can make the crumb feel snappy rather than stretchy. Excess xanthan also raises the risk of gumminess, especially when the batter already contains plenty of water.
HPMC follows a different sequence. Its main gel develops with heat, above about 60°C, so it supports shape as the loaf's structure forms in the oven. That hot-set behavior suits sandwich bread and pizza. A 2011 study found that 1.0% to 1.5% hydrocolloids improved loaf volume and shelf life compared with control gluten free bread. Trained panelists preferred 1.5% HPMC for volume, appearance, and firmness (the systematic review and study discussion).
Egg white powder supplies neutral protein for browning and crumb set. Weigh it accurately. Too much can produce a dry, meringue-like crust, and it does not fit egg-free or vegan baking.
| Agent | Mechanism | Dosage per 250 g flour | Best For | Dietary Note |
|---|---|---|---|---|
| Psyllium husk | Flexible hydrated gel | 7 to 10 g | Hearth loaves and rolls | Check allergen and cross-contact needs |
| Xanthan gum | Fast viscosity and bubble binding | 1 to 2 g | Quickbreads and controlled binding | Suitable for many gluten free formulas, but verify product handling |
| HPMC | Heat-activated gel | 1 to 1.5 g | Sandwich bread and pizza | Choose a certified gluten free product where required |
| Egg white powder | Protein coagulation and browning | 15 to 20 g | Firmer crumb and color | Not suitable for egg allergy or vegan baking |
Use these amounts as starting points per 250 grams of flour, not as interchangeable substitutions. Binder choice is only the first decision. Water balance determines whether the gel can form and whether the batter expands evenly. Research on water and hydrocolloid interactions connects poor combinations with low stability, overexpansion, weak crumb, or restricted gas-cell growth (research on water and hydrocolloid interactions). Adjust one variable at a time, then judge the baked crumb rather than the bowl's appearance alone.
Mixing, Proofing, and Baking the Loaf Step by Step
Begin with a 750-gram flour baseline and use a stand mixer fitted with a paddle, not a dough hook. Add the flour blend, salt, yeast, and selected binder to the bowl. Whisk the dry ingredients first so the binder disperses instead of forming one concentrated pocket. This is the first engineering decision, water-binding. The dry mix must be evenly prepared before liquid can hydrate it.
Add the water, oil or melted butter, and any dairy or egg in three additions. Beat for 30 seconds on low, then 90 seconds on medium after each addition, scraping the bowl as needed. The finished batter should drop from the paddle in a slow ribbon. If it gathers into a kneadable ball, it lacks enough water for this loaf style. A wheat-like dough ball is not a sign of success here. It usually predicts a dry, compact crumb.
Let the batter rest for 20 minutes. Psyllium needs this time to build its gel, while the starches absorb water. That rest reduces gritty pockets and makes the batter easier to shape. Judge the consistency again after resting, because a mixture that looks loose at first may thicken substantially.
Shape without degassing
Grease a Pullman pan or a 9 × 5-inch loaf pan, then transfer the batter gently. Smooth the surface with wet fingers or a damp spatula. Handle it like a fragile foam rather than wheat dough. Pressing, punching, or repeated reshaping removes the bubbles that will provide lift.
Proof at 35°C and about 75% to 85% humidity for 45 to 70 minutes. Controlled experiments have used conditions such as 34°C with relative humidity above 90% for 40 minutes and 35°C with 65% relative humidity for 40 minutes. Those differences show why proofing temperature and moisture affect crumb uniformity and gas retention (controlled proofing research, another proofing experiment).
Watch the batter rather than relying on the timer. It should crest about 1 to 1.5 cm above the rim, with a domed surface that jiggles slightly. Gluten free loaves commonly rise about 50% to 75% rather than doubling. Waiting for a dramatic doubling can overextend the gas-retention system and leave the loaf vulnerable to collapse.
Bake until the center sets
Heat the oven to about 190°C. Put a small metal tray of boiling water on the lower rack for the first 12 minutes, then remove it so the crust can dry. Bake for about 45 to 55 minutes, allowing for differences in pan, oven, and loaf size.
The final engineering decision is bake-set. Check the center with an instant-read probe. A standard loaf should reach about 96°C internally at sea level before removal. Insert the probe in the center, away from the pan wall, and cool the loaf on a wire rack for a full 2 hours before slicing.
For comparison, a guide to high protein gluten free bread shows why high-protein and gluten-free formulas need different structural strategies. A high-protein formula containing wheat gluten is not gluten free.
Fixing Dense Crumb, Collapse, and Gumminess
A loaf with a tight, heavy crumb usually failed at the first engineering decision, water-binding. The batter did not hold enough usable moisture, the binder was too weak, or the flour blend contained too much dense whole-grain material. Gluten-free batter should resemble a thick paste that can support bubbles, not a stiff wheat-style dough.
Collapse points to the second decision, gas-retention. If the loaf rises high and then sinks or wrinkles, its gas cells expanded beyond the strength of the surrounding network. Overproofing can cause this failure. Too much xanthan can also create an overly elastic system that stretches, then gives way suddenly.
Gumminess belongs mainly to bake-set. A probe may reach the target temperature while moisture is still moving through the crumb and the starch structure is still firming. Slice too soon and steam escapes through the cut surface, leaving the center wetter and making a formula problem look worse.
Match the symptom to one adjustment
| Symptom | Stage at Fault | Likely Cause | Targeted Fix |
|---|---|---|---|
| Dense, heavy crumb | Water-binding | Too little liquid or binder | Raise water by about 5% to 10% or add about 1 g more psyllium per cup of flour |
| Tall loaf collapses | Gas-retention | Overproofing or binder too elastic | Use psyllium or HPMC, and bake at the first crest rather than waiting for excessive expansion |
| Wet or gummy center | Bake-set | Bake rushed or loaf sliced too soon | Extend baking by about 5 to 8 minutes at 180°C, check the probe in two spots, and cool for 2 hours |
Make one small adjustment at a time. Water and hydrocolloids interact: changing both sharply can produce excessive expansion in one loaf and restrained gas-cell growth in the next, as rheology research on gluten-free bread indicates (gluten free bread rheology research).
Do not add flour automatically to a dense loaf. If the batter lacked hydration, extra flour tightens the network and can leave the crumb even heavier. Identify the failed stage first, then adjust only that lever.
Storing, Freezing, and Refreshing Gluten Free Bread
Cooling is part of the recipe, not a courtesy after baking. Leave the loaf on a wire rack for at least 90 minutes before slicing, and use the full 2-hour cooling period for a large sandwich loaf. Cutting early releases internal steam and can leave you blaming the formula for a gummy crumb that was still setting.
For short-term storage, keep the cooled bread at room temperature in a paper-towel-lined bag or bread box for 2 to 3 days. The towel helps manage crust moisture, while room-temperature storage avoids the faster staling that can occur when cold temperatures accelerate starch retrogradation.
Freeze in portions
Slice the loaf before freezing if you want individual servings. Double-wrap it in foil, place it in a freezer bag, and freeze at -18°C for up to 3 months. Remove only what you need, because repeated thawing and refreezing damages texture and increases drying.
For dough-specific handling, follow this guide to thawing frozen dough. If you're planning bread around household dietary needs, personalized gluten-free diet plans can help organize meals without turning the bread itself into a nutrition claim.
Refresh a whole loaf in a 180°C oven for 8 to 10 minutes after a light mist of water. For one slice, microwave it for 30 seconds, then toast it for 2 minutes. The microwave restores softness, while the toaster removes surface moisture and brings back some crust texture.
If a properly stored slice tastes chalky rather than merely stale, revisit hydration and flour texture. Storage can't correct a blend that started with too little water or an excess of coarse whole-grain flour.
DBakerAid™ coordinates yeast fermentation and dough proofing conditions, which can make the timing-sensitive stages of gluten free bread easier to repeat at home. Visit DBakerAid™ to review the system and its recipe workflow, then start with one carefully measured loaf and record what your batter, proof, and crumb tell you.