

You're standing at the counter with a jar of starter that looks lively enough to matter, but the recipe in front of you says to feed it and gives a string of numbers with almost no context. 1:1:1? 1:2:2? 1:5:5? Most bakers don't need more ratios. They need to know which one fits tonight's room temperature, tomorrow's bake time, and how much flour they're willing to throw away.
That's the job of a sourdough starter feeding ratio. It isn't a sacred formula. It's a control knob. Once you see it that way, feeding gets much simpler, and your starter gets much more predictable.
Table of Contents
- What a Sourdough Starter Feeding Ratio Actually Means
- The Common Ratios from 1 - 1 - 1 to 1 - 10 - 10
- How to Calculate and Scale a Feed
- Adjusting Ratios for Kitchen Temperature
- Maintenance Feeds Versus Bake-Day Builds
- Example Feeding Schedules You Can Follow
- Troubleshooting Starter Behavior After a Feed
What a Sourdough Starter Feeding Ratio Actually Means
A feeding ratio tells you how much ripe starter you carry over into fresh flour and water, measured by weight and written in a fixed order: starter, flour, water.
If you feed 20 grams of starter with 20 grams of flour and 20 grams of water, that is a 1:1:1 feed. If you keep the same 20 grams of starter but feed 40 grams of flour and 40 grams of water, that is 1:2:2. The ratio changes the pace of the culture because you are changing how much food the microbes get relative to the amount of mature starter already in the jar.
That matters more than bakers often expect.
A ratio is not a badge of correctness. It is a setting. In practice, it sets three things you care about in a real kitchen:
- how fast the starter rises
- how long it stays near peak
- how much acidity carries into the next build
Smaller feeds move faster because a larger share of the jar is already fermented. Larger feeds slow things down because the starter has more fresh flour and water to work through before it peaks. In a cool kitchen, that can help you avoid underactive builds. In a warm kitchen, it can keep the starter from racing ahead while you sleep or leave for work.
The numbers also say nothing about your conditions by themselves. A 1:2:2 feed at 68°F behaves very differently from a 1:2:2 feed at 78°F. Flour choice changes the rhythm too. Whole grain usually speeds things up. White flour usually gives a steadier, slower curve.
This is why feeding ratio works best as a variable you tune to your schedule, room temperature, and tolerance for discard. Bakers who want a same-day refresh often choose a smaller feed. Bakers trying to hold a starter overnight or keep a tiny seed culture without constant waste often use a larger one.
For a clear primer on how the organisms in the jar behave before you start adjusting ratios, see this guide to sourdough wild yeast.
One more practical point. Ratio and hydration are related, but they are not the same thing. A 1:1:1 feed keeps equal flour and water by weight, which gives you a 100% hydration starter. The ratio tells you how much old starter stays in the mix. Hydration tells you the texture of the new mix.
Keep those separate, and ratio choices get much easier.
The Common Ratios from 1 - 1 - 1 to 1 - 10 - 10
Feed a starter at 9 p.m. in a 78°F kitchen with 1:1:1, and it may be peaked and falling before breakfast. Feed that same starter at 1:5:5, and you usually get a much more usable overnight window. That is the job of ratio choice. It sets the pace so the starter matches your kitchen and your schedule.
A useful rule from King Arthur's ratio guide is to group feeds by timing: 1:1:1 for fast refreshes, 1:2:2 for same-day use, 1:3:3 to 1:5:5 for longer holds, and 1:10:10 for very delayed feeds or occasional maintenance (King Arthur Baking on feeding ratios). That framing is more practical than chasing a single “best” ratio.
What each common ratio does
1:1:1 is the quickest common feed. I use it when I want the culture to turn around fast, or when a sluggish starter needs a short, active cycle to get moving again. The trade-off is a narrower peak window, especially in a warm room.
1:2:2 is a strong everyday ratio for many home bakers. It still peaks the same day, but it gives you more margin if lunch runs long or the dough has to wait an hour.
1:3:3 and 1:5:5 are scheduling ratios. They buy time, soften the carryover acidity, and make overnight or workday feeding easier. In a cool kitchen they can feel slow. In a warm kitchen they often solve more problems than they create.
1:10:10 is a specialty tool. It suits hot weather, long gaps between feeds, or a tiny seed starter that you want to keep going with minimal attention. It is usually more than you need for routine baking.
Common sourdough starter feeding ratios compared
| Ratio | Approximate Peak Time | Discard Volume | Best Use |
|---|---|---|---|
| 1:1:1 | Fast in most active room-temperature kitchens | Lower if you keep a small seed starter, but frequent feeds can still add up | Quick refresh, same-day baking, active room-temperature maintenance |
| 1:2:2 | Slower, with a wider working window than 1:1:1 (Sourdough Ratio feeding guide) | Moderate | Pre-bake feed, day schedule, slightly longer peak window |
| 1:3:3 | Moderate to slow, depending on temperature | Moderate to higher per feed | Warm kitchens, evening feed for next-morning use |
| 1:5:5 | Often suited to overnight timing in many kitchens | Higher per feed | Overnight build, extending time between feeds |
| 1:10:10 | Longest interval of the common ratios | High per feed, but manageable if built from a very small seed amount | Long delays, low-attention maintenance, vacation timing |
The discard trade-off is real
Higher ratios reduce speed, not waste by themselves. Waste comes from feeding more total starter than you need.
Serious Eats makes that point well. 1:2:2 and 1:5:5 can help reduce discard if you also keep a small seed culture, but larger feeds still use more flour overall if the jar size keeps creeping up (Serious Eats on reducing starter discard).
Keep this in mind when choosing a ratio:
Bigger feeds fix timing. Small seed amounts fix waste.
That is why the same 1:5:5 ratio can feel efficient in one kitchen and excessive in another. If you are feeding 10 g of starter, it is a tidy overnight build. If you are feeding 100 g of starter, it is a flour bill.
How to Calculate and Scale a Feed
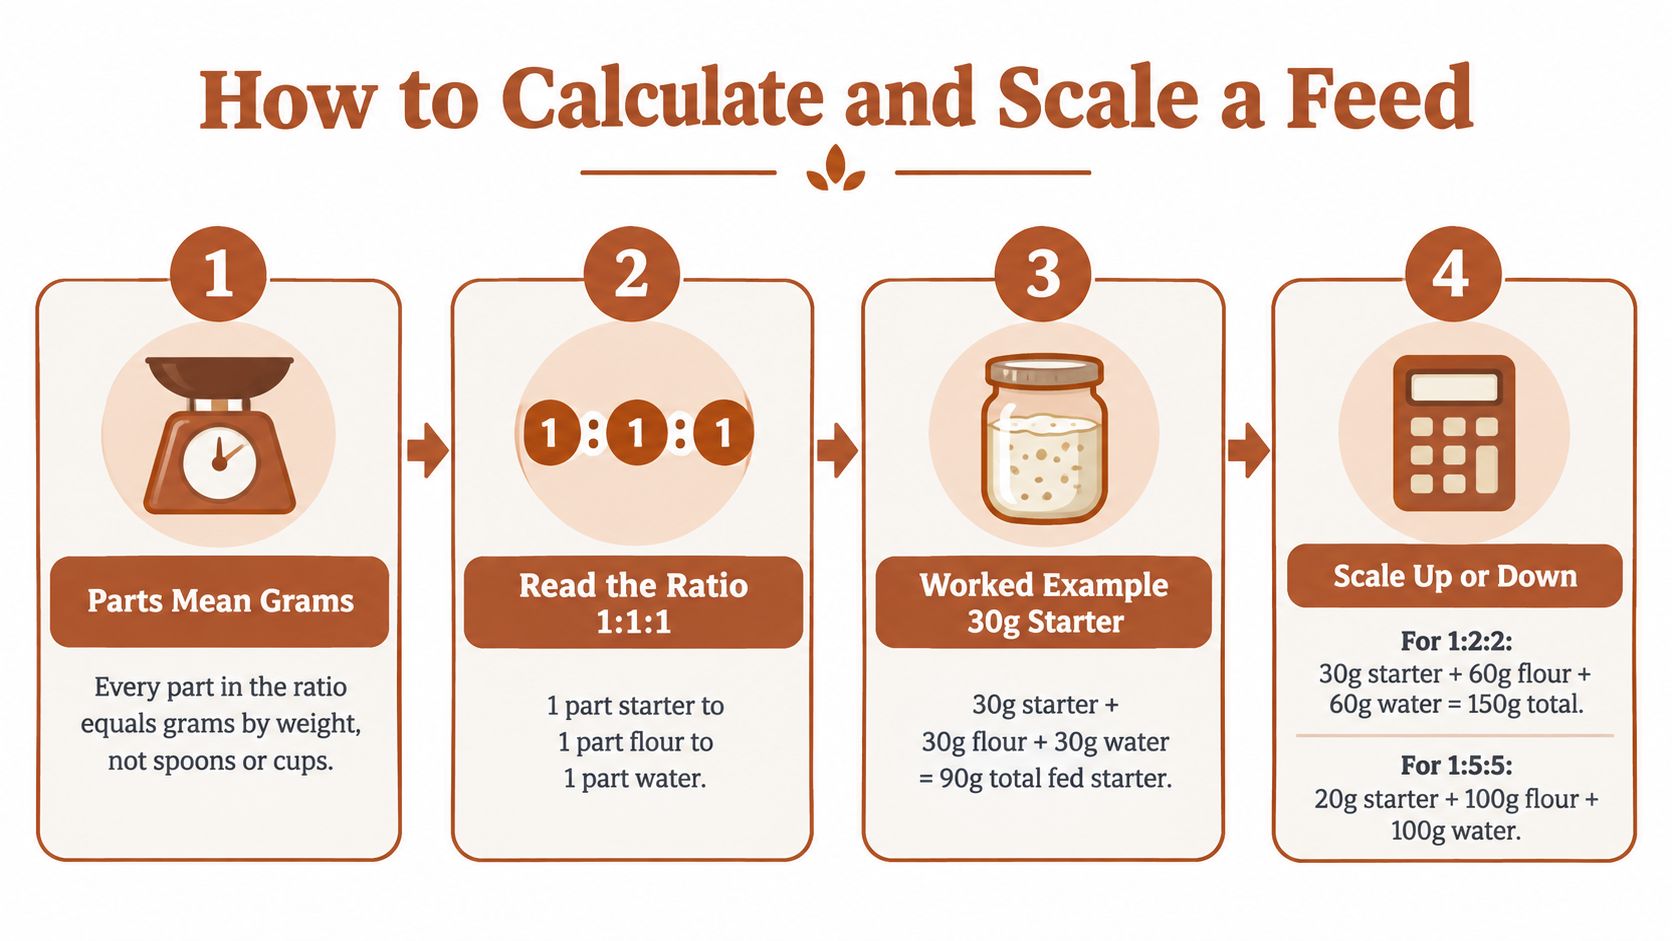
Once the ratio clicks, the math is easy. Every part means grams, not cups or spoons. If you use volume, the numbers stop meaning what you think they mean.
Start with what's already in the jar
If you have 30 g starter and you feed it at 1:1:1, you add:
- 30 g flour
- 30 g water
That gives you 90 g total fed starter.
If you keep the same 30 g starter and switch to 1:2:2, you add:
- 60 g flour
- 60 g water
That gives you 150 g total.
If you want a larger, slower build at 1:5:5 using 20 g starter, you add:
- 100 g flour
- 100 g water
That gives you 220 g total.
Use total weight when you want precision
If you know your target final weight, divide that target by the sum of the ratio parts.
For 1:1:1, the total parts are 3.
For 1:2:2, the total parts are 5.
For 1:5:5, the total parts are 11.
So if you want 100 g total starter at 1:2:2, divide 100 by 5. One part is 20 g. That means:
- 20 g starter
- 40 g flour
- 40 g water
A scale matters here because a few grams off in a small jar can change timing more than people expect. If you need a refresher on weighing ingredients cleanly, DBakerAid's guide on how to use a scale covers the basic setup well.
Later in the process, seeing the math in motion helps. This walkthrough is useful if you want a visual before your next feed.
Quick reference by target jar size
| Target Total | 1:1:1 | 1:2:2 | 1:5:5 |
|---|---|---|---|
| 50 g | about 16.7 g starter + 16.7 g flour + 16.7 g water | 10 g starter + 20 g flour + 20 g water | about 4.5 g starter + 22.7 g flour + 22.7 g water |
| 100 g | about 33.3 g each | 20 g starter + 40 g flour + 40 g water | about 9.1 g starter + 45.5 g flour + 45.5 g water |
| 150 g | 50 g each | 30 g starter + 60 g flour + 60 g water | about 13.6 g starter + 68.2 g flour + 68.2 g water |
| 200 g | about 66.7 g each | 40 g starter + 80 g flour + 80 g water | about 18.2 g starter + 90.9 g flour + 90.9 g water |
| 300 g | 100 g each | 60 g starter + 120 g flour + 120 g water | about 27.3 g starter + 136.4 g flour + 136.4 g water |
For standard liquid starter feeds, water weight equals flour weight. That's the familiar 100% hydration baseline.
Adjusting Ratios for Kitchen Temperature
You feed the starter before bed, expect it to be ready in the morning, and wake up to a jar that has already peaked and started to sink. In another kitchen, the same ratio would still be climbing. Temperature is usually the reason.
Kitchen heat changes how fast your starter burns through a feed. The ratio controls how much food is available, but room temperature decides how quickly that food gets used. A 1:1:1 feed in a warm kitchen can move too fast for an overnight schedule. The same feed in a cool room may be perfectly manageable.
That is why there is no single correct feeding ratio. The useful ratio is the one that matches your room, your timing, and how much discard you are willing to create.
Peak Time by Temperature and Ratio
| Ratio | Cool (60–67°F) | Moderate (68–74°F) | Warm (75–82°F) |
|---|---|---|---|
| 1:1:1 | Slow to moderate. Expect a longer wait than the usual room-temp baseline | Often the easiest quick same-day option | Fast. Can peak and begin falling sooner than expected |
| 1:2:2 | Moderate | Often lands in a comfortable daytime window | Faster than many bakers expect, but still steadier than 1:1:1 |
| 1:3:3 | Moderate to long | Useful for overnight or all-day timing | Often a strong choice when 1:1:1 moves too fast |
| 1:5:5 | Long | Good for overnight timing | Can behave like a practical all-day feed |
| 1:10:10 | Very long | Long | Useful when you need a delayed peak in heat |
Use the table as a starting point, not a promise. Flour choice, starter maturity, and jar size all shift timing. Whole grain starters usually run faster. A starter fed at peak behaves differently from one fed after it has sat hungry for hours.
What to change first
In a warm kitchen, increase the ratio before you change anything else. More fresh flour and water relative to the seed starter buys time and usually gives you a wider peak window. If 1:1:1 keeps overrunning your schedule, move to 1:2:2, 1:3:3, or even 1:5:5.
In a cool kitchen, do the opposite. A smaller feed such as 1:1:1 or 1:2:2 keeps the inoculation stronger, so the culture gets moving without waiting all day.
I handle temperature this way in real kitchens:
- Warm room, short same-day feed: 1:2:2 or 1:3:3
- Warm room, overnight feed: 1:5:5 or higher
- Cool room, same-day feed: 1:1:1
- Cool room, overnight feed: 1:2:2 or 1:3:3, depending on how cold the kitchen gets
If your room swings a lot between day and night, choose for the warmest stretch, not the coolest one. Starters speed up fast once the kitchen warms.
For bakers trying to make sense of why the same jar behaves differently in July and January, this guide to fermentation science and temperature effects gives the background that makes ratio changes easier to judge.
Maintenance Feeds Versus Bake-Day Builds
A healthy starter has two jobs, and they're not the same job.
Maintenance feeds keep the culture alive, stable, and ready to wake up. Bake-day builds produce a specific amount of vigorous starter at the moment you need it. Trouble starts when bakers use the same feeding approach for both and expect the same result.
Maintenance is about stability
For storage, small is usually better. Keep a modest seed amount, feed it enough to stay balanced, and avoid creating a jar of starter you'll just discard later.
A maintenance routine often looks like this:
- Small seed amount kept in the fridge or at room temperature depending on how often you bake
- Moderate feed ratio that fits your interval between feedings
- Minimal expansion target, because you're preserving the culture, not building volume for dough
If you bake infrequently, a small fridge-kept seed starter tends to be easier to manage than a large room-temperature jar.
Build feeds are about strength and timing
A bake-day build needs freshness, predictable rise, and enough volume for the dough. That often means feeding in stages rather than trusting a sleepy maintenance jar to do heavy lifting immediately.
A practical build tends to involve:
- A refresh feed to wake the starter fully
- A larger build feed timed to your mixing schedule
- An optional extra build if the starter is active but not yet vigorous
A starter that survives in the fridge isn't automatically ready to raise a full loaf well.
Tools like process control help. A proofing setup, a stable warm spot, or a guided fermentation appliance can reduce the guessing. If you use a system such as D'BakerAid, its staged fermentation control is designed to keep conditions steady during starter activation and dough proofing, which matters most when your room temperature isn't cooperating.
What doesn't work well
Two habits cause more frustration than anything else:
- Using an unfed fridge starter directly in dough and hoping bulk fermentation will fix it
- Maintaining too large a starter for the amount of bread you bake
Keep the mother starter small. Build big only when the recipe demands it.
Example Feeding Schedules You Can Follow
Bakers usually don't need theory at this point. They need a schedule they can copy, then adjust after one or two cycles.
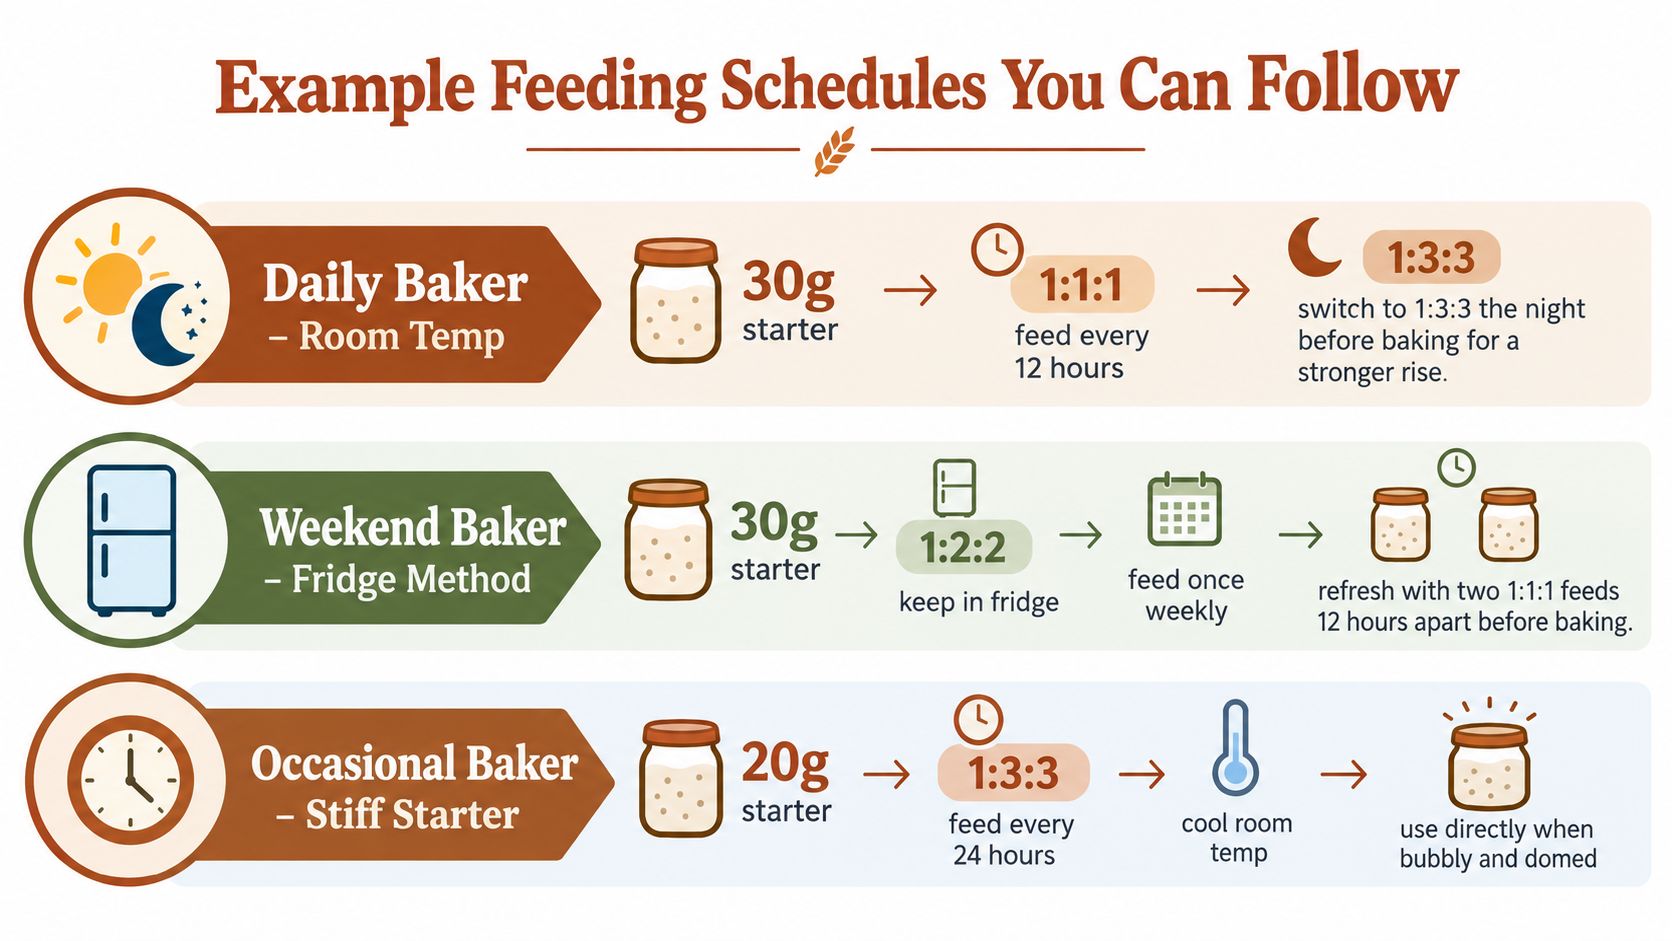
Daily baker at room temperature
Keep 30 g starter on the counter.
Every 12 hours, feed at 1:1:1:
- 30 g starter
- 30 g flour
- 30 g water
The night before baking, switch to 1:3:3 so the rise stretches longer:
- 30 g starter
- 90 g flour
- 90 g water
That build gives you a wider overnight window than the usual quick refresh.
Weekend baker with a fridge routine
Keep a small starter in the fridge through the week. On Friday night, take out 20 g starter and feed 1:2:2:
- 20 g starter
- 40 g flour
- 40 g water
Saturday morning, feed part of that again at 1:1:1 to sharpen activity:
- 30 g starter
- 30 g flour
- 30 g water
By Sunday, the starter should be much more reliable for dough than a straight-from-fridge feed.
Occasional baker after a long gap
If the starter has been sitting for weeks, don't ask it to do a full loaf after one casual feed. Start with 15 g starter and wake it with 1:1:1 about half a day before you want to begin rebuilding:
- 15 g starter
- 15 g flour
- 15 g water
Then do a stronger build the night before:
- 15 g starter
- 30 g flour
- 30 g water
In the morning, if it looks fully active, use a final build such as:
- 20 g starter
- 20 g flour
- 20 g water
or a slightly longer one like:
- 20 g starter
- 40 g flour
- 60 g water
If it's bubbling but not climbing strongly, give it one more feed before trusting it with your dough.
Signs you need an extra build
- Weak rise instead of a rounded, lifted dome
- Sharp solvent or harsh acidic smell
- Bubbles without meaningful expansion
- A starter that peaks and collapses too quickly after waking
If you document feeding times and visual cues, even in a simple creator workflow notebook, you'll spot patterns much faster. A lightweight template like LunaBloom AI's starter package for creators can be useful if you like tracking process and outcomes rather than baking from memory.
Troubleshooting Starter Behavior After a Feed
Most starter problems aren't signs that the culture is dead. They're signs that the ratio and conditions don't match what the jar needs.
The common reaction is to panic-feed more flour into the jar without changing anything else. That usually wastes time and flour. Look at behavior first.
Symptom-to-Ratio Adjustment Chart
| Symptom | Likely Cause | Recommended Ratio Change |
|---|---|---|
| Starter stays flat and smells harshly acidic or boozy | Underfed, overripe, or left too long between feeds | Tighten to 1:1:1 or 1:2:2 and feed more often |
| Dark liquid layer forms on top | Hunger and long delay between feeds | Use 1:1:1 if you need a fast recovery, then repeat on schedule |
| Rises fast, then collapses repeatedly | Too warm or too little fresh food for the conditions | Move toward 1:5:5 or even 1:10:10 if the kitchen is hot |
| Batter turns thin and watery after racing upward | Fermentation is outrunning the feeding plan | Increase the ratio and reduce the seed amount |
| Bubbles appear but the rise stalls halfway | Often a warmth problem more than a food problem | Keep the ratio steady first, then warm the jar and reassess |
| Starter seems alive but lacks dough strength | Maintenance feed wasn't enough for baking power | Give it a dedicated build feed before mixing dough |
Three fixes that usually work
If it's underfed, shorten the interval before you increase the ratio. A starving starter often needs quicker, simpler feeds first.
If it's overrunning the schedule, feed a smaller seed amount into a larger fresh mix. That's where 1:5:5 and 1:10:10 make sense.
If it's sluggish, warm the environment before blaming the culture. Many “weak starter” problems are really cold-counter problems.
Don't throw out a starter just because one feed looked wrong. Adjust the ratio, adjust the timing, and read the next cycle.
A dependable sourdough starter feeding ratio is the one that makes your jar predictable in your kitchen. Not someone else's.
If you want tighter control over starter activity and dough proofing, DBakerAid™ offers a precision fermentation setup that helps remove the room-temperature swings that make ratio timing harder to judge. That's especially useful when you're trying to match a starter peak to a real baking schedule instead of babysitting the jar all day.