

You feed your sourdough starter before bed, mark the jar, and expect it to be ready by breakfast. Instead, it barely moves. The same starter may race to its peak during a warm spell, then appear lifeless when the kitchen cools. The clock hasn't changed, but the biology has.
Proofing sourdough starter isn't a fixed-time task. Wild yeast and lactic acid bacteria respond to temperature, hydration, flour, feeding ratio, and the condition of the culture itself. The reliable approach is to control what you can, measure the rise, and judge readiness through several signals rather than bubbles alone.
Table of Contents
- The Biological Reality of Wild Yeast
- Mapping Temperature Bands and Feeding Ratios
- Executing a Controlled Proofing Workflow
- Verifying Readiness Beyond the Float Test
- Strategic Retardation and Cold Proofing
- Diagnosing and Fixing Proofing Failures
The Biological Reality of Wild Yeast
You refresh a starter on a cool morning, mark the jar, and find only a few bubbles hours later. The same culture may dome and peak much sooner when its temperature rises. Flour and feeding ratio matter, but temperature is often the hidden variable that makes a familiar schedule unreliable.
Sourdough contains wild yeasts and lactic acid bacteria. Yeasts produce the gas that expands the culture, while bacteria create acids that shape aroma, flavor, texture, and pH. Their activity responds to temperature, hydration, flour, feeding ratio, and culture condition. Elapsed time provides context, not a final readiness signal.
A review of wheat sourdough processes found fermentation temperatures, timings, and acidity varied widely. The same review reported fermentation-plus-proofing times from 30 minutes to 20 hours or more, fermentation at 30°C in 61% of surveyed processes, and pH values spanning roughly 3.2 to 6.1 (review of wheat sourdough fermentation processes). Reported fermentation and proofing periods of about 8–24 hours at 25–35°C describe biological range, not a universal timetable.
What changes inside the jar
After feeding, scattered bubbles may appear before the culture gains enough gas to lift its surface. As activity increases, the starter can dome, expand, retain gas, and develop a sharper but still pleasant sour-yeasty aroma. At or near peak activity, the structure feels inflated rather than merely foamy. Later, the dome flattens, the surface may recede, and a high-water mark can remain on the jar.
Volume and chemistry change together. A starter that has risen dramatically, smells harsh, and already collapsed is at a different stage from one that has just reached a rounded, gas-filled peak. That difference matters when deciding whether to mix dough immediately or adjust the next feeding.
Practical rule: Treat temperature as an ingredient. If you don't know the culture's temperature, you don't fully know its timetable.
For a closer explanation of how wild yeast behaves during fermentation, read this guide to sourdough wild yeast activity.
Mapping Temperature Bands and Feeding Ratios
Once temperature becomes part of the formula, you can use it to shape the starter's schedule. A practical starter-management range is around 75–80°F, or 24–27°C, where many bakers see strong activity. At 60–65°F, a common 1:1:1 feeding ratio may take 12–16 hours to peak, while a 1:2:2 feed at 75–80°F may peak in roughly 5–8 hours (sourdough starter temperature and feeding chart).
Those figures aren't promises. Flour type, hydration, culture maturity, and the actual temperature inside the jar all move the endpoint. They are useful operating ranges for planning, especially when you need to decide whether to feed before work, before bed, or shortly before mixing.
Temperature sets the pace
Independent sourdough research commonly uses proofing temperatures around 30–39°C with controlled humidity. One controlled study compared sourdough bread proofing at 30°C for 4, 8, 12, 16, 20, and 24 hours, while another reported an optimum sourdough pH between 3.5 and 4.0 for activating cereal proteases (sourdough proofing research).
For dough rather than the starter itself, the most predictable fermentation zone is 72–78°F, or 22–26°C. Below about 65°F, activity slows enough to create underproofing risk. At 80–85°F, fermentation accelerates, but the dough can overproof and lose structural strength (sourdough fermentation temperature guidance).
That distinction matters. A starter can be lively at a temperature that makes a finished dough move too quickly. You should choose a temperature based on the stage you're controlling, not assume that warmer is always better.
Feeding ratio changes the runway
A 1:1:1 refresh uses equal weights of starter, water, and flour. It leaves a relatively high proportion of mature culture in the mixture, so the starter can reach peak activity sooner under the same conditions. A 1:2:2 refresh introduces more fresh food and dilutes the mature culture, which generally gives the starter a longer runway before its peak.
Don't use feeding ratios to compensate for a culture that's weak. First establish that it rises consistently. Then use the ratio and temperature together to fit your schedule. If your starter peaks while you're away, increase the fresh flour and water or lower the holding temperature. If it stalls overnight, use a smaller refresh or a warmer, controlled environment.
The relationship between yeast fermentation temperature and timing is the practical foundation. You aren't trying to force a rigid timetable. You're adjusting biological speed while preserving the point at which the culture has its best leavening capacity.
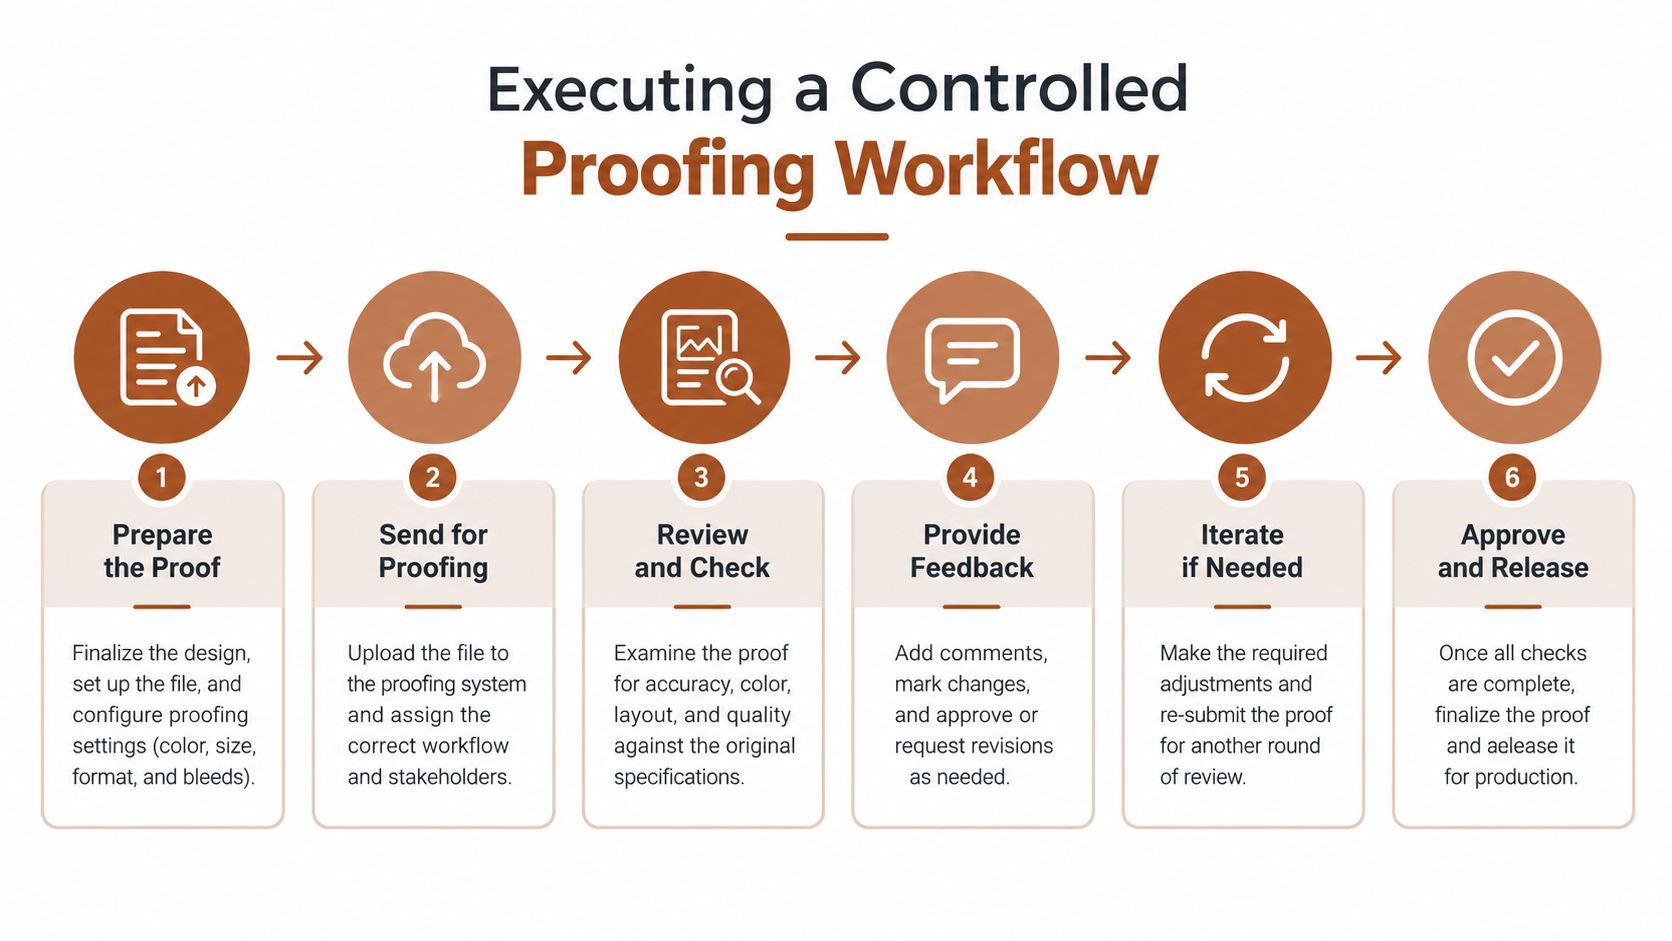
Executing a Controlled Proofing Workflow
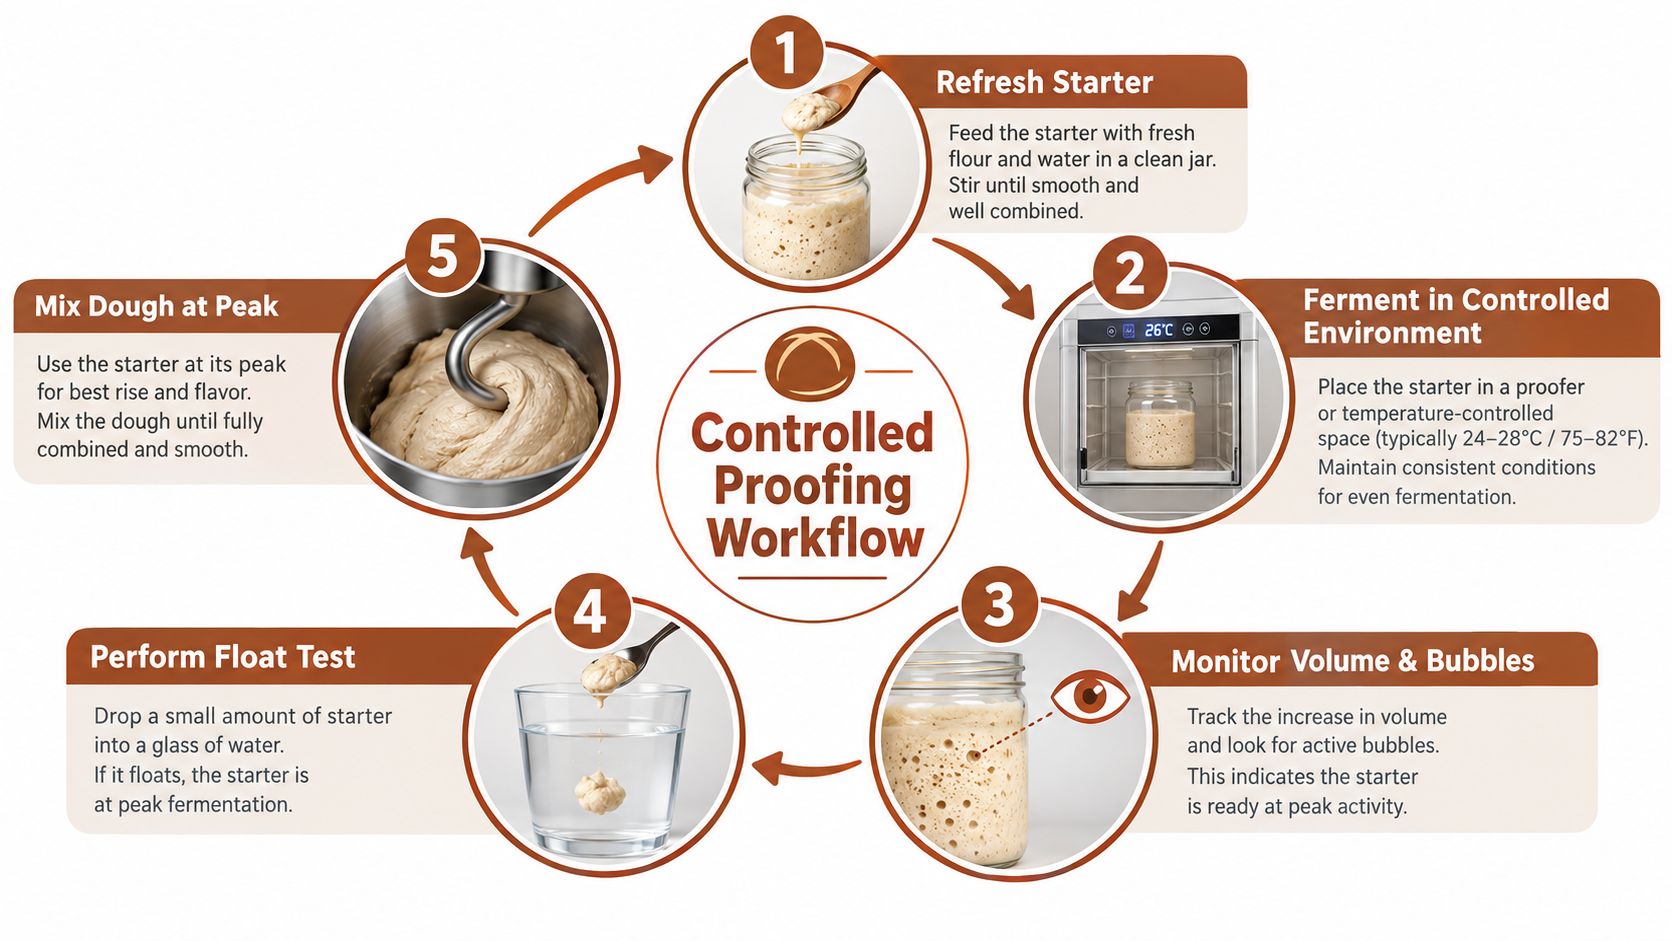
A starter sitting on a variable kitchen counter can peak while you are asleep or stall before you check it. Control the measurements first. Use a clean jar, digital scale, thermometer, and visible marker. The marker records actual expansion, so surface bubbles do not become your only evidence of fermentation.
Refresh and establish a baseline
Refresh at 1:1:1 by weight, hold the mixture near 76°F, and mark its starting level. Use 2, 4, and 6 hours as a practical baseline for recording the rise. A healthy culture should double by roughly hour 4–5, then fall about 20% by hour 6 (a Reddit-derived starter proofing baseline with hour-by-hour rise checkpoints).
Those checkpoints are useful because they show the curve, not just a final height. A starter that doubles early and declines has a different working window from one that barely rises at the last check. Record the flour, feeding ratio, temperature, and peak time. After several refreshes, you can match your culture to a reliable schedule instead of relying on room temperature.
- Weigh the refresh. Keep starter, flour, and water consistent by weight.
- Mark the starting line. Place a rubber band or erasable mark at the mixture's surface.
- Hold the temperature. Keep the jar away from sunlight, drafts, appliances, and changing room conditions.
- Measure expansion. Check at the planned intervals and record the highest level.
- Inspect the peak. Look for a domed surface, active bubbles, and a pleasant sour-yeasty aroma.
- Use or refresh. Mix the dough near peak activity, or feed the culture once it begins to decline.
Control the environment, not just the timer
A temperature-controlled proofing appliance reduces the swings that make ambient proofing difficult. The SureDough™ system, for example, lets the baker set temperature and time rather than depend on a fluctuating room.
The culture still responds to flour, hydration, and maturity. Stable temperature makes those biological effects easier to interpret, so a rise curve becomes more useful than a clock reading.
The same workflow applies when building a levain for a larger dough. Refresh the culture, hold it consistently, and use its rise curve to decide when it has developed enough strength. A jar that reaches peak at a known temperature gives you more scheduling control than one left beside a cold window.
Verifying Readiness Beyond the Float Test
A starter can float and still be late. Trapped gas may keep a sample buoyant after the culture has passed its strongest point, while a healthy starter can sink because hydration, flour choice, or structure changes how it holds gas. Use the float test as supporting evidence, not as the decision.
Assess volume, surface structure, aroma, and acidity together. Practical guidance places a healthy starter's doubling time at 8–12 hours near 25°C, with vigorous cultures reaching peak activity sooner. That 8–12 hour figure assumes a 1:1:1 feed near 25°C. Cooler rooms and larger feeds stretch the process toward the 12–16 hour range covered earlier. A ripe starter commonly falls around pH 3.8–4.5, with a domed surface, bubbles breaking through, and a clean sour-yeasty aroma (starter readiness methodology).
Compare the signals side by side
| Signal | What it tells you | Limitation |
|---|---|---|
| Volume rise | The culture has produced and retained gas | A high rise can be followed by collapse |
| Dome and bubbles | Fermentation is active near the surface | Bubbles alone do not prove peak strength |
| Aroma | Acidity and fermentation are developing | Aroma remains subjective |
| pH | The culture has reached a measurable acidity range | pH does not show gas retention by itself |
| Float test | A sample may contain enough trapped gas to float | It can create false confidence or doubt |
Read the surface in context. A rounded top with bubbles breaking through usually indicates activity near peak. Once the dome flattens or the starter recedes, maximum expansion has passed. The culture may still leaven dough, but its timing and lifting strength have changed.
Match readiness to the dough
A basic wheat dough tolerates variation better than a heavy, high-hydration, whole-grain, or enriched formula. Dense doughs need dependable gas production and sufficient maturity to support longer or more demanding fermentation. If the dough is difficult, a passing float test does not compensate for a weak rise curve.
Final dough proof at room temperature commonly runs 1–4 hours. Refrigerated retardation at 5–8°C can extend to 8–16 hours. These are final-dough ranges, not starter-proofing times, so keep the two stages separate when planning fermentation.
For feeding and maintenance decisions, consult this sourdough starter refreshment guide. Record temperature, feeding ratio, rise, and peak behavior. Over several feeds, those measurements provide a more dependable readiness profile than a single float-test result.
Strategic Retardation and Cold Proofing
At the end of a long bake day, a refrigerator can protect your schedule, but it cannot repair dough that has already fermented too far. Cold proofing slows yeast activity and acid development. It preserves the dough's current condition while allowing fermentation to continue gradually, so the dough must enter the refrigerator with enough structure and fermentation reserve.
For same-day baking, final proofing commonly occurs at 72–78°F. Refrigeration around 38–42°F slows the process, and cold retardation commonly lasts 12–48 hours, depending on the formula and production schedule (sourdough proofing temperature guidance). Use these figures for final dough, not for starter readiness.
Longer isn't automatically better
Flour type, hydration, dough temperature, fermentation time, and feeding history all affect how a dough responds to refrigeration. A well-structured dough with moderate fermentation may tolerate a longer retard. A wet, whole-grain, or highly enzymatic dough may lose strength sooner, producing weaker shaping, excess acidity, or a flatter loaf.
Overnight fermentation can improve scheduling and may develop flavor, but it is not a reliable quality guarantee. Independent guidance identifies 37–39°F as a useful cold-proofing range and warns that flavor and texture can deteriorate after about 3 days (sourdough proofing FAQ). Treat that guidance as a practical boundary, not a fixed rule for every flour blend or dough temperature.
Choose the retard based on dough condition
Refrigerate the dough when fermentation is established, the dough still holds tension, and the gluten network has reserve. Dough that is slack, excessively expanded, or already difficult to shape usually becomes less stable during an extended retard.
Whole-grain and specialty flours require closer control because their water absorption and gluten behavior differ. High-hydration dough may show bubbles and apparent activity while its structure is weakening. Judge its readiness through tension, volume, and gas retention rather than surface activity alone.
Measure the dough temperature before refrigeration. A known starting temperature makes the handoff more repeatable and lets you adjust retard length with evidence. The refrigerator then becomes a controlled scheduling stage, not storage for dough that has already passed its useful fermentation window.
Diagnosing and Fixing Proofing Failures

A starter can look lively while still lacking the fermentation strength your dough requires. A technical troubleshooting workflow identifies starter maturity mismatch as the leading cause in 68% of cases (starter proofing troubleshooting workflow). Using it before peak activity, or well after collapse, leaves the dough with less gas production than the formula assumes.
Begin with the culture. Confirm that it has been doubling consistently, note whether the feeding ratio changed, and measure the jar temperature rather than relying on room conditions. Bubbles alone are weak evidence. A starter may appear active while producing too little gas to lift the dough effectively.
Use measurements to challenge false reads
The poke test becomes unreliable when the dough has not built enough gas retention. High-hydration dough can also feel soft regardless of fermentation stage. Measure the dough's core temperature at 76–78°F, then check rise, surface tension, and how the dough responds to handling. Temperature gives you a biological reference point that visual cues alone cannot provide.
A sluggish starter usually needs a warmer, stable holding environment and a consistent refresh before baking. Overactive dough may need cooler conditions, a larger feeding ratio, or an earlier move to refrigeration. Change one variable at a time. Adjusting flour, hydration, temperature, and timing together prevents you from identifying the cause.
High-protein doughs may resist visible expansion because they are stiffer. Gluten-free doughs require different formulas and structural expectations. Judge each dough against its ingredients, gas retention, and strength rather than an airy wheat-loaf standard.
A controlled fermentation setup can reduce ambient temperature swings and make starter and dough behavior easier to measure. It does not replace observation, but stable conditions make each adjustment more informative.
D'BakerAid™ offers controlled fermentation and proofing through its temperature-and-time hub, with separate bowls for starter fermentation and dough proofing, plus an optional D'Steamer for baking. Visit DBakerAid™ to see how a more controlled workflow can make peak activity easier to repeat.