

You've probably had this happen: the dough looks promising, the butter block feels manageable, and then the finished pastries come out heavy, greasy, or split around the chocolate. Pain au chocolat isn't difficult because the ingredient list is complicated. It's difficult because fermented dough, chilled butter, proofing temperature, and oven timing must stay coordinated from start to finish.
This pain au chocolat recipe focuses on the physical cues that matter. You'll learn how the butter should feel before lamination, when the dough needs another cold rest, how to judge proofing by wobble rather than a clock, and why a few degrees can decide whether the layers separate or collapse. Pain au chocolat is a relatively modern French viennoiserie, built from the same laminated, yeast-leavened dough style as a croissant, but shaped around one or two pieces of dark chocolate instead of a crescent form. Its development is associated with early nineteenth-century Paris and the Viennese baking tradition introduced through the bakery founded by August Zang and Ernest Schwarzer at 92 rue de Richelieu. The word “croissant” entered the French dictionary in 1863, reflecting how firmly viennoiserie had become established in France (historical background on pain au chocolat).
Table of Contents
- Preparing the Détrempe and Butter Block
- Executing the Lamination Folds
- Shaping and Enclosing the Chocolate
- Managing the Final Proof
- Baking for Maximum Oven Spring
- Troubleshooting Lamination and Proofing Failures
Preparing the Détrempe and Butter Block
The détrempe carries the butter layers, so build strength without making the dough stiff. Combine strong bread flour, yeast, salt, sugar, and the liquid specified by your formula. Mix until cohesive, then develop the dough until it feels elastic and stretches before tearing. It should resist lightly while remaining supple. Dough that feels rubbery will contract under the rolling pin, while weak dough cannot retain the gas produced during fermentation.
Shape the dough into a flat rectangle, not a thick ball. The flatter profile chills more evenly and makes the first roll easier. Refrigerate it until cold throughout and relaxed. Cold dough slows fermentation while you prepare the butter, and relaxed gluten reduces spring-back. If the rectangle keeps shrinking as you roll, cover it and chill it again rather than forcing it.
Butter consistency must match the dough. A hard block fractures into pieces; a warm, greasy block smears and destroys the separation between layers. The aim is plasticity, where the butter bends and rolls as one piece.
Find the plasticity window
Bring the butter block to approximately 11–15°C before enclosing it. Professional dry butter may laminate near 11°C, while ordinary butter often behaves better around 13–14°C (technical pain au chocolat recipe and butter guidance).
Test it with a rolling pin or the flat of your hand. It should flex and flatten without cracking, yet remain matte rather than shiny or oily. A clean break means it is too cold, so let it warm slightly. Greasy marks, excessive softness, or easy denting mean it has gone too warm. Chill it before enclosing it.
The butter block needs square corners and consistent thickness from edge to edge. Uneven thickness creates uneven resistance during rolling, leaving some areas thick and others thin or bare. The same principle explains why laminated dough depends on alternating dough and butter layers. Set the block on the chilled détrempe only when both have comparable firmness. That physical match prevents cracking, smearing, and early butter leakage.
Executing the Lamination Folds

A butter leak during the first turn usually starts with one mistake: rolling before the dough and butter share the same firmness. Roll the chilled détrempe into a square-cornered rectangle large enough to enclose the butter block. Rounded corners create thin areas, so the butter shifts toward them instead of staying evenly covered.
Set the butter in the center, fold the dough over it, and seal the join without trapping loose flour. Brush flour from every surface before closing and folding. Flour between the sheets prevents them from bonding and can leave weak, irregular layers.
Begin the first roll with firm, even strokes from the center outward. Lengthen the dough rather than crushing the butter. Lift and reposition it instead of dragging it across the bench, then square the ends with your hands. A consistent rectangle gives every later fold the same resistance.
Use cold rests to protect the layers
Use three folds, with approximately 20–30 minutes of chilling between turns. The fold style matters less than keeping the butter continuous and allowing the dough to relax. If the dough contracts, resists the pin, or feels warmer than the surrounding bench, refrigerate it before continuing.
| Physical cue | What it means | Correct response |
|---|---|---|
| Butter cracks into visible pieces | The butter is too cold or pressure is uneven | Stop, temper it slightly if needed, then roll gently |
| Butter streaks through the dough | The butter is too warm | Refrigerate until the surface feels firm again |
| Dough springs back sharply | Gluten is tense | Cover and chill before rolling further |
| Edges become thin or exposed | The rectangle has lost its shape | Square the dough and avoid forcing the next turn |
The laminated dough should feel cool, flexible, and distinctly layered. It should not feel wet or greasy. Butter on the bench is a stopping signal, not a problem to roll through. Chilling preserves the separation between layers.
After the final fold, chill the dough before sheeting. Sheet it to the 3–4 mm target established for the butter block stage, then return it to the refrigerator if it starts to soften. For practical guidance on fold direction, pressure, and handling, use this guide to laminating croissant dough.
Shaping and Enclosing the Chocolate
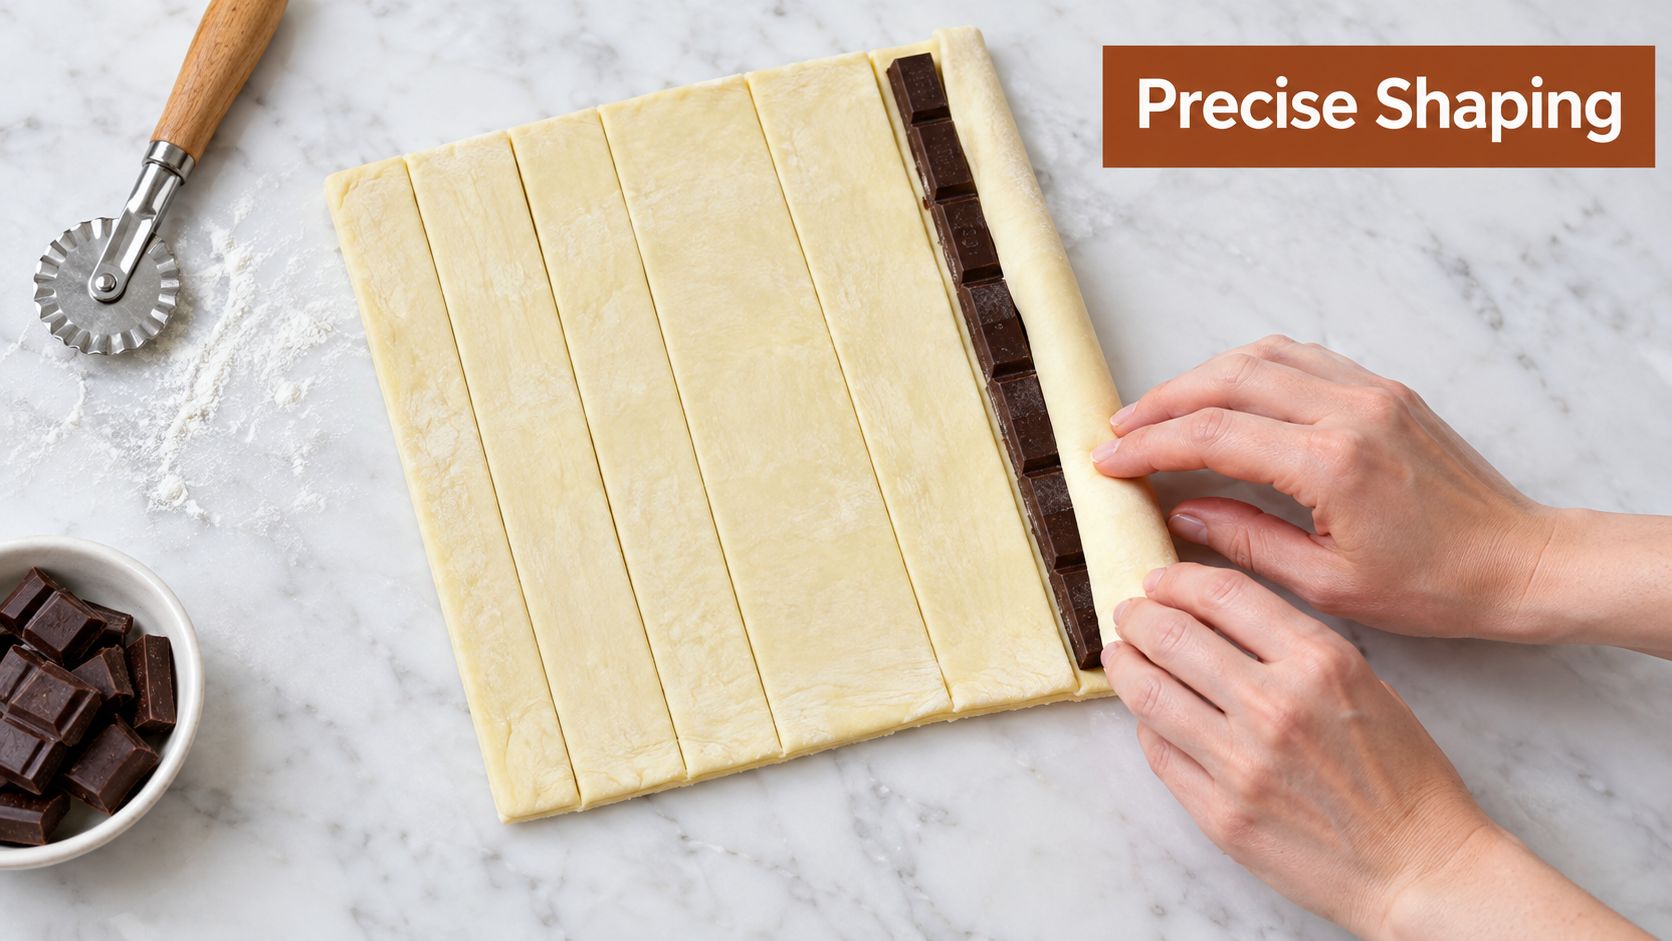
Sheet the dough to approximately 3–4 mm while keeping the edges straight. A professional pain au chocolat has enough length to wrap snugly around two chocolate batons without producing a thick, bready center.
Cut clean rectangular pieces. Consistent dimensions matter more than chasing a particular visual size, because uneven pieces proof and bake at different rates. A blunt knife compresses the cut edge and can seal the layers together, so use a sharp wheel or knife and cut straight down.
Place the first chocolate baton just inside one short edge. Roll the dough over it firmly enough to remove a loose pocket, but don't crush the layers. Place the second baton against the first wrapped section, then continue rolling until the seam is underneath.
Build tension without compressing the dough
The log should be snug, not strangled. If you roll too loosely, the pastry can unfurl in the oven. If you pull too hard, you compress the inner layers and create a dense band around the chocolate.
Set each pastry seam-side down on a lined tray. Keep the pieces separated so the sides can expand without fusing together. The finished shape should be rectangular or gently cuboid, with the chocolate running parallel to the long axis.
Dark chocolate batons give the cleanest center and predictable melting. Chopped dark chocolate can work, but irregular pieces create uneven pressure and may puncture the dough. If you're using chocolate for another pastry project, this guide to tempering chocolate at home covers handling principles that also help when working with batons.
A shaped pastry is ready for proofing when the seam stays closed and the surface remains cool and smooth. If the dough has become soft during cutting, refrigerate the tray before starting the final rise. That short pause is often the difference between visible layers and butter leakage.
Managing the Final Proof
The final proof decides whether the laminated dough opens into distinct, honeycombed layers or bakes up dense and greasy. Yeast needs enough warmth to generate gas, while the butter must stay pliable and firm. If the dough warms too far, the butter smears through the layers. If it stays cold or the proof stops early, the crumb remains tight.
Aim for approximately 20–26°C. Published protocols report 60–90 minutes at 20–23°C, while other practical guides use around 25°C for 2–2.5 hours, depending on dough temperature, yeast activity, and flour strength (proofing and baking research). Use those figures as working ranges rather than fixed appointments. Dough temperature at the start matters as much as the room temperature.
Read the pastry, not the timer
Look for visible expansion and clearer separation between the layers. Give the tray a gentle shake. Properly proofed pastries wobble as a whole, with a soft, aerated movement. A rigid vibration means the interior has not filled with enough gas.
Press one pastry lightly on an exposed side. The indentation should recover slowly and remain slightly visible. Rapid spring-back shows that the dough still has strong tension and needs more time. An indentation that stays deep, or a surface that collapses, indicates overproofing.
Practical rule: A cool, slightly underproofed pastry can often take more time. A warm pastry with greasy butter needs refrigeration before it can be judged again.
Butter stability sets the upper limit in a warm kitchen. The dough should feel cool, smooth, and flexible, never shiny or oily. If it feels tacky, or deforms when lifted, chill the tray instead of extending the proof. Greasy butter has already begun erasing the boundaries between layers.
Underproofing produces a tight interior, excessive oven lift, and splitting around the seams. Overproofing weakens the dough, so the pastries may rise briefly and then sink. A properly proofed piece feels light for its size and gives a subtle jelly-like wobble when the tray moves.
Use temperature as a decision tool
In a cool room, extend the proof only while the butter remains firm and the dough continues to expand. In a warm room, choose a cooler proofing spot and check the pastries by touch more frequently. After an overnight retard, let the shaped dough lose its hard chill gradually rather than placing it beside direct heat.
Bake as soon as the visual and tactile signs agree. Fully proofed pastries continue fermenting while they wait, and their butter keeps softening.
Baking for Maximum Oven Spring
Preheat the oven thoroughly before the tray goes in. Pain au chocolat needs strong initial heat, commonly around 200–230°C, to expand before the crust sets. The same experimental protocol cited earlier specifies 220–230°C for 12–15 minutes. Some industrial butter protocols use approximately 200°C with steam at the beginning.
Steam delays crust formation. Yeast can keep expanding, while water in the butter turns to vapor and pushes the dough sheets apart. In a home oven, a controlled burst of steam or high initial humidity can improve lift. Too much water softens the crust and lengthens drying.
Brush the proofed pastries lightly with egg wash. Keep it off the cut edges, where it can glue the layers together. Load the tray into the hot oven and add steam if your setup allows it. Once the pastries have expanded, let the crust dry and color fully.
Judge color and weight together
The crust should be a deep, even golden brown, not pale beige. Check the ends first, since exposed chocolate can darken before the pastry is fully baked. If the ends color too quickly, shield them without dropping the heat sharply. A weak bake can leave the center damp.
A baked pain au chocolat feels lighter than it looks. The sides should stand upright, the layers should remain distinct, and the seam should stay closed. Underbaking leaves a heavy interior that may collapse as it cools. Overbaking dries the thin layers and can scorch chocolate exposed at the ends.
Move the pastries to a rack soon after baking. The hot tray continues cooking the base, while trapped steam can soften the crust against the metal.
Judge the crust against professional examples to calibrate color and lamination. If you are planning a food-focused visit, this guide to the best afternoon tea spots in Paris points to cafés where you can compare laminated texture and crust color directly.
Troubleshooting Lamination and Proofing Failures
Butter leakage usually has one of three causes. The butter was too warm during lamination, the final proof was too hot, or the pastry was underproofed and forced a violent expansion in the oven. Look at the tray: greasy pools under the pastries indicate melted fat, while dry, torn seams often point to fractured butter or rough rolling.
A dense, bready interior usually means the dough didn't receive enough final proofing. It can also result from butter cracking during lamination, because broken butter creates uneven layers that can't expand continuously. The pastry may still rise, but it won't have the open, honeycombed separation expected from a well-handled viennoiserie.

Diagnose the visible defect
| Result | Likely cause | Adjustment |
|---|---|---|
| Butter runs onto the tray | Warm lamination or proofing | Chill between folds and proof at a lower temperature |
| Layers look fused | Butter smeared or excess flour remained between folds | Match butter and dough consistency, then brush flour away |
| Interior is tight and heavy | Underproofing or fractured butter | Extend proof by dough condition, not by a fixed clock |
| Pastries split dramatically | Underproofing, weak seams, or excessive oven expansion | Proof until puffy and wobbling, then seal the seam underneath |
| Pastries collapse after baking | Overproofing or insufficient structure | Shorten the proof and bake fully before removing from the oven |
| Ends are dark but centers are dense | Heat reached the chocolate before the crumb finished | Moderate the finish and verify full internal bake by lightness and structure |
A pastry that collapses after baking was often pushed beyond its structural limit. Overproofed dough loses strength, while underbaked layers haven't dried enough to support the shape. Don't solve that problem by just increasing the oven temperature. Correct the proof and make sure the finished crust has developed enough color before removing the tray.
The most reliable habit is to record the dough's condition at each stage. Note whether the butter cracked, whether the dough sprang back, how long it took to become visibly puffy, and whether the tray felt greasy before baking. Those observations are more useful than copying a timer because your flour, yeast, butter, and kitchen temperature won't behave exactly like someone else's.
A successful pain au chocolat recipe depends on disciplined transitions. Keep the butter plastic, keep the dough cold when it resists, proof until the tray wobbles, and bake before the layers lose their definition. Once those cues become familiar, the process stops feeling mysterious and starts behaving like a repeatable system.
D'BakerAid™ offers a temperature-controlled fermentation and proofing system designed to manage the conditions that make laminated dough inconsistent, with an optional D'Steamer for early-bake humidity. Visit DBakerAid™ to see how its guided pastry recipes and controlled proofing workflow can support more repeatable pain au chocolat at home.