

A ~704g wheat loaf formulated with protein isolate and vital wheat gluten yields ~10.6g of protein per slice when cut into ~16 slices, or about ~32g across three slices, clearing the ~30g-per-meal fitness target from bread alone. The method combines a weighed formula, controlled fermentation, careful shaping, and a fully baked crumb rather than adding protein powder to ordinary bread dough.
Learning how to make wheat bread at home this way means accepting a different benchmark. You're making substantial sandwich bread that contributes meaningfully to a meal, not trying to reproduce the lightest supermarket white loaf.
Table of Contents
- Why a High-Protein Wheat Loaf at Home Changes the Math
- Understanding High-Protein Wheat Dough
- Mixing, Autolyse, and Fermentation Windows
- Shaping, Baking, and Knowing When the Crumb Is Done
- How Your Homemade Loaf Compares to What You Buy
- Diagnosing Dense Crumb, Pale Crust, and Other Common Failures
- Your First Loaf and Where to Go Next
Why a High-Protein Wheat Loaf at Home Changes the Math
The useful question isn't just how much protein is in bread. It's how much protein you get for the portion you eat, and what that portion costs.
A formulated homemade loaf can outperform ordinary wheat bread without requiring you to replace sandwiches with shakes. The following recipe-level estimates come from the high-protein recipe collection, with approximately ~800g dough yielding ~704g baked bread and ~16 slices; actual results depend on ingredient labels, baked weight, and slice thickness.
| Pullman loaf formula | Protein per loaf | Per 100g | Per slice | Three-slice meal |
|---|---|---|---|---|
| Whey + Sprouted Wheat | ~170g | ~24g | ~10.6g | ~32g |
| Vegan Pea + Whole Grain | ~171g | ~24g | ~10.7g | ~32g |
| Soy Multigrain “Fitness” | ~170g | ~24g | ~10.7g | ~32g |
| Seeded Whey + Flax | ~163g | ~23g | ~10.2g | ~31g |
| Collagen + Whole Wheat | ~184g | ~26g | ~11.5g | ~34g |
Judge the loaf by its job
For a macro-tracker, the advantage is a sandwich base that contributes protein instead of leaving almost all of it to the filling. For a parent, it's fresh bread with a more substantial nutritional role. For a plant-based lifter, the pea and soy formulas provide alternatives to whey.
That doesn't make bread guilt-free through some special process. Food doesn't need a moral label, and higher protein doesn't automatically mean lower calories. Calculate protein bread calories from the complete ingredient list, including fats, seeds, and sweeteners.
A useful protein loaf is one you enjoy eating in a realistic portion, not one with the largest number on a recipe card.
Presentation matters too. For serving-format inspiration, the IFM Gourmet mini buns from IFM Gourmet Food Store offer a visual reference for smaller bread portions, not a nutritional comparison with these loaves.

The financial case needs similar discipline. Compare ingredient spending against protein delivered, rather than assuming homemade protein bread must be cheaper than every ordinary supermarket loaf.
Understanding High-Protein Wheat Dough
Vital wheat gluten and protein isolate do different jobs. Gluten supplements the wheat dough's structural network. Whey, pea, soy, and collagen contribute protein, but they aren't interchangeable replacements for the flour that builds the loaf.
Adding powder changes the balance between water absorption, dough strength, and expansion. A dough that feels dry immediately after mixing may become workable after hydration. Adding water until it resembles ordinary white dough can leave you with a mixture that can't hold its shape.
Hydration is a starting point, not a universal setting
For conventional wheat bread, approximately ~60–65% hydration, calculated as water weight divided by flour weight, is a useful starting benchmark. Controlled wheat-dough research shows that hydration and temperature jointly affect fermentation, gas retention, loaf volume, and texture, but those findings don't establish a universal water setting for isolate-enriched formulas (wheat dough hydration and temperature research).
Follow the dedicated formula's water quantity and calculation method. Don't improvise a vital wheat gluten ratio or substitute one protein powder scoop-for-scoop for another.
This visual comparison highlights the handling differences to watch for.
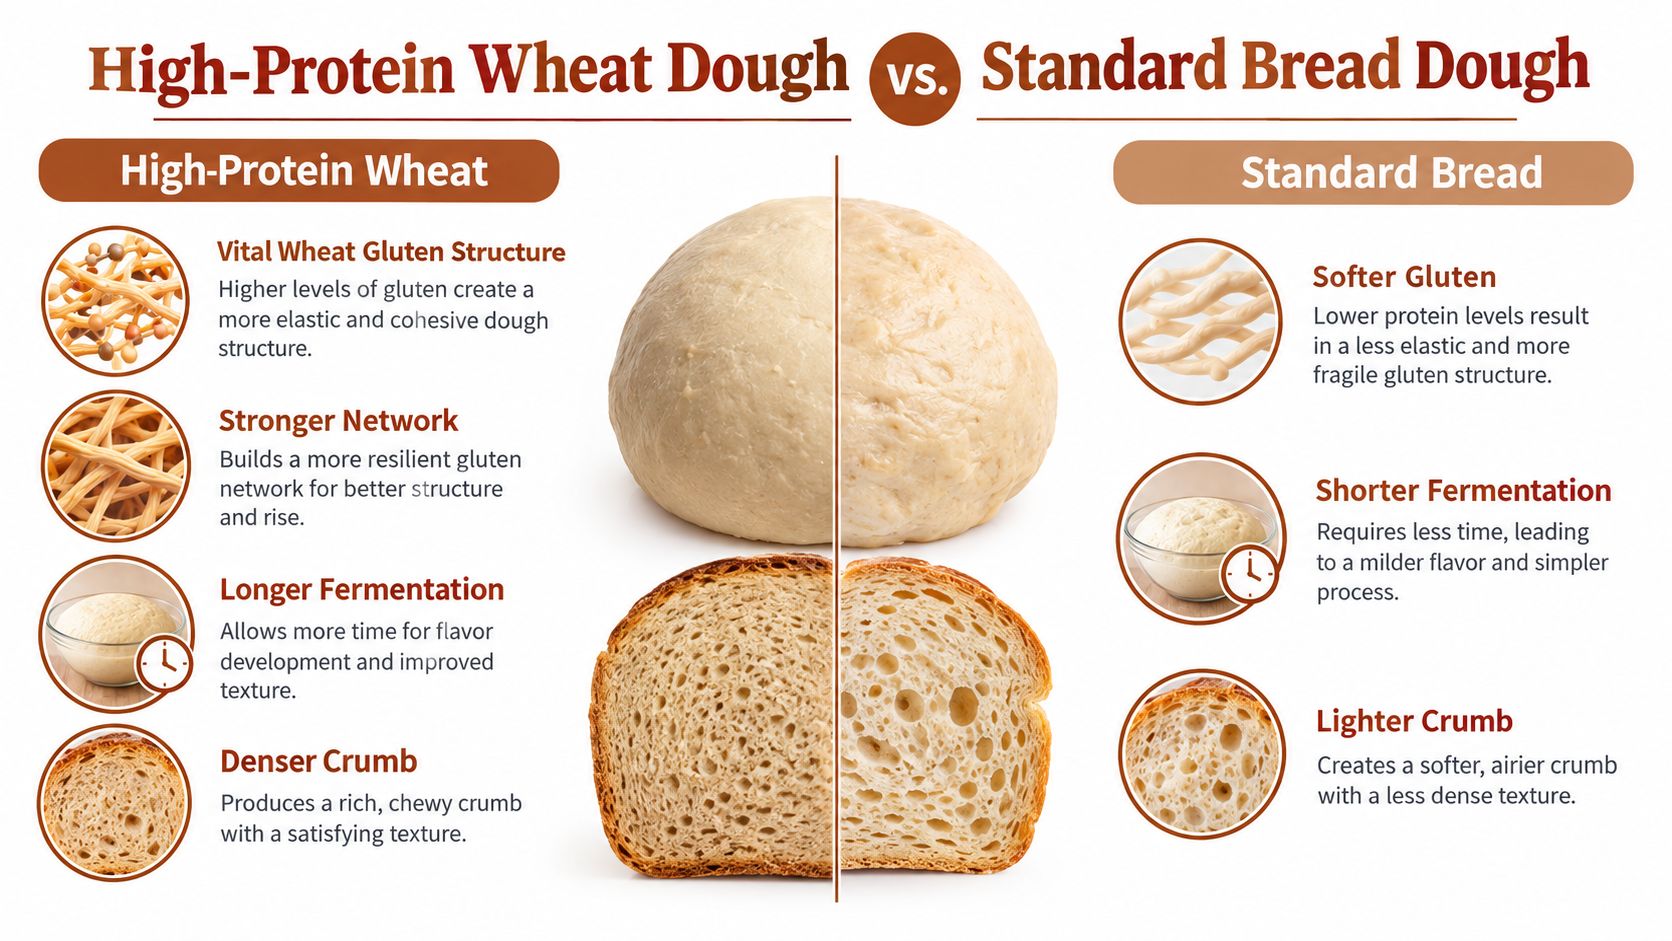
Use the graphic as a broad handling guide, not a rule that every high-protein dough needs longer fermentation. The formula, yeast quantity, and dough temperature determine the schedule.
Choose the protein before choosing the texture
Expect these recipe-dependent differences:
- Whey and collagen: A crumb closer to normal cream-colored wheat bread, with comparatively mild flavor.
- Pea: A slightly grey-green cast and a more noticeable beany character.
- Soy: A tan or darker loaf that suits multigrain formulations.
- Whole grain and seeds: A browner appearance and a more substantial eating texture.
Collagen isn't a complete protein, so its larger total shouldn't make it the sports-protein hero. Whey, pea, and soy are the more relevant starting choices for this comparison.
These doughs are generally denser, stiffer, and slightly tacky. Finished bread should have a tight, uniform crumb, not necessarily large open holes. For the flour side of that balance, consult the explanation of flour protein content.
These are high-gluten wheat breads. They contain wheat flour and vital wheat gluten and aren't suitable for someone who must avoid gluten.
Mixing, Autolyse, and Fermentation Windows
Start with a dedicated protein bread recipe, a digital scale, a dough thermometer, and a container that makes expansion visible. Weigh the water as carefully as the flour, and record the protein powder brand rather than treating all powders as equivalent.
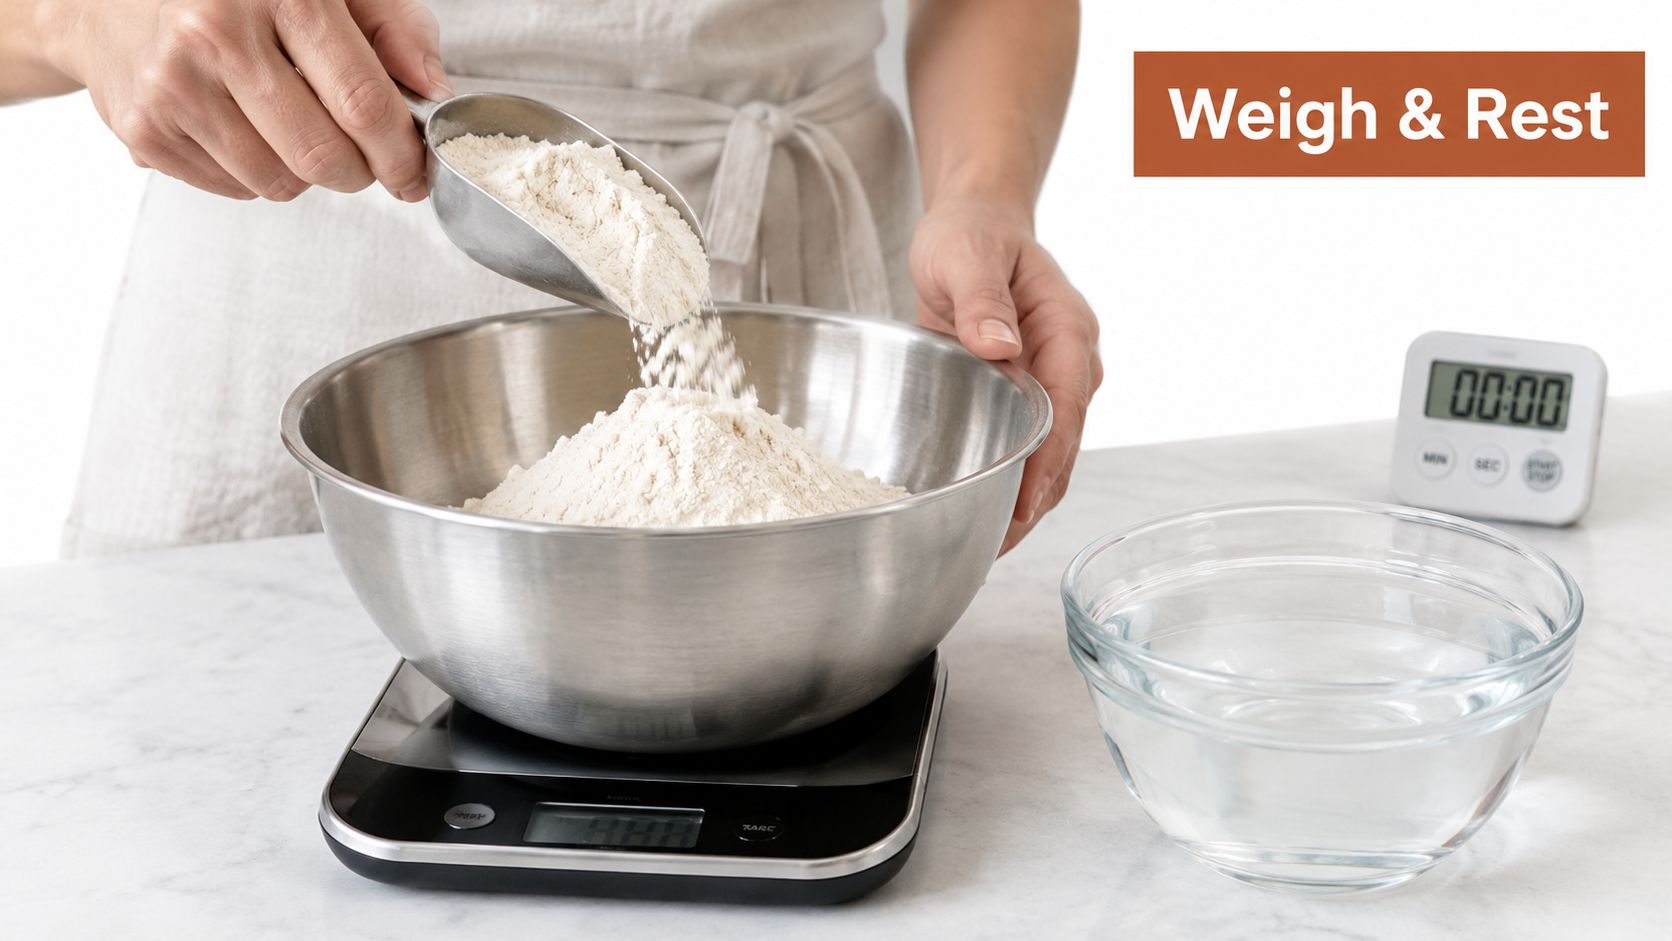
Set the bowl on the scale before measuring ingredients.
Build strength before chasing volume
If the formula includes an autolyse, combine its designated flour and water and let them hydrate before adding yeast and salt. Don't add an arbitrary rest to a guided recipe that uses a different mixing sequence. The purpose is hydration, not an opportunity to keep adjusting water by feel.
Add the remaining ingredients in the specified order, then knead until the dough becomes cohesive and elastic. It should stretch with some resistance rather than tear immediately. A bran-rich dough may never produce the transparent film you'd expect from refined white flour.
For powder selection and substitution questions, NZ Supps' guide to how to cook with protein powder is a useful companion resource. Keep the bread formula itself as the authority for quantities.
Many wheat pan breads use a final dough temperature around ~25–28°C, a bakery control range discussed in the review of dough rheology and breadmaking conditions. Measure the dough itself, not just the room, and avoid a proofing spot that cycles between cold drafts and direct heat.
Practical rule: Fix the environment before changing the yeast. Otherwise, you won't know which adjustment changed the result.
Read the dough at each transition
For the protein formulas discussed earlier, use their specified expansion target rather than automatically waiting for doubling. Check that the dough retains gas and still has enough elasticity to handle. If a formula calls for folds, use a controlled stretch-and-fold technique instead of repeatedly tearing and reworking it.
Gently release oversized pockets before shaping, without flattening every bit of gas out. During final proof, a light indentation that recovers slowly can help indicate readiness, but combine that observation with expansion and surface condition.
Use this video alongside the written handling cues.
Longer fermentation also involves a nutritional trade-off. Acidification, particularly in sourdough, can support phytate breakdown, but improved mineral bioaccessibility isn't the same as a demonstrated clinical benefit (review of fermentation and nutritional changes). Fermentation duration matters for phytate reduction, so a faster rise isn't automatically an equivalent process (research on whole-wheat fermentation variables).
Shaping, Baking, and Knowing When the Crumb Is Done
Picture the dough at the end of bulk fermentation: expanded, elastic, and still capable of holding tension. Turn it onto the work surface, ease it into a rectangle suited to the pan, then roll it into an even cylinder. Seal the seam and place it seam-side down in the prepared Pullman pan.
The aim is consistent thickness along the loaf, not maximum tightness. Pulling until the surface tears creates a weak point, while loose shaping can leave gaps between layers. Let the shaped loaf proof according to its recipe before committing it to the oven.
Match the oven method to the loaf
A high-heat, steam-assisted wheat-bread approach uses approximately ~245–260°C preheating for at least ~30 minutes, an initial ~10–15 minutes of steam or covered baking, then approximately ~220–230°C until the center reaches about ~96°C (oven heat and steam guidance). That's a reference method, not a universal schedule for every enriched protein Pullman loaf.
For a dedicated sandwich formula, follow its baking profile and the pan manufacturer's heat limits. Protein-enriched crust can color faster, so automatically applying an artisan hearth-bread schedule may darken the exterior before the middle is ready.
- Open loaf in a pan: Use the recipe's prescribed steam arrangement and keep added water away from hot glass and oven components.
- Lidded Pullman loaf: Follow the recipe's lid instructions rather than assuming extra steam is necessary.
- Covered bread vessel: Confirm that both the vessel and its handles are rated for the intended oven setting.
Steam is useful early because it delays crust setting while the loaf expands. Adding it late won't recover lost oven spring. Repeatedly opening the door also interrupts the conditions you worked to establish.
Verify the middle, then leave it alone
When the crust looks ready, check the center with a probe thermometer rather than judging only by surface color. Avoid touching the pan with the probe, which can give a misleading reading. A dark top and an underdone center can occur together.
Don't slice a hot loaf to find out whether you baked it properly. Finish baking first, then let the crumb set.
Remove the bread from the pan as directed and cool it fully on a rack. Moisture continues redistributing during cooling; cutting early can compress the crumb and create a sticky-looking slice that's difficult to interpret.
How Your Homemade Loaf Compares to What You Buy
Protein bread vs regular bread is only a useful comparison when the serving sizes are visible. Homemade slices can weigh more than supermarket slices, so a larger protein number doesn't necessarily represent an equivalent increase in protein concentration.
USDA-linked data places commercially prepared whole-wheat bread at approximately ~12.3g protein per 100g and ~3.95g per ~32.1g slice (whole-wheat bread nutrition baseline). That's a better defined comparison than a generic slice estimate.
Protein Bread Comparison Between Homemade Wheat Loaf and Store Alternatives
The homemade estimates below use the recipe collection cited earlier. The retail protein range comes from a comparison of commercially sold high-protein breads, which reports approximately ~5–7g per slice, including Aldi L'Oven Fresh at approximately ~7g per slice.
| Bread Type | Protein per Slice | Cost per Slice | Cost per Gram of Protein |
|---|---|---|---|
| Plain white bread | Lower-protein reference; check label | Check local shelf price | Calculate from label |
| Standard whole-wheat bread | About 4g | Check local shelf price | Calculate from label |
| Store protein bread | About 5–7g | Varies by brand and pack | ~5.2¢ modeled benchmark |
| Homemade protein wheat loaf | ~10–11g, depending on formula | ~$0.22–0.43 | ~2–3¢ modeled estimate |
Ingredient-cost estimates put soy at ~$3.56 per loaf, pea at ~$4.04, whey at ~$5.04, and collagen at ~$6.81, using the recipe collection's US mid-market pricing assumptions. These are ingredient estimates, not quotes from your grocery store.
Count the costs you actually pay
The modeled protein-cost advantage is approximately ~42–60%, or about half the retail benchmark, but it doesn't include your appliance purchase, electricity, labor, or failed batches. Protein powder is the major cost driver, so this isn't bread made for pennies.
- For grocery savings: Replace modeled ingredient prices with your receipts.
- For macro tracking: Weigh the cooled loaf and use actual ingredient nutrition labels.
- For portion control: Keep slice thickness consistent rather than assigning the same protein value to every cut.
On the evidence available, “roughly twice typical store protein bread” is a rounded serving comparison, not a universal claim about every retail product or every slice.
Diagnosing Dense Crumb, Pale Crust, and Other Common Failures
A compact crumb isn't automatically a failed loaf. These formulas are designed to produce substantial sandwich bread, so the useful distinction is between tight and fully set versus compressed, gummy, or collapsed.
Before changing ingredients, examine the failure. Was the dough weak before shaping? Did it lose height during proofing? Was the crust already dark while the center remained underdone? Those observations point to different corrections.
The visual guide separates common symptoms.
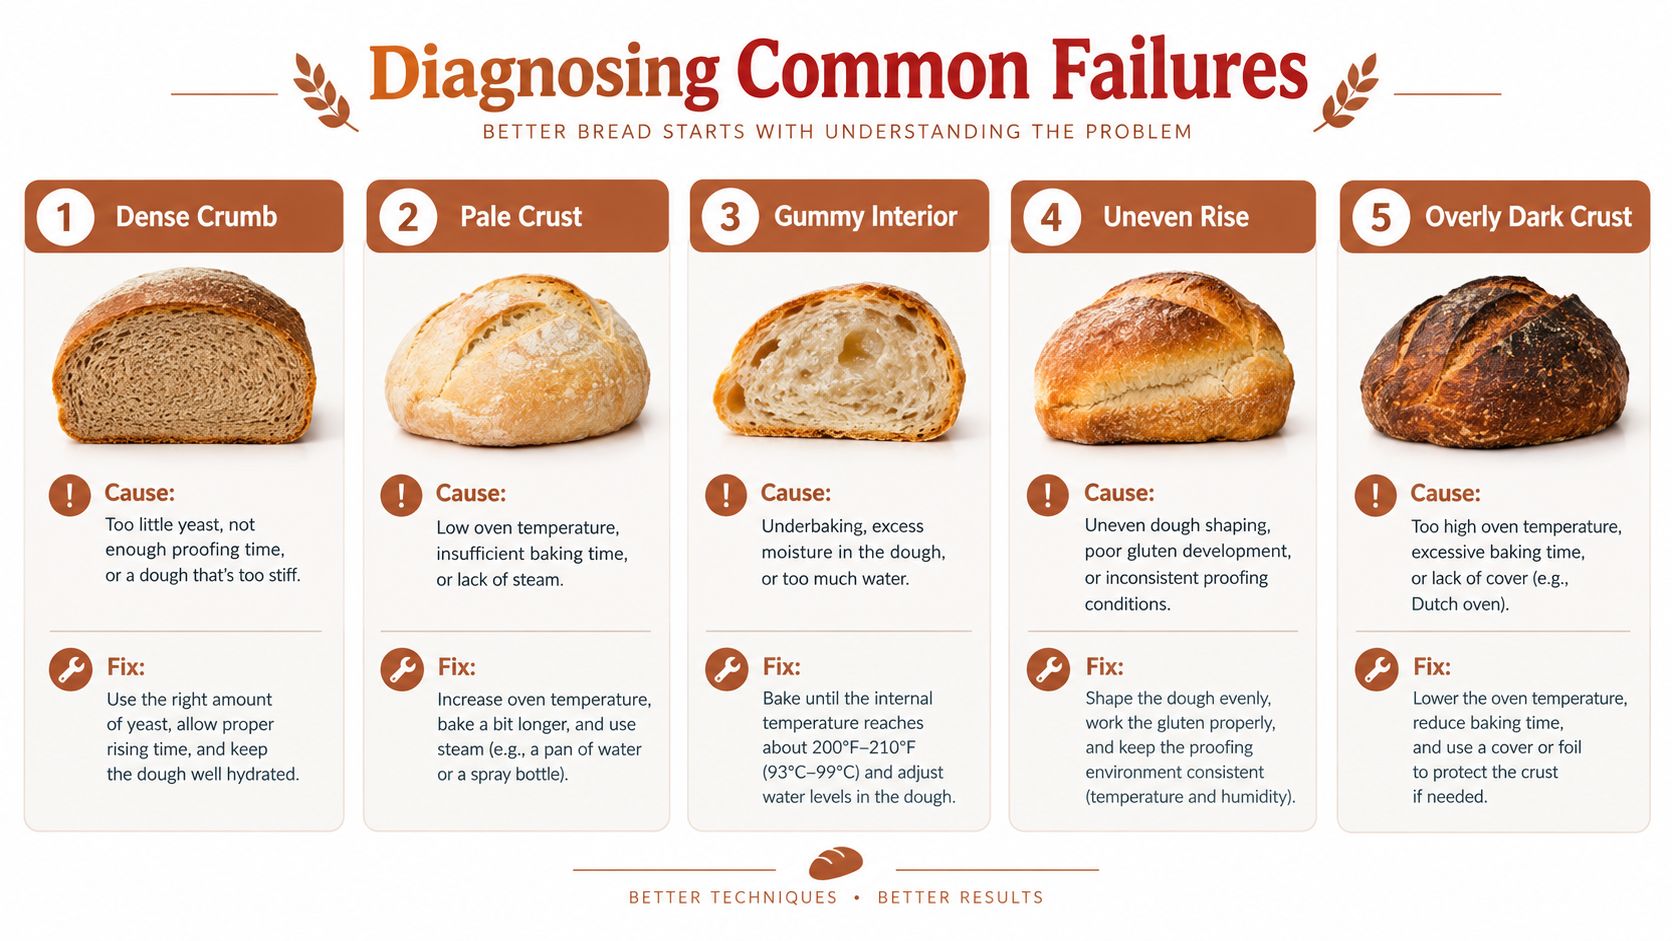
Match the correction to the evidence
| Symptom | What to investigate | Next-bake correction |
|---|---|---|
| Dense but dry crumb | Weak development or insufficient fermentation | Improve mixing or allow the prescribed fermentation endpoint before shaping |
| Gummy center | Underbaking, excess water, or cutting while warm | Verify center doneness and full cooling before reducing water |
| Pale, soft crust | Inadequate preheating or excessive retained moisture | Confirm preheat and complete the drying phase |
| Collapsed top | Fermentation exceeded the dough's holding capacity | End proof earlier and verify dough temperature |
| Uneven rise | Uneven shaping or inconsistent pan loading | Shape a cylinder of uniform thickness |
| Dark exterior with an underdone center | Oven profile too aggressive for the formula | Use the dedicated sandwich-loaf profile rather than extending high heat |
A pale crust doesn't identify a steam problem by itself. Releasing steam too early can limit expansion, while retaining moisture too long can interfere with drying. Check the whole sequence instead of treating every pale loaf the same way.
Stop using doubling as the default
The recipe collection's protein doughs generally target approximately ~50–75% expansion, rather than doubling. That's a formula-specific handling cue, not a universal limit for wheat bread.
If your dough repeatedly collapses after you wait for a dramatic rise, change that endpoint before adding more gluten or yeast. More ingredients won't reliably repair an overextended proof.
Use the broader homemade bread troubleshooting guide when the symptom falls outside these patterns.
Change one controllable variable per bake. Otherwise, a better loaf won't tell you which correction worked.
Keep notes on water, dough temperature, proof endpoint, and center doneness. “Too dense” is an impression; “held shape before proof, then slumped before baking” is useful operating information.
Your First Loaf and Where to Go Next
Choose the protein source you'll keep buying. Whey is a sensible starting point for a mild sandwich loaf; pea or soy suits a plant-based approach. Use collagen only with a clear understanding that its protein total doesn't make it nutritionally interchangeable with the other options.
Don't build your first loaf around substitutions. Choose a dedicated formula, buy the specified ingredients, and complete a baseline bake before adjusting flavor or texture.
Set up a repeatable first attempt
A scale, probe thermometer, suitable loaf pan, and stable fermentation space are the practical essentials. A controlled proofing appliance is another option if your kitchen temperature varies substantially, but it won't replace correct mixing, shaping, or baking.
- Before mixing: Check the protein powder label and confirm you have the specified flour and vital wheat gluten.
- During fermentation: Record dough behavior alongside the recipe's time and temperature settings.
- After cooling: Weigh the finished loaf, portion it consistently, and calculate nutrition from the ingredients you used.
- Before repeating: Decide whether the main issue was handling, proofing, baking, or a texture you don't prefer.
The meal-level payoff is the one established at the opening: a substantial bread portion can supply the protein target before fillings. Treat that target as a meal-planning convention, not a universal requirement for every person.
Use automation for consistency, not permission to ignore the dough
A high protein bread machine search can obscure an important distinction. A system that controls fermentation and proofing isn't necessarily an all-in-one mixer and oven. Check which operations remain yours before buying.
Dedicated yeast-activation and proofing bowls with temperature-and-time control can reduce environmental variability. They don't turn whey, pea, soy, and collagen into interchangeable ingredients, and “guaranteed result” language shouldn't replace readiness checks.
The companion recipe library also includes a separate rice-, tapioca-, and potato-starch-based gluten-free range. Those breads aren't the high-protein wheat loaves discussed here.
Pick the whey, pea, or soy formula tonight, weigh the ingredients, and run it without substitutions. A documented baseline gives you something useful to improve.
DBakerAid™ offers a yeast-fermentation bowl, dough-proofing bowl, and temperature-and-time control hub, with an optional steam accessory for oven baking. If maintaining stable fermentation conditions is the difficult part of your homemade protein bread routine, visit DBakerAid™ to review the system and explore the companion high-protein recipes.