

A loaf can fail even when the recipe is correct. The proofer reads 10°F warmer than expected, the dough rises too quickly, and the baked loaf emerges pale, tight, or collapsed. That familiar result raises the more useful question: why does the same dough behave so differently at 75°F and 95°F?
The answer isn't one magic setting. Dough proofer temperature controls fermentation speed, gas retention, dough strength, and the timing of the bake. A dough proofer is a temperature-controlled chamber that keeps dough in a chosen activity range, instead of leaving fermentation to an unpredictable countertop.
For most yeast doughs, independent baking references place a practical proofing band around 24–29°C (75–85°F), with cooler conditions slowing fermentation and warmer conditions accelerating it. You can confirm the broader proofing science in this technical guide to bread proofing. The reliable baker doesn't memorize one number and stop there. They read the dough, account for the recipe, and adjust the chamber to match the result they want.
Table of Contents
- Why Your Dough Proofer Temperature Changes Everything
- How Temperature Drives Yeast Activity and Fermentation Speed
- Lean vs Enriched Dough and Why Their Sweet Spots Differ
- Pizza Laminated and Sourdough Proofing Windows at a Glance
- Humidity Airflow and the Proofer Chamber Environment
- Common Proofing Mistakes and Why Cooler Often Beats Hotter
- Setting Up and Monitoring Your Proofer at Home
Why Your Dough Proofer Temperature Changes Everything
A baker once placed shaped loaves in a warm proofing cabinet, expecting a dependable rise. The dough looked ready quickly, so the baker followed the clock and moved it to the oven. Instead of expanding, the loaves spread sideways. The crust colored unevenly, and the crumb felt dense.
The problem wasn't necessarily the flour or the shaping. The chamber had been warmer than intended for much of the morning. That small change allowed the dough to ferment faster than its gluten structure could comfortably support.
The proofer controls more than warmth
During proofing, yeast produces carbon dioxide. Gluten holds that gas in pockets, creating the internal structure that later expands in the oven. If fermentation moves too slowly, the dough may remain tight and underdeveloped. If it moves too quickly, the yeast can produce gas faster than the dough can retain it, leaving weak structure and an overproofed loaf.
A controlled chamber gives you a stable environment for that process. Counter proofing can work well, but room temperature changes with weather, sunlight, kitchen appliances, and drafts. A proofer separates those variables from the dough.
Practical rule: Temperature determines the pace, but the dough's volume, feel, and response determine readiness.
The practical range for many yeast-based doughs sits around 24–29°C (75–85°F), while specialized proof cabinets may use warmer settings in tightly controlled production. A bakery reference notes that many bakeries ferment dough around 23–30°C, preserving handling quality rather than just picking the warmest option. You can compare that approach with this industry explanation of fermentation temperature.
One setting won't suit every batch
A cool lean dough, a buttery enriched dough, and refrigerated dough don't arrive at the proofer in the same condition. Their starting temperature, yeast level, flour strength, sugar, fat, and desired flavor all change the appropriate window.
That's why the useful question isn't “What is the best dough proofer temperature?” It's “What temperature gives this dough enough time to ferment while preserving its structure?” The sections below turn that question into a workable method.
How Temperature Drives Yeast Activity and Fermentation Speed
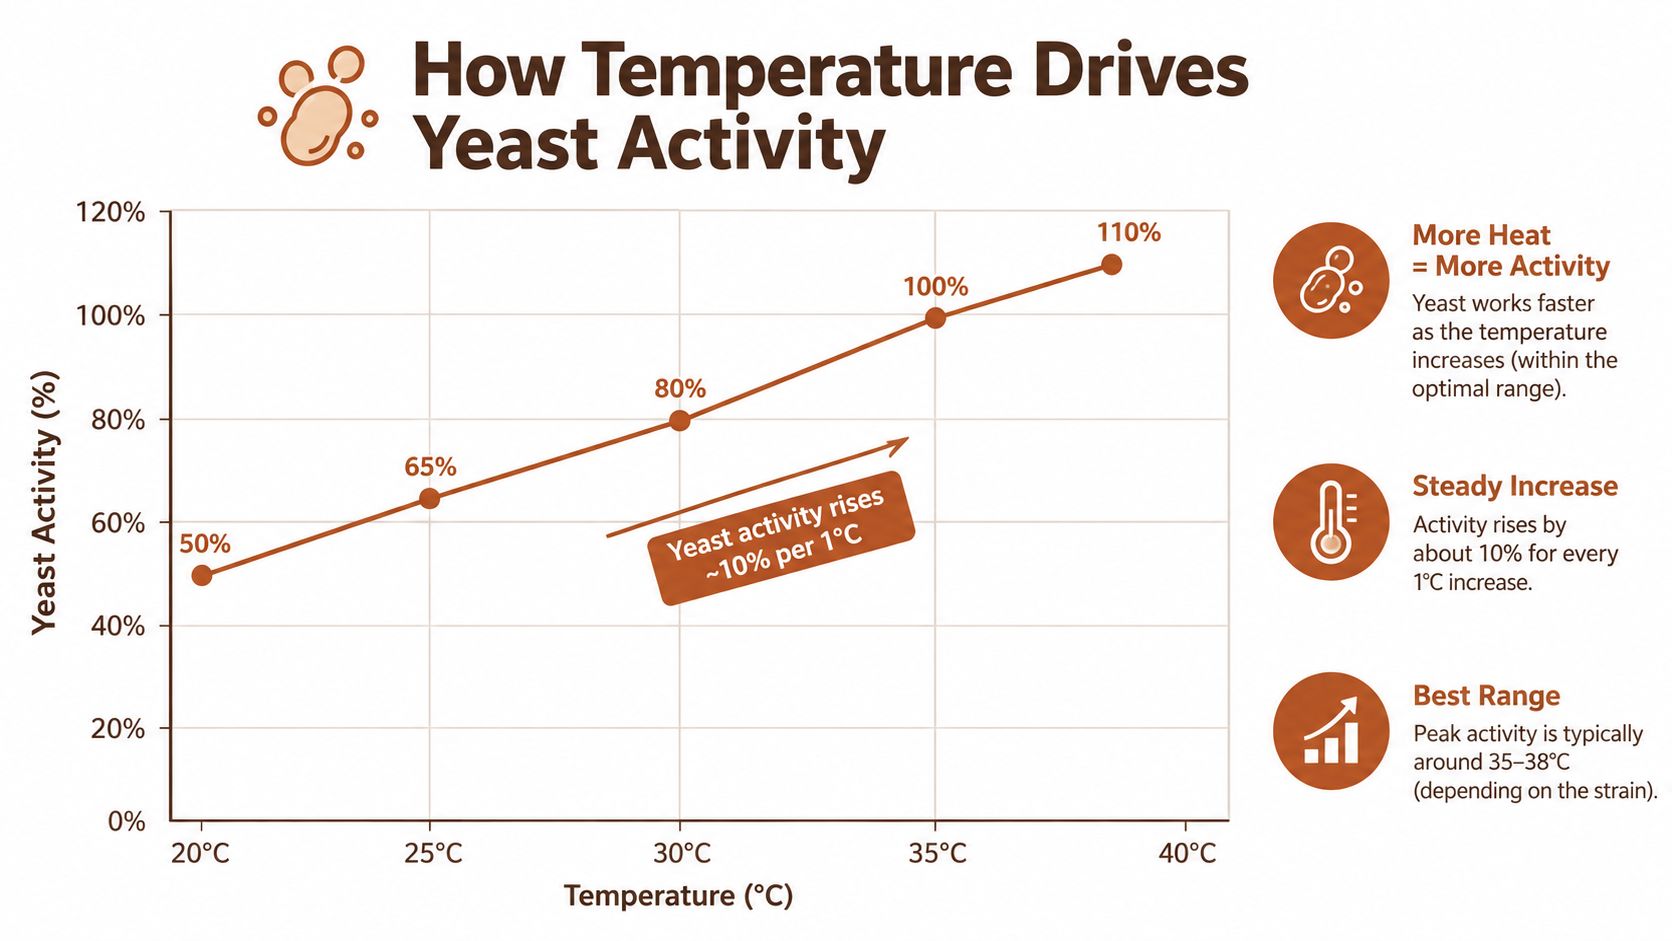
What changes when dough rises by only a degree or two? Within a suitable fermentation range, warmer dough usually gives yeast a faster pace. Bakers commonly estimate that each 1°C increase in dough temperature can accelerate yeast activity by about 10%, as described in this fermentation science resource. The estimate is a guide, not a timer, because yeast level, flour, dough strength, and moisture all affect the result.
A dough comfortable at 25°C may ferment noticeably faster at 26°C. A warmer chamber can shorten the schedule further, yet the dough may still need time to develop enough structure to retain its gas. Use the temperature change to anticipate speed, then judge readiness by volume, elasticity, and how the dough responds to a gentle press.
Temperature changes the balance
Cooler proofing slows gas production and gives flavor development more time. Warmer proofing can make production quicker, but a fast-rising dough may outpace the gluten network that must hold the expanding gas. Temperature controls the pace. The dough's structure determines whether that pace is useful.
A practical band for many yeast doughs is 24–29°C (75–85°F). Other guidance places room-temperature proofing around 21–24°C (70–75°F), a warm proofing spot around 27–29°C (80–85°F), and faster proof-box conditions around 32–38°C (90–100°F). These ranges provide reference points rather than universal instructions. Compare the conditions in this bread proofing temperature guide.
The temperature of the yeast mixture and the temperature of the finished dough serve different purposes. Guidance for active dry yeast, rapid-rise yeast, and bread-machine yeast gives them different handling recommendations, so liquid used to activate yeast is not automatically the right final proofing temperature. Yeast handling guidance from Fleischmann's explains that distinction.
Use temperature, yeast, and time together
Yeast quantity changes the meaning of a proofer setting. Less yeast with a cooler, longer fermentation can build flavor gradually, while more yeast with warmer conditions can fit a shorter schedule. Chamber humidity matters too. Moist air limits surface drying, helping the dough expand; a dry chamber can form a skin that restricts expansion even when the temperature is suitable. The same setting can therefore overproof one dough and underproof another.
A controlled study compared dough temperatures of 28, 31, and 34°C with proofer temperatures of 35, 40, and 45°C. Proof time, volume, scoring, and firmness changed across those combinations. Higher dough temperatures paired with lower proofer temperatures produced the best bread scores, showing why chamber temperature alone can mislead you. Read the study on dough and proofer temperature interaction for the detailed findings.
For a practical home-baking explanation of how these variables work together, see fermentation science for home bakers.
Lean vs Enriched Dough and Why Their Sweet Spots Differ
A lean baguette dough and a rich brioche dough may share flour, yeast, and water, but they don't behave alike in a proofer. The lean dough contains little or no added fat and sugar, so its gluten network remains relatively direct and responsive. The enriched dough contains ingredients that change both its structure and fermentation pace.
Lean doughs handle warmth more easily
Baguettes, ciabatta, and rustic country loaves often tolerate a warmer proofing environment around 27–29°C (80–85°F). That warmth can help the dough ferment efficiently while preserving the extensibility needed for shaping and oven expansion.
Enriched doughs usually need more restraint. Butter, eggs, and sugar make the dough softer and heavier, while fat can coat gluten strands and reduce the dough's ability to organize quickly. At excessive warmth, butter becomes slack, the dough can feel greasy, and the shape may lose definition.
Sugar also creates osmotic stress for yeast. A sweet dough may need a gentler temperature and more patience than a lean dough, even when both are sitting in the same kitchen.
A working comparison
| Dough Type | Proofer Temperature | Typical Proof Time | Key Consideration |
|---|---|---|---|
| Lean bread | 27–29°C (80–85°F) | Recipe-dependent | Warmer conditions can support efficient fermentation and good structure |
| Enriched bread | 24–27°C (75–80°F) | Recipe-dependent | Keep butter firm enough to preserve dough strength |
| Sweet yeasted dough | Moderate and controlled | Recipe-dependent | Sugar can slow yeast, so avoid treating warmth as the only solution |
The table gives you a starting point, not a replacement for observation. A high-yeast lean dough may need less warmth than a low-yeast country loaf. A heavily enriched dough may need a cooler chamber than a lightly enriched hamburger bun.
The same proofer setting can overproof one dough and underproof another because temperature interacts with ingredients, yeast level, and starting dough temperature.
Look for volume gain, surface tension, and the dough's response to a gentle touch. If butter begins to soften visibly or the dough loses its shape before it has developed enough volume, lower the chamber temperature rather than just shortening the timer.
Pizza Laminated and Sourdough Proofing Windows at a Glance
Specialty doughs make the limits of temperature control obvious. Pizza dough benefits from a fermentation pace that builds flavor and extensibility. Laminated dough needs enough warmth for yeast activity, but not so much that the butter melts. Sourdough depends on both the temperature of the dough and the strength of the culture.
Pizza dough
A pizza dough can ferment in a cooler proofer around 24–27°C for roughly 1–4 hours, depending on yeast level and process. A cold retard around 4°C creates a different schedule and flavor profile. Raising the chamber toward 30°C accelerates gas production, but it can leave the dough overproofed and make the baked crust feel gummy.
For pizza, judge readiness by elasticity and extensibility as well as volume. Dough that's too young may snap back during stretching. Dough that's too mature may feel loose, tear easily, or refuse to hold a shaped edge.
Laminated dough
Croissants and danishes need a narrower final-proofing window after shaping. A chamber around 24–26°C for roughly 60–90 minutes gives the yeast room to work while helping the butter remain layered. Butter can melt above 27°C, which threatens the separation that creates flaky layers.
Humidity matters here because dry air forms a skin across the surface. A relative humidity around 70–75% helps the dough stay supple without making the butter surface wet and unstable.
Sourdough
Sourdough follows its own rhythm. A bulk fermentation around 24–26°C may take 4–6 hours, followed by a final proof around 22–26°C for 3–4 hours, depending on starter strength and dough composition. An overnight cold proof around 4–7°C slows the process and supports a more developed flavor.
| Dough Type | Proofer Temp | Humidity | Typical Duration |
|---|---|---|---|
| Pizza | 24–27°C | Moderate, surface protected | 1–4 hours |
| Laminated dough | 24–26°C | 70–75% RH | 60–90 minutes |
| Sourdough bulk | 24–26°C | Covered to prevent drying | 4–6 hours |
| Sourdough final proof | 22–26°C | Covered or humid | 3–4 hours |
Use the clock as a reference, not a verdict. A gentle poke should leave an indentation that fills slowly. A visible dome, a light feel, and controlled elasticity matter more than matching an exact minute.
Humidity Airflow and the Proofer Chamber Environment
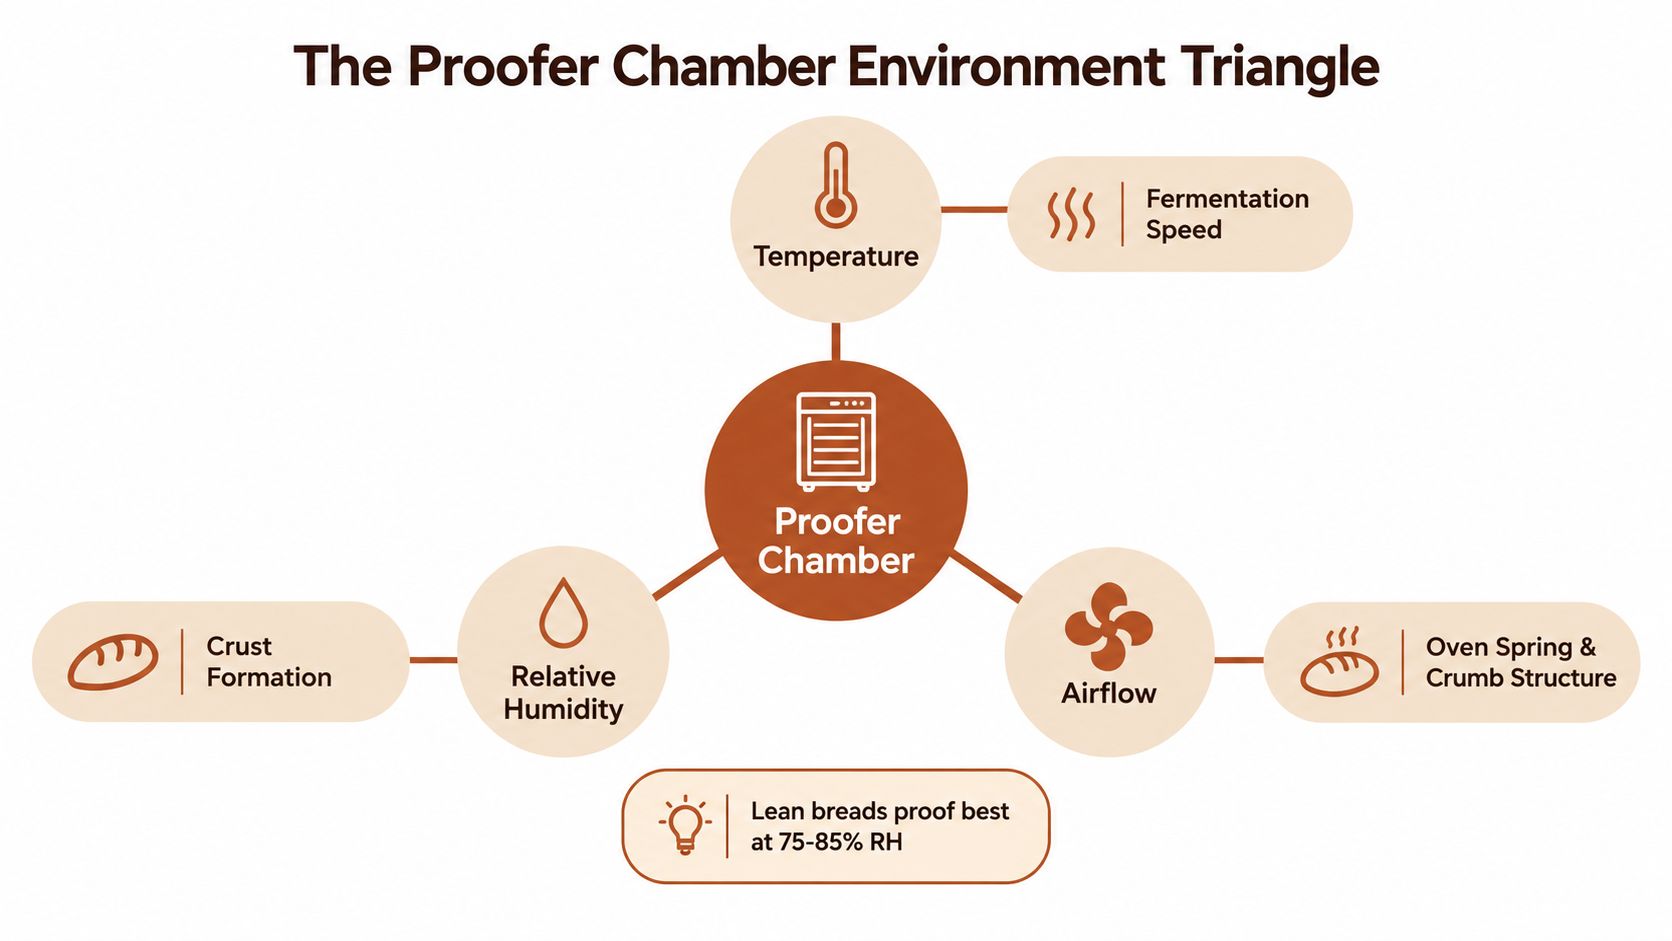
A proofer isn't just a warm box. Temperature, relative humidity, and airflow work together to determine whether the dough surface stays flexible, whether the crust begins forming too early, and whether the dough retains enough strength for oven expansion.
Independent proofing guidance commonly places targets around 75–85% RH at 35–40°C, while industrial systems often stabilize around 38–40°C with 80–90% RH. Those warmer settings belong to controlled systems and specialized production, not to every home dough. The same guidance also notes that airflow changes the humidity requirement. At 35°C with air moving at 1.5 m/s, the stated need can fall to 73–75% RH. See this proofing environment research for the relationship between chamber stability, humidity, and airflow.
Humidity protects the surface
A dry dough surface forms a skin. That skin can restrict expansion and create cracks when the dough enters the oven. Excess humidity creates a tacky surface and can weaken delicate dough, particularly when the chamber temperature also runs high.
Lean breads commonly proof well around 75–85% RH, while laminated doughs often need around 70–75% RH to stay supple without compromising butter layers. A stable, slightly cooler chamber can outperform a hotter chamber that repeatedly swings between dry and damp conditions.
Airflow needs restraint
Still air helps shaped loaves retain moisture. A fan can distribute heat, but a direct stream across the dough may dry one side faster than the other. That uneven surface changes how the dough expands and can produce inconsistent crust texture.
At home, use a thermometer-hygrometer at dough height rather than relying on the chamber display alone. A covered container or a shallow water source can help, but it won't tell you the actual RH unless you measure it. For more practical control ideas, see how to control proofing humidity.
Common Proofing Mistakes and Why Cooler Often Beats Hotter
Hotter isn't automatically better. A warm chamber can shorten fermentation, but it can also reduce the time available for flavor development and make the dough harder to catch at its ideal stage.
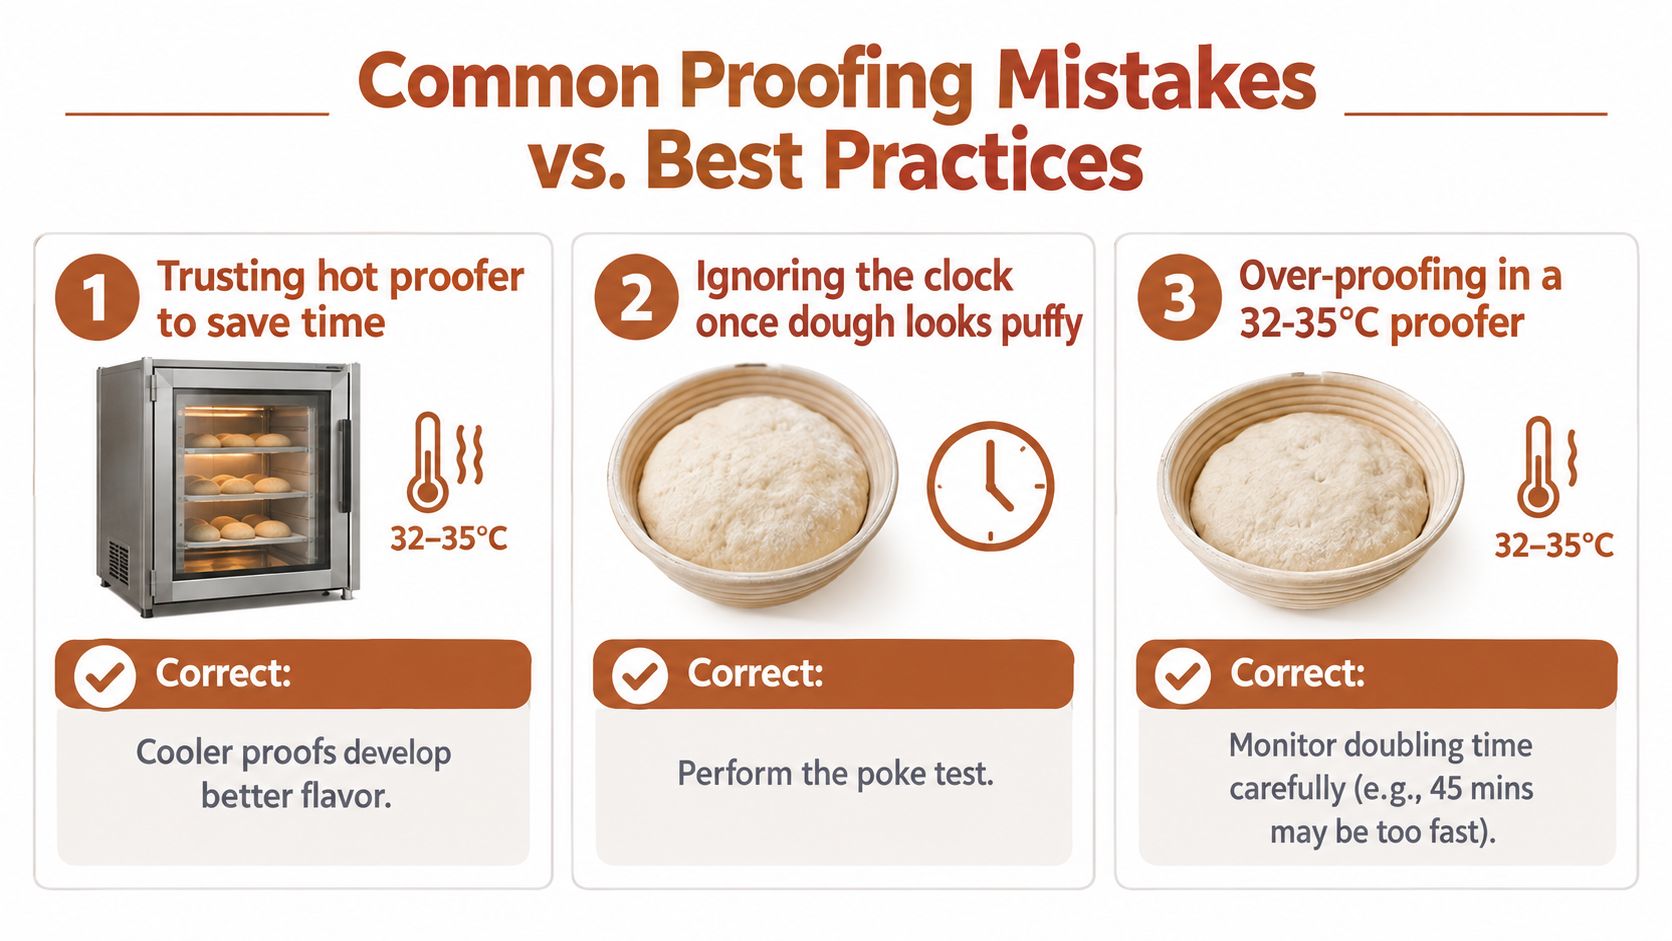
A proofer around 32–35°C may move dough rapidly, especially when the dough itself begins warm. That speed can exhaust fermentable sugars sooner, weaken gluten, and leave a loaf with less developed flavor. By contrast, cooler proofing around 21–24°C creates a slower process that many bakers choose for deeper flavor and more controlled structure.
Three habits that cause trouble
- Trusting heat to save time: A warmer setting may speed the rise, but it won't repair weak gluten or compensate for an inaccurate dough temperature.
- Stopping at a visual estimate: Puffy dough isn't always ready. A gentle poke that slowly fills suggests better timing than a clock alone.
- Adding yeast instead of changing the process: More yeast can create a fast rise without giving the dough enough time to develop handling strength and flavor.
The poke test is simple. Press the dough lightly with a fingertip. If the indentation springs back immediately, the dough likely needs more time. If it stays fully sunken, the dough may have gone too far. A dent that fills slowly is a useful sign that the dough is near its target.
Cooler proofing isn't automatically superior. It gives the baker more time to observe and often supports flavor, but the correct choice still depends on yeast level, dough temperature, and the desired schedule.
A warm kitchen can push dough beyond its intended range. If the room is already hot, lower the proofer setting or shorten the exposure. Adjusting the dough's starting temperature can be cleaner than repeatedly changing the chamber once fermentation is underway.
Setting Up and Monitoring Your Proofer at Home
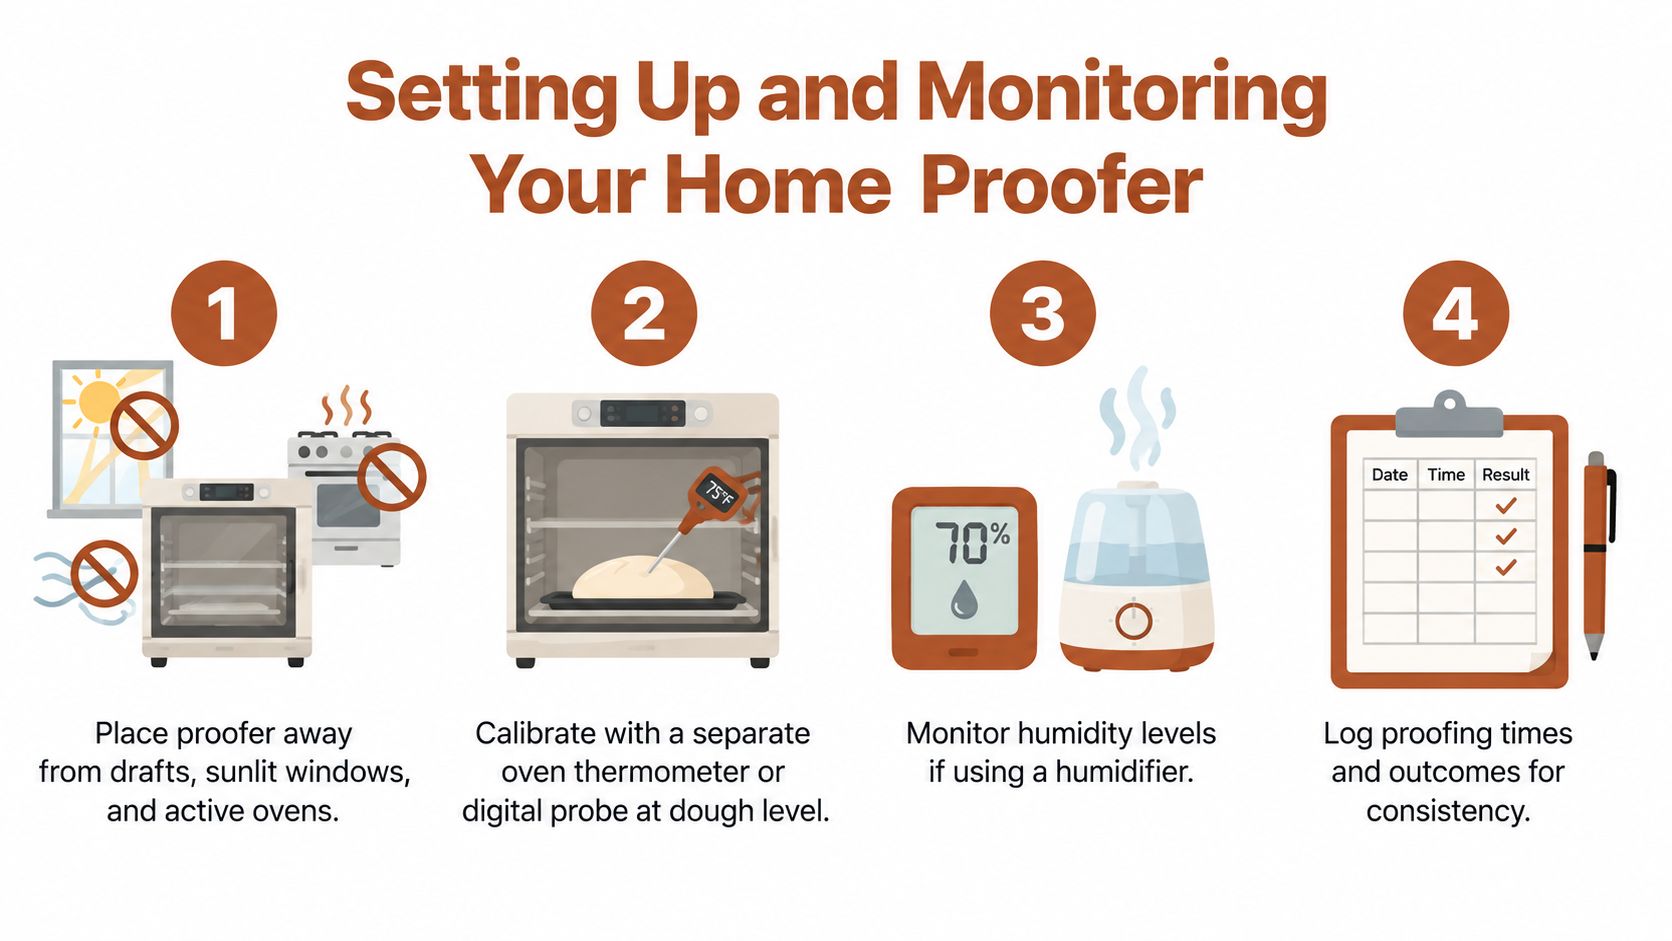
Start with measurement, not the dial. Place the proofer away from drafts, direct sun, and an active oven. Then check the chamber with a separate oven thermometer or digital probe positioned at dough height, because the built-in display may not represent the temperature where the dough sits.
A practical home setup
- Measure the chamber: Put a thermometer at dough level and allow the environment to stabilize before judging the reading.
- Check the dough itself: After proofing begins, measure the dough's center with an instant-read thermometer when practical. The dough temperature matters more than the air temperature alone.
- Protect the surface: Cover the bowl or shaped dough, or use controlled humidity, so airflow doesn't create a dry skin.
- Record the result: Note the chamber temperature, dough temperature, proof duration, volume change, and final crumb.
Use the recipe's target as a starting point, then adjust in small increments. A dough that rises too quickly may need a cooler chamber or less yeast. A dough that barely changes may need more time, a warmer environment, or a review of yeast freshness and dough temperature.
Judge readiness with more than the timer
Look for a meaningful increase in volume, a slightly aerated feel, and a surface that responds gradually to a gentle poke. Different doughs can reach readiness at different levels of expansion, so don't force every recipe to double.
A shallow water pan can support humidity in a basic setup, but measure the result if consistency matters. For a deeper look at choosing and using a home proofing box, read this home proofer guide.
Keep the central lesson visible in your notes: the best dough proofer temperature is the one that matches the dough's starting temperature, yeast level, structure, humidity needs, and fermentation goal. If you want a system that controls fermentation and proofing conditions instead of leaving those variables to the kitchen, DBakerAid™ is designed to manage temperature and timing for repeatable home baking. Visit DBakerAid™ to review the proofing system and recipes before your next loaf.