

You've got croissants on the counter, eggs in the fridge, and a plan for brunch. The temptation is to press the pastry into a pan, pour in the filling, and bake until the top looks golden. That can work, but a browned top won't tell you whether the bottom is flaky, pleasantly custardy, or still a greasy sponge.
Croissant crust quiche starts with a texture decision. Raw laminated dough gives you the clearest pastry layers. Torn baked croissants give you a quicker, softer base, with crispness determined largely by how you prepare them before the custard goes in. Neither route can compensate for waterlogged vegetables or a shell that never gets enough heat.
Table of Contents
- Choosing Fresh, Day-Old or Toasted Croissant Bases
- Laminating, Lining and Timing the Croissant Crust
- How to Blind-Bake the Shell Before Filling
- Fixing a Soggy, Greasy or Raw Quiche
- Make-Ahead Service and Safe Reheating
- Bake Your First Croissant Crust Quiche This Weekend
Choosing Fresh, Day-Old or Toasted Croissant Bases
Choose the base before you choose the baking schedule. Laminating from scratch gives you the greatest control over the rim and the most distinct flaky layers, but it also requires cold handling, resting, and a proper blind bake. Pressing torn store-bought croissants into a pan skips that dough work, not the need to manage moisture.
With baked croissants, the question is how much custard you want the interior to absorb. Fresh pastry makes a softer base; lightly toasted pastry gives you a more defined boundary between crust and filling. Day-old croissants sit between those extremes.
Croissant base types compared for quiche
| Base | Texture result | Best filling | Main risk |
|---|---|---|---|
| Fresh torn croissants | Soft, bread-pudding-like base | Mild fillings with no vegetables, such as cheese | Heavy base that absorbs too much custard |
| Day-old croissants | Balanced, structured base | Ham, cheese and chive, and other medium-moisture fillings | Chewy edge if the croissants are too stale |
| Briefly toasted or pre-baked shell | Defined, crisp layer | Spinach, tomatoes or mushrooms, once drained | Overbaked edge if toasting runs long |
Tear croissants into broad pieces rather than fine crumbs. Fit them together with overlapping edges and press just enough to close gaps. Crushing the whole base flat removes the airy texture you chose croissants for in the first place.
For a fresh-croissant base, expect the bottom to be buttery and custardy rather than shattering. For a toasted base, stop when the exposed surfaces feel dry and begin to colour. Browning them too much now leaves little margin during the filled bake.
Texture rule: A crisp rim and a custardy interior can coexist. A wet filling and a reliably crisp bottom are much harder to reconcile.
Keep preparation separate from storage safety. The USDA's safe-food-handling guidance is the appropriate reference for handling the eggs, dairy, and cooked fillings, not evidence that a particular croissant preparation will stay crisp.
If you're preparing slices for takeaway, Packaging Panda's packaging advice for UK takeaway counters is a useful companion for thinking about grease-resistant wrapping. Packaging comes after proper cooling and temperature control; wrapping can't repair a soggy base.
Laminating, Lining and Timing the Croissant Crust
Use a tested croissant dough formula scaled to your pan. This is a handling method, not a substitute for ingredient weights or the fermentation schedule that belongs to that formula. A shallow metal quiche pan is easier to assess than a deep dish because the crust and custard have less distance to cook through.
The temperature benchmarks below come from Domson's laminated-dough fundamentals, which specifies 22–25°C mixed dough, approximately 4–5°C chilled dough, and 12–16°C plastic roll-in butter, with roughly 30 minutes between folds, a 3–4 mm final thickness, and an initial baking reference of around 200°C for 10–20 minutes. Treat the baking window as a starting point for an unfilled shell, not a promise that every pan will finish on schedule.
Croissant crust quiche stages, temperatures and times
| Stage | Temperature | Time | What it protects |
|---|---|---|---|
| Détrempe mixing | 22–25°C dough | Until smooth, not fully developed | Gluten that stretches without tearing |
| Chill détrempe | About 4–5°C | Until firm throughout | Clean butter layers when rolled |
| Temper roll-in butter | 12–16°C | Until plastic, not oily | Butter that stays in sheets |
| Folding and rest between folds | Keep below roughly 26°C | About 30 minutes between folds | Separate layers that steam apart in the oven |
| Final chill before lining | About 4–5°C | Until cool, firm, and relaxed | A shell that holds its shape |
| Blind bake | About 200°C | Starting reference of 10–20 minutes, then assess | A base set before custard reaches it |
| Filled quiche bake | Reduce from the initial shell-baking heat, following your tested filling recipe | Until the centre is safely cooked and gently set | Custard cooked through without unnecessarily darkening the crust |
Build layers without smearing the butter
- Mix the détrempe until smooth. Combine the flour, water, yeast, salt, and sugar according to your formula. Don't chase a fully developed bread-dough windowpane at this stage. Rolling and folding continue to work the gluten, and excessively elastic dough fights the rolling pin.
- Chill until the dough is firm throughout, not merely cool on its surface. Flattening it into a neat slab helps it chill evenly. If the centre still feels soft while the outside is cold, give it more time rather than forcing the butter enclosure.
- Make the butter bend before enclosing it. Press it through parchment with a rolling pin. It should flex without snapping into hard fragments or leaving an oily smear. Dough and butter need compatible firmness, even though their ideal working temperatures aren't identical.
- Enclose the butter completely, seal the seams, and make the prescribed single folds with refrigerated rests between them. Brush away excess flour before closing each fold. Flour trapped inside the packet creates dry seams rather than useful separation.
During rolling, stop if butter squeezes from an edge or the surface turns shiny. Refrigeration can firm softened butter, but it won't rebuild layers that you've already smeared into the dough. Pushing harder with the rolling pin makes that failure worse.
For a closer look at the enclosure and folding sequence, use our guide to laminating croissant dough. Keep the work surface lightly floured and lift the dough occasionally so it doesn't stick and stretch unnoticed.
Fit the shell without pulling it
Roll to the target thickness, then lift the pastry into the cold pan with slack around the corners. Lower it into the junction between base and sides before trimming. Don't pull the edge upward to make a short sheet reach the rim.
Dock sparingly and chill the lined pan again. Docking gives trapped air an escape route, but excessive puncturing weakens the base and creates routes for custard leakage.
Cold dough can still be badly laminated. Look for separate, continuous layers, not simply a slab that feels firm.
Because croissant dough contains yeast, refrigeration doesn't replace fermentation. Follow your dough formula's rise schedule, but don't borrow an aggressively warm proofing routine intended for another dough. For a quiche shell, you're aiming for controlled expansion, not a tall, pillowy croissant that leaves no room for filling.
The measurements that matter most are the dough's handling temperature and the finished custard's centre temperature. The clock helps organise the work; it doesn't establish doneness.
How to Blind-Bake the Shell Before Filling
An unset shell beneath wet custard is difficult to rescue. The filling slows surface drying while the butter melts, so you can finish with a firm top over a dense, greasy bottom. Petitchef's guidance on preventing watery quiche and soggy crust recommends blind baking and controlling filling moisture rather than relying on a longer final bake.
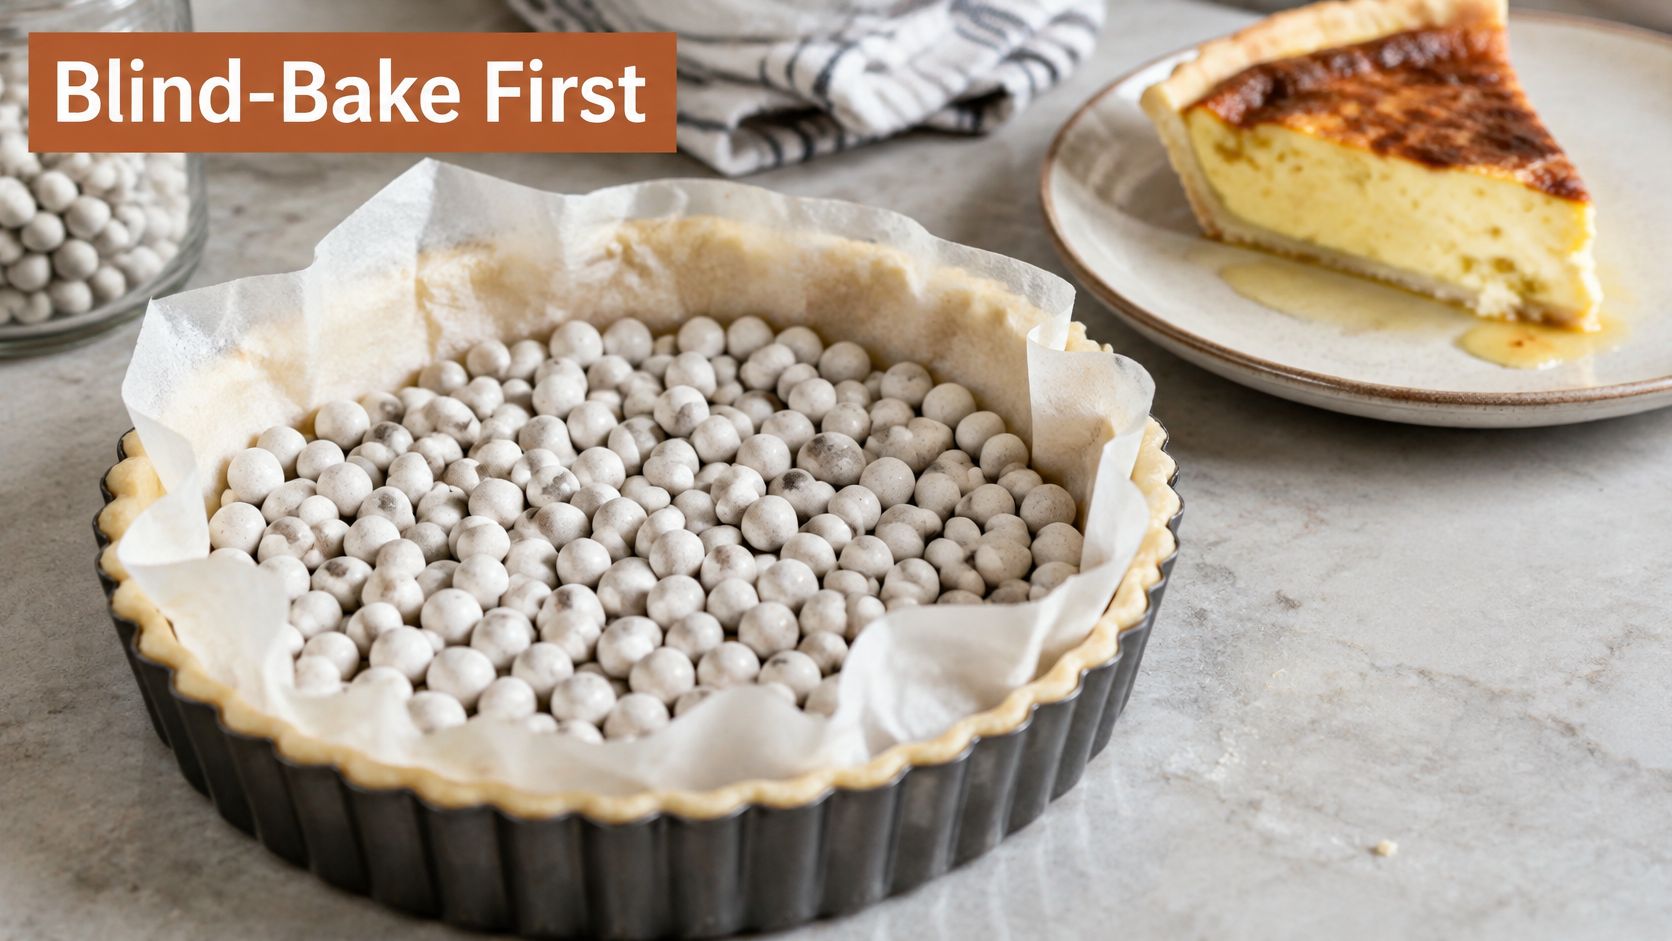
Use parchment to keep the weights separate from the pastry, as shown below.
Set the shell before adding custard
- Dock the chilled base lightly, then line it with parchment. Ease the paper into the corners without dragging the pastry away from the pan. Leave enough overhang to lift the weights safely.
- Add ceramic baking weights or dried beans evenly across the bottom and against the sides. An unsupported wall can slide inward before it sets. Don't pack the weights so aggressively that you crush the laminated dough.
- Bake until the sides hold their shape and the base begins to colour. Use the hot initial-bake reference in the timeline, but inspect the pastry itself. A pale, damp-looking floor isn't ready just because the rim has puffed.
- Lift out the parchment and weights, then return the shell to dry its exposed surface. Reduce the heat if the edge is darkening faster than the bottom. A loose foil shield protects the rim without covering the base.
- Cool the shell before filling. You want a dry surface and a settled structure, not hot pastry receiving cold custard.
This video offers an additional visual reference for the preparation.
Keep the filling from undoing the bake
Cook mushrooms until their released liquid has evaporated. Squeeze cooked spinach, drain tomatoes, and cool cooked meats before assembly. Arrange these ingredients loosely, then add custard without flooding the rim.
Bake on a preheated metal tray to give the underside direct heat. Keep the filling shallow enough that the centre can cook before the exposed pastry becomes too dark. Our quick and easy pie crust guide covers the conventional pastry route if you'd rather avoid lamination.
The acceptance test is underneath: a dry, browned base, visible layers, and no translucent strip of raw dough. A golden top alone doesn't pass.
Fixing a Soggy, Greasy or Raw Quiche
A pale, soggy bottom usually points to an unset shell or excess filling moisture. Don't immediately increase the oven temperature. If the rim is already dark, extra heat may burn the exposed pastry while leaving the protected underside disappointing.
Cut a rested slice and inspect the failure before changing the next batch. A damp crumb, a translucent raw layer, and a puddle of butter aren't the same problem.
Croissant crust quiche symptoms, causes and fixes
| Symptom | Likely cause | Fix |
|---|---|---|
| Pale, soggy bottom | Shell not blind-baked, or wet filling | Blind-bake until the shell is set, drain vegetables, and bake on a preheated metal tray |
| Greasy, pooled butter | Butter melted during shaping or rolling | Chill before continuing and match butter firmness to dough firmness |
| Dense, bready layers | Butter absorbed into the dough | Change the next batch's handling process; stop rolling when the packet softens |
| Raw centre under a browned top | Oven too hot, or filling too deep | Shield the top, reduce heat, and continue until the centre is safely cooked; use a shallower filling next time |
| Cracked or weeping custard | Overbaked custard | Remove promptly once safely cooked; check earlier on the next bake |
| Shell slumps in the pan | Dough stretched when lined | Fit without pulling, support the sides during blind baking, and chill before baking |
Separate rescue work from process changes
A raw centre may still be finishable in the oven, provided you continue cooking promptly and check it with a thermometer. A butter-soaked laminated base won't become properly layered again. That needs a change in the next dough batch, not another stretch of baking.
For a slumped shell, inspect how you transferred the dough. If you pulled it over the rim, chilling alone won't remove all that tension. Give the dough enough width and lower it into the corners instead.
A longer bake can dry pastry. It can't reconstruct butter layers or remove excess liquid from vegetables already sealed beneath custard.
Check an unexpectedly fast-browning oven with a separate oven thermometer. Our guide to testing oven temperature helps distinguish a thermostat problem from a filling problem.
Rotate the tray when one side colours faster, watch the shell rather than only the timer, and let the finished quiche settle before cutting. Slicing while the custard is still fragile makes even a well-baked base look wetter than it is.
Make-Ahead Service and Safe Reheating
Cook the quiche completely before cooling it for later service. The New York State Department of Health's egg-safety guidance gives 160°F (71°C) for egg dishes and 165°F (74°C) for reheated leftovers; refrigerate leftovers within two hours and use shallow containers for prompt cooling. Insert the thermometer into the centre of the custard without touching the metal pan.
A gentle wobble is a useful texture cue, but it isn't a temperature measurement. Check the centre before taking the quiche out, particularly when the top colours early or the filling is deeper than usual.
Cool, transport, and reheat deliberately
- Cool promptly. Don't leave the whole quiche on the counter waiting for it to become completely cold. Divide it into portions when practical and refrigerate in shallow containers.
- Transport cold. Use an insulated carrier with cold packs, then refrigerate at your destination. A warm car isn't a holding cabinet.
- Reheat gently. Use the oven and check the middle of a portion. Shield exposed pastry if it darkens before the custard reaches its reheating endpoint.
- Plan service. Bring out manageable amounts rather than leaving the entire batch on a buffet for an open-ended brunch.
Safety and quality aren't identical. Reheating can toughen custard and soften or grease the croissant layers, so avoid repeatedly warming and cooling the same portions.
Don't refrigerate a partly cooked egg-filled quiche with the intention of finishing it later. The practical make-ahead alternative is to prepare the unfilled shell and cooked fillings separately, then assemble and bake, or fully bake the quiche and reheat it.
Discard quiche that exceeds the room-temperature serving limit. Neither a crisp crust nor a normal smell establishes that it's safe.
Bake Your First Croissant Crust Quiche This Weekend
For a first attempt, choose day-old croissants with ham, cheese, and chive. That combination gives you a useful middle ground: enough pastry structure to slice cleanly without making your success depend on scratch lamination. Use a tested egg-and-dairy filling scaled to your pan rather than guessing the custard volume.
Fit broad croissant pieces together, dry the base without browning the edges, and cool it before assembly. Add the filling in a shallow layer, bake until the centre is safely cooked, and let it settle before serving.
Check the route you actually chose
- Using baked croissants. Look for closed gaps, a dry surface, and no hard, heavily compressed patches.
- Making raw laminated dough. Confirm the butter stayed plastic, the packet never became oily, and the lined shell relaxed before baking.
- For either method. Keep the filling drained and the custard below the rim. Have parchment, weights, a metal tray, and a probe thermometer ready before starting.
D'BakerAid's optional precision system uses a Stage 1 fermentation bowl, a Stage 2 proofing bowl, and a hub to manage temperature and time. You knead your dough your way, use the device for fermentation and proofing, then bake in your own oven; our kit works with any recipe and flour, including enriched and gluten-free doughs, though this croissant method contains wheat.
The method doesn't require that equipment. Controlled dough handling, a properly set shell, and a measured custard endpoint matter more than the appliance you choose.
DBakerAid™ offers controlled fermentation and proofing for home bakers who want a more repeatable dough process. If you're moving from torn-croissant quiche to making your own laminated crust, visit DBakerAid™ to see how the system fits between kneading and baking in your own oven.