

You've got a pie to bake tonight, but the filling is already chosen, the oven is warming, and the crust is still only an idea. That's when you reach for the fastest method, then discover that a shortcut chosen for the wrong filling creates a soggy base, a cracked edge, or a crust that shrinks away from the pan.
A quick and easy pie crust works best when you match the method to the pie. A wet fruit filling needs moisture resistance, a custard needs a properly baked base, and a savory quiche may be perfectly happy with dough pressed straight into the pan. The ratio below gives you a reliable starting point, while the method choices help you protect texture and save time.
Table of Contents
- Choosing the Right Shortcut Before You Start
- Three Mixing Methods and What Each Gives You
- No-Roll, Press-In, and Crumb Crust Options
- Par-Baking and Freezing for a Crispy Bottom
- Fixing the Most Common Quick Crust Mistakes
- Quick Variations for Sweet, Savory, and Gluten-Free
- Your Two-Minute Crust Plan Before You Bake
Choosing the Right Shortcut Before You Start
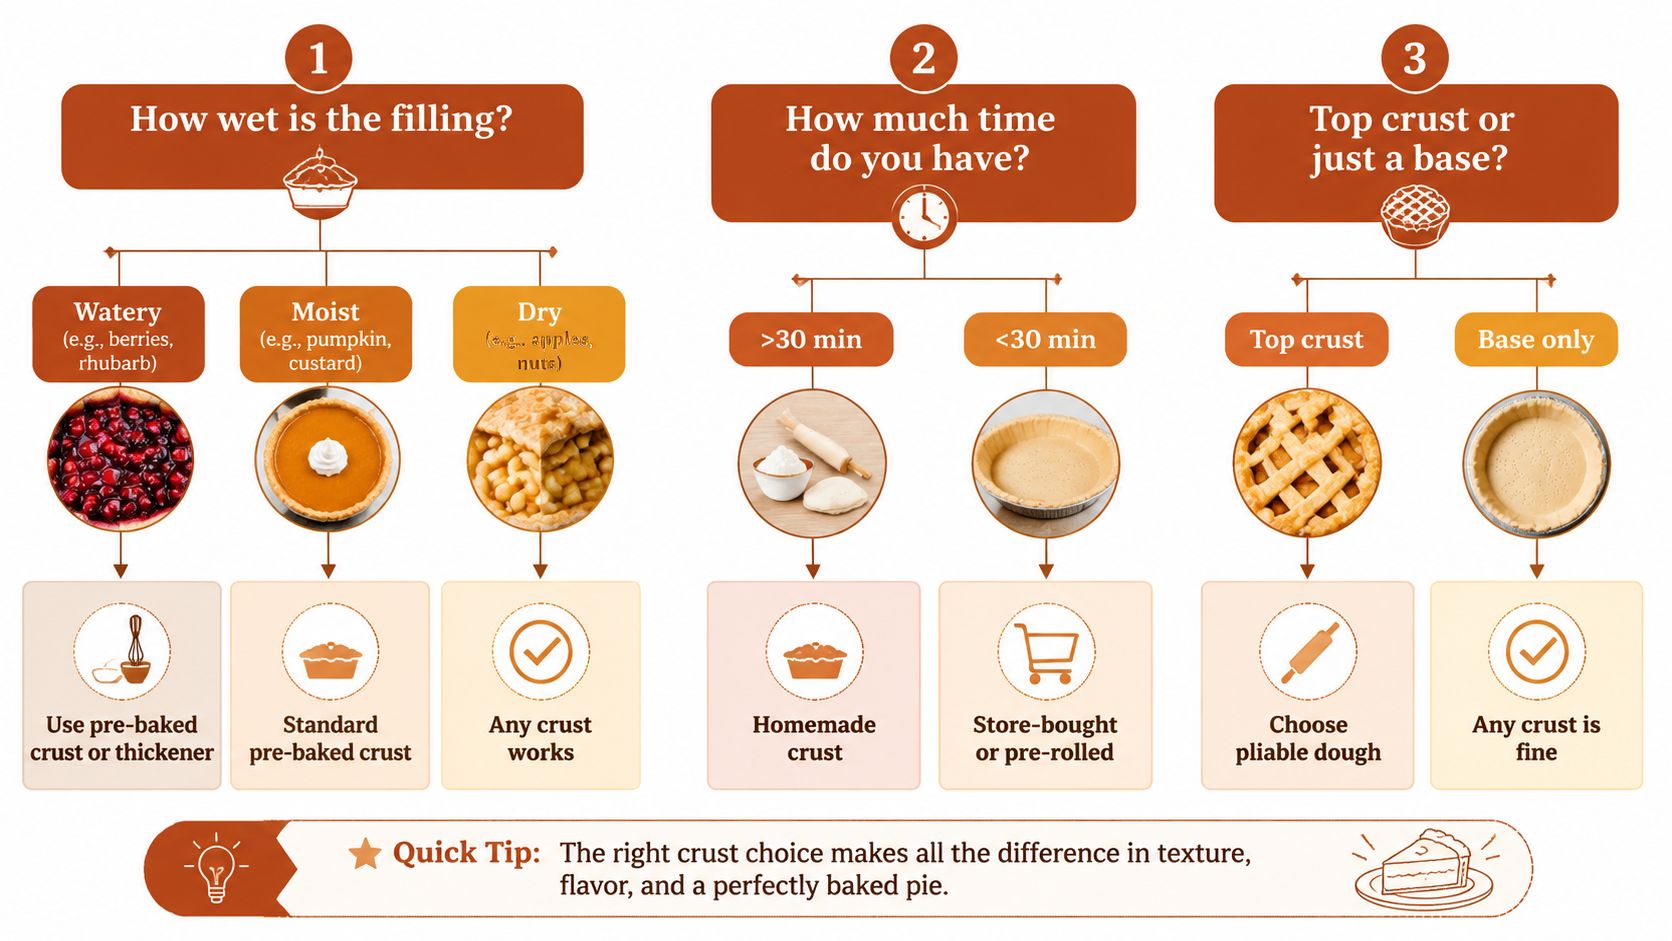
Before you measure flour, answer three questions. How wet is the filling? How much time do you really have? Do you need a top crust or only a base? Those answers matter more than whether you use a pastry cutter, a food processor, or your hands.
Watery fillings such as berries and rhubarb put the greatest pressure on the bottom crust. Use a par-baked shell, a suitable thickener, or both. Pumpkin and other moist custards also benefit from a pre-baked base, while drier fillings such as apples and nuts give you more flexibility. A chess pie or similar custard can also work well with a press-in crumb crust when you want to avoid rolling.
A useful kitchen rule is simple:
Fast rule: If the filling bakes in under 45 minutes, choose a sturdy no-roll crust. If it bakes longer or carries substantial moisture, par-bake the shell first.
A top crust changes the decision. You need dough that stays pliable enough to roll, lift, and cover the filling without tearing. For a single bottom crust, you can prioritize speed and structure instead.
Start with the ratio
The foundational formula is 3:2:1 by weight, meaning three parts flour, two parts fat, and one part liquid. A practical single 9-inch crust uses 300 g flour, 200 g cold fat, and 100 g ice water, plus 5 g salt and 10 g sugar. This ratio is a scalable framework, not a fragile formula tied to one brand of butter, and it reflects the broader baking guidance around a 3:2:1 crust ratio from a pie crust ratio calculator.
For bakers without a scale, that amount is approximately:
- Flour: 2 1/4 cups all-purpose flour
- Fat: 2/3 cup plus 2 tablespoons cold butter or shortening
- Water: about 1/3 cup plus 1 tablespoon ice water
- Seasoning: 5 g salt and 10 g sugar by weight
The weight relationship is the part to protect. In this formula, fat is about 67% of the flour weight, and water is about 33%, so the dough stays tender while remaining workable. Add water gradually rather than dumping it in, because flour absorbs differently depending on humidity and how you measure it.
The scaling math is straightforward. Half a batch is 150 g flour, 100 g fat, and 50 g water. A doubled batch is 600 g flour, 400 g fat, and 200 g water, with the salt and sugar doubled too. For a second perspective on how home-kitchen quantities translate from the ratio, this practical pie crust guide discusses cold fat, visible butter pieces, and hydration control.
If you're using a food processor or other baking equipment, these food processor accessories can make short, controlled mixing easier. Don't chase a smooth dough. Stop when it looks shaggy and holds together when squeezed.
Three Mixing Methods and What Each Gives You
There isn't one correct mixing tool. Each method changes the texture of the dough, so choose according to the pie rather than convenience alone.
Hands-on mixing gives you the most irregular fat distribution. Use a pastry cutter or two knives, and work for about 4 minutes. Stop when the fat pieces range from pea-sized to almond-sized. Those pieces create pockets that can separate as the crust bakes, which makes this method a strong choice for fruit pies where flakiness matters most.
A food processor is the speed option. Pulse the flour and fat for 8 to 10 seconds, then add the ice water in short pulses. The result is more uniform and sandy, producing a tender shell that's often less flaky than a hand-mixed crust. It suits custards and savory fillings, but the blade can warm the fat, so chill the dough promptly.
A stand mixer with the paddle runs for about 1 minute on low. It falls between the other methods, giving you more flake than a processor and less hands-on work than cutting in fat manually. It's especially convenient when you're scaling the dough for more than one pie.
Keep the butter around 50 to 60°F so it's pliable enough to break into the flour without melting. Overmixing is the fastest way to damage all three methods. Once the dough forms a shaggy mass, stop.
Mixing Method Comparison for Quick Pie Crust
| Method | Active Time | Resulting Texture | Best For | Main Risk |
|---|---|---|---|---|
| Hands with pastry cutter | About 4 minutes | Irregular, flaky layers | Fruit pies and rustic galettes | Working the dough too much |
| Food processor | 8 to 10 seconds of pulsing | Uniform, sandy, tender | Custards and savory fillings | Blade heat and overprocessing |
| Stand mixer with paddle | About 1 minute on low | Moderately flaky and even | Larger batches | Mixing beyond the shaggy stage |
No-Roll, Press-In, and Crumb Crust Options
Rolling creates a flexible sheet, but it isn't always the quickest route. These three methods skip the rolling pin and work best when the filling doesn't require a traditional top crust.
No-roll pat-in crust
For custards, cream pies, and sturdy single-crust bakes, use a softer dough close to a 2.5:2:1 ratio of flour, fat, and liquid. Press it into a greased 9-inch pan with lightly floured fingers, pushing the dough evenly up the sides without stretching it. Chill for 30 minutes, then blind-bake at 400°F for 12 minutes before adding the filling.
Press-in cookie or pretzel crust
For cheesecake, icebox pies, and other fillings that don't need a long bake, combine 1.5 cups crushed cookies or pretzels, 2 tablespoons sugar, and 5 tablespoons melted butter. Press the mixture flat into the pan and chill for 20 minutes. You don't need to bake it if the filling is chilled or set without oven heat.
Nut-based savory crumb crust
For a quiche or savory tart, mix 1 cup ground pecans or walnuts, 0.25 cup grated Parmesan, and 3 tablespoons butter. Press it into the pan, chill it briefly, and toast it before adding the filling. This makes a flavorful gluten-free base, but it isn't the same as a wheat pastry crust and won't provide a flexible top.
No-Roll Crust Methods at a Glance
| Method | Chill Time | Bake Time | Best Filling Pairing |
|---|---|---|---|
| No-roll pat-in dough | 30 minutes | 12 minutes at 400°F | Custard, cream, and pumpkin |
| Cookie or pretzel crumb | 20 minutes | None when used for chilled fillings | Cheesecake and icebox pie |
| Nut-based savory crumb | Brief chill | Toast before filling | Quiche and savory tarts |
Par-Baking and Freezing for a Crispy Bottom
A quick crust becomes much more dependable when you separate the shell from the filling long enough to dry and set the base. Par-baking is partial baking. It gives the bottom a head start before wet ingredients arrive.
Chill the shaped shell, line it with parchment, and fill it with pie weights or dried beans all the way to the top. Bake at 400°F for 15 minutes, then remove the parchment and weights. Return the shell to the oven for 5 to 8 minutes, until the base looks pale gold and dry.
For custard or pumpkin fillings that will finish baking in the shell, a shorter blind bake of 10 minutes can be enough when the recipe calls for it. For very wet fruit, bake the shell until it has visibly started to brown before adding the filling. Incomplete prebaking is a common cause of a soft bottom, a problem also addressed in this guide to common pie crust questions.
Freezing is the most useful make-ahead shortcut. Wrap shaped dough disks in plastic and place them in a freezer bag for up to 3 months. An unbaked shell can be frozen for up to 2 months. Bake it directly from frozen, adding 5 minutes to the bake time. If you need help handling frozen dough safely, use this guide to thawing frozen dough.
Par-Bake and Freeze Timings by Filling Type
| Filling Type | Par-Bake Time | Temperature | Freezer Storage |
|---|---|---|---|
| Custard or pumpkin | 10 minutes | 400°F | Unbaked shell, up to 2 months |
| Moist fruit | 15 minutes weighted, then 5 to 8 minutes unweighted | 400°F | Unbaked shell, up to 2 months |
| Dry apple or nut filling | Optional, depending on recipe | Use the filling recipe | Shaped dough disk, up to 3 months |
| Chilled cream or icebox filling | No bake for crumb crust | Chill instead | Freeze components separately when suitable |
Fixing the Most Common Quick Crust Mistakes
A failed crust usually gives you a useful clue. Don't automatically blame the recipe. Look at the dough's temperature, hydration, and handling.
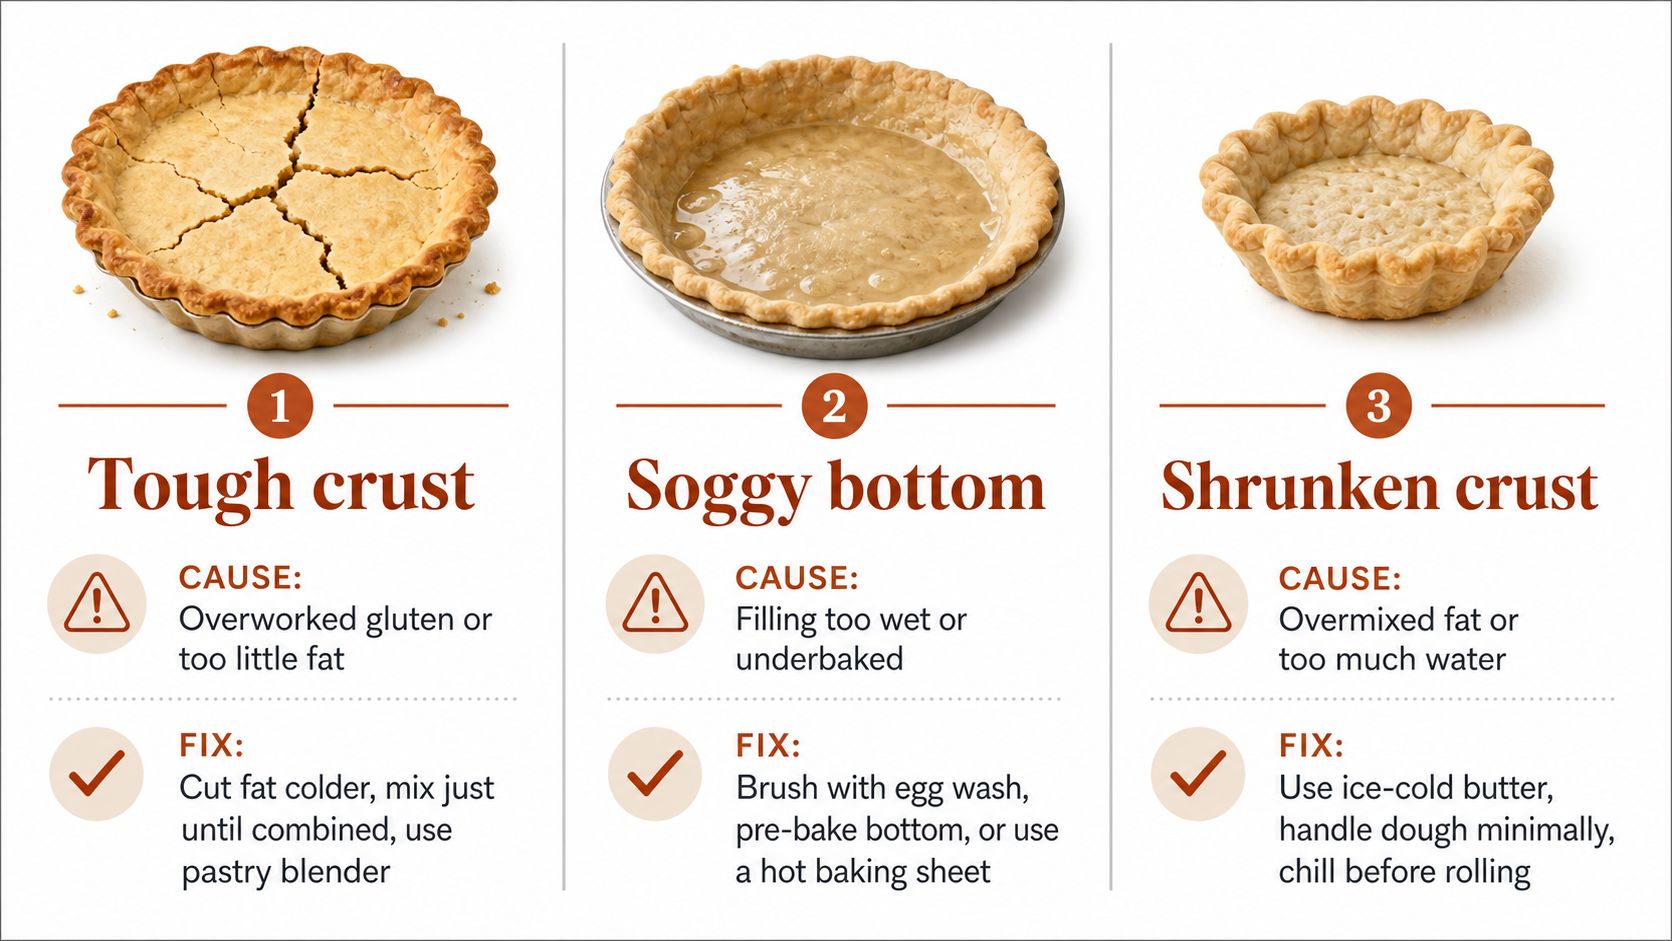
Tough crust
Overworked gluten or too little fat can make pastry firm and chewy. Cut the fat into the flour while it's cold, stop mixing as soon as the dough becomes shaggy, and rest it for 20 minutes before rolling. That rest gives the dough time to relax, which makes rolling easier without adding more water.
Soggy bottom
An under-baked shell and a wet filling are the usual causes. Par-bake with weights at 400°F for 15 minutes, then finish the shell uncovered for 5 to 8 minutes. You can also brush the hot base with a thin egg-white wash, while fruit fillings should be thickened with cornstarch until they coat a spoon rather than run freely across it.
Shrunken crust
Stretching dough into the pan creates tension that pulls the sides downward in the oven. Rest the shaped crust for 30 minutes, dock the base with a fork, and press the dough up the sides without tugging it. Keep the dough close to the original ratio instead of adding extra water to make it easier to handle.
The visual test: A shaggy dough with visible fat is usually safer than a smooth dough that feels perfectly cooperative.
The crust can also fail after it leaves the oven. A pie baked in an oven that runs hot may brown before the base dries, while a cool oven can leave the bottom pale and damp. For a wider discussion of temperature, butter layers, and the steam that creates lift, this food-science explanation of pie crust provides useful technical context.
Quick Variations for Sweet, Savory, and Gluten-Free
The base ratio can handle several styles without a complete rewrite. Change the seasoning, choose a compatible fat, and adjust the bake gently.
For a sweet crust, add 1 to 2 tablespoons granulated sugar and 1/4 teaspoon fine salt per cup of flour. This works for fruit pies and custards. For savory dough, skip the sugar and add 1 tablespoon grated Parmesan or fresh herbs such as thyme or rosemary.
A gluten-free version needs different expectations. Substitute a 1:1 measure-by-weight gluten-free flour blend containing xanthan gum, then add 1/2 tablespoon extra cold water because gluten-free flours absorb liquid differently. The dough may feel more fragile, so a press-in method is often easier than rolling. These instructions are for a gluten-free crust, not for a conventional wheat crust.
For a convenient ready-made alternative, you can order from local producers on Loyaltie when making a gluten-free base matters more than mixing from scratch.
Vegan dough uses equal-weight cold vegan butter sticks or refined coconut oil in place of dairy butter. Keep the substitute cold and handle it like butter. Gluten-free and vegan crusts often benefit from a 5-minute longer par-bake at a slightly lower temperature, around 375°F instead of 400°F, so the edges brown without burning.
Quick Pie Crust Variations at a Glance
| Variation | Key Swap | Add-In | Bake Adjustment |
|---|---|---|---|
| Sweet | Keep the base fat and flour | Sugar and fine salt | Follow filling recipe |
| Savory | Omit sugar | Parmesan or fresh herbs | Watch cheese and herbs for fast browning |
| Gluten-free | 1:1 gluten-free blend by weight | Xanthan gum in the blend, plus extra water | Around 375°F, with a longer par-bake |
| Vegan | Equal-weight vegan butter or refined coconut oil | None required | Around 375°F if edges brown quickly |
Your Two-Minute Crust Plan Before You Bake
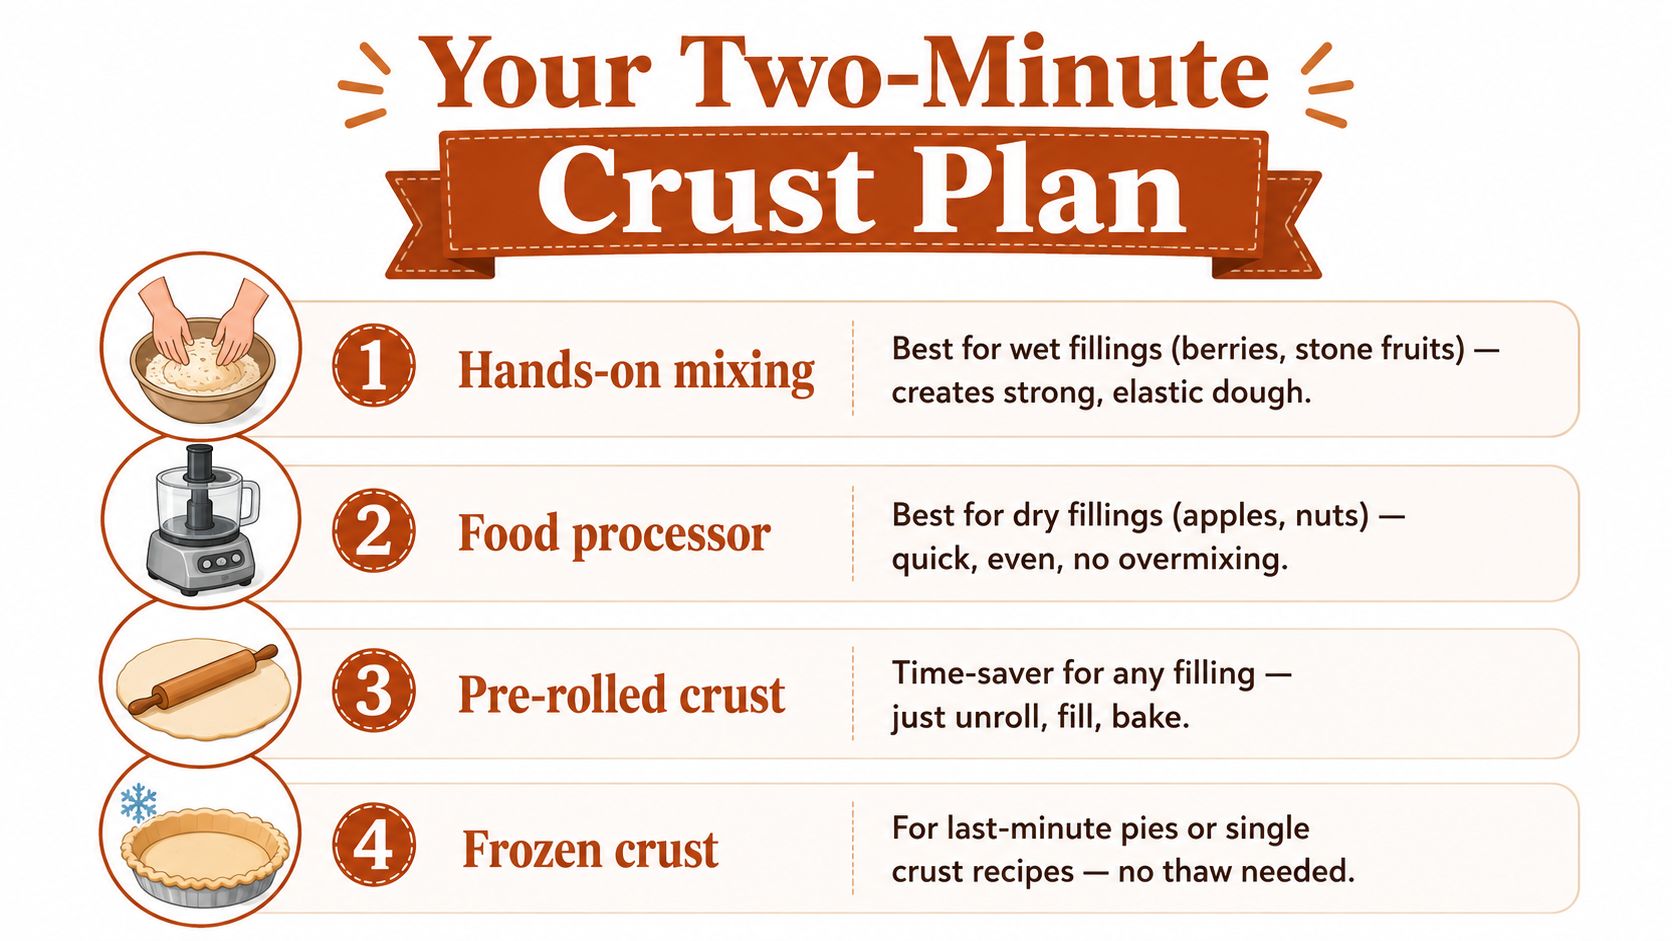
Stand at the counter and name the filling first. That single decision keeps you from using a delicate flaky dough under a filling that needs a dry, firm base.
- Buttery fruit pie: Mix by hand so you keep irregular fat pieces and a flaky texture. Freeze or thoroughly chill the shaped shell if you want the crispest bottom.
- Custard, pumpkin, or cream pie: Use a no-roll crust, crumb crust, or par-baked shell. Structure matters more than dramatic layers here.
- Large savory pie or galette: Use a food processor for speed, but pulse only until the dough comes together. Keep the filling from overwhelming the base.
- Enriched dough with sugar or eggs: Use a stand mixer with the paddle, watching closely so the dough doesn't become overworked.
- Very wet filling: Par-bake with weights, then finish the shell until it looks dry and lightly browned.
- Last-minute single crust: Use a pre-rolled or frozen shell. Don't force a handmade method when the clock is already against you.
A kitchen scale makes the ratio much easier to repeat, especially when you're adjusting a batch for a smaller tart or a double-crust pie. This guide to using a scale can help you move from approximate cups to dependable weights.
Save the pie recipes at dbakeraid.app, write down the filling you're making tonight, and choose one method before you pull out the flour. With that decision made first, the dough can come together in under fifteen minutes.
DBakerAid™ brings controlled fermentation and proofing into the home kitchen through a precision bread-making appliance system, with separate bowls for yeast fermentation and dough proofing plus a hub that manages temperature and time. Visit DBakerAid™ to explore the system and find guided recipes for more repeatable home baking.