

The popular advice is simple: preheat the cast-iron pot, drop in a wet dough, cover it, and wait for a crusty loaf. That method works well for a conventional lean dough. It doesn't automatically work for a high-protein bread recipe.
Whey, pea, soy, or collagen isolate changes the dough before the cast iron ever enters the picture. Add vital wheat gluten, and you get a loaf that's denser, stiffer, slightly tacky, and less willing to expand than an ordinary artisan boule. The reward is substantial, though. A carefully controlled loaf can deliver about 10–11 g of protein per slice, with a soft, uniform crumb that works for sandwiches, toast, and a high-protein meal.
This cast iron bread pan recipe treats heat, fermentation, and proofing as connected variables. The pan matters, but the dough temperature and rise matter just as much.
Table of Contents
- Why High-Protein Doughs Need a Different Cast Iron Approach
- Understanding Cast Iron Thermal Properties for Bread Baking
- Formulating the High-Protein Dough Structure
- Precision Fermentation and Proofing Variables
- The Baking Schedule and Steam Management Strategy
- Evaluating the Macro and Cost Payoff
Why High-Protein Doughs Need a Different Cast Iron Approach
A standard Dutch-oven bread recipe usually expects a high-hydration lean dough that can expand rapidly in a hot, humid enclosure. High-protein dough doesn't behave that way. Protein isolate absorbs water differently from wheat flour, while vital wheat gluten adds strength without creating the same relaxed extensibility as a simpler flour-and-water dough.
The finished dough feels firmer and more resistant during shaping. It may rise only 50–75% rather than doubling, depending on the recipe, protein brand, yeast dosage, and fermentation temperature. If you wait for a dramatic doubled volume, you can push the dough past its useful proof and end up with a loaf that has weak structure and a dry, compact interior.
Practical rule: Judge high-protein dough by texture, surface tension, and a slow-returning indentation, not by the visual expectation of a classic sourdough boule.
Why the usual lean-dough method fails
A cold, dense protein dough loaded into a fiercely preheated vessel can develop a dark bottom before its center has fully set. The cast iron transfers heat steadily, and a heavy base keeps delivering energy after the oven temperature is reduced. That combination is useful for crust development, but it can punish a formula with a stiff crumb or a relatively dry surface.
The opposite mistake is just as common. Baking a protein loaf in a cold pan may reduce the initial crust-setting pressure and make loading safer, but the dough loses the thermal boost that helps it expand. The result can be a pale, low-volume loaf with a soft base.
The useful middle ground is controlled heat, not maximum heat. Protein-enriched doughs need enough early energy for expansion, enough humidity to keep the surface flexible, and a later temperature reduction that protects the bottom from overbrowning.
What the loaf should be like
This isn't a light, airy white loaf. Expect a tight, even crumb and a soft but heavier bite. Whey and collagen versions stay close to a normal cream color, pea protein can look slightly grey-green and taste mildly beany, soy creates a tan or darker crumb, and whole-grain formulas bake browner.
The crust may brown a little faster than expected. Slices should still cut cleanly once the loaf has cooled, which makes this format practical for meal prep. A Pullman-style loaf is especially useful because its straight sides support consistent slicing and portion tracking.
The key adjustment is to stop treating the recipe as an ordinary high-hydration boule. Cast iron can supply stable heat and a humid covered environment, but it can't repair underhydrated dough, underproofing, or excessive protein powder.
Understanding Cast Iron Thermal Properties for Bread Baking
Cast iron helps bread, but high-protein dough does not get a free pass just because the pot is heavy. The same thermal behavior that gives lean dough strong oven spring can set the crust too early on a denser, protein-fortified loaf. That is why pan temperature matters as much as formula strength.
Cast iron stores a lot of heat and releases it slowly. Its reported density is approximately 7.2 g/cm³, and its specific heat capacity is about 0.45 J/g°C. It also moves heat more slowly than aluminum, approximately 55 W/mK compared with roughly 237 W/mK for aluminum. Those properties explain why a cast-iron vessel can bake with steady energy, yet still push the base toward overbrowning if the dough is tight, dark, or lower in effective hydration. Cast iron's thermal behavior in cooking
A thin aluminum pan reacts fast. Cast iron reacts slowly, then keeps giving off heat after a cool loaf goes in. For standard artisan bread, that is usually an advantage. For macro-friendly doughs with extra gluten, whey, soy, pea, or whole grain, it creates a narrower margin for error. You want enough stored heat to drive early expansion, but not so much bottom heat that the crust hardens before the center has time to lift.
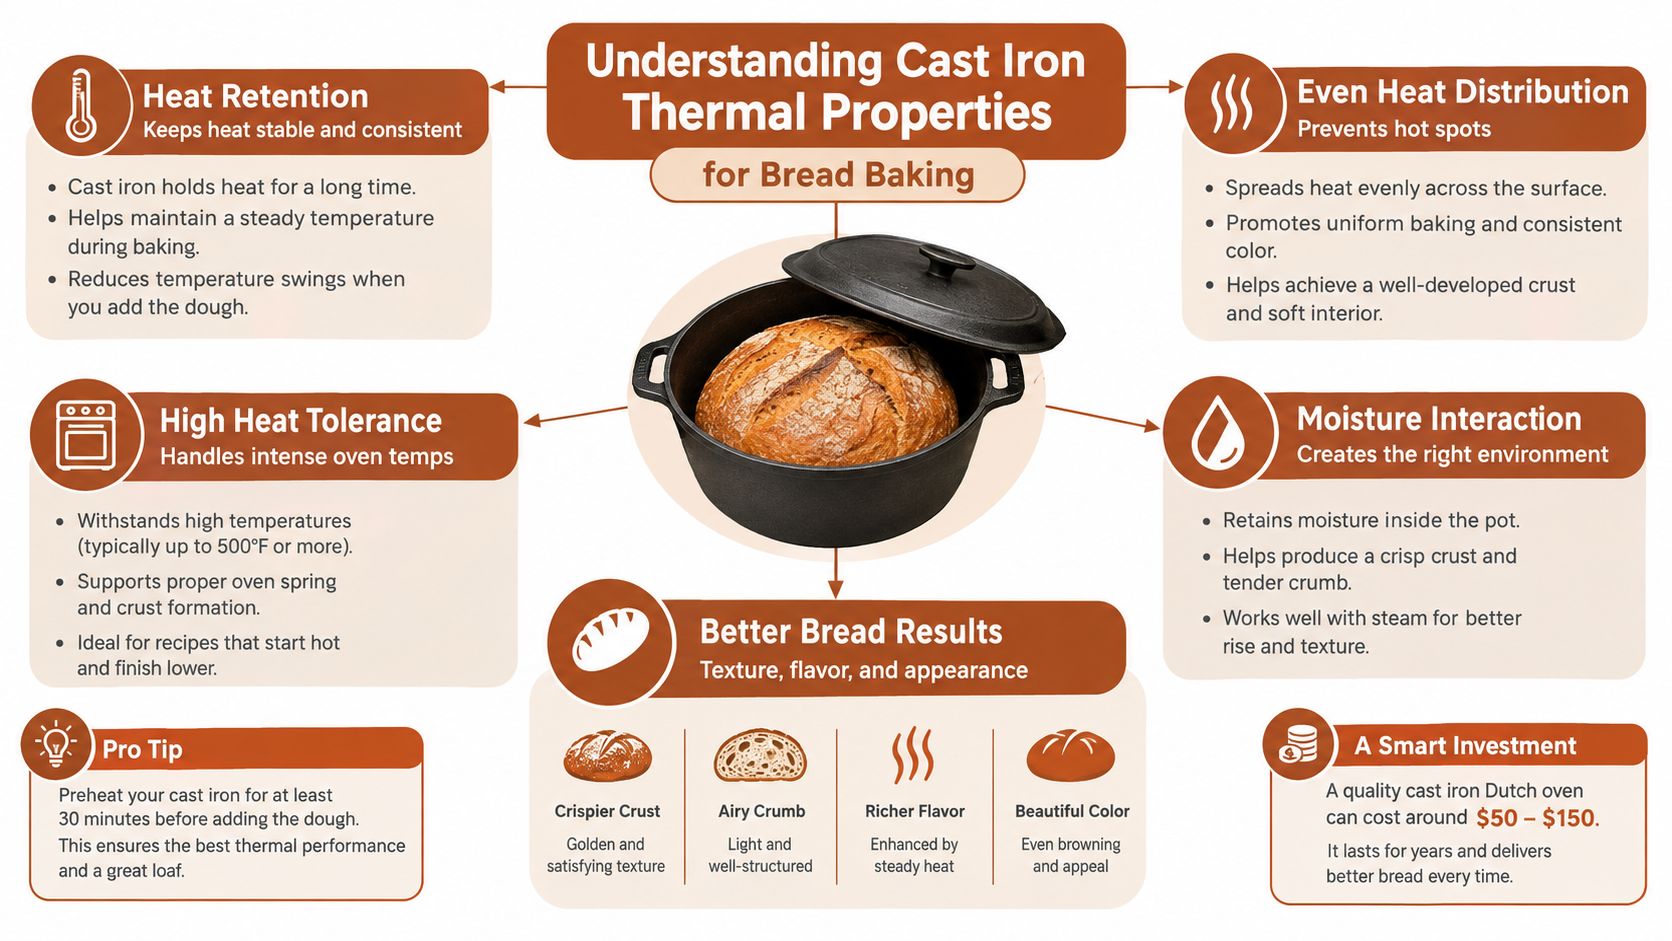
Preheating is a trade-off
For a conventional artisan loaf, a full preheat often improves oven spring and crust. A cast-iron vessel is commonly heated empty at 232°C for 45–60 minutes before loading. That full-preheat method works, but it is not automatically the best setup for a dense, high-protein dough.
In practice, these loaves often benefit from a moderated approach. If the base darkens too fast, put a baking sheet under the vessel to buffer direct heat from below. If the loaf is especially dark from whole grain or protein additions, lower the oven temperature earlier in the uncovered phase. For some formulas, a warmed pan gives better balance than a fully saturated one.
Pan shape changes the result too. A covered Dutch oven traps moisture around the loaf and supports better surface flexibility early on. A Pullman pan gives the dough more side support and makes slicing and portioning easier, but it does not create the same enclosed steam effect unless covered. Grease carefully, and use parchment if release looks uncertain. For more on enclosed-pot baking, see this guide to bread in a cast-iron pot.
The practical takeaway is simple. Use cast iron for its stable heat, then adjust preheat intensity to match the dough, not the other way around.
Formulating the High-Protein Dough Structure
High-protein bread fails in cast iron long before it reaches the oven if the dough structure is wrong. A standard lean formula can tolerate a wider mixing range and still spring well. Once you add isolate, the margin gets tighter. The dough needs enough wheat-based structure to trap gas, enough water to stay extensible, and enough restraint that it does not collapse under its own density.
A practical benchmark for this cast iron bread pan recipe starts with about 800 g of dough and bakes down to roughly 704 g, usually sliced into about 16 pieces depending on moisture loss and how thick you cut it. The base structure is simple: bread flour or whole-wheat flour, vital wheat gluten, and one protein isolate. That combination gives better repeatability than treating protein powder like a minor add-in.
Each isolate changes the dough in a different way:
- Whey isolate: Gives the mildest flavor, a lighter crumb color, and the closest feel to a conventional loaf.
- Pea isolate: Works for a vegan version, but the crumb can skew slightly grey-green and the flavor is more noticeable.
- Soy isolate: Pushes the loaf toward a tan, darker, more grainy profile with a firmer set.
- Collagen isolate: Can drive the protein count highest in these formulas, but collagen is not a complete protein, so it is a poor choice for the main sports-nutrition angle.
The isolate carries much of the protein load. Vital wheat gluten does the structural work that the isolate cannot do on its own, helping the dough hold fermentation gas instead of baking up tight and low. Flour still matters most for yeast activity, dough elasticity, browning, and overall bread flavor.
Mixing sequence
Mix the bread flour, whole-wheat flour if using it, vital wheat gluten, and most of the water first. Let that sit for 30–60 minutes before adding the rest. In high-protein formulas, this early hydration step matters more than bakers expect because dry pockets of gluten or isolate are harder to fix later.
Then add the instant yeast and salt with the remaining water. Mix until the dough is evenly hydrated, then knead or fold until the surface turns cohesive. Expect resistance. A good protein dough is stiff, slightly tacky, and elastic enough to hold its shape, not glossy and loose like a high-hydration artisan dough.
For reference, a lean loaf built only around flour, water, salt, and yeast behaves differently at the same stage. It usually feels more extensible, opens more easily during proof, and gives you more room for error. That is exactly why formula balance matters more here than in a standard cast-iron loaf. For a tested formula breakdown, see this high-protein bread method.
Hydration is the control knob
Hydration decides whether this dough bakes like bread or like a dense protein block.
Protein powders absorb water unevenly. One whey isolate can leave the dough pliable, while another makes the same percentages feel dry and tearing. Pea and soy often need different adjustments, and whole-wheat flour increases absorption again. Add water gradually and judge the dough in the bowl and in your hands, not just on paper.
The target is a smooth mass that stays together after mixing, folds without crumbling, and does not spread fast once placed in the pan. Too little water gives a tight, heavy loaf. Too much leaves a sticky dough that struggles to support its own weight. Bulk fermentation should start once the dough looks cohesive and elastic. It does not need to look puffy yet, and rough handling at this point costs volume that high-protein dough usually cannot get back.
Precision Fermentation and Proofing Variables
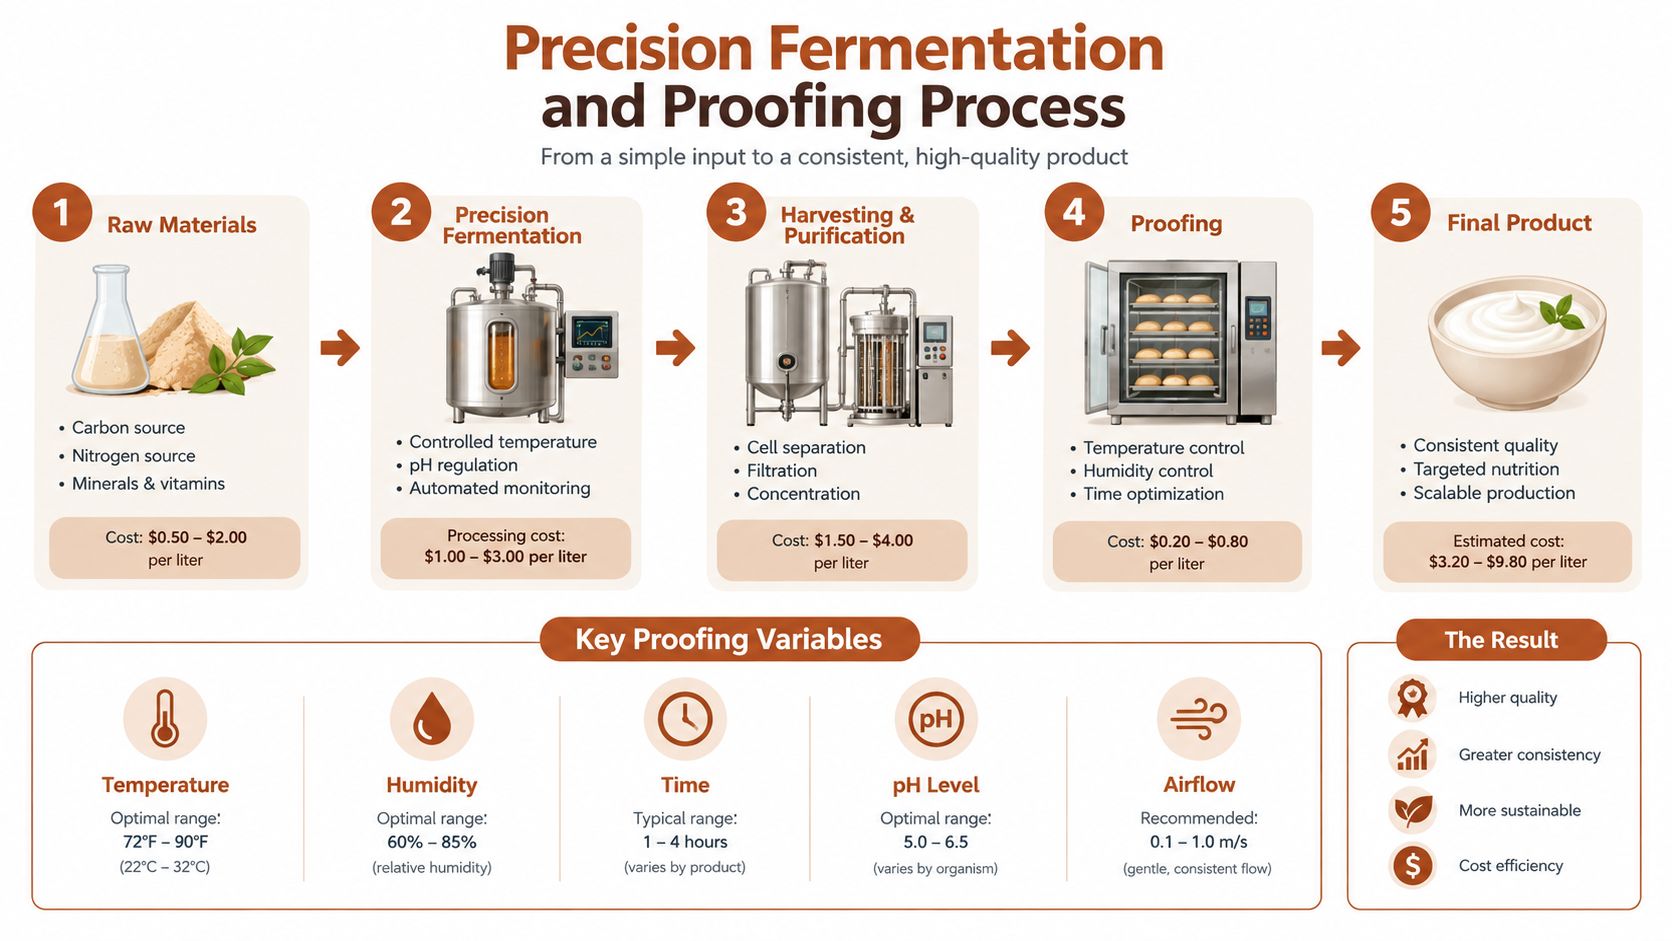
Stiff, high-protein dough exposes sloppy proofing fast. A small swing in dough temperature, room temperature, or surface moisture can change the rise enough to affect volume, scoring, and crumb, even when the ingredient weights stay the same. That matters more in cast iron baking because this style of dough usually has less margin for recovery once it goes into a very hot, heavy vessel.
A laboratory study tested dough temperatures of 28, 31, and 34°C, yeast concentrations of 2.5%, 3.25%, and 4.0%, and proofing temperatures of 35, 40, and 45°C. Proof time shifted with both yeast level and dough and proofer temperature, and loaf volume, scoring, and firmness changed as well. The study on dough and proofer temperatures is a good reminder that fixed rise times work poorly once you start pushing protein higher.
A repeatable fermentation pattern
Keep bulk fermentation covered and watch for two signs at the same time. The dough should expand visibly, and it should feel slightly aerated instead of tight and resistant. For a benchmark lean dough, a long bulk of roughly 12–18 hours at 20–22°C followed by shaping and a final proof of about 2–4 hours at 24–26°C can be a useful reference point. High-protein formulas often need closer observation because isolates, whole-grain content, and dough stiffness can shift the pace without warning.
Handle the dough carefully during shaping. Dense dough can hold gas, but it does not forgive rough degassing the way a more extensible lean dough sometimes will. Set the shaped loaf in the greased pan or on parchment, then cover it right away so the surface stays flexible and can keep expanding.
Humidity does real work during fermentation. A bread-technology guide specifies at least 75% relative humidity for fermentation rooms and at least 80% in proofers during final proofing. The same guide notes that yeast activity at about 21°C can be roughly halved compared with warmer conditions, while temperatures above about 35°C can make ordinary baker's yeast dormant or kill it. Humidity and yeast activity guidance explains why one dry kitchen gives you a skinned dough and another gives you a clean rise.
Use the fingertip test to confirm readiness. If the indentation springs back immediately, give it more time. If it returns slowly, bake. If the dough collapses, spreads, or feels fragile, it has gone past the sweet spot.
A precision system such as D'BakerAid controls Stage 1 yeast fermentation and Stage 2 dough proofing through a hub that manages temperature and time, with an optional D'Steamer for humidity control. I still read the dough first. The machine helps keep conditions steady. It does not replace judgment.
The Baking Schedule and Steam Management Strategy
High-protein dough usually loses volume in the oven for a simple reason. Bakers often use a standard lean-dough schedule, then expect heavy cast iron to fix structure problems on its own. It will not. Cast iron gives you stored heat and stronger oven spring pressure, but dense dough still needs a bake sequence that protects expansion early and finishes the center before the crust gets too dark.
Loading and scoring
Preheat the empty cast-iron pan or Dutch oven to 232°C for 45–60 minutes if you want maximum bottom heat and the strongest early lift. For softer high-protein doughs, I use parchment as a sling and lower the loaf in without hesitation. The longer the dough hangs in the air or folds on the way down, the more likely it is to lose shape before the lid goes on. If your last loaf came out with a dark or tough base, use a shorter preheat or load into a warm pan instead of a fully heated one.
Score the dough approximately 12 mm deep with a sharp lame or knife. That depth matters more with protein-heavy formulas because the crust can set fast and resist expansion. One confident slash usually works better than several decorative cuts that spread pressure across a dough that already has limited elasticity.
Scoring rule: Give the dough one clear release point, then let steam and retained heat do the expansion work.
Cover the vessel as soon as the loaf is loaded. Bake at 232°C for 20–30 minutes with the lid on. This covered phase traps the loaf's own moisture, slows crust formation, and gives the interior enough time to push upward before the shell firms. The covered and uncovered sequence is a standard benchmark for cast-iron baking, and it matters even more here because added protein tends to tighten the crumb if steam escapes too early.
Finishing without scorching
Remove the lid and reduce the oven to about 218°C. Continue baking for another 15–25 minutes, then check the center with a digital thermometer. A finished loaf should reach approximately 98–99°C internally. If the crust is where you want it but the center is still behind, loosely tent the top and keep baking. Raising the heat usually darkens the outside before the middle catches up.
Bottom heat needs active management with this style of dough. A baking sheet under the pot can soften the heat hitting the base, which helps when you're using raw cast iron, darker flour blends, or ingredients that brown fast. A lighter vessel or a slightly shorter preheat can help too, though you give up some of the aggressive early crust setting that makes cast iron useful in the first place.
If bread goes into the oven often enough to shape your kitchen decisions, a kitchen remodel with double oven can make staggered baking a lot easier. For steam timing and moisture control outside a lidded bake, see how to bake with steam.
Let the loaf cool fully before slicing. High-protein crumb sets more slowly than many standard loaves, and cutting early can make a properly baked center look underdone.
Evaluating the Macro and Cost Payoff
The useful comparison isn't just loaf price. It is protein delivered per slice and per gram of protein, because protein powder drives much of the cost.
The five D'BakerAid high-protein formulas use whey, pea, soy, or collagen isolate alongside vital wheat gluten and flour. Their approximate results range from 163–184 g of protein per loaf, 23–26 g per 100 g, and 10.2–11.5 g per slice, depending on the recipe, protein brand, baked weight, and slice thickness. A three-slice meal supplies roughly 31–34 g of protein, which clears the 30 g meal target from bread alone.
| Bread Type | Protein Per Slice | Relative Multiplier |
|---|---|---|
| Plain white | ~2.5 g | Baseline |
| Whole wheat | ~3.5 g | About 1.4× plain white |
| Dave's Killer or Kodiak | ~5–6 g | About 2–2.4× plain white |
| Best retail protein bread | ~7 g | About 2.8× plain white |
| D'BakerAid high-protein bread | ~10–11 g | About 4× plain white |
The ordinary bread comparisons are approximate because slice weights differ. A USDA FoodData Central comparison lists 4 g of protein in a 43 g large or thick slice of ordinary white bread, while another entry lists 2.6 g in a 29 g slice. The serving-basis comparison is a useful reminder to compare grams by stated serving size, not by the word “slice” alone.
Ingredient cost varies by isolate. Approximate US mid-market costs are $3.56 for soy, $4.04 for pea, $5.04 for whey, and $6.81 for collagen per loaf, or about $0.22–0.43 per slice and $0.67–1.28 for a three-slice meal. The estimated cost is about 2–3¢ per gram of protein, compared with approximately 5.2¢ for retail protein bread, making the homemade option about 42–60% cheaper per gram, or about half. A retail 10 g-per-slice example and listed package prices show why specialty protein bread occupies a premium tier.
This isn't “pennies” bread. Protein powder is the cost driver, and collagen is the expensive option. The stronger argument is that a controlled homemade protein bread recipe gives macro-trackers a fresh loaf with substantially more protein per slice while reducing the cost of the protein itself.
DBakerAid™ combines controlled fermentation and proofing with recipe guidance for difficult doughs, including the dense, high-protein formulas used in this cast iron bread pan recipe. Visit DBakerAid™ to see the system, recipes, and baking accessories, then start with the high-protein recipes for a repeatable loaf.