

You lift the lid from the cast iron pot and get the answer immediately. A successful loaf has risen against the score, the crust is richly browned rather than merely tan, and the aroma arrives before the steam clears. A disappointing loaf looks flat, pale, torn, or damp at the base, even when the dough seemed healthy on the counter.
The difference usually isn't one mysterious sourdough trick. It comes from a small set of decisions: pot size, surface preparation, dough tension, scoring, starting temperature, steam control, and cooling. Cast iron is forgiving once those decisions are deliberate, but it also makes mistakes obvious because its heat and moisture retention are so strong.
Table of Contents
- What a Good Cast Iron Loaf Looks Like
- Choosing and Prepping Your Cast Iron Pot
- Shaping, Scoring, and Loading the Dough
- Cold Start vs Hot Start Method
- Temperature, Timing, and Steam
- Troubleshooting Common Cast Iron Bakes
- Putting the Workflow Together
What a Good Cast Iron Loaf Looks Like
When the lid comes off, look at the score first. A clean slash should have opened into an ear, with one side lifting above the crust instead of splitting randomly across the loaf. That controlled bloom shows that the dough had enough strength to expand and that the cut gave the pressure somewhere to go.
The crust should be richly caramelized, blistered, and dry-looking, not pale or leathery. Cast iron holds heat steadily, while the covered vessel keeps moisture around the dough during the opening phase. That combination delays crust setting long enough for expansion, then allows the uncovered finish to develop color and crispness.
Four checks before the first slice
- Crust: Look for an even, well-browned surface with some blistering. A pale finish usually points to too little uncovered time, insufficient heat, or a lid removed too late.
- Bloom: The loaf should open symmetrically around the score. A torn side seam often means the score was too shallow, too late, or made at the wrong angle.
- Shape: A round loaf should sit upright rather than spreading into the pot wall. Good surface tension supports oven spring; slack shaping produces a wider, lower result.
- Crumb: The first cut should reveal an even interior, with no compressed band or wet-looking line at the base. An irregular crumb can reflect uneven shaping, incomplete proofing, or handling that knocked out the dough just before loading.
The sound matters too. A properly baked loaf often gives a hollow knock on the bottom, and the underside should feel dry and papery rather than soft or tacky. Don't judge the crumb while the loaf is still hot. Steam continues moving through the bread after baking, and cutting early can make a correctly baked loaf appear gummy.
Practical rule: Judge the loaf in this order: expansion, crust, underside, then crumb. Each clue points to a different stage of the bake.
The rest of the process is about protecting those visible results. The pot must have enough room for expansion, the dough needs a controlled hand-off, and the covered phase has to preserve steam without making the finished crust soft.
Choosing and Prepping Your Cast Iron Pot
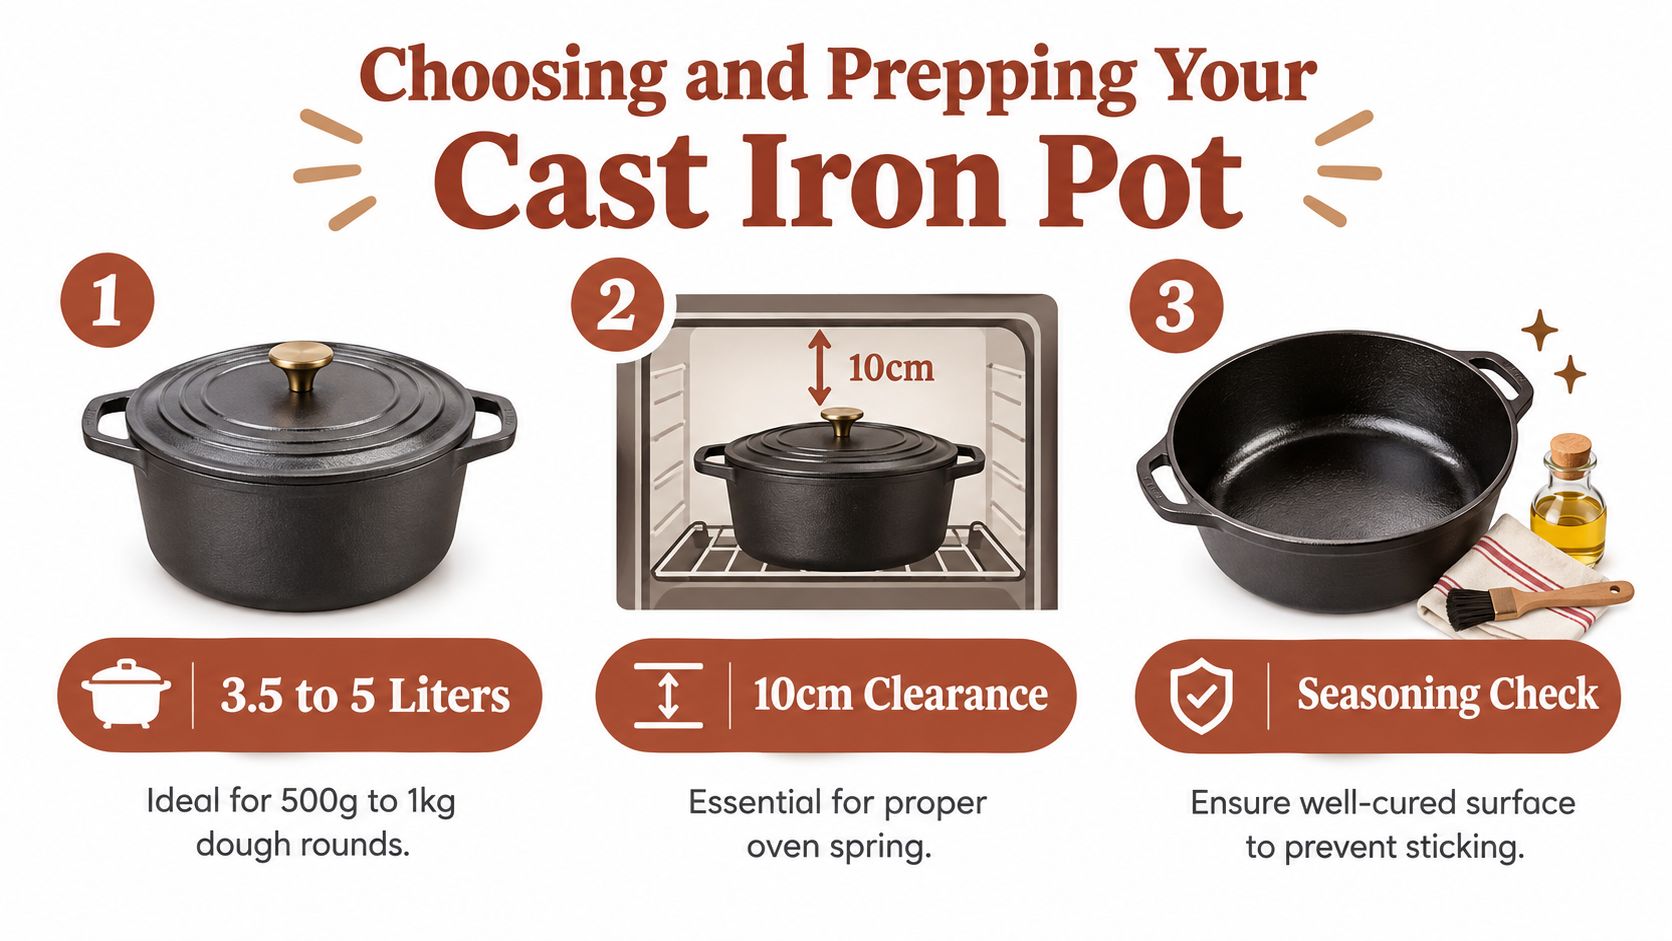
Treat the pot like baking equipment, not just cookware. For a dough round between 500 g and 1 kg, a 3.5 to 5 L Dutch oven generally gives useful room, with at least 10 cm of headspace above the shaped dough. A cramped pot restricts expansion and can press the crust against the lid. An oversized vessel gives steam more room to disperse, which can weaken the early crust environment.
Enameled cast iron works well for bread once it's fully heated. Bare cast iron tolerates high heat comfortably and can encourage a darker crust, but it demands more attention to seasoning and release. In either case, check the lid fit. A lid that rocks, vents heavily, or has an unsuitable knob can undermine the enclosed bake.
Preflight checks
- Inspect the interior. Bare iron should have a thin, even polymerized oil layer. Flaking seasoning or visible rust needs attention before dough goes in. Enameled interiors shouldn't have chips or exposed damaged areas.
- Check the lid and knob. Confirm that every part is rated for the temperature you plan to use. A 250°C oven-safe ceiling is a sensible limit to verify before baking.
- Plan the release. Parchment is the safest choice for a sticky dough or a newly seasoned pot. A light layer of cornmeal can help, but it isn't a substitute for a properly prepared surface.
- Match pot and dough. A boule needs room to rise vertically. A batard needs enough length without forcing the dough against the walls.
For a purpose-built option, the D'BakerAid artisan cast iron bread pot is designed around this enclosed baking workflow. Any suitable cast iron vessel still needs the same checks for capacity, lid fit, surface condition, and heat rating.
Choose the starting method before heating
Use a hot start if your priority is maximum expansion and a pronounced ear, and if you can load the dough quickly and safely. Use a cold start if transferring a fragile loaf into hot iron feels risky, or if your oven tends to scorch the base.
Don't heat the pot halfway and improvise. A partially heated vessel combines the handling problems of a hot start with the weaker expansion of an underheated bake.
Shaping, Scoring, and Loading the Dough
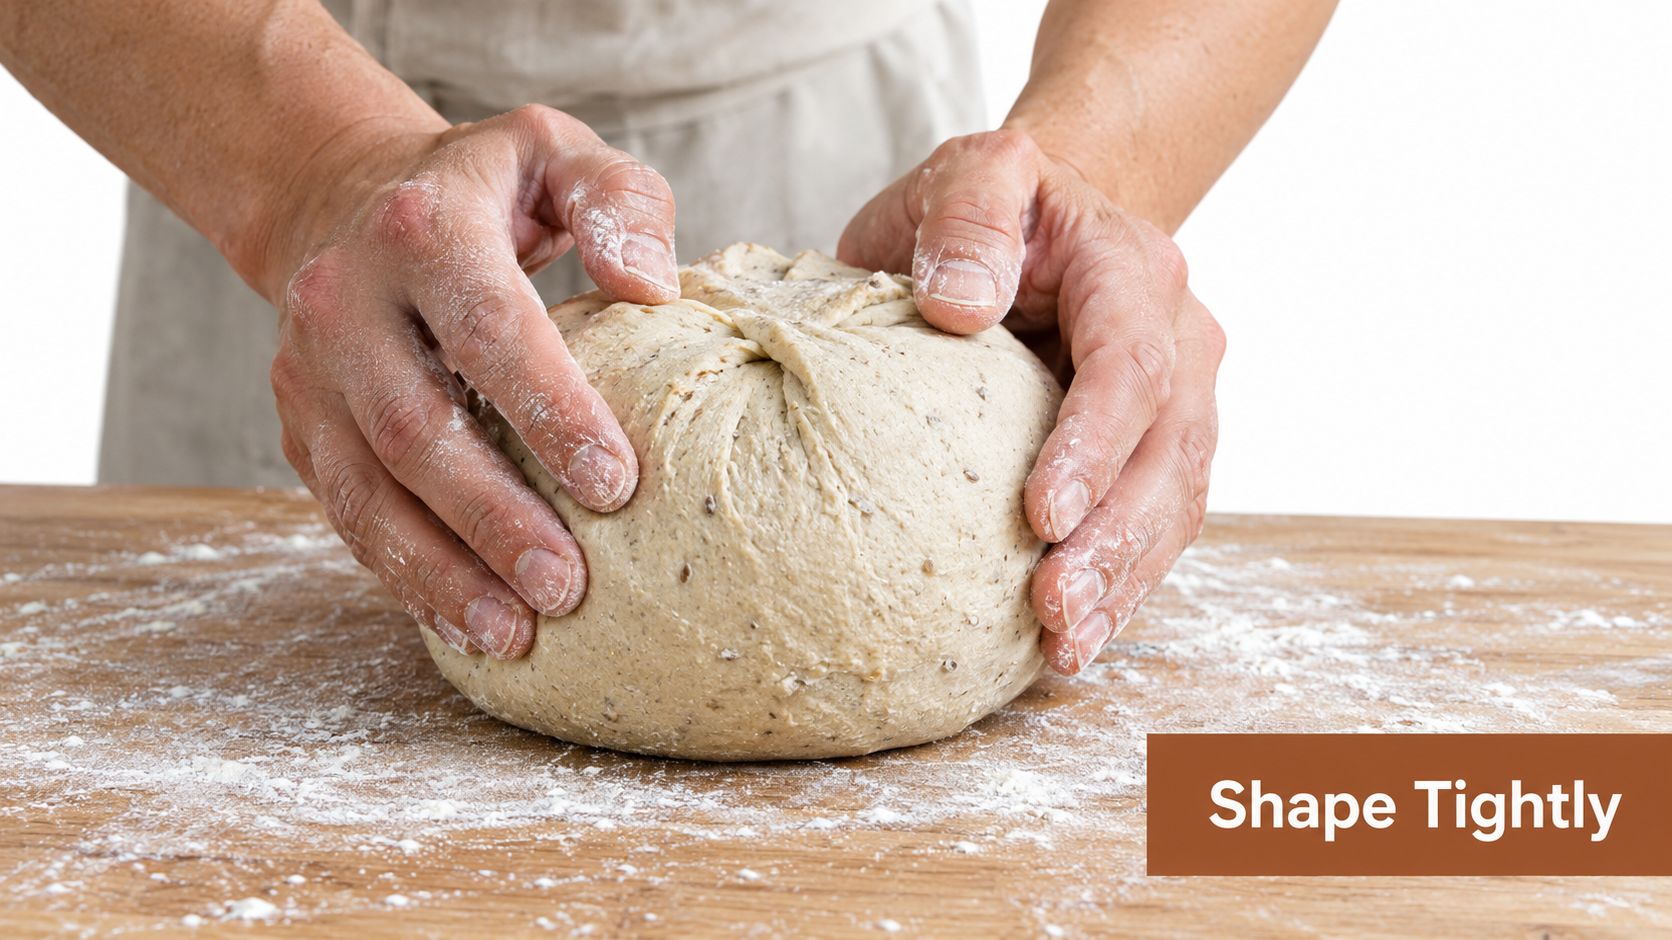
High-hydration dough doesn't need more bench flour. It needs surface tension. Turn the dough onto a lightly floured surface, fold the edges toward the center, then use your hands or a bench scraper to draw the dough across the bench until the outer skin feels taut. Excess flour makes that skin harder to build and can leave dry patches along the seam.
A boule is the easier first shape because it distributes tension evenly. A batard can give you a longer sandwich-friendly form, but slack dough tends to relax against the pot wall. Give the shaped loaf a final rest until it looks puffy and holds its form, not until it has doubled again.
Score for controlled expansion
Scoring is a pressure-release decision. For an ear, make one deep slash at roughly 30 to 45 degrees, holding a sharp lame or blade at a shallow angle and moving decisively. A crosshatch gives the loaf several release points and generally encourages broader spread rather than one dramatic lift. More examples are collected in these bread scoring techniques.
Score immediately before loading. If the cut sits exposed while you prepare the pot, the skin can dry and seal, which encourages a burst somewhere else. A deep cut is useful only when it is clean. Sawing back and forth drags the dough and collapses the edge.
Make the transfer boring
The safest loading sequence is:
- Parchment sling: Set the shaped dough on a wide parchment strip, score it, then lower the whole sling into the pot.
- Cornmeal base: Dust the bottom lightly and slide the dough in with a scraper or peel.
- Direct drop: Use only when the dough is firm, the pot is accessible, and your hands can clear the rim without hesitation.
The hand-off at the pot mouth is the highest-risk moment. Keep the dough low, avoid stretching the parchment, and don't hover over a preheated vessel while trying to reposition the loaf. The ideal dough is at peak spring, still rounded and aerated, but not so relaxed that it spreads as soon as it leaves the basket.
Cold Start vs Hot Start Method
The hot-start versus cold-start argument survives because both methods can produce good bread. They solve different kitchen problems. A hot pot gives the dough an immediate burst of energy and a stronger steam enclosure, while a cold pot makes loading calmer and reduces the chance of burning your hands or dropping the loaf.
A practical default is the hot start for a well-shaped, firm dough when you want a pronounced ear and a more assertive crust. Preheat the pot to roughly 475 to 500°F, or 246 to 260°C, for 45 to 60 minutes. The pot must be fully heated, not merely warm.
A cold start makes more sense for fragile dough, awkward oven access, or a baker who values a deeper-colored base and gentler expansion over dramatic lift. Load the dough into a room-temperature or chilled pot, cover it, and let the vessel heat with the oven.
| Factor | Cold Start | Hot Start |
|---|---|---|
| Loading safety | Easier and slower | Requires speed and disciplined mitt handling |
| Oven spring | Gentler | Stronger initial expansion |
| Crust | Often deeper on the bottom and sides | Thicker initial crust with stronger early setting |
| Ear development | More restrained | More dramatic when scoring and shaping are sound |
| Crumb tendency | Can be slightly less open | Better for maximum opening |
| Sticking risk | Lower handling stress, but release still matters | Higher if parchment or dusting is skipped |
| Best use | Fragile dough, scorch-prone ovens, cautious loading | Firm dough, strong shaping, open crumb priority |
Neither method repairs under-proofing or weak shaping. A cold pot won't rescue a loaf that has already spread, and a hot pot won't create structure the dough doesn't have. The starting temperature changes the first minutes of expansion, not the quality of the dough underneath.
The honest trade-off: Hot start improves the ceiling of the bake. Cold start improves the margin for error.
If your bottom routinely burns, switch to cold start before changing the whole recipe. If your loaf is pale and squat but releases cleanly, a fully preheated pot is the more logical experiment.
Temperature, Timing, and Steam
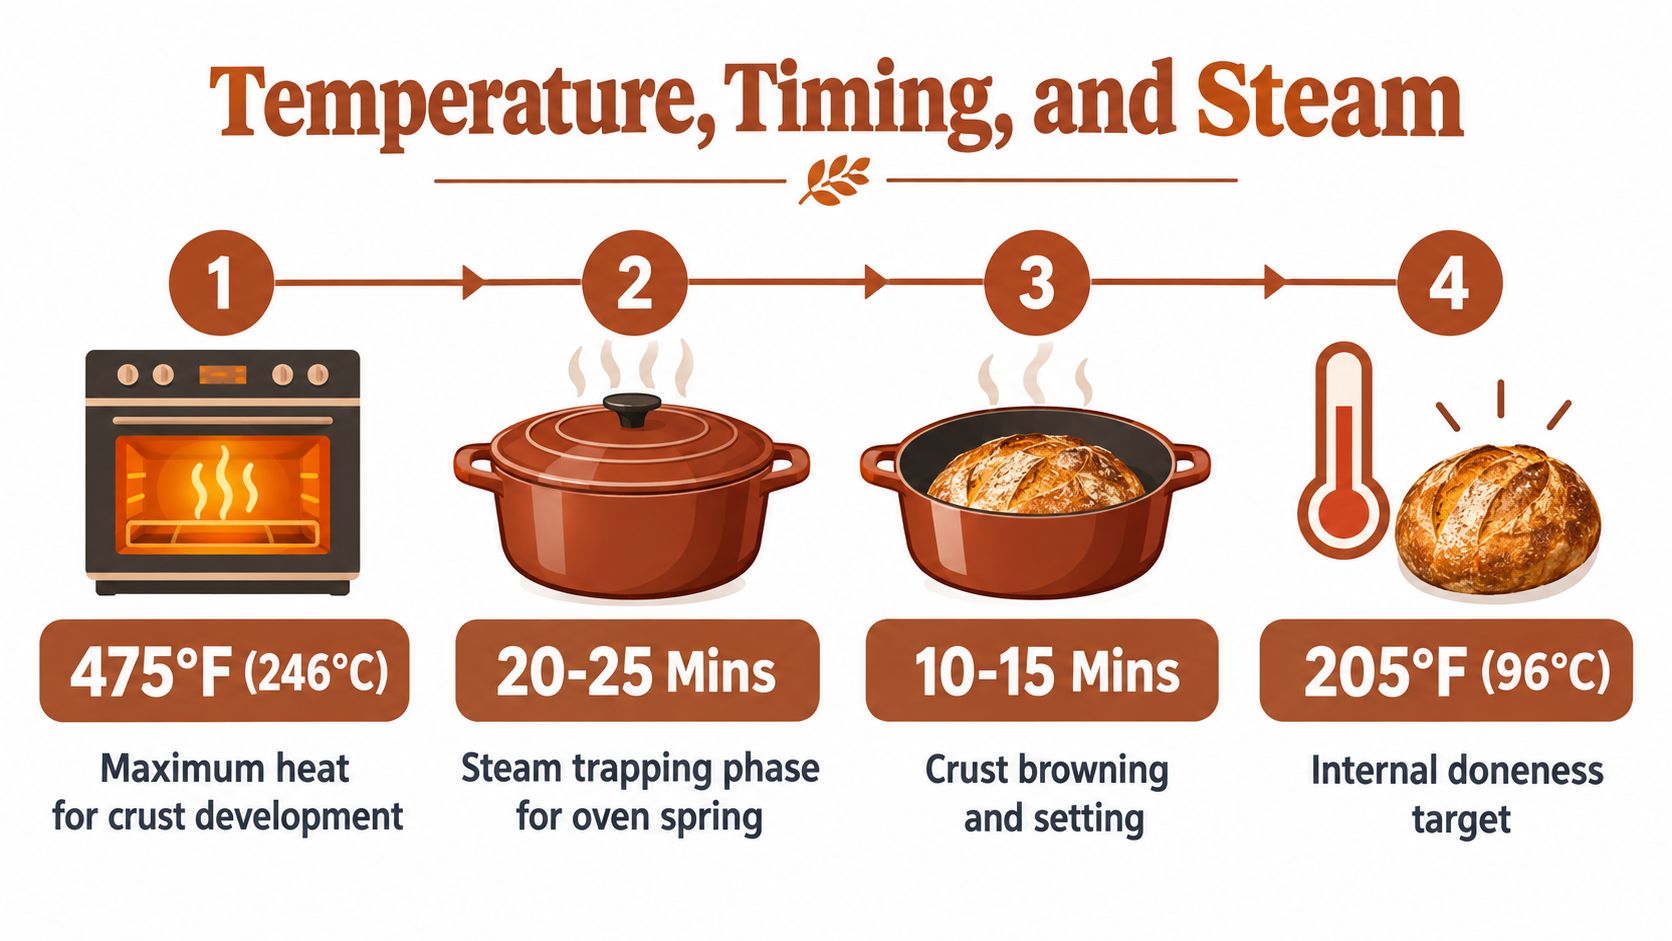
Run the covered phase hot, then let the uncovered phase do the finishing work. A reliable hot-start playbook begins at 475°F, or 246°C, with the lid on for 20 to 25 minutes. Then remove the lid, lower the oven to 430 to 440°F, or 221 to 227°C, and bake uncovered for another 15 to 25 minutes, depending on loaf size and color.
The covered pot acts as a steam generator because the dough releases moisture into a sealed space. That humid environment delays crust formation, allowing expansion before the surface becomes rigid. Once the lid comes off, moisture escapes and the crust sets, browns, and dries. This is the same basic logic behind hearth baking, but the cast iron vessel supplies the enclosed environment without requiring a separate steam tray.
Use the lid as a control
Remove the lid when the loaf has completed most of its expansion but still needs color. Leaving it on too long traps moisture and can leave the crust soft. Removing it too early sacrifices the steam-rich phase that supports oven spring.
If the back of the loaf is coloring faster than the front, rotate the pot after the lid comes off. Home ovens develop hot spots, and cast iron distributes heat well without eliminating uneven airflow around the vessel.
For doneness, use an instant-read thermometer in the center of the loaf. A practical target is 205 to 212°F, or 96 to 100°C, depending on the dough. The bottom should sound hollow when tapped, but the thermometer is more dependable. Pulling bread early is a common cause of gummy crumb because the interior hasn't finished setting.
More steam-focused technique is available in this guide to baking with steam. After baking, remove the loaf from the pot promptly and cool it on a rack. Leaving it inside the covered pot lets residual moisture soften the bottom crust.
Troubleshooting Common Cast Iron Bakes
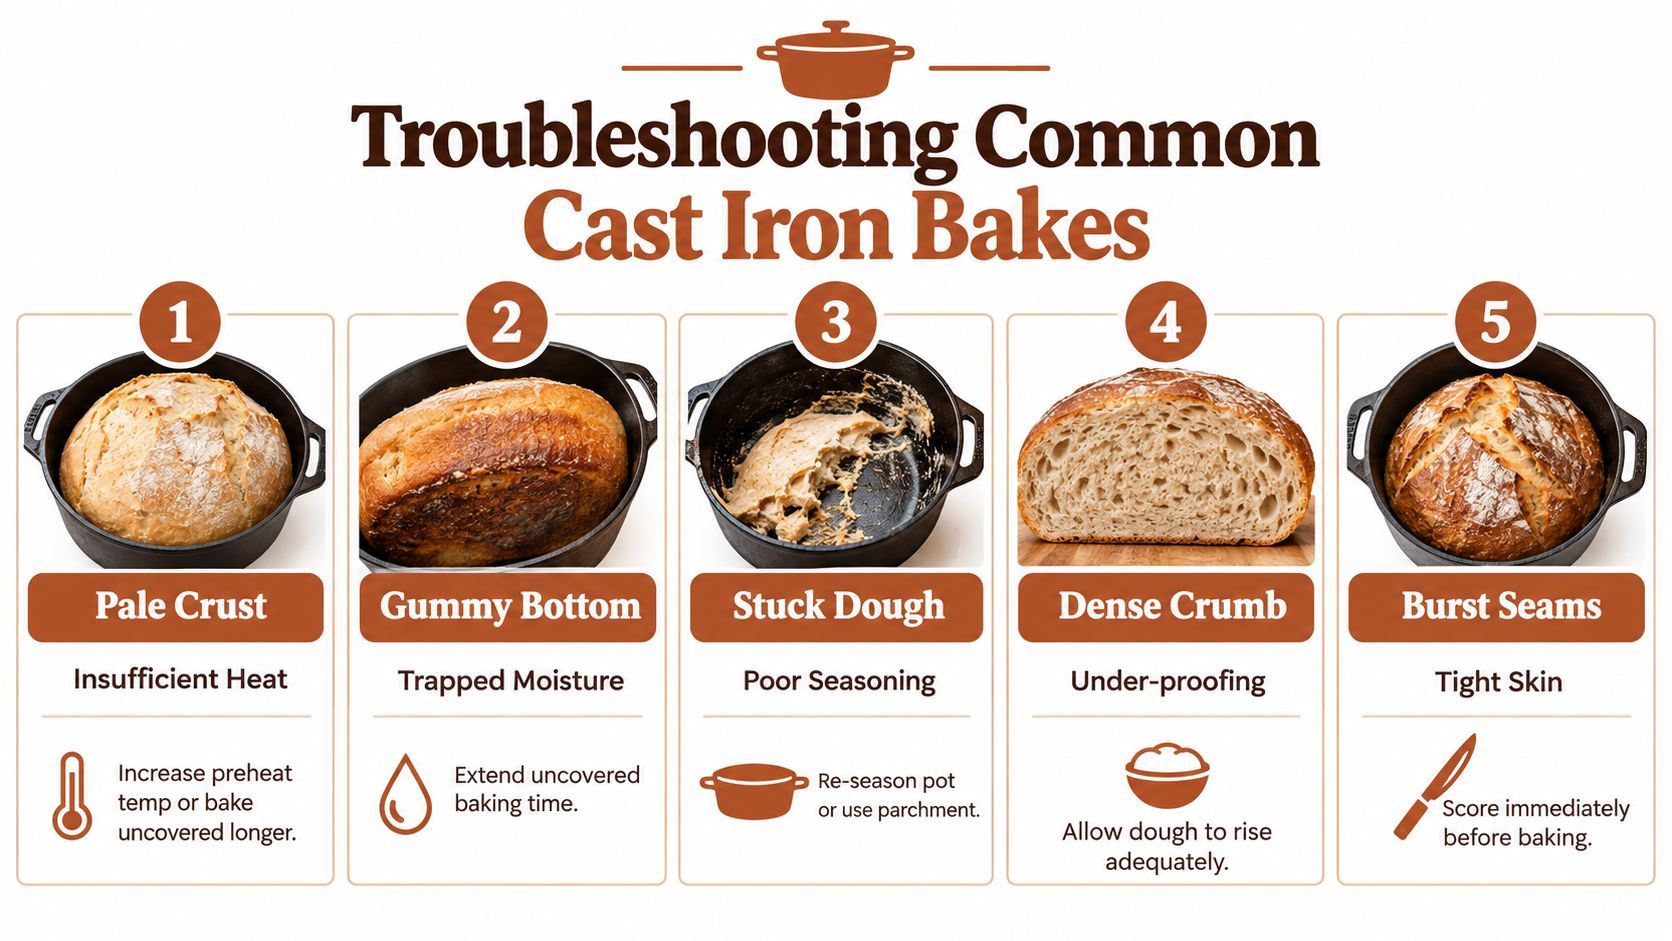
A cast iron pot doesn't automatically fix a weak bake. It can amplify the result, which means a pale crust, stuck base, or dense interior usually points to a specific stage that needs adjustment.
Pale crust
First check the oven's actual heat with a thermometer rather than trusting the dial. If the loaf is still pale after the lid comes off, extend the uncovered phase and confirm that the surface isn't shielded by excess flour. Sugar or egg wash can change browning speed, so adjust the finish rather than raising heat blindly.
Gummy bottom
A wet base usually needs more uncovered baking or faster removal from the pot. A dark rack position can intensify bottom heat, while a cold stone or heavy surface beneath the vessel can change how quickly the base sets. Move the pot higher or place a sheet pan below it if the underside darkens before the crumb is ready.
Stuck dough
Skipping parchment is the obvious culprit, but an under-seasoned or newly machined pot can be just as responsible. Use a parchment sling while the surface develops, and don't leave the loaf resting inside the covered pot after baking because trapped moisture encourages adhesion and softens the base.
Dense crumb
Separate shaping from proofing. A tight, heavy crumb can come from weak surface tension, incomplete fermentation, or a loaf that didn't get enough oven spring. If the dough feels dense before loading, give it more fermentation time. If it feels inflated but spreads during transfer, improve shaping and handling instead.
Burst seams
A burst seam means the dough found a weak point. Score immediately before baking, make the cut decisive, and avoid letting the shaped loaf sit uncovered long enough for its skin to dry. If the score opens cleanly but the side still tears, review shaping tension and proofing rather than cutting deeper at random.
Don't chase color alone. A dark crust can hide an underbaked center, while a lighter loaf may be fully cooked. Check the crumb and internal temperature before changing the recipe.
Putting the Workflow Together
Use the first bake as a controlled baseline. Mix the dough, complete bulk fermentation, and proof until the dough is aerated and responsive. Choose either a fully preheated Dutch oven at about 500°F or a cold start, shape the loaf, score it, and load it without delay.
For the hot-start version, bake covered for about 20 minutes at 500°F, then remove the lid and finish for 20 to 25 minutes at 460°F. Confirm the center is baked, remove the loaf from the pot immediately, and cool it on a rack for at least an hour before slicing. If the top colors too quickly, protect it after the lid comes off rather than shortening the bake before the crumb is set.
The two useful adjustment points are the lid transition and the cooling period. Remove the lid earlier for more crust development, later for more retained moisture and expansion. Let the loaf cool fully if you want a clean, sliceable crumb rather than a compressed interior.
After that baseline, change one variable at a time. Adjust hydration, replace all-purpose flour with bread flour, or try a longer cold retardation. Log the pot, start method, lid timing, crust color, bottom color, crumb, and release. That notebook becomes more useful than a pile of disconnected recipes.
DBakerAid™ combines controlled fermentation and proofing with an optional D'Steamer for steam-assisted baking, which can make the dough-to-pot workflow more repeatable. Visit DBakerAid™ to explore the system, recipes, and cast iron baking accessories.