

Most advice for rye bread baking starts with the wrong assumption, that rye is just wheat bread with a different flour. That's how bakers end up with a sticky slab, a gummy center, or a loaf that looks set outside and still collapses after cooling. Rye plays by a different rulebook, because it leans on acidity, enzyme control, and tight process control more than on the gluten structure wheat bakers are used to.
That's also why rye bread has stayed important in places where wheat was less reliable. Rye was likely domesticated in northern Europe around 1,000 BCE, with the first written record by Pliny the Elder around 77 CE, and by the Middle Ages it had become a staple across much of Central and Eastern Europe, with rye cultivation in Finland beginning around 500 BCE (historical rye bread background). In crop terms, rye still occupies a small global footprint, with a reported 4.2 million hectares and 0.2% of global field area, which says a lot about how specialized, but still meaningful, this grain remains (global rye crop reference).
A lot of my own rye failures came from treating it like a stronger version of sandwich bread. It isn't. Once I stopped chasing a high rise and started controlling pH, mixing, proofing, and bake profile, rye finally behaved like rye.
Table of Contents
- Why Rye Bread Baking Breaks All the Wheat Rules
- Choosing the Right Rye Flour for Your Loaf
- The Science of Acidity and Enzyme Control in Rye Dough
- Mixing and Proofing High-Rye Doughs with Precision
- Baking Profiles and Steam Management for Rye Loaves
- Troubleshooting Common Rye Bread Failures
- Recipe Variations and Building Your Rye Baking Skills
Why Rye Bread Baking Breaks All the Wheat Rules
Rye bread fails for the same reason so many bakers keep failing it, they bring wheat instincts to a grain that doesn't behave like wheat. Rye dough is usually sticky, hard to handle, and has very low gas retention, so the loaf comes out with a low volume and a coarse crumb rather than the airy structure people expect from wheat bread (rye dough structure reference). That's not a defect in the recipe, it's the material.
Structure comes from a different mechanism
Wheat bread depends heavily on gluten development. Rye doesn't give you the same payoff, because its structure leans more on pentosans and starch behavior than on a strong gluten network. That's why a rye dough can look “underdeveloped” to someone trained on wheat, while being exactly where it should be.
The biggest trap is the old advice to “let it double”. For rye, that can be dangerous, because the loaf can over-proof before the structure has enough strength to hold the gas. Once that weaker matrix gives way, the collapse is hard to reverse.
Practical rule: treat rye like a specialty bread, not a wheat swap. The recipe isn't asking for more kneading or a longer rise, it's asking for tighter control.
Why rye rewards restraint
The handling difference is real. Rye dough feels heavier, tackier, and less elastic, and that means you'll get better results by working it less, not more. That's also why rye bread fits so well into a precision baking workflow, where the fermentation and proofing environment are controlled instead of guessed.
If you want to understand the kitchen around a loaf, not just the loaf itself, kitchen and bath design insights from Jennifer Gilmer Kitchen & Bath are a useful reminder that well-planned spaces reduce friction in hands-on work. Baking rye has that same logic. The process gets easier when every variable is contained.
Rye bread baking is less about force and more about discipline. The moment I stopped expecting it to behave like white bread, the results became more consistent and a lot less frustrating.
Choosing the Right Rye Flour for Your Loaf
Rye flour is not one ingredient with one behavior. The milling level changes how the dough handles, how much water it takes up, and where the flavor lands in the finished loaf. White or light rye keeps only the starchy endosperm, medium rye includes some bran, and dark rye is usually whole grain, with bran, germ, and endosperm all present (rye flour types reference).
Match the flour to the loaf you want
Light rye gives the mildest flavor and the most sandwich-friendly crumb. Reach for it when you want rye character without a heavy slice that turns dense under the knife. Medium rye sits in the middle, which makes it a practical choice when you want more flavor but do not want to jump straight into a traditional dark loaf.
Dark rye brings stronger flavor and a tighter texture. That suits hearty loaves, seeded breads, and formulas where the rye itself needs to stand front and center. If you have ever baked a loaf that tasted right but sliced like it was fighting back, dark rye was probably doing what dark rye does.
Read the bag for consistency
The home-baking problem is that the name on the bag does not always tell you enough. “Rye flour” can mean different extraction levels from different mills, and inconsistent flour means inconsistent hydration. If one brand absorbs water faster than another, you will feel it in the dough almost immediately.
Practical rule: start with a flour you can buy again and again. Rye baking gets easier when the flour stays the same from bake to bake.
A useful internal reference for understanding flour strength and bread performance is this guide on mastering flour protein content. Rye is its own category, but the broader point still applies, flour choice changes handling, structure, and the finished crumb.
Blend for control, not just tradition
Blending rye types is one of the easiest ways to tune a loaf. A lighter rye blend can give you a cleaner slice for sandwiches, while a darker blend pushes flavor and fiber. The core question is what the bread is for before you mix anything.
I get the most repeatable rye bread baking by starting with one flour, noting how it behaves, then blending with intent. That approach gives you a clearer read on hydration and structure than chasing authenticity without knowing what the flour in front of you does.
The Science of Acidity and Enzyme Control in Rye Dough
Rye separates the patient bakers from the frustrated ones. Rye structure depends heavily on acidity and enzyme control, not just gas production, and once you understand that, a lot of “mystery failures” stop looking mysterious. For rye breads above roughly 30% to 40% rye, sourdough acidification becomes a structural necessity because low pH suppresses amylase, the enzyme that can otherwise break down starch and leave a gummy crumb (rye acidity and pH reference).
pH does more than add flavor
The critical idea is simple. If the dough sits at about pH > 4.2, amylase stays too active and keeps chewing through starch. That weakens the crumb, and the loaf can bake up looking done while still cutting like paste in the center. Acidity doesn't just make rye taste more “sourdough,” it helps the loaf hold its shape.
That's why rye fermentation often leans on a much larger prefermented fraction than wheat sourdough. In rye formulas, 30% to 60% of total flour in the preferment is common, and the preferment itself is often proofed for 12 to 18 hours at about 70–80°F (21–27°C) (rye fermentation schedule reference). That long, controlled fermentation builds both lift and the acidity rye needs.
Build the dough around the science
A workable rye sourdough schedule is less about chasing speed and more about giving the culture time to do two jobs. It has to produce gas, and it has to acidify the dough enough to keep the starch-degrading enzymes in check. When that balance is right, the dough is still dense, but it's stable.
Practical rule: if a rye loaf is gummy, don't assume it needed more time in the oven first. Ask whether the dough was acidic enough before it ever hit the pan.
This is also where a lot of wheat-style advice becomes misleading. A baker can let wheat dough “double” and get away with it. Rye needs a cleaner control point, because over-proofing can push a weak pentosan matrix past the point of recovery.
If you're trying to adjust sour flavor without wrecking the loaf, this sourdough sourness guide is a useful companion. The bigger takeaway here is that rye doesn't ask for more fermentation by default. It asks for the right kind of fermentation.
Mixing and Proofing High-Rye Doughs with Precision
High-rye dough fails fast when you treat it like wheat. The gluten network is weak, the paste sets differently, and a long knead only makes the dough tighter without giving you the structure you want. Very short mixing is the rule for high-rye doughs because rye has low mixing tolerance, and the more rye you use, the less it wants to be worked (BAKERpedia rye process reference).
Keep the mix brief
The practical goal is simple, combine everything and stop. BAKERpedia's process guidance says the sponge is fermented for 3 to 4 hours, then the dough is mixed briefly on first speed, with even shorter low-speed mixing as rye levels rise (BAKERpedia rye process reference). That matches what I found after too many dense loaves and gummy crumbs. Once the flour is hydrated and the dough looks evenly mixed, more mixing does not help. It usually hurts.
A short mix also protects the dough from heating up too much, which matters more than most wheat bakers expect. Rye dough does not need the polished, elastic look that signals gluten development in wheat dough. It needs even hydration, a smooth paste, and enough acidity to keep the loaf stable through proof and bake.
Here's the pattern I trust:
| Rye Percentage | Mixing Time | Proof Temp | Humidity | Expected Rise |
|---|---|---|---|---|
| Low to moderate rye | Brief, just until combined | Warm, controlled | High enough to prevent skinning | About 50% to 75% |
| High rye | Even shorter than moderate rye | 92–95°F (33–35°C) | 85% RH | About 50% to 75% |
The exact rise matters less than the texture and the timing. Rye dough often looks fuller without ever behaving like a doubled wheat dough, and that is normal. If you keep chasing volume, you can end up with a loaf that looks ready on the surface but collapses or turns gummy inside.
Proof for rye, not for wheat
The final proof target for high-rye doughs is 92–95°F (33–35°C) at 85% RH for 30 to 40 minutes (BAKERpedia rye process reference). That is a very different environment from a casual warm spot in the kitchen. A stable proofing chamber matters because rye is sensitive to both surface drying and over-proofing.
A clean rye proof is usually a 50% to 75% rise, not a neat double. You are watching for the loaf to look aerated and ready, not inflated beyond reason. If the dough looks fragile, slack, and slightly puffy, that can be the right stopping point. If you wait for wheat-style volume, the dough can go past the point where it still holds shape.
Good steam control matters too, because a dry skin on rye can make the top split in the wrong place. Using steady steam during the proof and early bake helps keep the surface from setting too soon, which gives the loaf a better chance to expand evenly. If you are using a precision appliance, the value is in repeatability, not in fancy features.
D'BakerAid™ is one example of a system built around that kind of control, with temperature-managed fermentation and flour-specific proofing programs that are meant to reduce the guesswork around difficult doughs. That kind of setup does not make rye easier by magic, it just holds the conditions steady long enough for the dough to do what it is supposed to do.
Baking Profiles and Steam Management for Rye Loaves
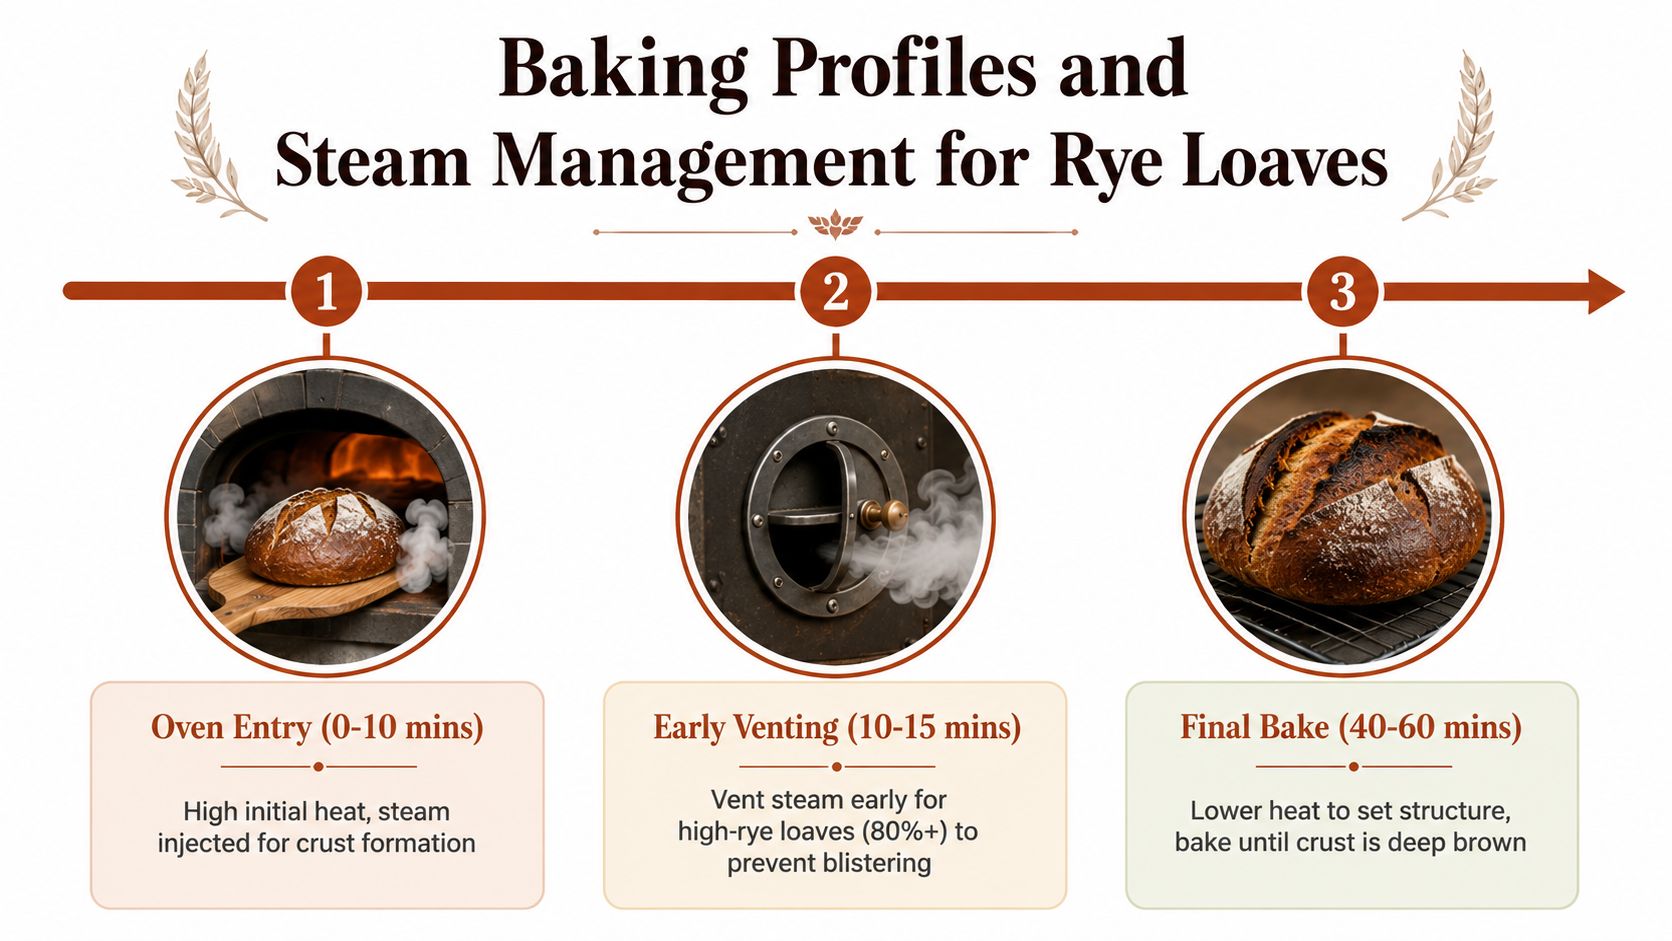
The oven phase is where a rye loaf either settles into structure or turns into a loaf you cannot really save later. Rye does not want wheat-style treatment. High-rye breads, especially 80%+ loaves, need the steam released early, because too much trapped steam can blister the crust and leave the finish rough. Steam helps at the start, then rye wants a clean vent and steady dry heat.
Start hot, then back off
A workable profile starts at 480–535°F, then drops to 410°F after the first push of oven spring. That is the part many home bakers get wrong, because rye needs strong early heat, then a finish that sets the crumb without drying the crust into a shell. The exact window depends on the formula, but the logic stays the same, give the loaf enough heat to expand, then back off so the interior can finish baking through.
A second practical range is 425–450°F (218–232°C), with an internal temperature target of 204°F (95°C) in the center. The numbers are a guide, not a substitute for watching the loaf. Rye loaves vary more than wheat loaves do, and the bake has to account for that instead of pretending every dough behaves the same.
If the loaf is high in rye, venting early matters more than holding steam too long. Too much humidity can rough up the crust, especially on denser loaves that already have limited spring. I learned that the hard way by treating rye like a pan sourdough and leaving steam in place for too long. Using steady steam during the bake helps only if it is followed by a clear vent and enough dry heat to finish the loaf.
Don't trust color alone
Rye can brown quickly, but color is not proof of doneness. A thermometer gives the definitive answer, and the center should reach 204°F (95°C) before you call it finished. Pulling early often leaves a crumb that seems set on the outside but turns gummy once the loaf cools.
The rest after baking matters just as much as the heat in the oven. A 66% rye loaf benefits from about 12 hours of rest, and an 80% rye loaf needs at least 24 hours before slicing so the structure can finish developing. Cutting too soon is one of the easiest ways to mistake an under-rested loaf for a failed bake.
Rye is unforgiving if you rush the finish. The crust may look ready while the crumb is still settling, and that is exactly where many home bakers go wrong. A controlled bake, then a patient rest, gives the loaf the time it needs to firm up without collapsing into a gummy center.
Troubleshooting Common Rye Bread Failures
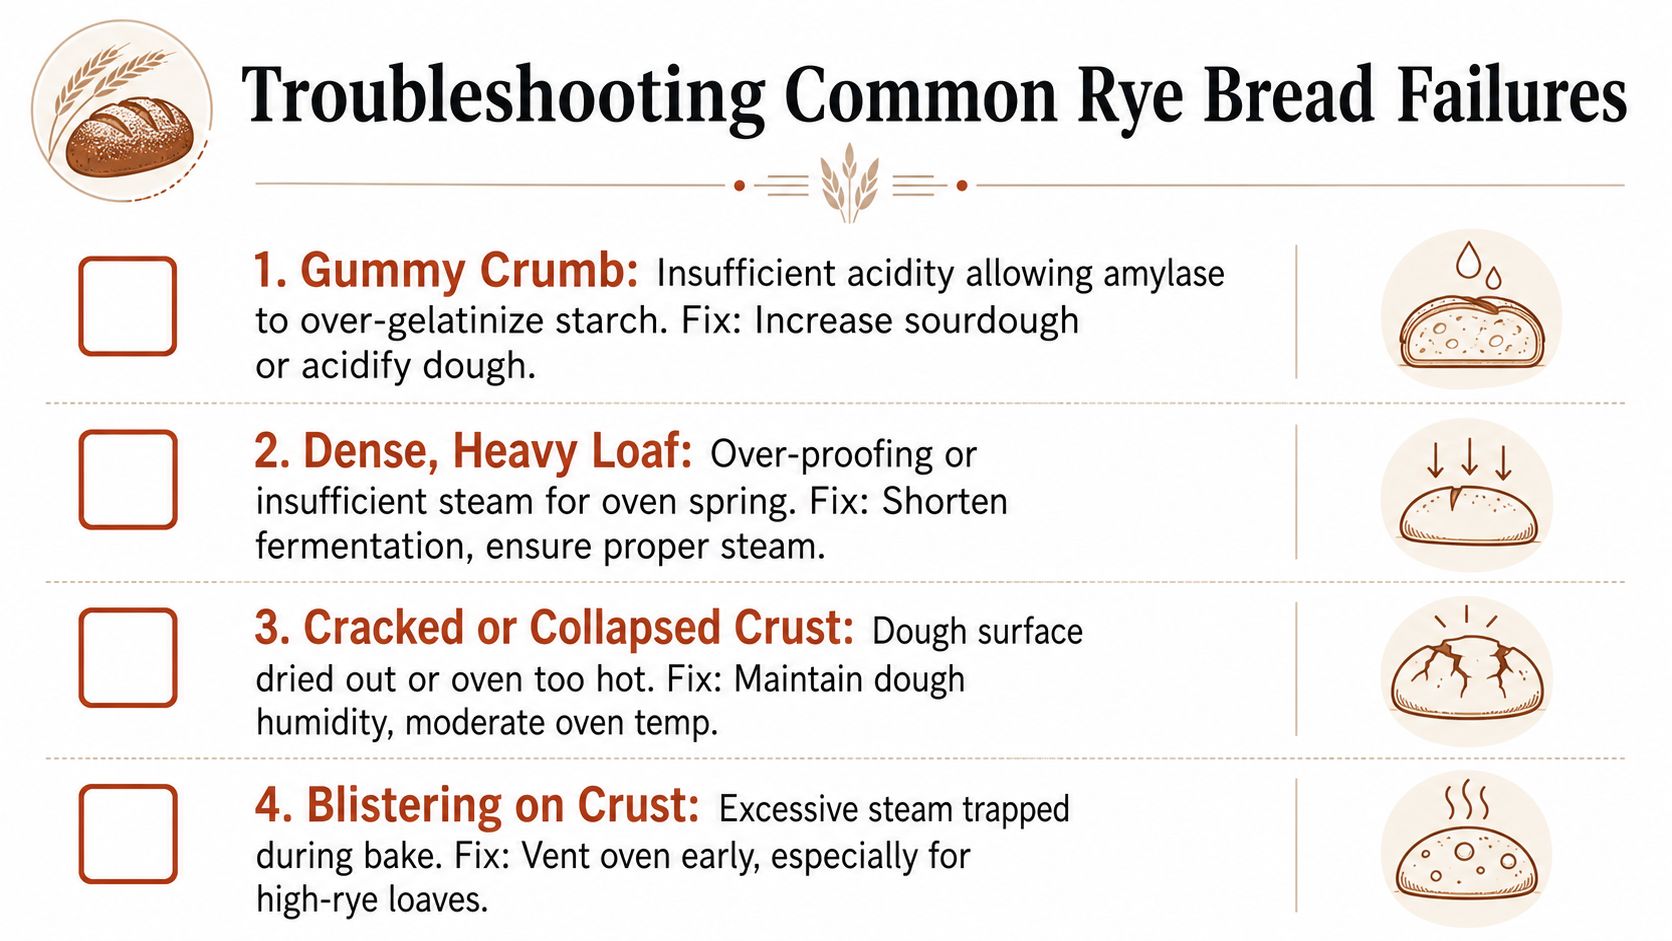
Most rye failures are predictable once you know what the dough was missing. The loaf tells the story in the crumb, the crust, and how it behaves after cooling. If you've baked a few bad ones, you've already seen the same four problems show up again and again.
Gummy crumb, collapsed loaf, or both
A gummy crumb usually points to insufficient acidity, which lets amylase over-process the starch. The fix is to strengthen the sourdough side of the formula or acidify the dough more effectively before baking. If the loaf is gummy and the center looks almost gelled, don't blame the oven first.
A collapsed loaf is different. That usually means the dough was over-proofed, and rye's weaker pentosan matrix gave up under the load. The fix is less rise time, a tighter proofing environment, and more attention to the dough's actual behavior rather than the clock alone.
Rye doesn't forgive “just one more hour” the way wheat dough sometimes does.
Dense brick, cracked crust, or blistering
A dense, heavy loaf often comes from over-mixing or from not giving the loaf the steam support it needed in the oven. Rye has very low structural tolerance, so once it's beaten up, it can't rebuild itself the way wheat dough can. Keep the mix short and stop thinking in terms of full gluten development.
A cracked or collapsed crust usually means the surface dried out or the oven ran too hot. The fix is to keep the dough humid before bake and bring the oven back into a sane range. Blistering on the crust is the opposite problem, which usually means the steam stayed in too long, especially on high-rye loaves. Vent early and let the crust dry when it needs to.
The useful habit here is to diagnose by symptom, then trace backward. Rye gives clear feedback if you know how to read it, and that saves a lot of random recipe hopping.
Recipe Variations and Building Your Rye Baking Skills
The easiest way to get better at rye is to work up in stages instead of jumping straight to a dense dark loaf. Start with a 30% rye blend that behaves more like wheat dough, then move to a 66% medium rye sandwich loaf, and only then tackle an 80%+ traditional dark rye. That progression teaches you how rye changes the dough at each step without overwhelming the process.
Start mild, then move darker
A lighter blend is where you learn handling. The dough still gives you some of the wheat-like feel you know, but it introduces rye's stickiness and flavor in a manageable way. Once that starts feeling normal, a medium rye loaf becomes the bridge into more authentic structure and darker flavor.
Seeds are the easiest way to add texture without making the bake chaotic. Caraway, fennel, and sunflower all work well, and a rye loaf can carry them without losing its identity. If you want a more traditional Nordic direction, a seeded Pullman-style loaf is a natural fit.
Use scalding when you want more moisture
Scalding, where gelatinized rye flour is mixed with hot water, is useful when you want better moisture retention and a softer finished crumb. It's not a rescue move for bad fermentation, but it can make a well-managed loaf feel more complete. That technique has become more visible in recent rye content because bakers are paying closer attention to process control instead of just mixing and waiting.
Rye also brings real functional and nutritional advantages. Published reviews note that bread typically contains about 45% to 55% carbohydrates, 6% to 10% proteins, and 1% to 2% fat, and that regular rye-bread consumption has been linked in scientific investigations to improved digestion, reduced cholesterol absorption, and lower risk of type II diabetes and cardiovascular disease (review summary). I'd keep that in the background rather than turning it into a sales pitch, but it helps explain why rye has stayed relevant.
If you want to keep going, build one loaf at a time and keep notes on flour, acidity, and bake behavior. That's the fastest route from “why did this fail?” to a loaf you can repeat.
See the high-protein recipes at DBakerAid™ if you want a precision baking setup that handles fermentation, proofing, and steam the same way every time. For rye and other difficult doughs, that kind of control takes a lot of the guesswork out of the bake. Shop the system, then pair it with the process discipline that makes rye bread work.