

You pull a tray of cinnamon rolls from the oven expecting soft, pillowy spirals. Instead, the centers are tight, the tops have collapsed, and the filling has leaked into the pan. Before changing the recipe, look at the proofing.
Proofing cinnamon rolls is less about obeying a timer and more about reading an enriched dough under real kitchen conditions. Butter, eggs, sugar, and milk slow fermentation compared with lean bread, while room temperature, humidity, yeast strength, flour protein, and filling moisture keep changing the pace. A clock can tell you how long the dough has rested. It can't tell you whether the dough is ready.
Table of Contents
- Why Cinnamon Roll Proofing Defies the Clock
- Proof Cinnamon Rolls From Mix to Pan
- Choose the Right Proofing Schedule
- Control Proofing With SureDough
- Protect Shape and Humidity
- Troubleshoot Proofing Problems
- Follow a Reliable Proofing Checklist
Why Cinnamon Roll Proofing Defies the Clock
The familiar “double in size” rule works poorly as a universal test for cinnamon rolls. Rich dough often rises more slowly and may finish with only 50–75% visible expansion, rather than a dramatic doubling. The dough can be ready before it doubles, or still need time after the clock says the rise should be finished.
A practical proofing range for shaped cinnamon rolls is 75–85°F (24–29°C), with many baking references placing the final proof near 78–82°F (25.5–28°C). Relative humidity around 75–85% helps keep the surface from drying, according to Bakerpedia's cinnamon-roll process guidance. In a dry kitchen, the outside develops a skin while the interior continues fermenting. That skin restricts expansion, so the roll may split, spread, or bake with a tighter crumb.
Read the dough, not just the timer
Two trays mixed from the same recipe can need very different treatment. A cool counter slows yeast activity, while an overly warm proofing spot can make the dough race ahead and weaken its structure. High-sugar, high-fat doughs also place more demand on yeast, so a warm room doesn't automatically guarantee a good rise.
Practical rule: Temperature tells you how quickly fermentation can proceed. The dough's volume, elasticity, surface, and response to a fingertip tell you whether it has finished.
The most useful readiness cue is a slow spring-back. Press a fingertip gently into the dough. A shaped roll that rebounds instantly is probably under-proofed. If the indentation fills gradually and leaves a slight mark, the dough is approaching the bake window. If it stays collapsed, feels fragile, or deflates when uncovered, it has likely gone too far. This 5–8 second slow recovery benchmark is described in bread-proofing guidance from Domson.
Proof Cinnamon Rolls From Mix to Pan
Start by managing the dough temperature before fermentation begins. Yeast is commonly hydrated in warm liquid around 105–115°F, and baking guidance warns that liquid above roughly 110–115°F can put yeast at risk, as outlined in this cinnamon-roll baking guide. The liquid should feel warm, not hot. A mixture that overheats the yeast can leave you diagnosing a “slow proof” that never had enough viable yeast activity to begin with.
After mixing and a short rest, place the dough in a lightly oiled bowl. Aim for a dough environment around 75–78°F and allow roughly 60–90 minutes for the first rise. Those figures are a working range, not a finish line. Watch for a gently domed surface, a softer feel, and an indentation that begins filling slowly when you press the dough.
The first rise
Enriched dough usually looks fuller rather than dramatically doubled. A useful target is 50–75% visible lift, paired with a soft, pillow-like feel. If the dough still feels dense and resists gentle pressure, keep it covered and give it more time. If it has become loose, fragile, or excessively gassy, move on rather than trying to force a larger rise.
Deflate it gently. You're redistributing the gas, not kneading the dough back to its starting condition. Roll the dough evenly, spread the filling without tearing the surface, and form a log with enough tension to hold the spiral without crushing it.
The final rise in the pan
Cut the rolls cleanly and place them in the prepared pan. Cover them loosely or tightly enough to seal out drafts, but don't let the cover press on the dough. Exposed dough dries quickly, and a dry surface can resist the upward expansion you need.
For the final proof, look for rolls that are visibly puffy, with spirals beginning to approach one another. Press a fingertip about one-quarter inch into a roll. A ready roll should spring back slowly and retain a slight indentation. The cinnamon-roll proofing guide from CinnamonRollsRecipe.com also identifies a practical two-stage pattern, with roughly 1–2 hours for the first rise and 30–60 minutes after shaping, while emphasizing that composition and room conditions change the result.
The pan itself affects the signal. Rolls packed close together support one another and rise into a soft clustered slab. Rolls with more space can expand outward before they begin pushing upward. Judge the dough's feel alongside its arrangement, not in isolation.
Choose the Right Proofing Schedule
There isn't one correct schedule for every baker. A same-day rise is straightforward, a warm proof saves time but demands supervision, and a cold proof gives you flexibility at the cost of planning.
| Method | Environment | Bulk Rise | Final Proof | Total Time | Flavor Depth | Flexibility | Main Risk |
|---|---|---|---|---|---|---|---|
| Room temperature | 75–78°F | 60–90 minutes | 45–60 minutes | Same day | Moderate | Moderate | Slow rise in a cool kitchen |
| Warm oven | 80–85°F | 45–75 minutes | 30–45 minutes | Same day | Lighter | Low | Excess heat or surface drying |
| Overnight cold proof | 38–40°F after shaping | Cooler bulk approach | 8–14 hours | Overnight | Deeper | High | Over-proofing or under-tempering |
The room-temperature path is the easiest starting point. It gives you enough time to observe the dough and correct course. Keep the bowl and pan covered, and use the fingertip test rather than ending the rise automatically when the planned time has passed.
The warm-oven route works when you need speed, but the oven is a poor proofing chamber unless you can verify its temperature and humidity. An oven light or proof setting may create a warm pocket, while another oven may climb beyond the useful range. For broader technical context, this guide to proofing oven temperature explains why controlled warmth matters more than choosing the warmest available location.
An overnight cold proof suits breakfast baking and deeper flavor. Shape the rolls, cover the pan, and refrigerate at 38–40°F for 8–14 hours. The dough continues fermenting slowly, so shape it slightly under-proofed. The next day, let the rolls temper while covered and assess them by feel. If they're already light and jiggly, don't wait for a dramatic increase in size. If they feel firm and cold, give them more room-temperature time before baking.
Control Proofing With SureDough
At the counter, three variables can shift together: dough temperature, room warmth, and humidity. SureDough™ holds the proofing environment more steadily and tracks time at temperature, reducing the guesswork caused by a drafty kitchen. For a deeper look at enclosed proofing setups, see this dough proofer box guide.
Use the program as a controlled starting point, then check the dough yourself. Cinnamon-roll dough contains butter, eggs, and sugar, so it often rises more slowly than lean dough. At the programmed endpoint, press a fingertip lightly into the surface. A slow spring-back indicates readiness. A quick rebound calls for more proofing, while a dent that remains suggests the dough has gone too far. SureDough can steady the environment, but it cannot account for every difference in flour, yeast, filling, or shaping tension.
Match the program to the flour
Choose among the four programs according to flour strength and dough composition. They are not interchangeable buttons.
| SureDough Program | Best Flour Match | Cinnamon Roll Use |
|---|---|---|
| Sandwich Loaf | High-protein bread flour | A gentler, cooler fermentation for dough with strong gluten |
| Pizza | Lower-protein flour | A warmer, more closely watched rise |
| Laminated Dough | Whole-grain or bran-rich dough | Support for dough that ferments and softens differently |
| Croissant | Mixed or specialty flour formulas | Controlled testing when the recipe behaves unlike standard white flour |
Higher-protein bread flour can handle a longer, cooler ferment because its gluten network provides more structure. Lower-protein flour and whole-grain blends may become ready sooner or feel different at the same temperature. The enriched formula still limits speed across every setting, so judge expansion, surface tension, and fingertip response rather than chasing the fastest rise. Adjust the program when the dough feels tight, slack, or unusually slow.
Protect Shape and Humidity
Shaping can undo good fermentation surprisingly quickly. Rolling too aggressively compresses the dough, while a dry bench or exposed cut sides creates a surface that resists expansion. Keep the dough evenly thick, spread the filling without forcing it to the edges, and roll the log firmly enough to hold its spiral without stretching it thin.
Give the rolled dough a short bench rest of 10–15 minutes before panning if it feels tight. That pause relaxes the gluten, allowing the cut pieces to round out instead of pulling against the spiral. After cutting, arrange the pieces with about 1 inch of space for more individual definition, or place them nearly touching for a softer pull-apart result.
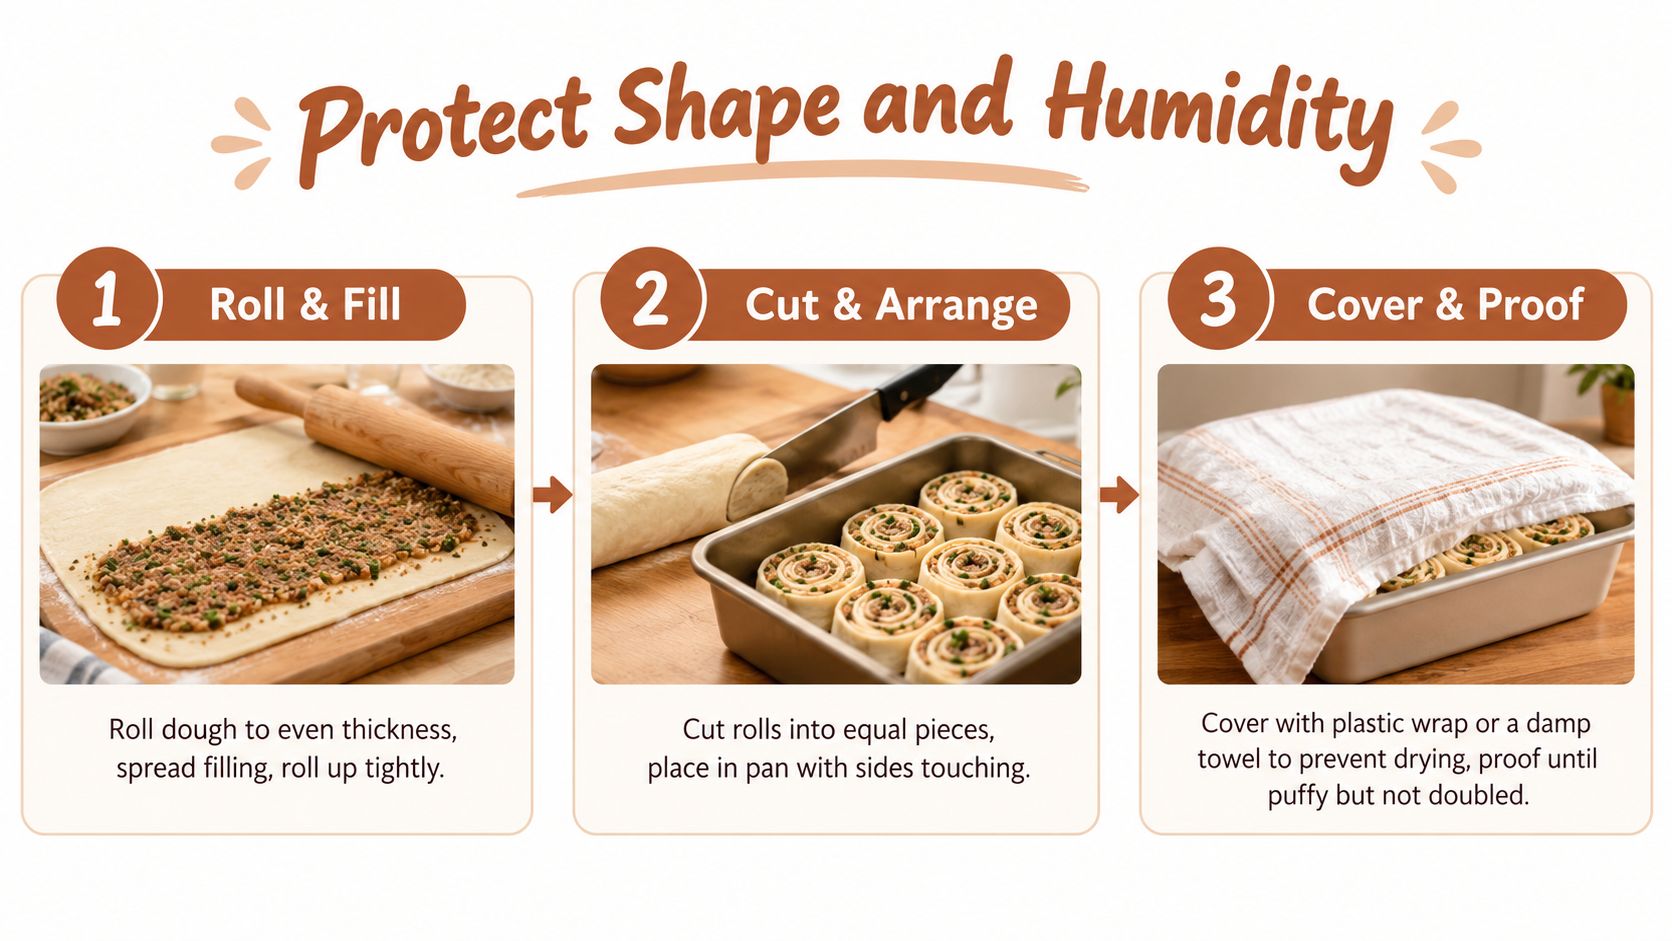
Cover the pan immediately with lightly oiled plastic wrap or a damp tea towel. The cover should prevent drying without resting heavily on the rolls. In a dry kitchen, a shallow pan of hot water can raise humidity, while D'Steamer can maintain roughly 70–80% humidity around the pan during final proofing, as discussed in this humidity-control guide.
Humidity doesn't make the dough rise by itself. It keeps the surface supple so the gas already being produced can expand the rolls evenly. If the tops feel leathery before baking, correct the humidity before extending the proof.
Troubleshoot Proofing Problems
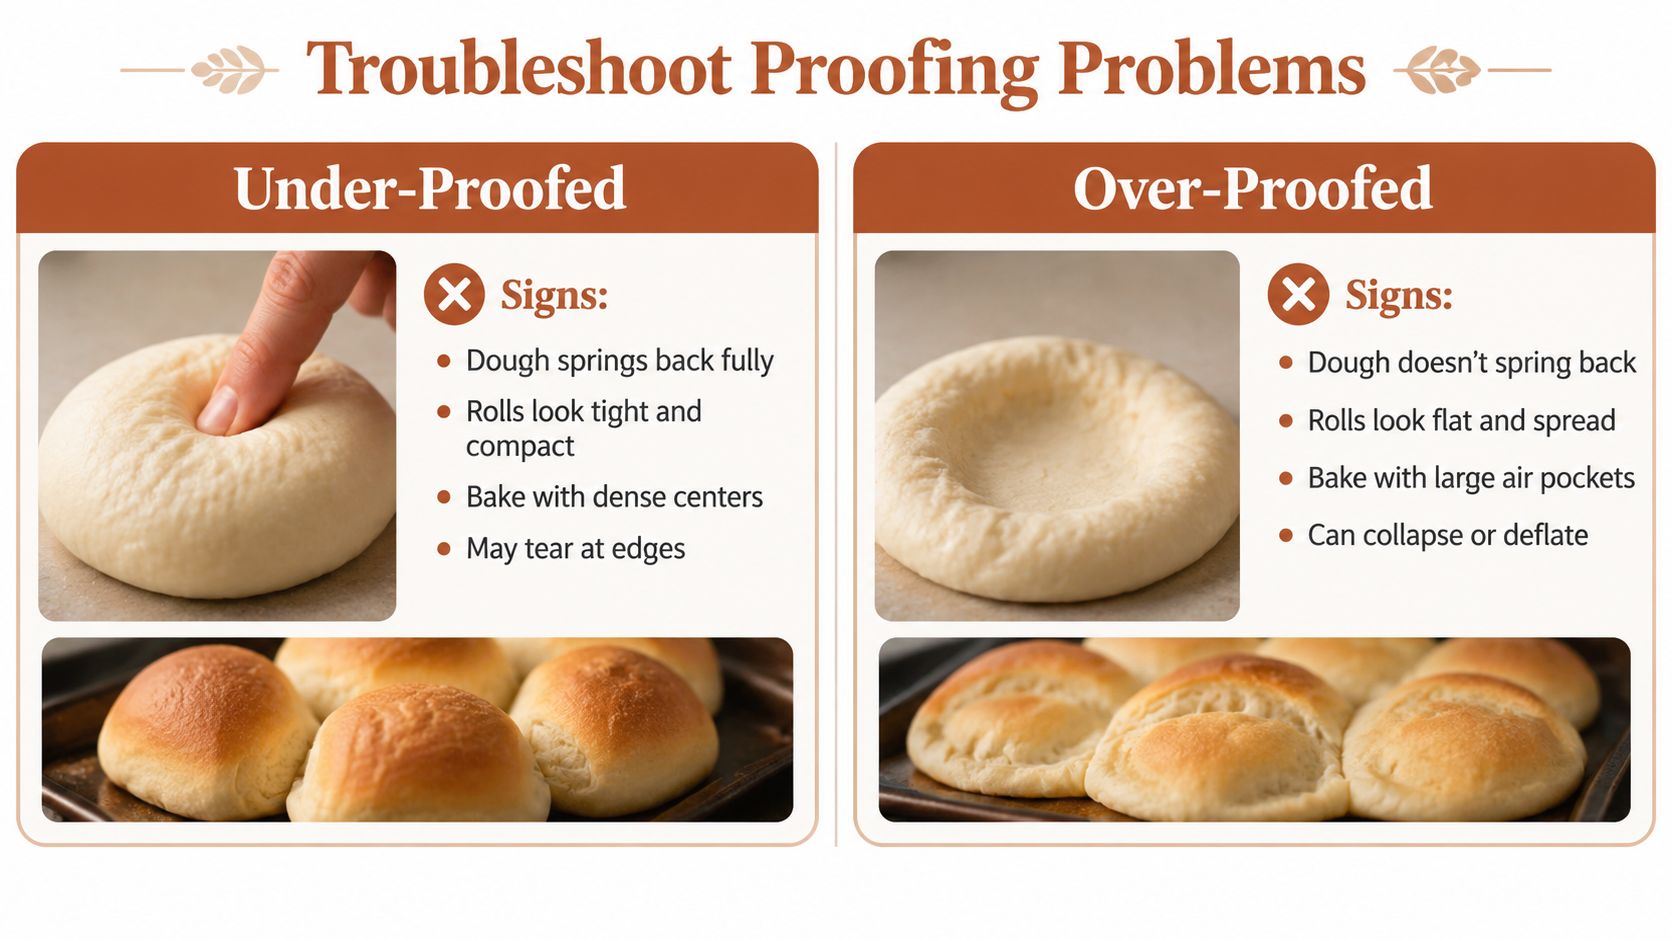
A fully risen-looking tray can still be wrong. The common assumption is that more puff means better rolls, but over-proofed dough can look impressive until it loses structure in the oven. The reliable diagnosis comes from combining the poke test with how the rolls hold their shape.
Under-proofed rolls
Under-proofed dough springs back fully after a fingertip press. The rolls look tight and compact in the pan, and the shaped dough may tear at the seams because the gluten is still resisting expansion. In the oven, these rolls tend to produce dense centers and less separation between layers.
Give them more warm, humid time. Check that the yeast was fresh and that the bulk rise softened and expanded the dough before shaping. Raising heat aggressively isn't the first fix. The general technical range for enriched yeast dough is around 35–40°C with 75–85% relative humidity, while 40–43°C is better treated as an upper ceiling than a routine target, according to industrial bread-proofer data.
Over-proofed rolls
Over-proofed rolls feel pillowy but fragile. They spread sideways, don't recover after a poke, and may deflate when you remove the cover. Baked results can include gummy interiors, a pale top, large weak pockets, or a flattened profile.
If the dough has reached that stage in the pan, bake it rather than extending the proof. Next time, shorten the final rise or use a cooler environment. A dry top points to insufficient humidity, while uneven expansion often comes from a pan sitting on a cold or uneven surface. Dense bottoms can result from shaping after the dough has already gone too far, or from excessive heat concentrated beneath the pan.
Use this visual diagnosis alongside the demonstration below, but let your own dough provide the final decision.
Follow a Reliable Proofing Checklist
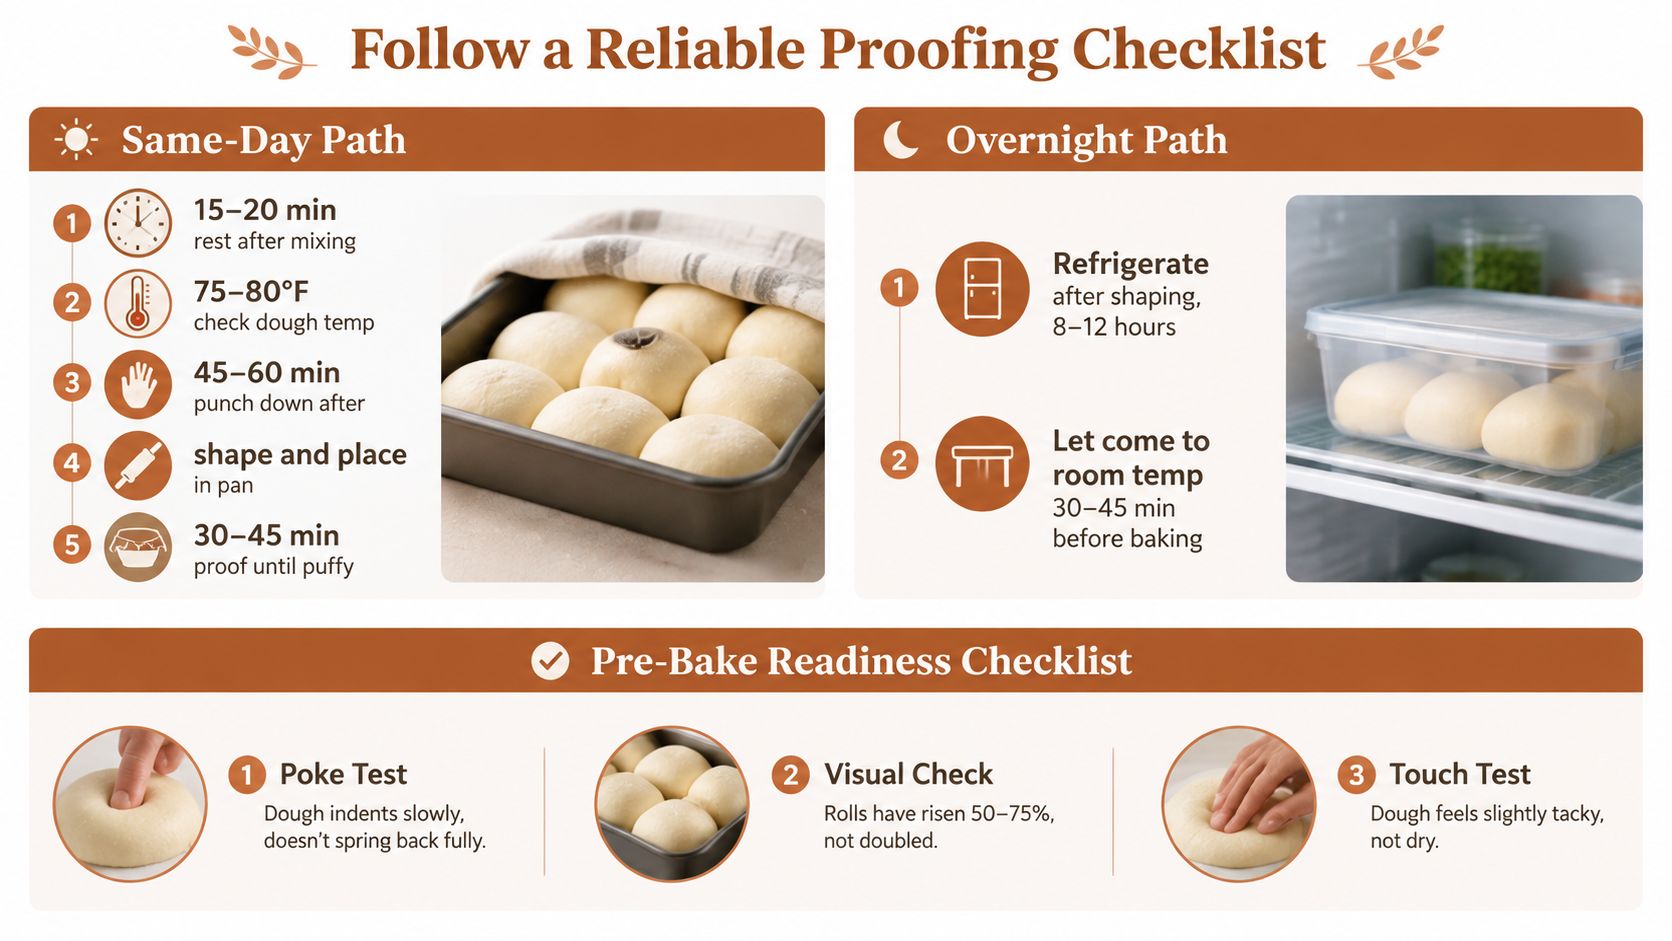
For a same-day bake, mix the dough, let it rest briefly, then complete the bulk rise in a warm, covered bowl. Shape the rolls after the dough has expanded and softened, allow a short bench rest if the log feels tight, and proof in the pan until the fingertip indentation recovers slowly.
For an overnight bake, refrigerate the covered shaped rolls after cutting. The cold rise can run for 8–12 hours, followed by 30–45 minutes at room temperature while still covered, as reflected in this overnight cinnamon-roll reference. Don't bake by the refrigerator clock alone. Check that the rolls feel lighter, look puffy, and respond slowly to pressure.
Before baking, check:
- Volume: The rolls have expanded noticeably, but they don't need to double.
- Surface: The dough feels supple and slightly tacky, not dry or crusted.
- Fingertip recovery: The indentation fills slowly and leaves a faint mark.
- Temperature: The dough has proofed in a suitable warm environment, or has had enough time to temper after refrigeration.
- Pan arrangement: The rolls have room to expand without being crushed together.
For repeatable practice, browse the D'BakerAid recipes and compare the dough cues with your own kitchen conditions.
DBakerAid™ offers controlled fermentation and proofing through the SureDough™ system, with manual temperature and time settings that can also support shaped cinnamon rolls. Visit DBakerAid™ to see how a controlled environment can make proofing less dependent on room drafts, dry air, and guesswork.