

Following a recipe to the minute and still getting a dense or flat loaf isn't a failure of effort. It's usually a failure of the timetable. A pain au levain recipe doesn't run on a fixed dose of commercial yeast. It runs on a living culture, and living cultures don't respect your clock.
Control dough temperature and learn to read the dough itself, and the same formula starts behaving the same way in January and in July.
Table of Contents
- What a Pain au Levain Recipe Really Controls
- Ingredients and Levain Preparation
- Mixing, Folding, and Bulk Fermentation
- Shaping and the Final Proof
- Scoring and Baking for a Crisp Crust
- Controlling Fermentation Temperature for Repeatable Loaves
- Troubleshooting, Tips, and Your Next Bake
What a Pain au Levain Recipe Really Controls
Most recipes tell you to bulk ferment for four and a half hours. That instruction assumes your kitchen matches the author's kitchen. Put the same dough in a 20°C winter kitchen and a 28°C summer kitchen, follow the same schedule, and you'll shape one dough too early and the other too late.
Pain au levain rests on one of the oldest leavening systems in breadmaking, a flour and water culture fermented by naturally occurring yeasts and lactic acid bacteria. Before commercial baker's yeast became widely available in the nineteenth century, sourdough cultures and brewer's yeast were the principal leavening methods, a history detailed in research on the origins of sourdough leavening. That origin matters in your kitchen today.
Time Is an Output, Not an Input
Yeasts produce gas. Bacteria produce acid. Temperature, hydration, flour composition, and oxygen exposure change how fast each group works, so elapsed time is the result of those conditions, not a control you can set independently.
Practical rule: Set the temperature, watch the dough, and let the time fall where it falls. Reverse that order and you'll chase inconsistent loaves.
That shift turns the recipe into a process window instead of a timetable. You get a formula in baker's percentages, a target dough temperature, physical readiness cues at every stage, and two proofing routes you can choose based on schedule. If your room temperature swings wildly, you'll also see how controlled proofing removes that variable entirely.
None of this requires more skill. It requires paying attention to different signals, the rise and dome of the dough, how it feels under your fingertips, how it smells, rather than a timer that can't see any of that.
Ingredients and Levain Preparation
Start with the formula, then build the levain. Baker's percentages let you scale the loaf up or down without recalculating anything, because every ingredient is expressed against the flour weight.
Pain au Levain Formula at a Glance
| Component | Baker's Percentage | Amount for 500 g Flour | Role in the Dough |
|---|---|---|---|
| Bread flour | 100% | 500 g | Structure and gluten strength |
| Water | 70 to 72% | 350 to 360 g | Hydration for gluten and open crumb |
| Mature levain | 15 to 20% | 75 to 100 g | Leavening, acidity, and aroma |
| Salt | 1.8 to 2.0% | 9 to 10 g | Flavor and fermentation control |
These benchmarks, roughly 70 to 72% total hydration, 15 to 20% levain, and 1.8 to 2.0% salt, come from a practical pain au levain formula and workflow. Treat them as a starting point for your flour, not a universal constant.
Build the Levain First
Build your levain 8 to 12 hours before mixing and use it at peak activity, fully expanded, domed, and smelling sweetly tangy rather than sharp and acetone-like. If you're unsure what peak looks like, this explanation of what levain is and how it differs from starter walks through the visual markers.
A sluggish levain dooms the loaf before mixing begins. No amount of folding or extended bulk fixes a culture that wasn't ready, because weak gas production and weak acid balance carry through every later stage.
Flour Choice Changes the Water
Bread flour gives beginners the widest margin for error. Whole grain and rye additions absorb more water and ferment faster, so the same hydration percentage produces a noticeably different dough. Each flour has a different water absorption capacity that directly affects fermentation behavior and dough properties, as shown in research on flour absorption and sourdough performance.
When you change flours, hold back a little water at mixing and add it in small increments after you see how the dough feels. Maximum hydration isn't automatically better. A slightly lower hydration loaf often shapes cleaner and scores more reliably.
Finish prep with a 30 to 60 minute autolyse. Combine flour and water, rest them, and the flour hydrates on its own, which reduces the mechanical mixing you'll need for gluten development later.
Mixing, Folding, and Bulk Fermentation
The sequence below follows the order you'll work in, from first mix to the end of bulk. Watch how each stage pairs an action with something you can see or feel.
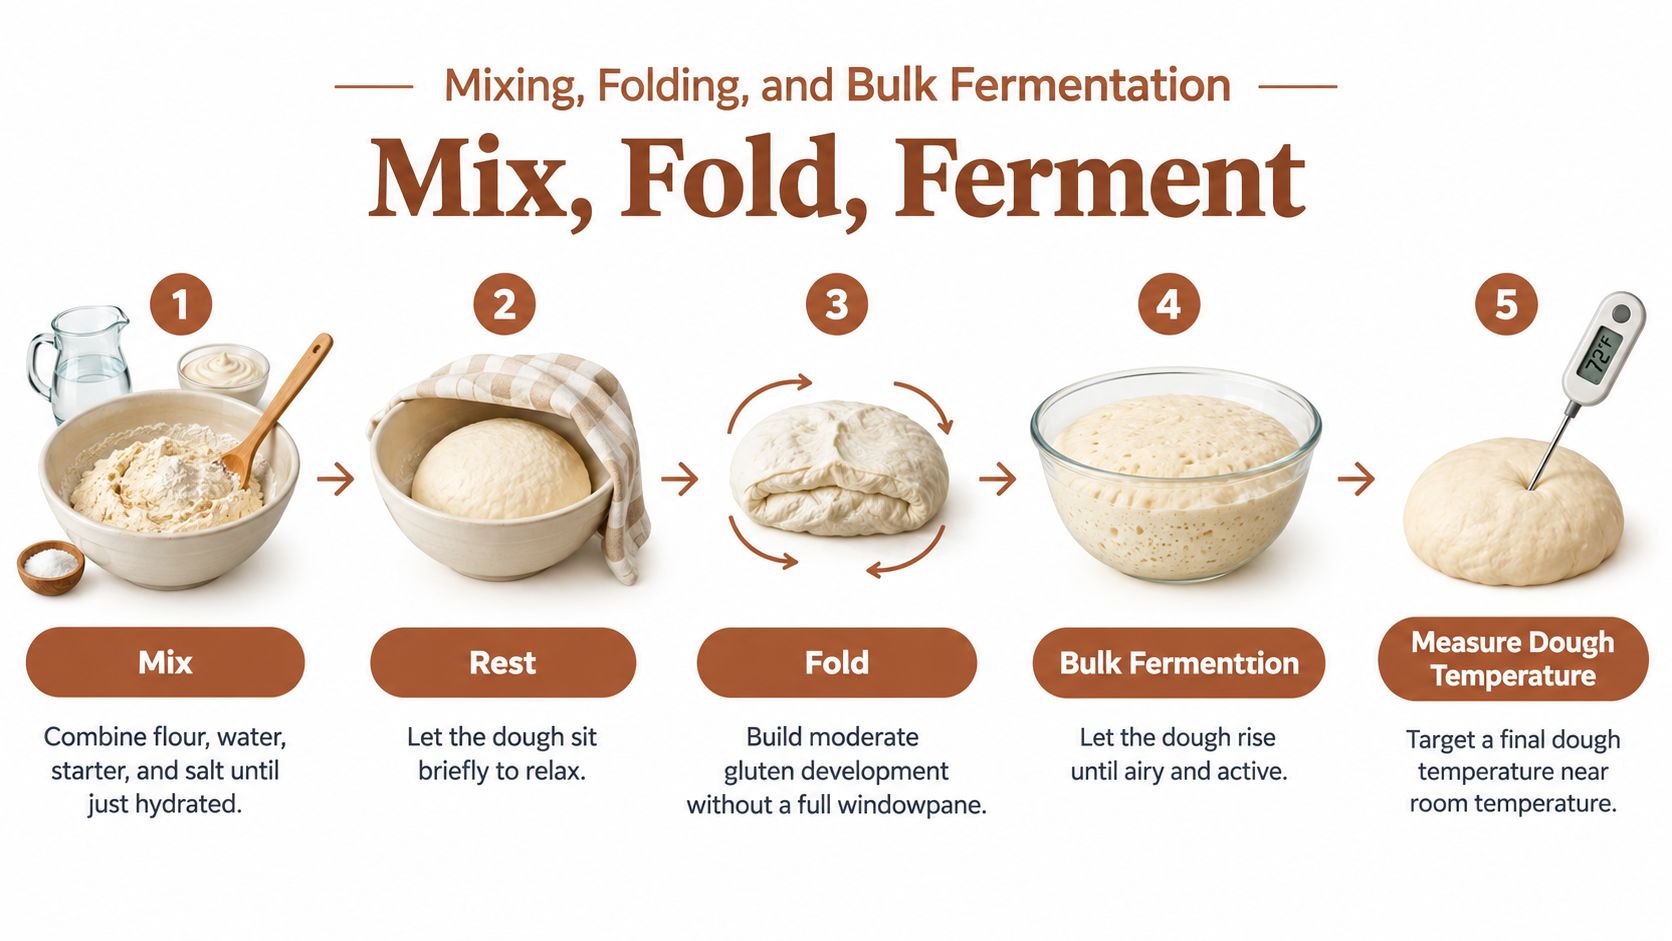
Mix to Moderate Development
After the autolyse, work in the levain and salt and mix until the dough reaches moderate gluten development. You're not chasing a full windowpane here. The dough should look cohesive and pull away from your hand in a shaggy but organized mass.
Take its temperature right away. Target a final dough temperature near 25 to 26°C (77 to 79°F), a benchmark used in a professional lean bread formula with a defined dough temperature target. That single number sets the pace of everything that follows. A dough that starts warm will finish bulk early no matter what the clock says.
Fold Early, Then Leave It Alone
During the first 2 to 3 hours of bulk, give the dough three or four sets of folds at 30 to 45 minute intervals. Each fold layers strength into the dough the way lamination builds layers in pastry, organizing the gluten sheet and trapping gas. If your technique needs work, a breakdown of the stretch and fold technique shows hand placement and tension.
- First fold: The dough stretches far and resists little. That's normal.
- Second and third folds: Stretch shortens, resistance grows, and the surface smooths out.
- Last fold: The dough holds its shape in the bowl and feels elastic rather than slack.
Once the dough feels aerated and elastic, stop handling it. Late folds knock out the gas you've spent hours building.
Reading the End of Bulk
Bulk commonly takes 3 to 6 hours, but that range is wide because starter strength and temperature vary so much between kitchens. Judge readiness by state, not schedule.
Look for visible expansion, a gently domed surface, bubbles breaking at the edges of the bowl, and a soft jiggle when you nudge the container. If the dough still sits flat and dense, it isn't ready, whatever the timer says.
Shaping by the clock produces the two classic failures. Under-fermented dough tears during shaping and bakes into a dense, tight crumb. Over-fermented dough goes slack and sour, spreads in the oven, and gives weak spring. The cues above, checked every 30 minutes near the end of bulk, keep you between those two outcomes.
Shaping and the Final Proof
Turn the dough out gently. You've spent bulk fermentation building gas, and roughly dumping the dough onto the bench destroys a share of it in two seconds.
Preshape and Rest
Gather the dough into a loose round with a bench knife and one hand, using just enough tension to form a skin. Bench rest it for 20 to 30 minutes so the gluten relaxes. Skip this rest and the dough will fight you during final shaping, springing back and tearing instead of holding its form.
For the final shape, build surface tension deliberately. Fold the edges toward the center, then roll or drag the dough toward you so the outer skin tightens into a smooth membrane. That tension is what holds the loaf upright in the oven instead of letting it spread sideways. Place the shaped loaf seam up in a floured banneton.
Two Proofing Routes, Two Different Loaves
- Same-day warm proof: Roughly 1.5 to 3 hours at 24 to 27°C (76 to 80°F) gives you a milder loaf baked the day you mixed it.
- Overnight cold retard: About 3 to 5°C (37 to 41°F) in the refrigerator slows fermentation, develops deeper flavor, and firms the dough so scoring the next morning is far easier.
The cold route has a scheduling advantage home bakers underuse. A retarded loaf waits for you. You bake when the morning allows, not when a warm proof forces your hand.
The Fingertip Test
Whichever route you choose, judge readiness the same way. Press a floured fingertip gently into the dough and watch the response.
- Slow partial spring back: Ready to bake.
- Fast, full rebound: Under-proofed. Give it more time.
- No recovery, or the dough sighs and deflates: Over-proofed. Bake immediately and shorten the proof next time.
Combine that test with visible aeration and a slightly domed profile. One cue can mislead you. Three agreeing cues rarely do.
Scoring and Baking for a Crisp Crust
Heat saturation comes before everything else. Preheat the oven and vessel thoroughly to 230 to 250°C (450 to 480°F). A lukewarm Dutch oven, cast iron bread pot, or baking stone will kill your oven spring even when fermentation was perfect, because the dough needs that stored heat the moment it lands.
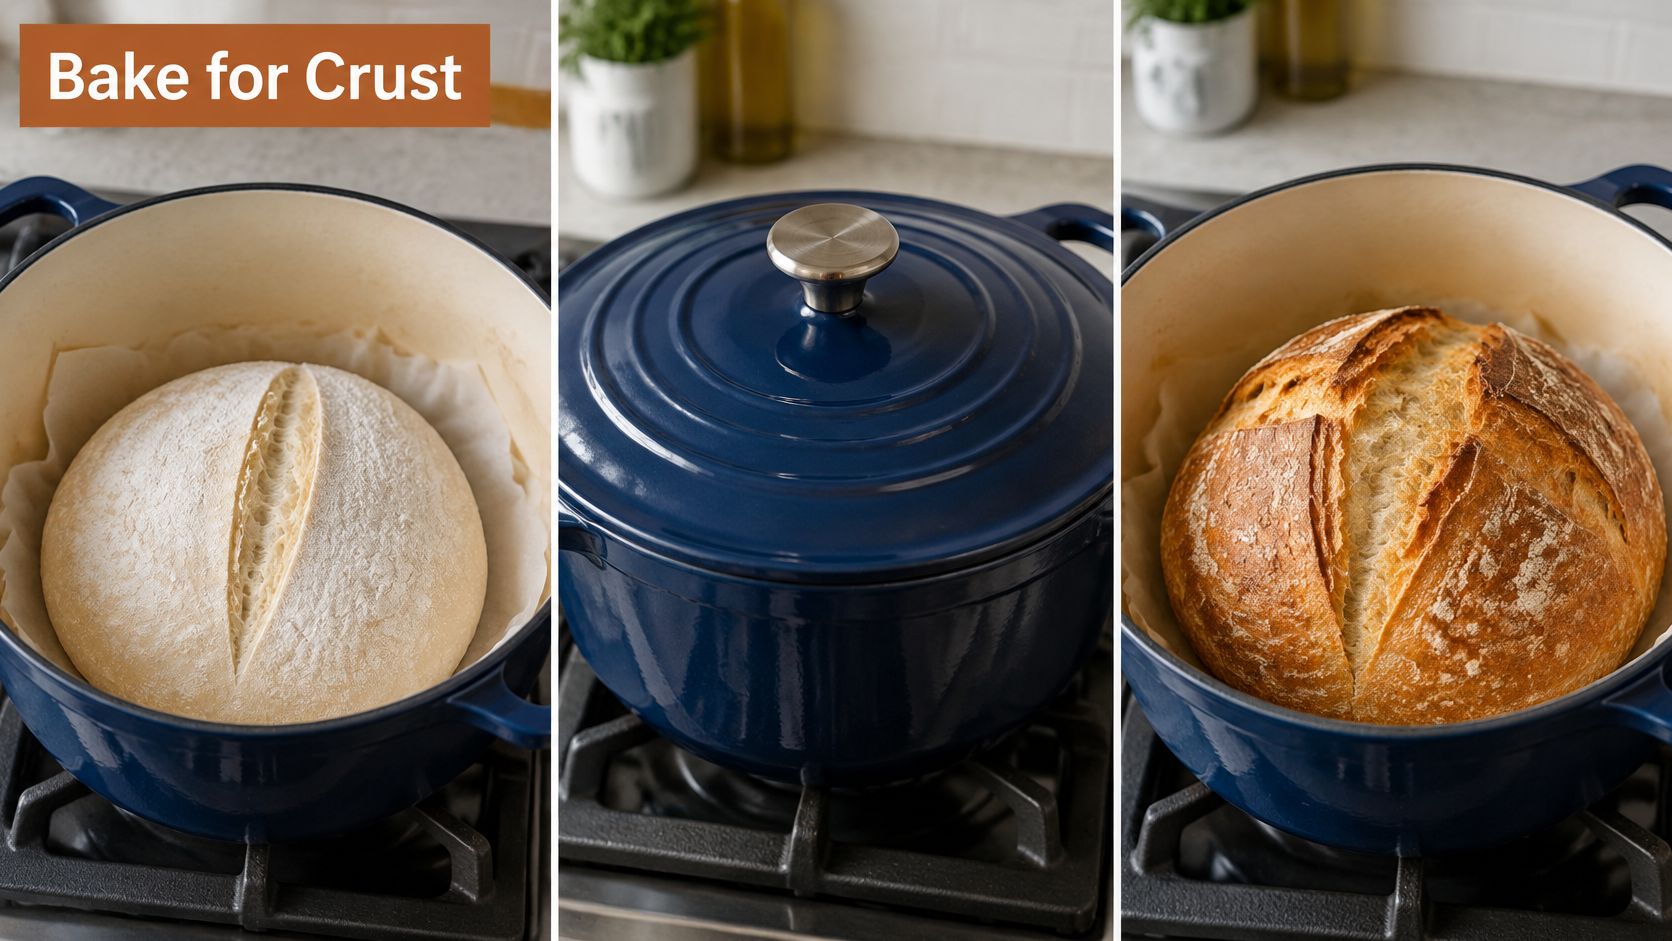
Score With Commitment
Use a lame or razor at a shallow angle and make one confident stroke. A timid, shallow score restricts the loaf's controlled opening and leaves a pale, thick seam where the crust couldn't split cleanly. Keep surface flour light for the same reason. Excess flour insulates the surface and dulls both the score and the crust color.
The same patience with heat pays off beyond bread. Low, steady cooking followed by high heat finishing is the logic behind a good weekend BBQ pork belly recipe too, where rushing the temperature stages ruins the texture you waited hours to build.
The Two-Phase Bake
Bake covered, or with steam, for roughly the first 25 minutes. Steam delays crust setting so the loaf can expand fully before the exterior hardens, a principle covered in guidance on baking with steam in a home oven. Then uncover and bake about 15 minutes more to build deep color and a thin, crisp crust.
Judge doneness by deep caramel color and a hollow sound when you tap the base. Then cool the loaf completely before slicing. The crumb is still setting as it cools, and cutting early turns a well fermented interior gummy.
Controlling Fermentation Temperature for Repeatable Loaves
Room temperature is the variable most recipes mention in passing and then ignore. It's also the variable that explains why your winter loaves and summer loaves behave like different recipes. Controlled wheat bread research testing sourdough fermentation from 16°C to 32°C and durations from 6 to 20 hours found that fermentation time and flour ash content were the main factors influencing sensory characteristics, according to a VTT study optimizing the sourdough process for sensory profile.
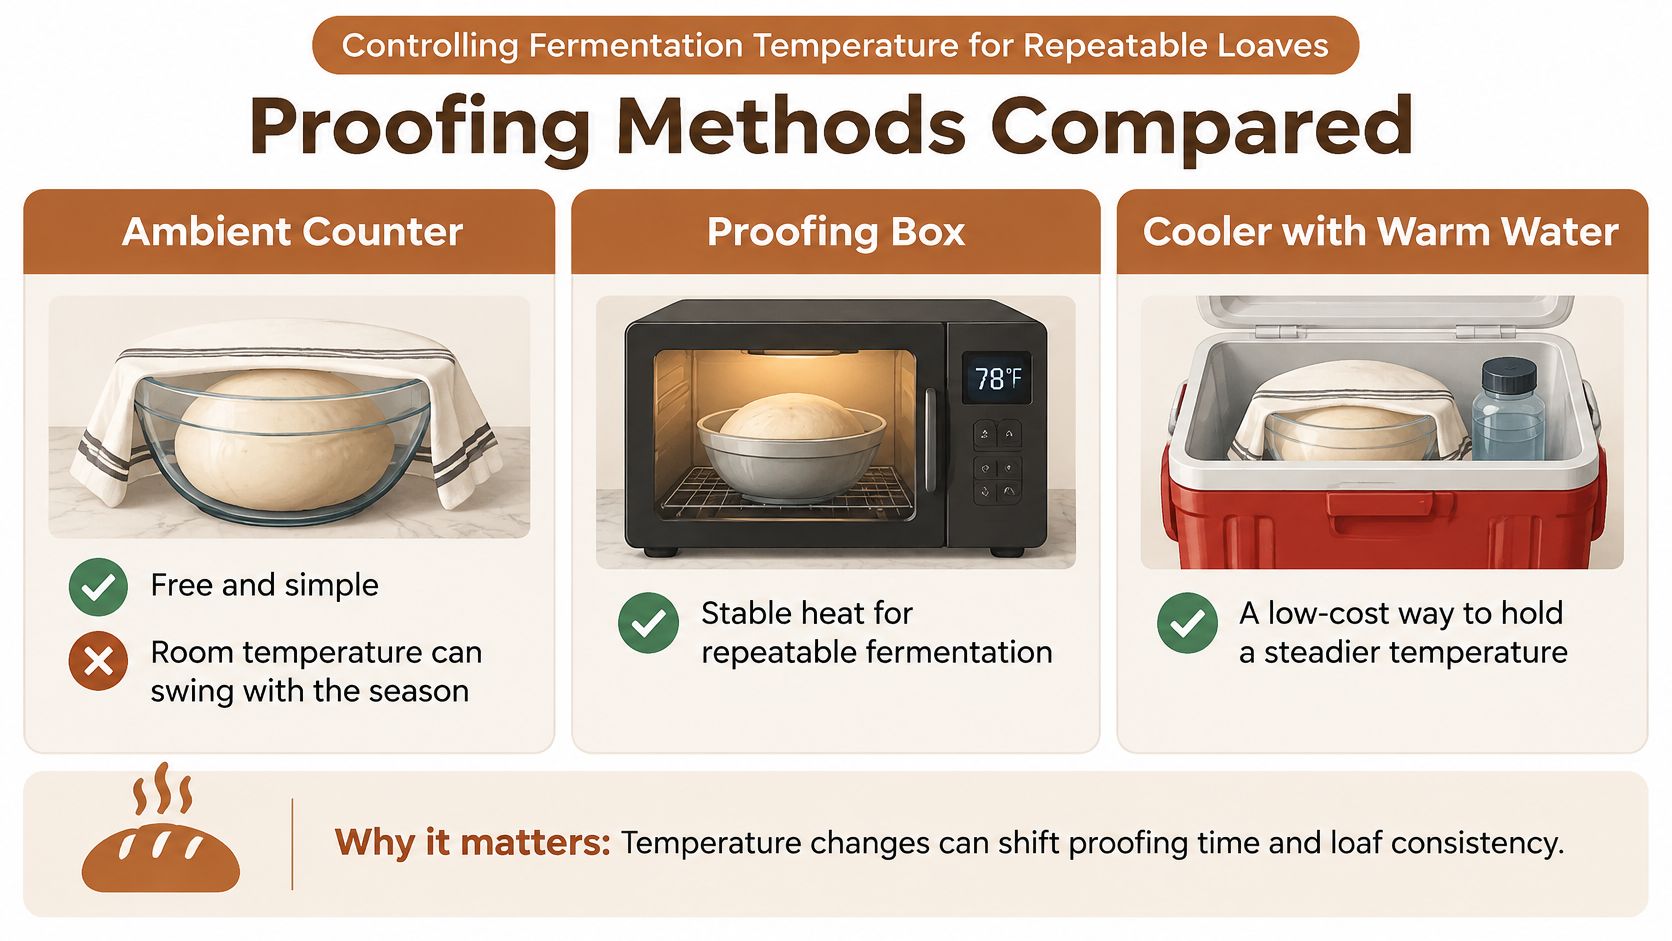
Three Ways Home Bakers Actually Proof
- Ambient counter: Free and simple, but it swings with the season, the heating cycle, and whether the oven's been on. Your timings drift with it.
- Improvised warm spots: An oven with the light on or a spot near a radiator adds warmth, but it's uneven and unmeasured. Part of the dough can run well ahead of the rest.
- Controlled proofing environment: A set temperature held steady regardless of the kitchen, so your readiness cues arrive on a predictable schedule.
Temperature changes more than speed. Low temperatures around 20 to 26°C can favor yeast growth, while the typical optimal growth range for sourdough Lactobacillaceae sits near 30 to 40°C, ranges summarized in a peer reviewed review of wheat sourdough breadmaking. Warmer isn't just faster. It shifts which microbes dominate, how quickly acid builds, and ultimately how the loaf tastes.
Correction rule: After a warm start, shorten your expectations and check the dough earlier. In a cold kitchen, extend bulk and trust expansion over the clock.
For bakers who'd rather remove the variable than keep correcting for it, D'BakerAid's SureDough system holds proofing temperature consistently across the ferment, with flour-specific programs and an optional steamer for the first minutes of the bake. It's one route to making the cues in this recipe behave the same way every time, though disciplined manual monitoring gets you there too.
Troubleshooting, Tips, and Your Next Bake
When a loaf disappoints you, diagnose it before you change the recipe. Most failures trace back to fermentation state, not ingredients, and the table below maps what you see to what went wrong.
| Symptom | Likely Cause | Fix on the Next Bake |
|---|---|---|
| Dense, tight crumb | Under-fermentation or a weak levain | Feed the levain to full peak and extend bulk until the dough domes |
| Flat, sour, slack loaf | Bulk ran too long or too warm | Lower dough temperature and shape earlier |
| Spread instead of sprang | Weak surface tension or over-proofing | Build more tension in shaping and use the fingertip test |
| Pale, thick seam | Score too shallow or dough over-floured | Score deeper at an angle and dust lightly |
| Weak spring despite good fermentation | Vessel wasn't fully preheated | Extend the preheat until the vessel is heat saturated |
Habits That Compound
Keep notes every bake. Record your final dough temperature, bulk duration, and how the dough looked when you shaped it. Two or three bakes of notes will teach you more about your kitchen than any recipe adjustment, because you'll start seeing your own patterns instead of guessing.
When you switch flours, drop hydration a few percent and earn the water back in small additions once you know how the new flour drinks. And cool every loaf fully before cutting, even when the troubleshooting table tempts you to inspect the crumb immediately.
Your Next Two Bakes
Bake this exact formula twice on consecutive weekends and change only the proofing temperature between them. Keep the flour, hydration, and levain build identical. Then taste both loaves side by side and compare crumb, acidity, and crust.
That single-variable comparison will show you, in your own kitchen, why temperature control is central to any good pain au levain recipe. Once you've felt that difference, you can decide whether to keep managing it by hand or let controlled proofing hold it steady while you focus on shaping and scoring.
If inconsistent room temperature is the part of this recipe you can't control, DBakerAid™ offers a precision system that holds fermentation and proofing conditions steady so your levain, bulk, and final proof behave the same way every bake. Visit the site to see how controlled proofing and steaming fit a home sourdough routine, and put your attention back on shaping, scoring, and the loaf itself.