

You've probably had that moment in the kitchen. The naan comes off the pan looking pale and flat, the edges are dry, and what you wanted was a soft bread that balloons up under the heat and stays tender long enough to tear and dip. That gap between restaurant naan and home naan is usually not about talent, it's about technique, heat, and timing.
This guide is built for the person standing there with flour on the counter and a skillet already warming up. It gives you a reliable dough formula, the proofing cues that matter, and a clear comparison of skillet, oven, broiler, and grill so you can cook with the equipment you already own. Homemade naan bread at home is a same-day bread, and when it works, the puff comes from fast yeast activity, a warm proof, and aggressive surface heat that creates steam fast enough to form bubbles and brown spots.
Table of Contents
- The Pull, the Puff, and Why Homemade Naan Is Worth the Effort
- Building the Naan Dough Formula From Scratch
- Mixing, Kneading, and Proofing the Dough Right
- Choosing Your Heat Source Skillet Oven Broiler or Grill
- Rolling Shaping and Cooking Each Piece
- Variations Worth Knowing Garlic Butter Whole-Wheat and Shortcuts
- Troubleshooting Flat Dense or Burnt Naan
The Pull, the Puff, and Why Homemade Naan Is Worth the Effort
The best naan has a simple payoff. You tear into a warm piece, the middle releases steam, and the surface shows those blistered brown spots that tell you the dough caught heat at the right moment. When home naan goes wrong, it usually turns into something closer to a tortilla, pale and dense, which is why so many cooks stop after one try.
What this bread actually needs
Naan does not ask for an overnight schedule. The dough is usually mixed, given a short warm proof, and then cooked the same day, because the bread depends on quick gas production and fast surface cooking rather than a long ferment. Home recipes commonly divide the dough into 8 pieces and cook each piece in just 1 to 3 minutes on a hot surface, which tells you how little time the actual cooking stage takes compared with the rise.
Practical rule: if the dough hasn't softened, expanded, and relaxed before it hits the pan, it won't puff well no matter how carefully you roll it.
That's why the right approach is to treat naan as a timing problem, not just an ingredient list. The dough needs enough moisture to stretch, enough warmth to rise, and enough heat to set the outside before the gas escapes. If you understand those three things, the rest of the process gets much less mysterious.
A lot of home cooks also get stuck comparing equipment instead of reading the dough. A skillet, oven, broiler, and grill all work differently, but they all have to solve the same problem, which is creating a quick burst of heat on one side of the dough. That's the thread running through every method in this guide.
Building the Naan Dough Formula From Scratch
A workable naan dough is not a stiff sandwich loaf dough, and it definitely isn't bagel dough. It should feel soft, pliable, and slightly tacky, because a little extra moisture helps the bread puff instead of staying flat. One practical way to think about the formula is flour for structure, water for stretch, yogurt or milk for tenderness, sugar for yeast food, salt for flavor control, and a small amount of oil or ghee for a softer crumb.
The ingredients and what each one does
All-purpose flour is the baseline for most home naan because it gives enough strength without making the dough too hard to roll. Yogurt adds tenderness and a mild tang, and milk does a similar job if that's what you have on hand. Sugar isn't there to make the bread sweet, it helps the yeast get moving, while salt keeps the flavor from tasting flat and also reins in the yeast a bit so the dough doesn't over-expand too fast.
Hydration matters more than many beginners expect. A dough around 60 to 65 percent hydration is usually easier to puff than a dry, stiff dough because the steam inside has room to expand. That's also why so many home cooks go wrong by dusting in too much flour during kneading, the dough loses elasticity and starts behaving like a heavy flatbread instead of naan.
If you want a reliable measuring habit, use the same care you'd use for bakery dough. bakery flour measuring techniques are useful here because even a small overpour of flour changes the feel of the dough fast.
| Naan Dough Hydration at a Glance | Texture | Puff Potential |
|---|---|---|
| Lower hydration | Firmer, easier to handle, but tighter | Lower |
| Around 60 to 65 percent | Soft, stretchy, slightly tacky | Better |
| High hydration | Very soft and slack, needs careful handling | Strong if managed well |
Practical rule: if the dough feels dry in your hands, the bread will usually bake up denser than you wanted.
Whole-wheat flour can work in part, but it pulls more water and makes the result heavier. High-protein versions can also be made, but those are a different bread profile and need different handling. Gluten-free naan is its own category entirely and won't behave like this dough, so it needs a separate formula and separate expectations.
Mixing, Kneading, and Proofing the Dough Right
The dough starts working the moment the yeast wakes up. Warm water, a pinch of sugar, and yeast should turn foamy before you add the flour, because that foaming tells you the yeast is active enough to carry the rise. After that, mix in the flour and yogurt until you've got a shaggy mass, then knead just long enough to turn it into something smooth and elastic.
Reading the dough by feel
A good naan dough should feel soft, elastic, and smooth, not tough. The surface should be a little tacky, but not so sticky that it clings to your fingers, and when you poke it, the dent should spring back slowly instead of collapsing. That's the sweet spot where the dough has enough structure to trap gas without becoming dry and rigid.
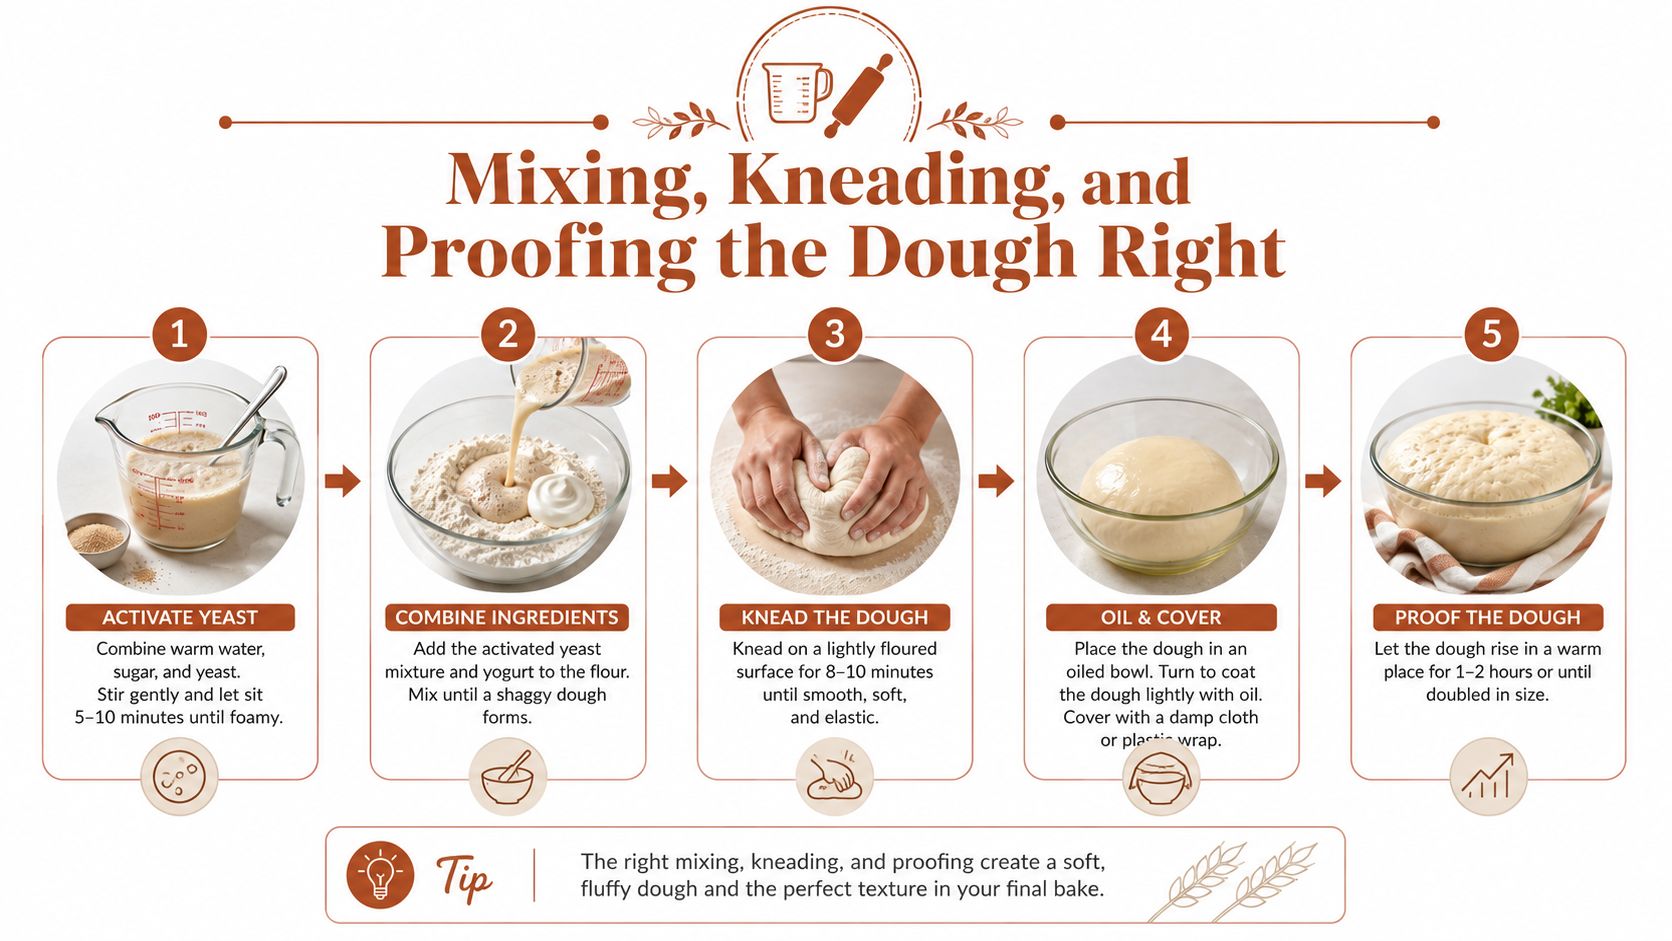
Kneading doesn't need to be aggressive. A short knead is enough if the flour is well mixed and the dough starts out hydrated, and home recipes often land in the 6 to 10 minute range for a smooth finish. After that, the dough should rest in a covered bowl in a warm spot until it's nearly doubled, which usually takes about 1 to 1.5 hours in a normal kitchen.
If your kitchen runs cool, a controlled proofing setup takes the guesswork out of the rise. That matters because cold dough doesn't build gas evenly, and naan needs that gas to puff on contact with heat.
The hard part is stopping at the right time. Over-proofed dough can collapse when you shape it, and then the puff disappears before the bread reaches the pan. Under-proofed dough stays tight and resists stretching, which is why it often cooks up flat even if the surface browns.
Here's a useful internal reference if you're comparing dough handling in other breads too, how to proof pizza dough. The principle is similar, the dough needs to relax before it goes under heat.
Choosing Your Heat Source Skillet Oven Broiler or Grill
Naan works because the cooking surface is hot enough to set the outside quickly while the inside still has time to expand. Most home recipes lean on a skillet, but that's not the only route. The better question is which heat source matches the equipment you already have, and how much char, speed, or batch capacity you want.
Four ways to get the right heat
A heavy cast-iron skillet is the most dependable choice for beginners because it holds heat and gives you direct control over browning. Preheat it well, cook over medium-high to high heat, and expect each piece to cook in roughly 1 to 3 minutes per side, with the exact timing depending on the thickness of the dough and your burner.
An oven with a preheated stone or steel works better when you want to bake several at once. Home naan recipes can use very hot ovens, and the BBC version bakes at 240°C / 220°C fan / Gas 9 for 4 minutes on a preheated tray, which shows how quickly the bread can finish under sustained heat. This method gives steadier batch cooking, though it won't brown quite like a skillet unless the top heat is strong.
The broiler is useful when you want fast top-down char and don't mind watching closely. It's less forgiving than a skillet because the line between browned and burnt is thin. The grill adds smoke and stronger surface flavor, and it's the best option when you already have an outdoor setup ready.

| Heat Source Comparison for Home Naan | Method | Temperature | Time per Side | Best For |
|---|---|---|---|---|
| Skillet | Cast iron on stovetop | Medium-high to high | About 1 to 3 minutes | Beginners and control |
| Oven | Stone or steel, preheated | Very hot oven | Short bake, not a long bake | Batch cooking |
| Broiler | Top heat | Very hot | Brief, closely watched | Fast char |
| Grill | Outdoor live heat | Hot grill surface | Brief, with quick flips | Smoky flavor |
To compare outdoor live-fire setups, best outdoor fire pits for cooking is a useful reference if your kitchen work eventually moves outside. That said, the skillet still wins as the default because it's the easiest way to learn what the dough is doing.
A lot of recipes fall short here. They tell you to heat a pan, but they don't really compare the tradeoffs, and they assume every kitchen has the same burners and pans. Once you pick one method and stick with it for a few batches, the dough gets much easier to judge.
Rolling Shaping and Cooking Each Piece
Once the dough has rested, it should feel relaxed and easy to divide. Cut it into 6 to 8 equal pieces, keep the pieces covered so the surface doesn't dry out, and work with one round at a time. If the dough sits uncovered for too long, the outer skin tightens and the bread won't stretch cleanly.
How to shape for puff
A rolling pin gives you the most even thickness, which is helpful when you're still learning. Hand-stretching makes a more rustic shape and can create uneven bubbles, which some cooks prefer because the blistering looks more natural. Either way, aim for an oval or round about 6 to 8 inches across, thin enough that heat can reach the center quickly.
Cook the naan on the hot surface and watch the first bubbles form in the first 20 to 30 seconds. Brush or drizzle a little ghee or butter as soon as you flip, then let the second side finish for another 30 to 60 seconds until the bread shows brown spots and feels cooked through. A fully puffed naan should be flexible, not crisp.
Useful cue: if the dough sits on the heat and nothing happens, the pan probably isn't hot enough yet, or the round is too thick.
If one piece refuses to bubble, don't keep pressing it flat. Give the pan more preheat time on the next round, or roll that piece a little thinner before trying again. A stubborn round usually means the dough is too cool, too dry, or too heavily floured on the surface, and all three slow down the steam that creates the puff.
A clean kitchen towel is the easiest way to keep the batch soft. Stack each finished naan under the towel while the others cook, because the trapped steam helps preserve tenderness without making the crust soggy. For another bread shape with similar shaping logic, pita bread with a little help from D'BakerAid is a useful compare-and-contrast read.
Variations Worth Knowing Garlic Butter Whole-Wheat and Shortcuts
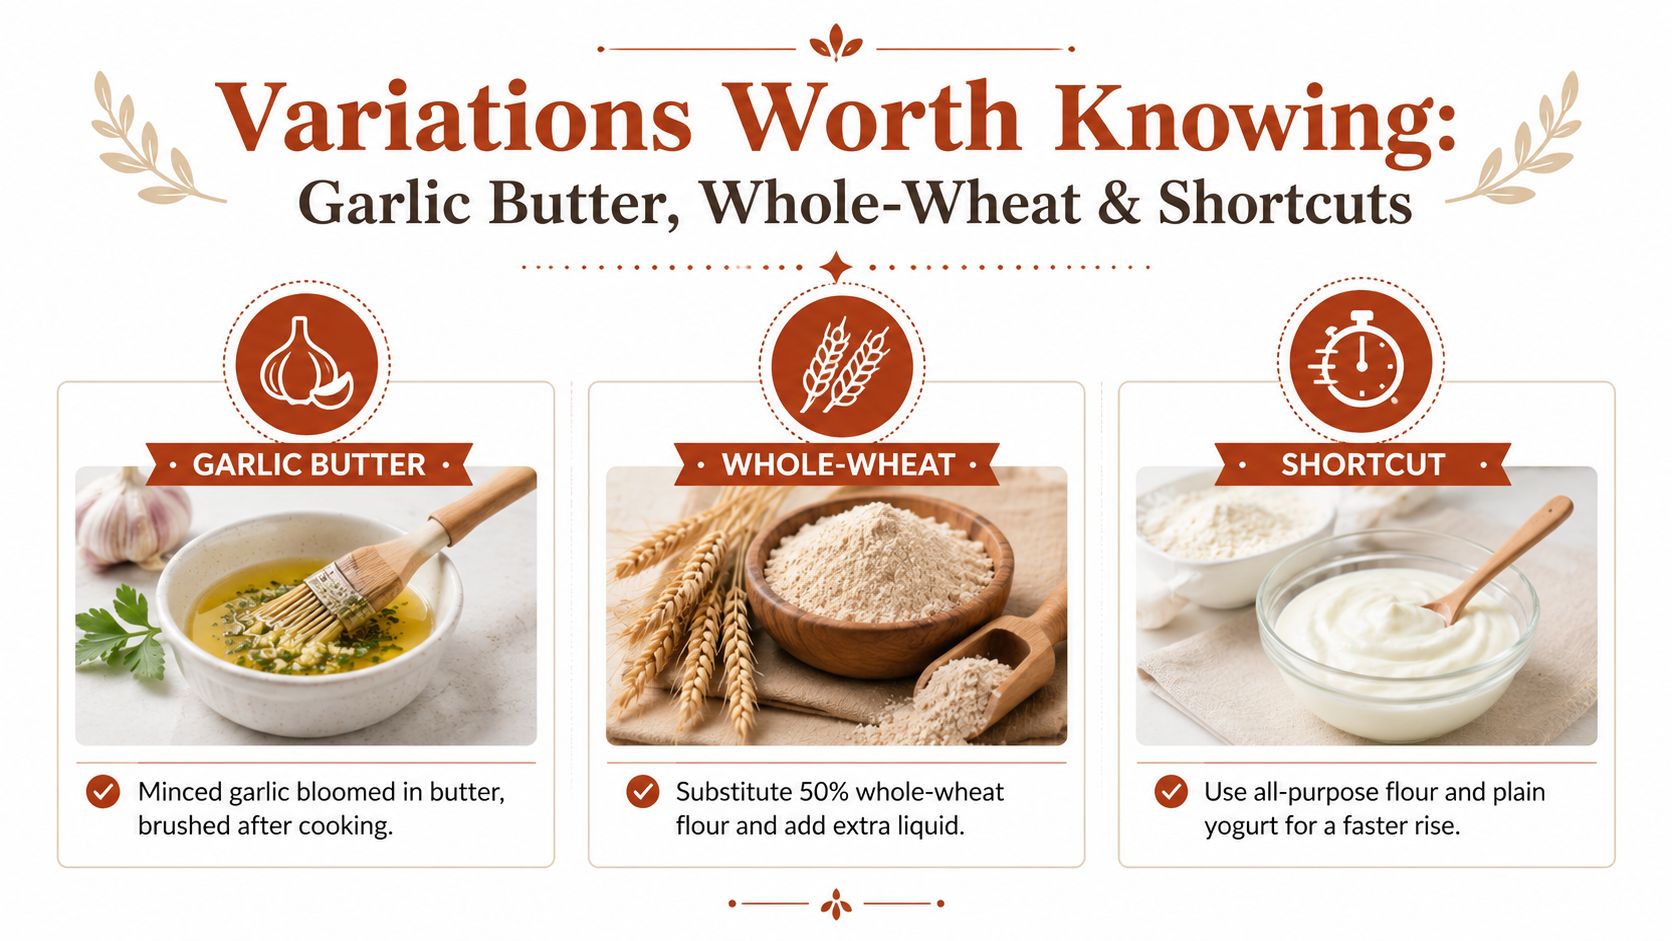
Garlic butter naan is the version many recognize first. The usual finish is simple, minced garlic bloomed in ghee or butter, then brushed onto the hot bread the moment it leaves the pan. That timing matters because the heat opens the aroma, and the butter sinks into the surface instead of sitting on top.
What changes when you swap the flour
Whole-wheat naan works best as a partial substitution. If you replace 25 to 50 percent of the all-purpose flour with whole-wheat, expect a nuttier flavor and a denser, less dramatic puff. That isn't a failure, it's just the cost of using a flour that pulls more water and adds more bran to the dough.
The shortcut trend is more complicated. No-yeast naan, yogurt-only versions, and two-ingredient doughs all move faster, and that speed is why they get attention. What they usually give up is the deeper chew and more reliable blistering that come from proper fermentation.
What shortcuts can't fully replace
A shortcut dough can still make a useful flatbread for busy nights. It just won't behave like traditional naan, and the texture usually lands somewhere between quick flatbread and soft skillet bread. If your goal is repeatable puff, the yeast-based dough is still the more forgiving choice.
High-protein versions and gluten-free versions belong in separate buckets. High-protein doughs can work, but the texture changes because the flour system is different, and gluten-free naan is a different formula entirely. The main thing is to match the dough to your goal instead of expecting one variation to do everything.
The decision is simple. If you want speed, use a shortcut. If you want the most naan-like puff, keep the yeast and give the dough time to rise.
Troubleshooting Flat Dense or Burnt Naan
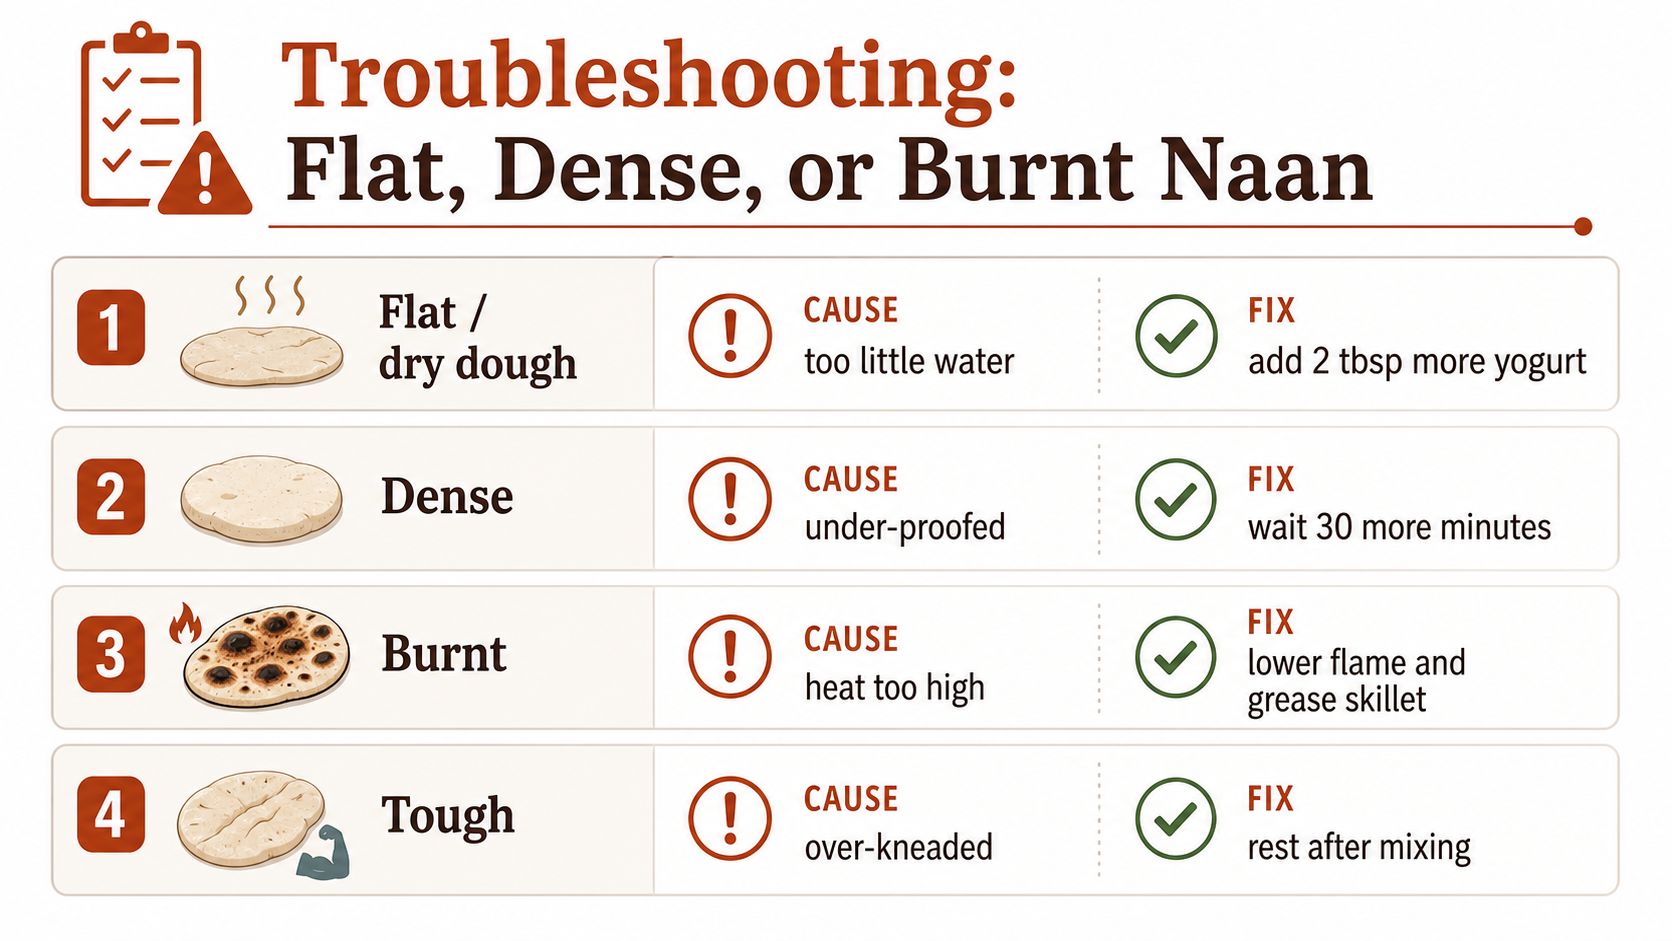
Most naan problems come from the same few places. If the bread doesn't puff, the dough or the heat was off. If it feels bready and heavy, the dough probably didn't hold enough air. If it burns before it cooks through, the surface temperature is too aggressive for the thickness of the round.
Quick troubleshooting guide
| Problem | Likely Cause | Quick Fix |
|---|---|---|
| Refuses to puff | Over-proofed dough or pan not hot enough | Rest a fresh batch a little less and preheat longer |
| Dense and bready | Too little hydration or too much flour | Wet your hands lightly and stop adding flour too early |
| Burnt outside, raw inside | Heat too high for the cook time | Lower the flame slightly and cook a touch longer |
| Dries out fast | No butter finish or no towel cover | Brush immediately and stack under a towel |
The feel of the dough still matters more than the clock. A dough that's too dry will fight you all the way to the pan, and a dough that's over-proofed will look puffy in the bowl but collapse when shaped. That's why controlled proofing and proper heat are the two levers worth fixing first.
For a broader look at why breads rise the way they do in the oven, what is oven spring is a helpful companion read. Leftovers store well if you wrap them once they've cooled, then reheat briefly in a skillet so the surface comes back to life without turning hard.
DBakerAid™ makes precision bread conditions easier to repeat at home, especially when a dough depends on temperature and proofing to puff the way naan should. If you want to move from one-off success to a more reliable routine for bread, pizzas, and other yeast doughs, visit DBakerAid™ and see how the system fits the way you bake.