

You pull a loaf from the oven, tap the bottom, and think, “That should have been better.” Maybe the crust is pale even though the bake felt long. Maybe it browned too fast, then tasted a little harsh. Maybe two loaves from nearly the same dough came out looking like different bakers made them.
That gap usually isn't luck. It's chemistry you can steer.
In bread, the color and aroma of crust come largely from the Maillard reaction in bread, the chain of heat-driven reactions that turns a dry, hot dough surface into something golden, nutty, toasty, and fragrant. The useful part for home bakers is this: once you understand what the reaction needs, you can stop guessing and start adjusting the few levers that matter most.
Table of Contents
- Why Your Crust Browned (or Didn't) Last Bake
- The Chemistry of the Maillard Reaction Explained Simply
- The Six Variables That Control Browning
- Practical Techniques to Encourage Deeper Crust Color
- When Browning Becomes a Trade-Off
- How Precision Fermentation and Steam Shift the Outcome
- Quick Home Experiments to See the Reaction in Action
- Troubleshooting Checklist and Final Bake Notes
Why Your Crust Browned (or Didn't) Last Bake
One baker loads a boule, steams the oven, and gets a handsome amber crust. Another baker uses a similar dough, similar shape, similar timing, and gets a loaf that looks underfinished. Then a third baker overshoots and ends up with a crust that darkens before the loaf feels fully baked inside.
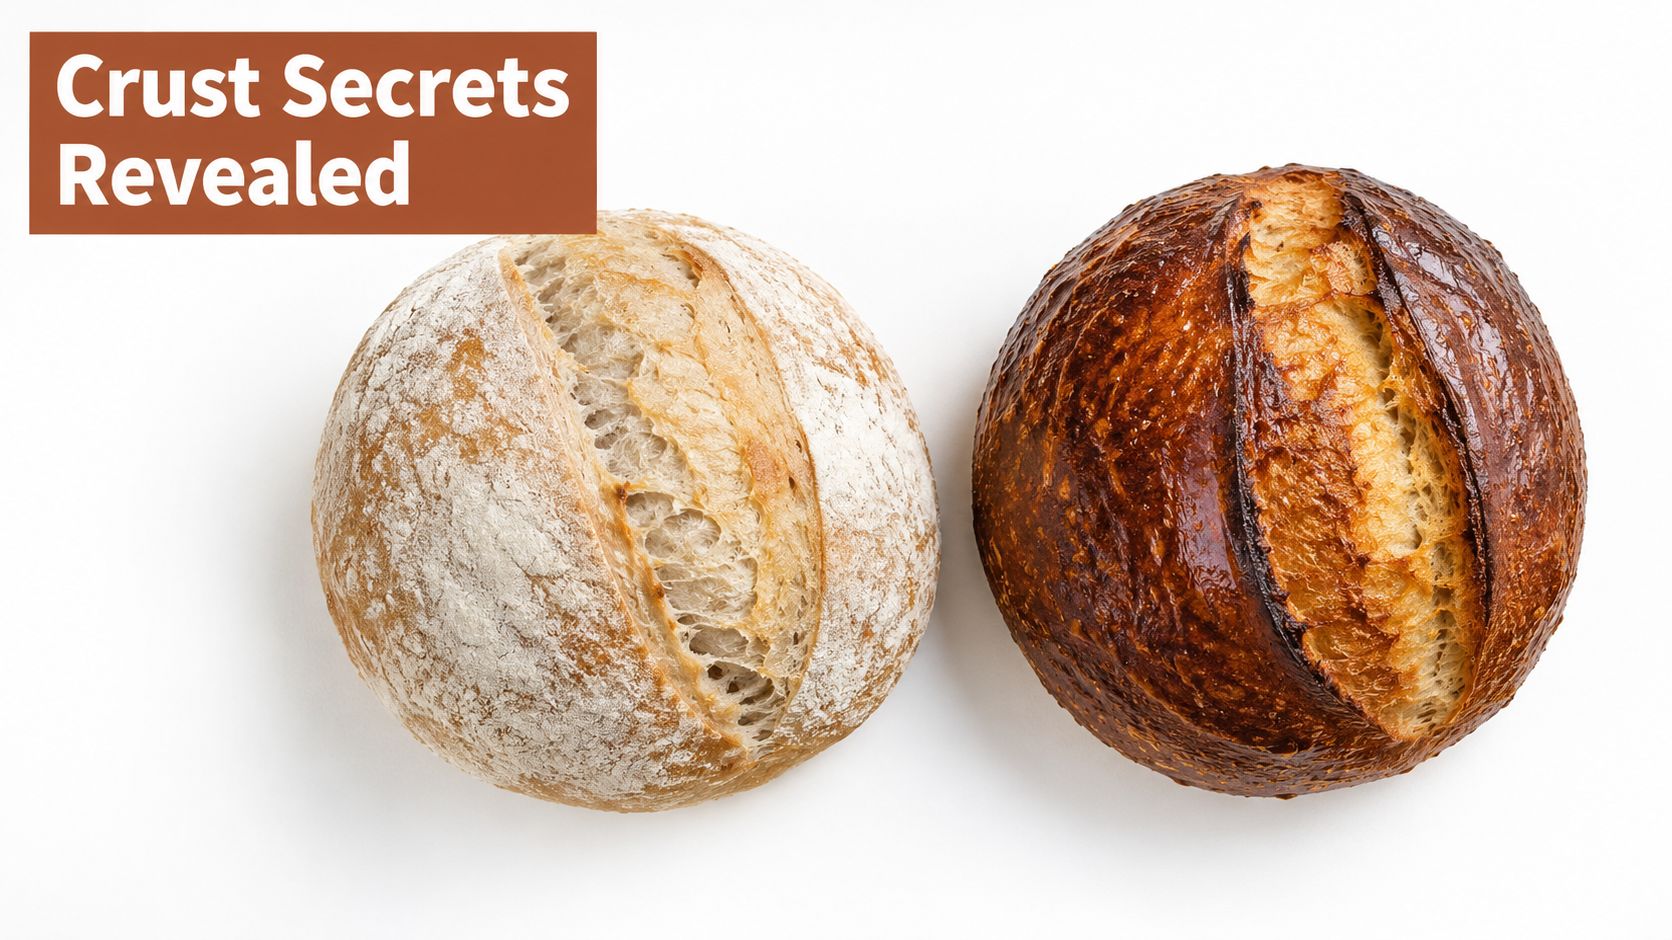
Those outcomes usually come from the same few variables. Surface temperature. Surface dryness. Available sugars. Amino compounds from flour proteins. And timing. If the dough surface stays wet too long, browning lags. If the oven runs cool, browning drags. If the crust dries and heats quickly, color can race ahead.
A baking science explanation from King Arthur notes that steam delays Maillard browning because the dough surface stays near 212°F/100°C early in the bake, below the roughly 280°F/138°C point where browning chemistry really speeds up, which is why bakers often steam first for oven spring and then dry the crust later for color (King Arthur's explanation of steam and browning).
That's why two “same recipe” loaves can behave so differently. One oven vents fast. Another holds moisture. One baker preheats thoroughly. Another trusts the beep. If you've ever suspected your oven runs cool, it's worth using a simple check like this guide to test oven temperature.
Browning is a surface event first. The crumb can be fully baked while the crust still hasn't entered its best browning zone.
The visible crust tells you what happened at the dough's outer few millimeters. That's where the Maillard reaction lives most intensely in bread, not in the center.
The Chemistry of the Maillard Reaction Explained Simply
The easiest way to understand this reaction is to think of toast. A plain slice starts pale. Then the surface dries, heats, and begins building flavor faster than your eyes can track. The smell changes before the color fully does. That's the chemistry waking up.
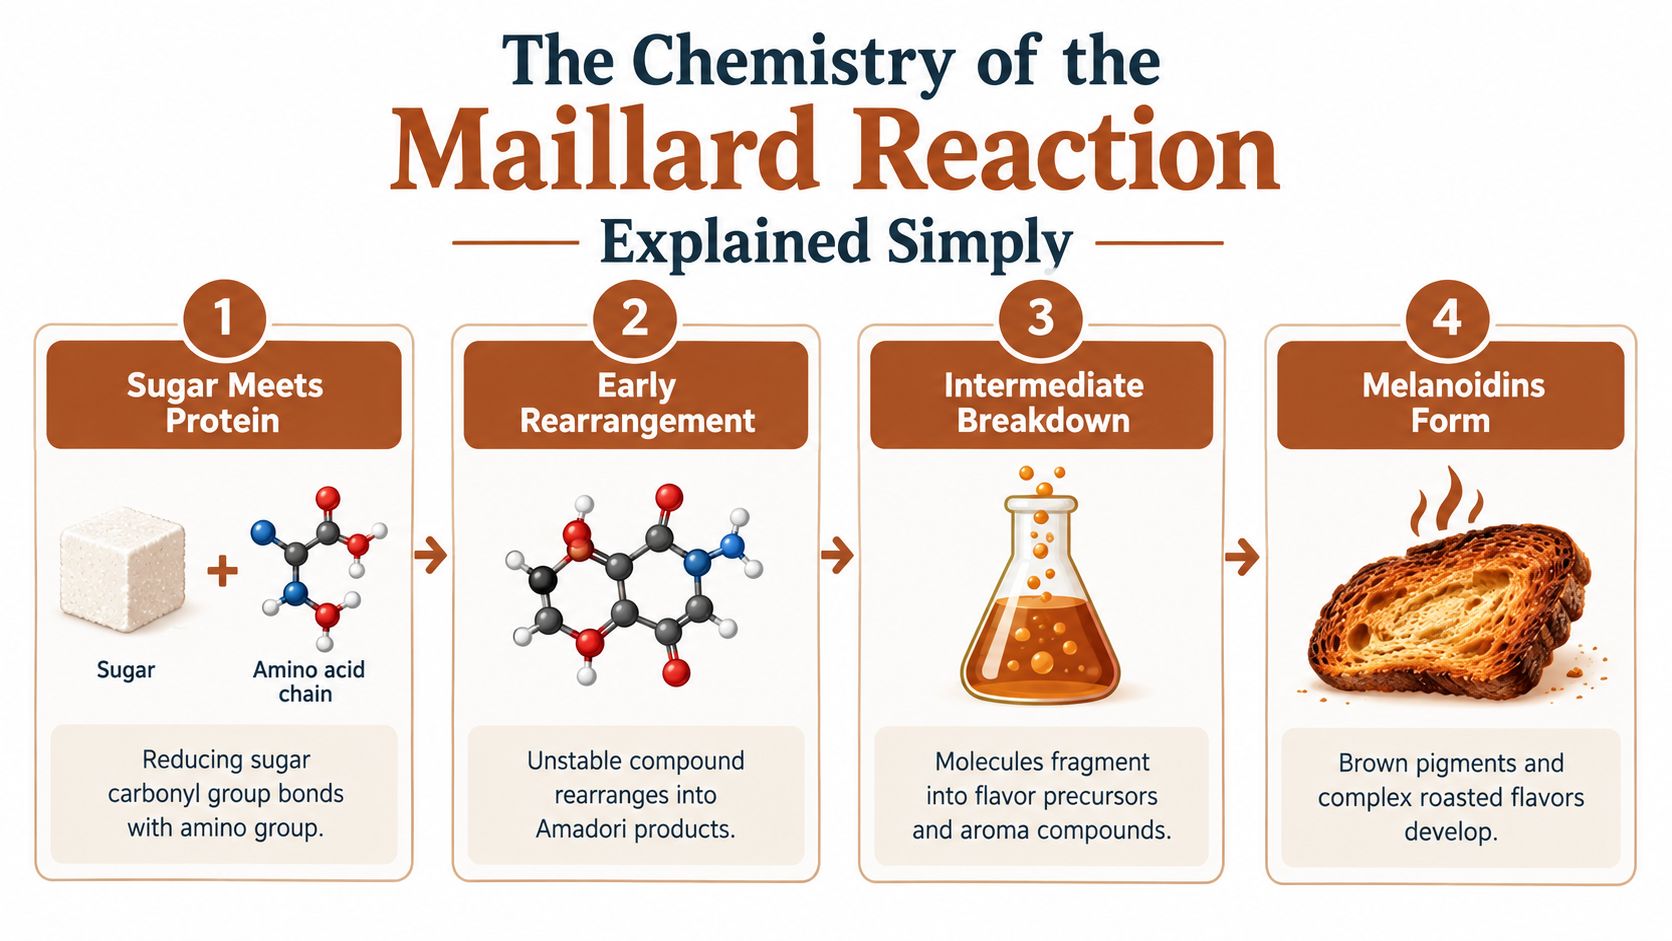
Step one starts quietly
A reducing sugar meets an amino group from an amino acid or protein. In bread dough, both are available. Flour contributes protein, and fermentation plus starch breakdown helps make sugars available.
At first, nothing dramatic appears to happen. Early products form, but they're mostly colorless.
Then the reaction branches
Those early compounds rearrange into what food chemists often call Amadori products. After that, heat keeps pushing them into smaller, reactive fragments. Those fragments create many of the aroma notes bakers recognize as toasted, roasted, malty, or nutty.
Later, some of those fragments combine into larger brown compounds called melanoidins. Those are important because they're part of what makes crust look browned rather than merely dried.
A peer-reviewed bread study found this chemistry much more concentrated in crust than crumb. The crumb contained the Maillard markers Nε-fructoselysine and Nε-carboxymethyllysine at levels 7 times and 5 times lower than the crust, and HMF was detected only in the crust and its model system. The same study also identified intact melanoidin macromolecules with molecular weights of 1.7–5.6 kDa, which shows that bread browning leaves measurable reaction products, not just color on the surface (peer-reviewed crust-versus-crumb bread study).
Here's a useful side note before the terms pile up: this is not enzymatic browning. Bread crust doesn't brown in the oven for the same reason a cut apple browns on the counter.
For a quick visual walkthrough, this short video helps:
Why bread formula matters
Not every dough browns the same way because not every flour gives the same protein backdrop. Stronger flour changes dough behavior, fermentation feel, and the supply of reactive building blocks at the surface. If you want a practical overview of that side of bread structure, this primer on flour protein content is useful.
Practical rule: Browning needs both partners. Sugar alone gives caramel-like behavior. Bread crust's signature flavor comes from sugar meeting protein under heat.
The Six Variables That Control Browning
If you want more control over crust, don't try to manage everything at once. In a home oven, a few variables dominate and the rest fine-tune the result.
The ranking that matters in practice
For most wheat breads, the biggest levers are temperature and surface moisture. After those come time and sugar availability. pH can shift reaction speed, but home bakers usually influence it indirectly through fermentation rather than by treating it like a lab knob. Amino acid concentration matters too, though in ordinary bread formulas it's often less adjustable than the others.
Bread crust is the main Maillard zone because the crust dries to about 5–10% moisture while the crumb stays much wetter. That dry, hotter surface creates the reaction environment, while the wetter crumb suppresses browning. The same research also showed that Maillard-related absorbance rose almost linearly during baking and increased faster at 225°C than at 200°C, confirming a strong temperature effect (bread baking kinetics and crust moisture study).
The six-variable table
| Variable | Effect on Browning | Practical Lever |
|---|---|---|
| Temperature | The strongest trigger. Higher surface heat speeds the reaction once the crust dries. | Preheat fully, use a stone or steel, verify oven accuracy. |
| Moisture | Wet surfaces resist browning because water holds surface temperature down. | Use steam early, then let the crust dry later in the bake. |
| Time | Browning depends on time spent hot after the surface can actually brown. | Extend the dry phase rather than only extending total bake time. |
| Sugars | More available reducing sugars usually support faster color and aroma development. | Use malted flour, a touch of glaze, or fermentation that frees more sugars. |
| pH | Dough acidity changes reaction behavior, often through fermentation effects. | Adjust fermentation style rather than chasing pH directly. |
| Amino acids | Needed for the reaction, but usually not the easiest home variable to manipulate. | Formula changes matter most in enriched or specialty doughs. |
Where readers often get confused
People often say “just bake hotter.” That's incomplete advice. If the loaf stays wet on the surface, more heat won't immediately mean more browning. It may only mean stronger oven spring for a while, then sudden color later.
Another common miss is treating steam as either always good or always bad. Steam is useful early because it delays crust set. But if you keep the surface wet for too long, you also delay the browning you want.
Practical Techniques to Encourage Deeper Crust Color
A good crust is rarely the result of one heroic trick. It's usually a stack of small choices that all push the same chemistry in the right direction.
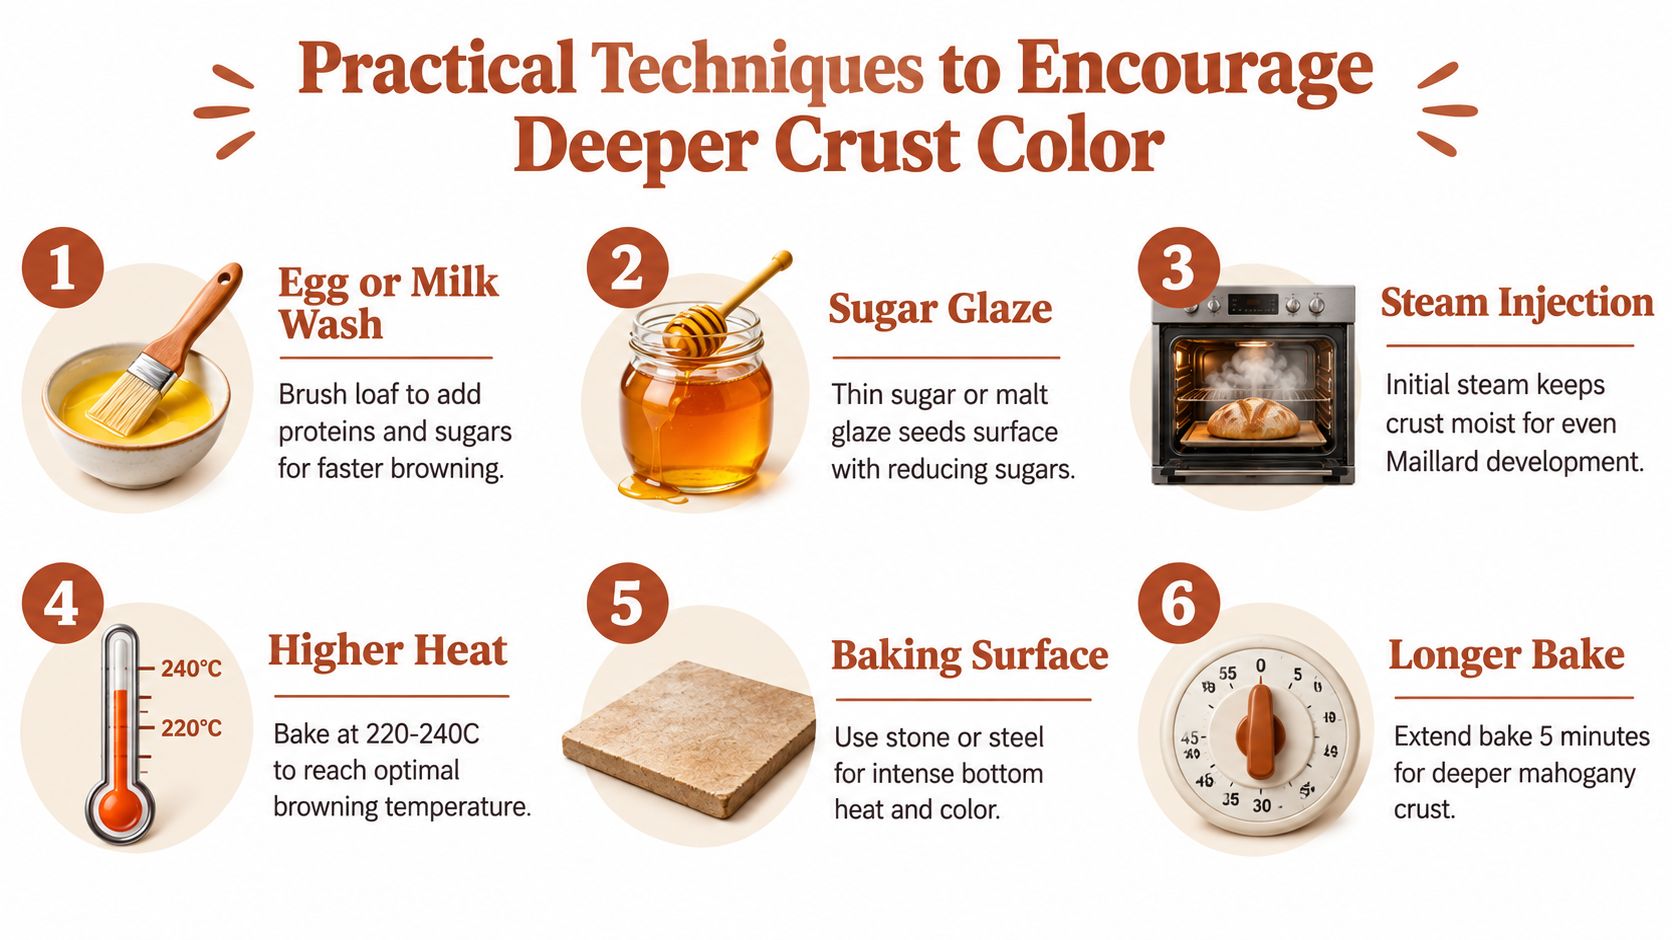
Start with the surface
If your loaf tends to bake pale, the simplest intervention is often on the outside, not inside the dough.
- Egg wash adds proteins and some browning support. It gives a shinier, faster-coloring crust.
- Milk wash can help a loaf color more warmly and a bit more softly.
- Thin sugar or malt glaze seeds the surface with extra browning fuel. Use it lightly, because too much can push the crust from golden to too dark.
Scoring also matters. A cut opens fresh surface area to oven heat. Deeper or more exposed scores often brown differently from a tightly sealed top.
Increase available sugars before baking
An autolyse can help dough organize itself, and a small amount of diastatic malt powder can support sugar availability for browning. Bakers use this carefully because more isn't always better. The point is to support color and fermentation, not to overload the dough.
If you work with high-protein doughs at home, remember they won't always rise like soft sandwich dough. Dough can be denser, stiffer, and slightly tacky, and it may rise about 50–75% rather than doubling. Finished loaves often have a tighter, more uniform crumb, a soft but heavier feel, and a crust that browns a bit faster. That's especially relevant if you're making high protein bread or a homemade protein bread with whey, pea, soy, or collagen plus vital wheat gluten. In those formulas, color can move quickly even when volume stays modest.
Typical sliced bread is much lower in protein by comparison. Ordinary white or wheat bread is often about 2–4 grams of protein per slice, while dense multigrain, seeded, sprouted, or commercial higher-protein loaves are often around 5–12 grams per slice depending on formulation and slice size (bread protein overview).
Use steam on purpose, then remove its protection
Steam is a timing tool. Early in the bake, it helps expansion and delays crust hardening. Later, you want the opposite.
Try this pattern:
- Load into a well-heated oven so the dough gets strong initial energy.
- Use steam early if you want better oven spring and thinner early crust.
- Vent or uncover later so the surface dries and color can deepen.
- Finish a little longer if needed once the crust is dry enough to brown well.
If a loaf looks pale late in the bake, ask one question first: is the surface still carrying moisture?
A Dutch oven, a covered baker, or an added steam source can all help. What matters is not the gadget itself but the transition from humid beginning to drier finish.
When Browning Becomes a Trade-Off
A darker crust usually tastes bolder. That part is true. But “darker is always better” isn't.
Recent review coverage on bread points out that acrylamide is a Maillard by-product formed during baking, and that mitigation is better handled through formulation choices such as sourdough or exogenous lactic acid bacteria, which reduce precursors and alter reaction pathways. A 2026 review frames bread acrylamide mitigation around precursor control and fermentation strategy rather than a simple time-and-temperature rule (2026 bread acrylamide review).
A simple way to think about crust targets
You don't need to fear every dark edge. You do need to stop treating near-black crust as the goal.
| Crust Color | Flavor Intensity | Maillard Markers | Acrylamide Risk | Best For |
|---|---|---|---|---|
| Light golden | Mild, wheaty, less roasted | Lower | Lower | Soft sandwich loaves, delicate enriched breads |
| Medium brown | Balanced toast, nutty notes | Moderate | Moderate | Everyday hearth loaves |
| Deep brown | Strong roasted character | Higher | Higher | Rustic loaves when bold crust is wanted |
| Near-black or charred | Bitter, harsh, smoky | Very high surface browning | Highest practical concern | Rarely worth aiming for |
What shifts the curve
Formulation changes matter. Fermentation style matters. Sweetener choice matters. Some newer bread work shows that allulose, xylitol, and mogroside don't just make bread brown more or less. They can change intermediates, aroma profile, and sensory perception, which is more useful than the old “sugar helps browning” shortcut (overview of sweetener substitution and Maillard behavior in bread).
That's why the better question isn't “How dark can I get it?” It's “What crust color gives me the flavor I want without pushing the by-products I don't?”
How Precision Fermentation and Steam Shift the Outcome
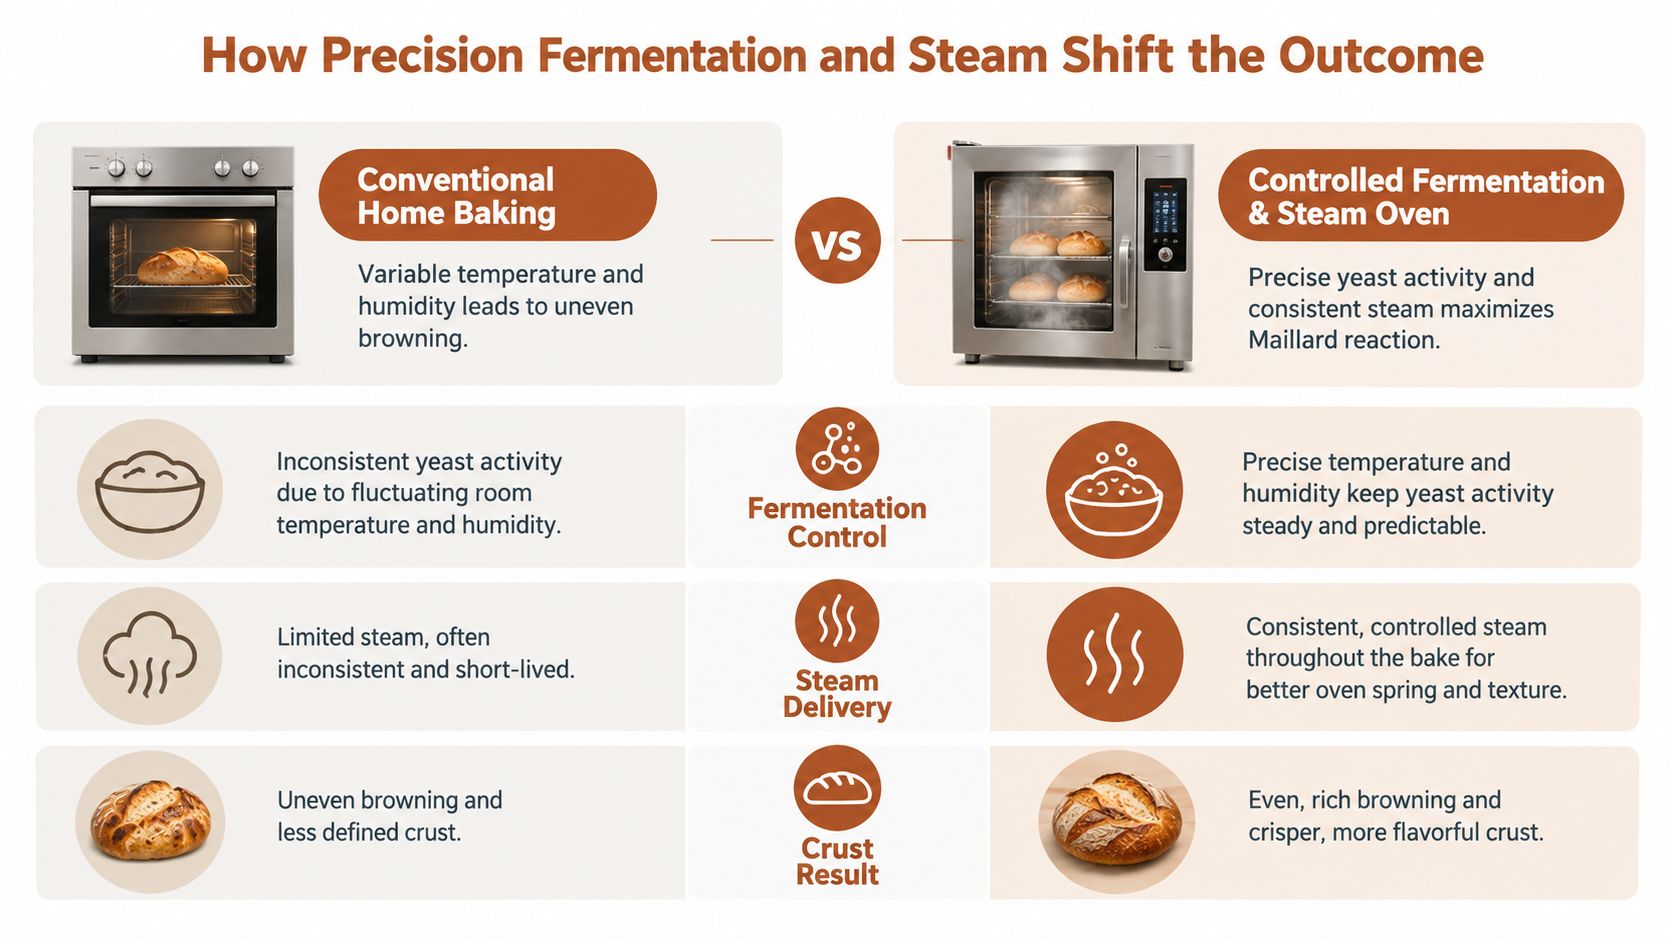
Some loaves brown inconsistently before they ever reach the oven. The dough wasn't in the same condition from bake to bake, so the crust chemistry didn't start from the same place.
Fermentation changes the surface chemistry
A dough that ferments predictably develops a more predictable sugar profile and acidity. That matters because the oven isn't creating crust from nothing. It's acting on whatever fermentation left behind.
This becomes especially obvious in specialty doughs. If you make high protein sandwich bread at home, the dough often feels denser and rises less dramatically than standard pan bread. Precision fermentation helps there because harder doughs are less forgiving when proofing drifts too cool or too warm.
For people tracking macros, this is more than a texture issue. A labeled protein bread may deliver about 10–15 grams of protein per slice, compared with roughly 2–5 grams for standard sliced bread, or around 2× to 4× the protein of typical white bread on a slice-by-slice basis (protein bread nutrition comparison). That makes consistency matter. If a protein bread recipe proofs poorly, the loaf can feel especially heavy.
Steam method changes color timing
Steam delivery also shapes when browning begins. A covered pot traps moisture close to the loaf. A tray of boiling water humidifies the oven more loosely. An added steam device gives more deliberate control over the first phase.
What bakers see in practice is straightforward:
- Dutch oven or covered baker usually gives strong oven spring and delays early color.
- Open bake with steam pan can work well, but the humidity window is less controlled.
- No steam at all often sets the crust early, which can limit expansion and lead to uneven browning.
If you want to compare those approaches in practical terms, this guide on how to bake with steam gives a useful home-baker view.
Consistent crust starts before the bake starts. Fermentation gives the oven the raw material that browning chemistry uses later.
There's also a market reason so many bakers care about this category now. The US high-protein bakery market is about ~$1.49B in 2024 and projected to reach ~$2.25B by 2030 with 7.1% CAGR, with bread making up about 52%, or roughly ~$770M of the US sub-market. Globally, high-protein bakery is about ~$4.8B and projected to reach ~$9.3B by 2035, with the US at about 33.5% of global. Those are projections, not current global US equivalencies.
Quick Home Experiments to See the Reaction in Action
You don't need a lab to learn this reaction. You need one dough, a notebook, and enough patience not to change five things at once.
Try one-variable tests
Run these as mini loaves, rolls, or divided dough pieces.
-
Surface wash test
Brush one piece with water, one with milk, and one with egg wash. Bake them together. Watch which one colors first, and note the aroma difference as the bake finishes. -
Temperature split test
Bake similar pieces hotter and cooler. Don't focus only on final darkness. Notice when color starts, how quickly it moves, and whether the darker loaf tastes balanced or pushed. -
Steam timing test
Cover one loaf longer and uncover another earlier. The loaf exposed sooner should begin coloring sooner because its surface dries sooner.
Keep the observations simple
Use a short scorecard after baking:
- Color: pale, golden, brown, dark brown
- Aroma: wheaty, toasty, nutty, sharp
- Crust feel: thin, leathery, crisp, thick
- Flavor: mild, balanced, bold, bitter edge
A useful experiment for high-protein bakers
If you're testing a high protein bread machine setup or a whey protein bread recipe, compare it with a standard loaf from the same pan size. The point isn't volume. It's how formula changes affect browning speed, crust thickness, and final slice quality.
Among tested high-protein loaf styles using protein isolate plus vital wheat gluten and wheat flour, a loaf can land around ~170g of protein per loaf, ~24g per 100g, and about ~10–11g per slice depending on recipe, with a 3-slice meal clearing roughly ~30g protein from the bread alone. Examples include whey, pea, soy, seeded whey, and collagen versions, with per-slice values around ~10.2g to ~11.5g depending on the formula. Those figures come from D'BakerAid recipe data.
That's also why some gym-goers compare protein bread vs regular bread slice by slice instead of loaf by loaf. The practical question is often, “Does three slices get me to a useful meal target without a shake?”
Troubleshooting Checklist and Final Bake Notes
When crust goes wrong, the fix usually becomes obvious once you match the symptom to the variable.
Fast diagnosis checklist
-
Pale crust after a full bake
Likely causes: low actual oven heat, too much retained surface moisture, weak late dry phase.
Try: longer preheat, less prolonged steam, more uncovered finish. -
Dark crust with underbaked interior
Likely causes: heat too aggressive for loaf size or pan type, sugar-rich surface, or thin loaf sections overcoloring first.
Try: lower the heat slightly, reduce sugary washes, shield the top if needed. -
Uneven browning
Likely causes: oven hot spots, uneven shaping tension, or poor steam distribution.
Try: rotate if your oven requires it, shape more evenly, simplify the steam setup. -
Bitter or burnt finish
Likely causes: overextended dry phase or pushing color past the flavor sweet spot.
Try: pull earlier and aim for brown instead of near-black.
A bake-note template worth keeping
Write these down after each loaf:
| What to note | What to record |
|---|---|
| Dough behavior | Soft, stiff, tacky, gassy, sluggish |
| Proof condition | Under, ready, slightly over |
| Surface before loading | Dry, slightly damp, washed |
| Steam approach | Covered, pan steam, none, uncovered timing |
| Crust result | Pale, golden, brown, dark |
| Flavor result | Mild, balanced, bold, bitter edge |
| Next adjustment | One change only |
A few details matter more than people think. If you're making homemade high-protein bread, expect a tighter crumb and a loaf that may brown a bit faster. If you're asking how much protein in bread, standard slices are often much lower than specialty formulas, while dedicated homemade versions can be built to land around ~10–11g per slice depending on recipe and slice thickness. And if you're asking is protein bread worth it, the honest comparison is cost per gram of protein, not just shelf price.
For D'BakerAid high-protein loaves, the stated cost to make runs about ~$3.56 to ~$6.81 per loaf depending on protein choice, about ~$0.22–0.43 per slice, and roughly ~2–3¢ per gram of protein versus about ~5.2¢ for retail protein bread, or about half the cost per gram of protein. The honest caveat is that this isn't “pennies” territory because protein powder drives cost. On a slice basis, the comparison provided is plain white at ~2.5g, whole wheat at ~3.5g, Dave's Killer or Kodiak at ~5–6g, better retail protein bread at ~7g, and D'BakerAid versions at ~10–11g depending on recipe.
The larger lesson stays simple. The Maillard reaction in bread isn't a mystery effect that shows up when it feels like it. It's a controllable process. When you manage fermentation, surface moisture, steam timing, and final drying on purpose, your best crust stops being an accident.
DBakerAid™ is built for bakers who want that kind of control, especially when tougher doughs make browning and proofing less predictable. Its two-stage system handles the hard part of fermentation and proofing so high-protein and specialty loaves come out more repeatably, and the optional steam setup helps you control the wet-first, dry-later bake pattern that drives better crust. See what it offers at DBakerAid™.