

The kitchen is warm, the starter jar looks lively, and the recipe says four hours. You check the dough at four hours and it has barely moved. Last week the same formula was already slack and sour by hour three. That is the main challenge with how to make naturally leavened bread: the clock does not travel well from one kitchen to the next.
A living mix of wild yeast and lactic-acid bacteria sets the pace. Warm dough acidifies and rises faster. Cool dough needs more time and still may not match yesterday's loaf. Read temperature, expansion, smell, and feel together, then move on only when those signs agree.
Table of Contents
- Ratios and Timings for Naturally Leavened Bread
- Build a Starter in Seven Days
- Mix, Autolyse and Fold the Dough
- Read Bulk Fermentation and Shape the Loaf
- Score and Bake for Maximum Oven Spring
- Diagnose a Flat, Dense or Gummy Loaf
- Plan Your First Naturally Leavened Loaf This Week
Ratios and Timings for Naturally Leavened Bread
Treat the table below as a starting map, not a rule. A warm room shortens every row. A cool one stretches them. Hydration, starter strength, and flour change the feel of the dough even when the weights stay the same.
| Stage | Ratio or hydration | Temperature | Time | Ready when |
|---|---|---|---|---|
| Starter feeding | 1:1:1 starter, flour and water by weight | 24–26°C | every 12 hours at room temperature; weekly in the fridge | doubles within 4–6 hours of a feed |
| Dough mix | 70–80% water to flour, starter at 10–20% of flour weight, 2% salt | 21–28°C | 30–60 minute autolyse, then mix | flour fully hydrated and dough cohesive |
| Bulk fermentation | same dough | 24–27°C | about 4–6 hours with folds | dough up 50–75%, bubbles visible, domed top |
| Final proof | shaped dough | 22–24°C room temperature or 4°C fridge | 1–2 hours at room temperature or 8–16 hours cold | poke springs back slowly |
| Bake | shaped loaf | oven preheated to 232–260°C with steam | 20 minutes covered, then 20–25 minutes uncovered | deep brown crust and 96–99°C inside |
Starter feeding at equal weights of culture, flour, and water keeps the mix at 100% hydration and easy to judge. A peak inside 4–6 hours means the culture is strong enough to leaven dough. If it takes all day, the later rows will run late too.
Dough mix sits in a practical band of 70–80% water. Starter at 10–20% of flour weight and 2% salt is enough lift without turning the dough into a sour puddle. Work the weights with a baker's percentage calculator so a 500 g flour mix and a 1 kg mix stay in proportion.
Bulk at 24–27°C for about 4–6 hours, with folds, is the row that moves most when the room changes. Final proof is either a short room-temperature rest or a cold retard. The bake needs a hot, steamy oven, then a dry finish.
Three checks tell you the schedule is working. The starter doubles on time. The dough grows by about half to three-quarters before shaping. The baked centre is fully set, not gummy.
Wheat sourdough is not gluten-free. Long fermentation changes acidity and flavour. It does not make the loaf safe for someone with celiac disease.
A 2025 consumer study in RSD Journal found that only 53.6% of people correctly identified the specific characteristics of sourdough, even though many link natural fermentation with greater healthiness. Treat this loaf as wheat bread. Keep it away from a gluten-free cutting board if someone in the house cannot eat wheat.
Build a Starter in Seven Days
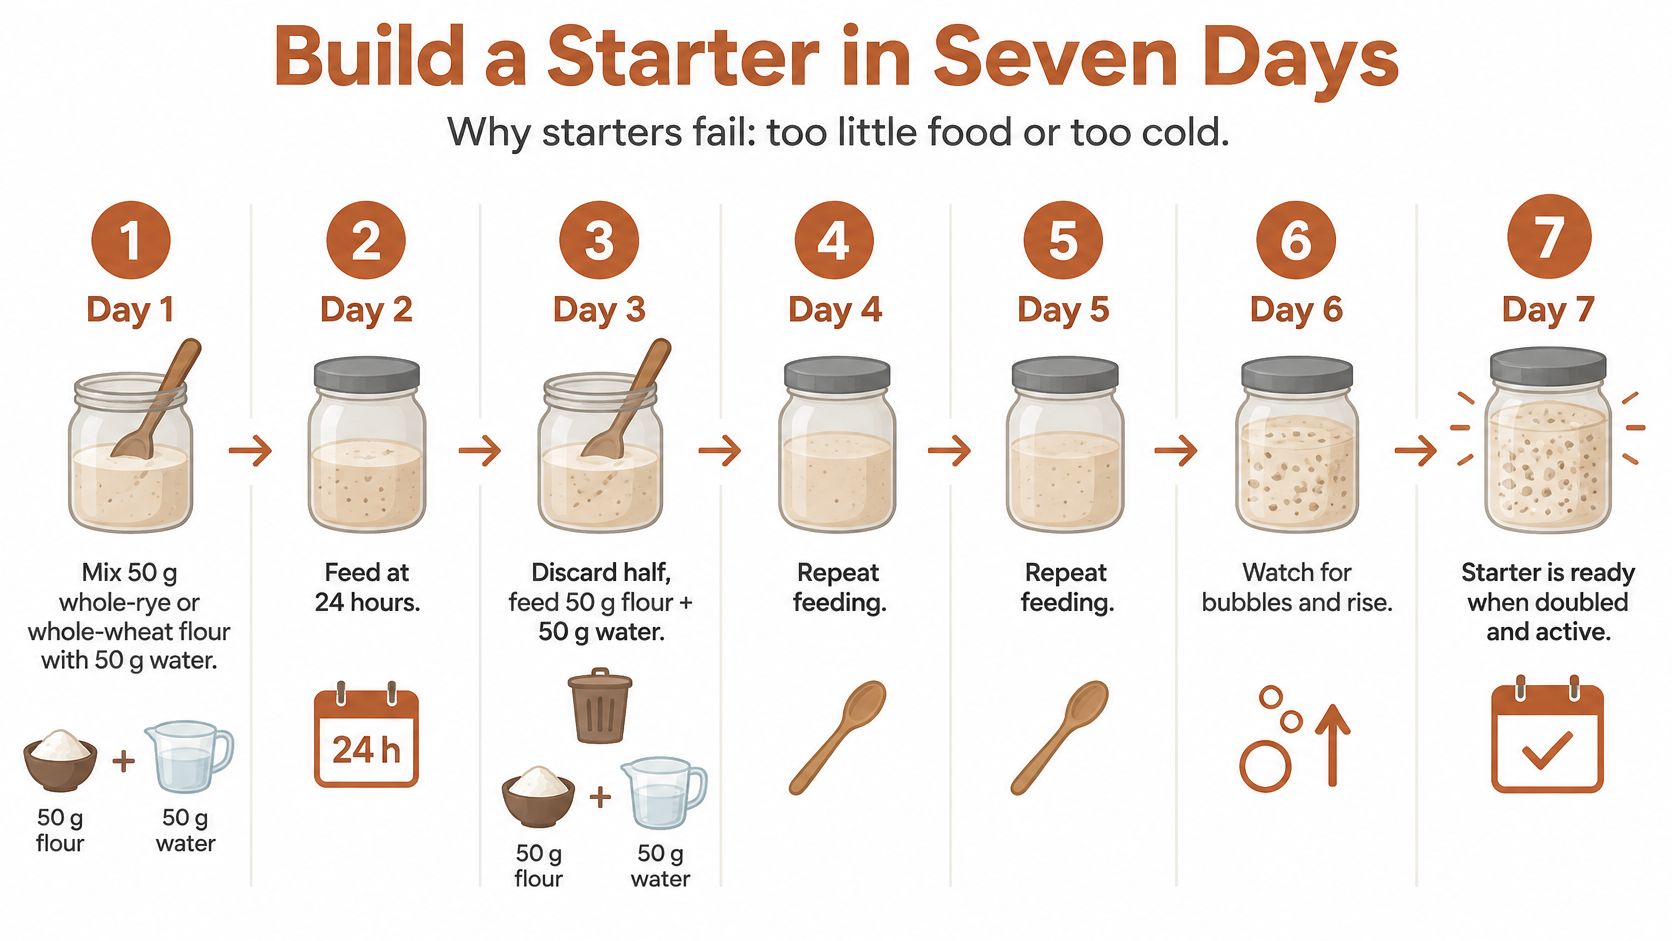
Most first starters fail for a dull reason. They are fed too little, or the jar sits too cold. Wild yeast on the flour needs fresh food and a steady 24–26°C. Cold tap water can push the rise back by hours. Skipping the discard leaves a jar of hungry paste that smells sharp and never doubles.
Days 1 through 5
- Day 1. Mix 50 g whole-rye or whole-wheat flour with 50 g water at 24–26°C in a clean jar. Cover loosely. Whole grain carries more microbes than white flour, so the culture has something to colonise. Leave it at room temperature. Expect little more than a thicker batter and a faint grain smell.
- Days 2–5. Refresh every 12 hours. Keep 50 g, discard the rest, and feed 50 g flour plus 50 g water. A 2025 study in Processes refreshed sourdough cultures every 12 hours for the first 5 days before a much hotter, shorter dough phase. You are only building the culture here. Stir until no dry flour remains. Mark the level with a rubber band so the rise is obvious.
Early bubbles can be bacteria, not a baker's yeast. A sweaty or nail-polish smell on day 3 or 4 is common. Keep the 12-hour rhythm. Do not bake with it yet.
Days 5 through 7 and storage
- Days 5–7. Once you see bubbles through the jar and a sour, yeasty smell, move to one feed a day. Check the height a few hours after each feed. If the top collapses before you look, you missed the peak. Feed a little earlier next time.
- Ready. The starter doubles within 4–6 hours of a feed and the top stays domed rather than falling in. It should look aerated and stretch slightly, not sit like paste.
A float test is a bonus, not the decision. Drop a small spoonful in water. If it floats, the culture is airy. If it sinks but still doubled and smells clean, trust the rise.
Fridge storage is one feed a week. Before a bake, give a warm-up feed and wait about 12 hours, or until it doubles again. A grey liquid on top is hooch from hunger. Pour it off, then feed. Pink, orange, or fuzzy growth means you throw the jar out and start over.
Practical rule: If the kitchen is below 21°C, set the jar in a warmer spot. More flour will not fix a cold culture.
Mix, Autolyse and Fold the Dough
Weigh every ingredient and write it down before the flour hits the water. A cup of flour can swing by tens of grams, and that swing is why one loaf feels silky and the next feels like clay.
Illinois Extension puts a useful handling range near 21–28°C. The same technical review notes dough mixed around 70–90% hydration, and fermentation-plus-proofing times running from about 30 minutes to 20 hours or more. That spread is why a batch log beats a copied clock time.
Autolyse, then salt and starter
- Combine flour and water and rest 30–60 minutes. That rest is the autolyse. Flour hydrates, gluten starts to form, and you skip a long knead. The dough should look shaggy at first and smoother by the end, with no dry pockets.
- Add starter at 10–20% of flour weight and 2% salt. Pinch and fold until the dough is cohesive. Salt tightens gluten and slows fermentation slightly, which is useful in a warm kitchen. Starter brings the microbes. Neither belongs in the water-and-flour rest if you want that rest to do its job.
At 80% hydration the dough feels sticky. That stick is water, not failure. Wet your hands and use a bench scraper. Dry hands tear the surface and make you add flour you did not plan to add.
Folds and the log
- Rest 30 minutes, then stretch and fold every 30 minutes for the first two hours, and hourly after that. Lift one side, pull it up, and fold it over. Turn the bowl and repeat three more times. Folds line up gluten without the heat and tearing of a hard knead.
- Stop when the dough holds a shape, feels elastic, and resists tearing when you stretch a corner. A windowpane the size of a postcard is enough. If it rips immediately, give it one more fold and another rest.
What you log matters more than a perfect paragraph of notes.
- Flour type: bread flour, whole wheat, or a rye share.
- Hydration and starter percentage: written as weights, not "a splash."
- Dough temperature at mixing: a probe in the centre, not the room guess.
- Time of each fold: so the next bake can drop or add a set.
Bulk readiness, including the risk of going too far, is a separate judgment from mixing. Get the dough strong and recorded first. You will read expansion and shape it once the dough, not the timer, says it is time.
Read Bulk Fermentation and Shape the Loaf
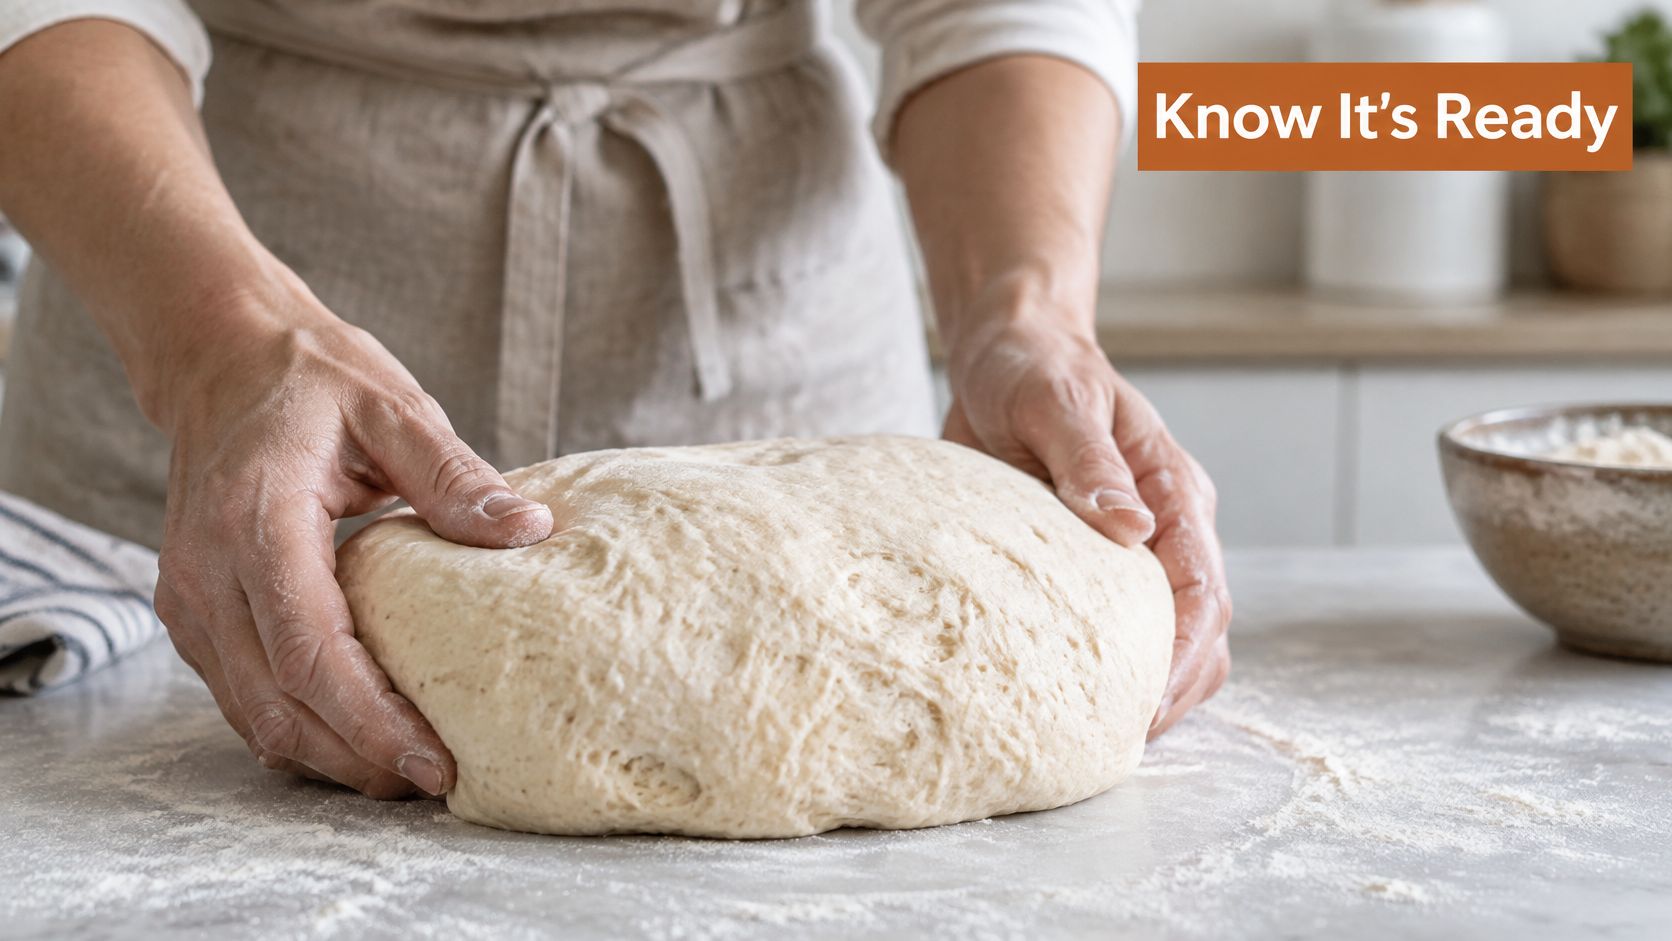
Ignore the "proof until doubled" habit. Naturally leavened dough is ready when it has grown about half to three-quarters, shows bubbles at the surface and along the bowl edge, wobbles like a cushion when you nudge the bowl, and holds a domed top with only slight stickiness. The smell should be mildly tangy and yeasty, not sharp like vinegar.
At 24–26°C, expect roughly 4–6 hours. A cool kitchen can take about twice that. A warm one can finish in about half. A peer-reviewed review reports sourdough fermented 4 hours at 30°C typically reaching a pH of 4.51–4.73, while 10 hours dropped pH to about 3.30–3.50. Reaching a workable production pH took about 11 hours at 25°C but only 9 hours at 35°C. Warmer dough acidifies faster. Cooler dough needs more time. An overlong ferment turns the dough acidic and weak, so it slumps and loses oven spring.
Shape before the dough slumps
- Turn the dough onto a lightly floured bench. Use the scraper. Do not punch the gas out.
- Pre-shape into a round and rest 20–30 minutes, uncovered. The skin relaxes so the final shape does not tear.
- Shape a tight boule or batard. Fold the edges to the centre, then roll the dough so the seam closes underneath. Tension on the outside is what holds height.
- Place it seam-side up in a floured banneton. Rice flour on the liner stops sticking better than more wheat flour.
The poke test
Flour a fingertip and press about a centimetre into the side.
- Springs back slowly and leaves a shallow dent: bake it.
- Springs back at once: it needs more time.
- The dent stays as a hole: it is overproofed. Bake it anyway, but expect less height, and shorten the next bulk.
A cold proof at 4°C for 8–16 hours fits a workday. The dough keeps fermenting slowly. Judge it in the morning with the same poke, not by how long it sat in the fridge.
The short clip below shows the hand position for a tight skin without degassing the dough.
Score and Bake for Maximum Oven Spring
A loaf that enters a cool oven, or an oven with weak steam, sets its crust before it can rise. Heat and moisture are the job. Scoring only directs a rise that the oven allows.
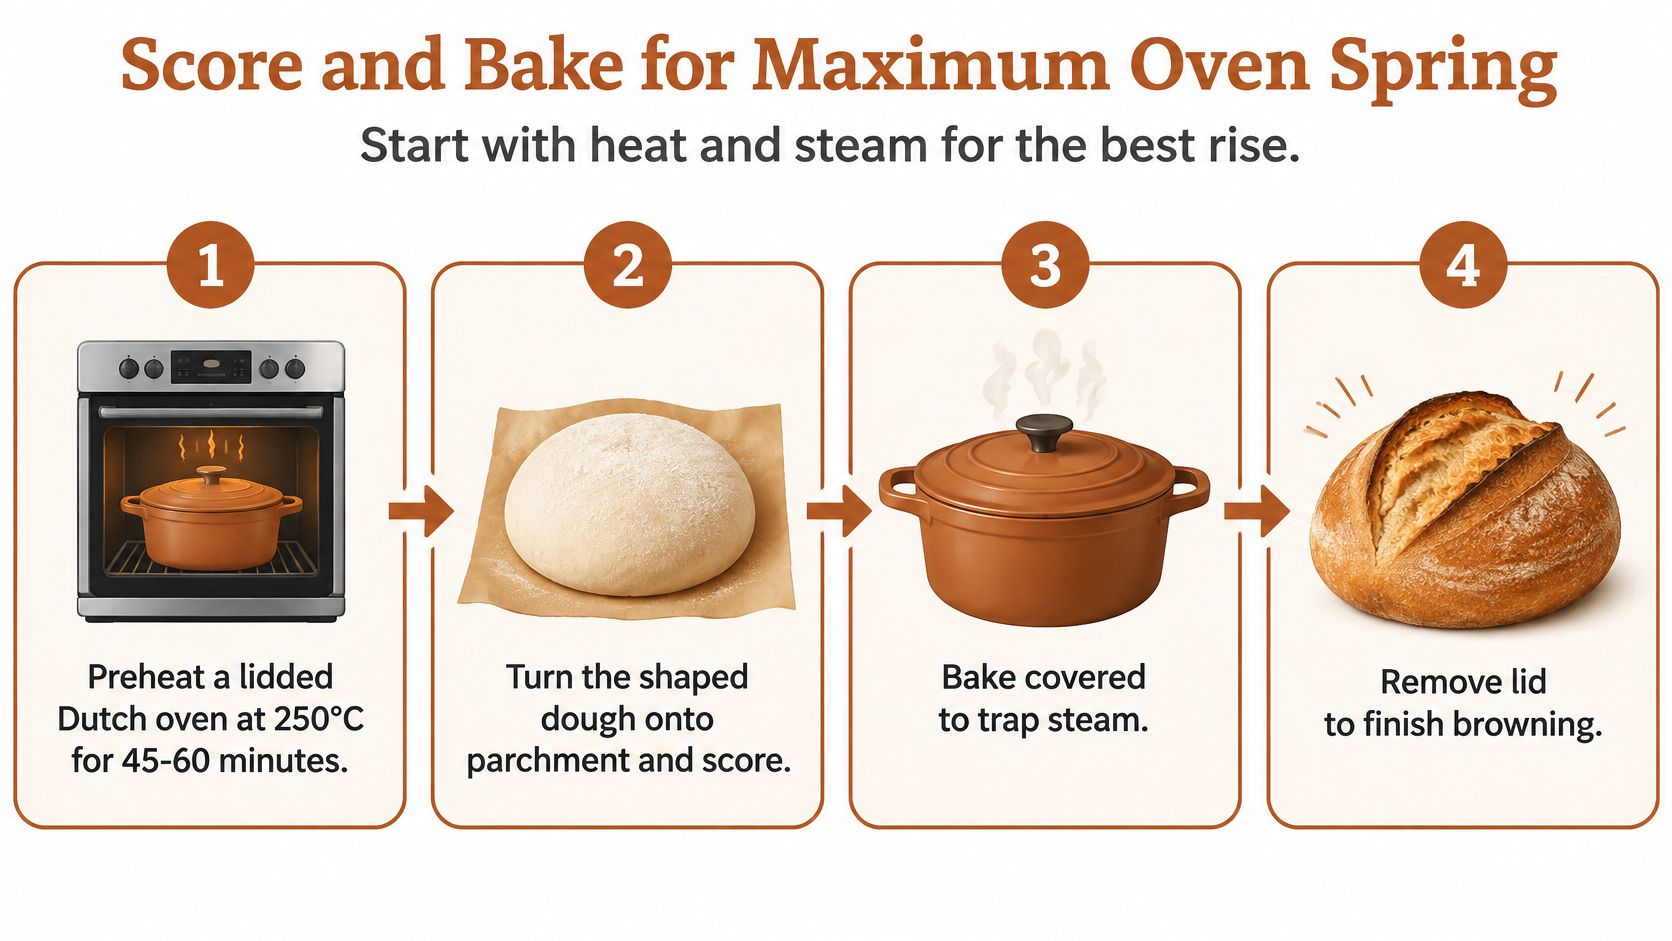
King Arthur Baking describes a fully preheated oven, typically around 232–260°C, a scored loaf, and steam that keeps the surface flexible, delays the crust, and gelatinizes surface starch for a glossy finish. A covered pot is the simplest home version of that steam.
Dutch oven sequence
- Preheat a lidded Dutch oven at 250°C for 45–60 minutes. The pot, not just the air, has to be hot.
- Turn the dough onto parchment. Score at about 45 degrees and roughly 1 cm deep, in one confident cut. Hesitant scratches seal up. For slash patterns that open cleanly, use these bread scoring techniques.
- Lower the parchment and loaf into the pot, cover, and bake 20 minutes. The lid traps water the dough releases.
- Uncover, drop the heat to 230°C, and bake 20–25 minutes until the crust is deep brown.
- Probe the centre. You want about 96–99°C.
- Cool on a rack for at least one hour. The crumb finishes setting as steam leaves. Cutting early collapses that set and turns the centre gluey.
Open oven and the mistakes that flatten a loaf
No Dutch oven? Load the loaf onto a preheated stone and add steam at the same moment, from a pan of boiling water or a preheated tray. Vent that steam once the loaf has expanded and the crust starts to colour. A dry finish is what crisps the outside. Steam held too long leaves the crust dull or leathery.
Opening the lid early dumps the moisture while the loaf is still expanding, so you get a shorter, denser bread. Scoring after a long rest on the counter lets the skin dry and tear at random. Slicing while hot wastes the hour you waited through the bake.
Higher hydration can give a thinner crust, but only if the dough was strong and the fermentation ended on time. Wet, weak dough spreads in the pot no matter how good the steam is.
Diagnose a Flat, Dense or Gummy Loaf
The loaf that spreads on the peel is the one bakers see most. It was either fermented too long or mixed too wet. Both feel slack. The fix is not more flour on the bench.
| Symptom | Likely cause | Fix |
|---|---|---|
| Loaf spreads flat | Overproofed dough or too much water | Shorten bulk, tighten shaping and cut water by 2–3% |
| Dense crumb, little oven spring | Underproofed dough or weak starter | Extend bulk and feed the starter at its peak |
| Gummy centre | Underbaked or cut while warm | Bake to 96–99°C and cool at least one hour |
| Sharp, sour flavour | Over-fermented or fermentation too warm | Shorten bulk or ferment in a cooler spot |
| Soft, dull crust | Steam held too long late in the bake | Vent the lid for the last 15–20 minutes |
| Sluggish starter, no bubbles | Cold or underfed starter | Feed twice daily at 24–26°C for 2–3 days |
Some fixes show up on the next bake. Less water, a shorter bulk, a tighter shape, and a full cool-down are one-loaf changes. A sluggish starter is not. It needs two or three days of twice-daily feeds before you trust it in dough.
Change one variable per bake and write that change in the log. If you cut water and also shorten bulk, you will not know which move fixed the spread.
Same feed, different jar
Two starters on a 1:1:1 feed can still diverge because temperature shifts the balance between wild yeast and lactic-acid bacteria. University of Illinois Extension places useful activity broadly around 70–82°F (21–28°C). Warmer conditions favour acid. A jar held near 30°C can taste sharp and lift weakly. A cooler jar rises slowly and stays milder.
Smell and measure the rise after every feed. If it turns sharp without lifting, move it to 24–26°C and keep the same weights. More food in a hot spot usually makes the sourness worse.
For a wider set of crumb and crust faults, keep a sourdough bread troubleshooting note next to the log so each symptom stays tied to one change.
Plan Your First Naturally Leavened Loaf This Week
Start the starter today. Put the first bake on the calendar seven to ten days out, and do not pull that date forward because the jar looks bubbly on day four.
Before you mix, confirm four things:
- The starter doubles within 4–6 hours of a feed for three days running.
- A scale and a probe thermometer are on the counter, not in a drawer.
- A dough log is open, with flour type, hydration, starter percentage, dough temperature, and fold times.
- A preheated Dutch oven or a steam setup is ready before the dough is scored.
Hand-timed fermentation works. It also needs that thermometer, frequent looks at the dough, and a new timing estimate whenever the kitchen changes temperature. The first two or three loaves will run long or short. Judge expansion, bubbles, and wobble, and bake when those show up.
You still mix, knead, and shape the dough your way. If you want the fermentation and proof held at a set temperature instead of guessing the room, place the dough in D'BakerAid™ for that stage, then bake it in your own oven. The device does not change your recipe, ingredients, or method.
Pick one loaf. Bake it when the starter is ready. Compare crumb and crust with the log before you change a single number.
DBakerAid™ holds fermentation and proofing at a steady temperature so a naturally leavened dough is not left to a warm afternoon or a cold night. You still shape the loaf and bake it in your oven, with less guesswork on the rise. See how the system fits a home bake at DBakerAid™.