

You pull the loaf from the oven, admire the dramatic holes along the side, and then discover that the center is dense and gummy. Slices tear, fillings fall through, and the largest holes turn out to be evidence of uneven fermentation rather than skilled baking. Open crumb isn't a contest for the biggest cavity. It's a controlled balance of gas, gluten, hydration, temperature, handling, and steam.
The most reliable way to get open crumb sourdough is to build a dough that can hold gas, ferment it until the structure is ready, and handle it gently enough to preserve that structure without protecting every oversized bubble. The result should be irregular but connected alveoli, a slightly glossy interior, thin chewy walls, and a crust that shatters instead of peeling away. For sandwiches, toast, or clean slices, a more uniform crumb may be the better result.
Table of Contents
- What Open Crumb Sourdough Actually Requires
- Choosing Flour, Hydration, and Starter
- Building Strength Through Mixing and Folds
- Reading Bulk Fermentation by Dough Cues
- Shaping, Proofing, Scoring, and Baking with Steam
- Troubleshooting Common Open Crumb Problems
- A Repeatable Sourdough Checklist
What Open Crumb Sourdough Actually Requires
Open crumb is the visible record of what happened inside the dough. Wild yeast produces gas, fermentation distributes and enlarges that gas, gluten traps it, shaping organizes it, and the oven expands it. If one part of the system is weak, increasing another variable usually creates a different failure rather than a better loaf.
The common shortcut is to add more water. Higher hydration can make dough more extensible and support larger gas cells, but only while the flour can absorb the water and still form a strong gluten network. Independent baking guidance commonly places open-crumb loaves around 75% to 80% hydration, while 65% to 70% tends to produce a tighter crumb, but those figures are starting points rather than guarantees. King Arthur Baking's open-crumb guidance also connects openness with starter strength, dough temperature, fermentation, and gentle handling.
The five variables that matter most
- Flour strength: Strong bread flour gives fermentation gas a more durable network. Whole-grain flour adds flavor and absorption, but bran can interfere with gluten development.
- Hydration: More water can increase extensibility, yet wet dough becomes harder to strengthen and shape when the flour can't support it.
- Starter maturity: A weak or immature starter won't generate gas consistently enough for a predictable crumb.
- Dough handling: Folds build structure early. Rough preshaping or aggressive shaping can either destroy useful gas or leave large bubbles concentrated in one area.
- Fermentation and steam: Under-fermentation leaves the crumb tight. Over-fermentation weakens the dough. Insufficient steam allows the crust to set before the loaf fully expands, as explained in this guide to steam and crust formation.
Sourdough has been made for centuries, with published histories tracing it to Ancient Egypt, but the modern preference for highly open artisan crumb is a relatively recent aesthetic emphasis. Traditional sourdough rise times can range from about 3 to 12 hours, depending on room temperature, which is a useful reminder that time has never been an isolated ingredient. A history of sourdough and its fermentation variables reinforces the practical point: crumb quality comes from repeatable biological timing, not from shaping theatrics alone.
Choosing Flour, Hydration, and Starter
Flour sets the ceiling for openness. Before changing your water, look at how the flour behaves when mixed, stretched, and fermented. Strong bread flour generally tolerates more water than soft flour, while whole-grain flour absorbs heavily but can produce a less open structure because bran disrupts gluten continuity.
Use the flour label as a guide, not a verdict. A dough that feels elastic, cohesive, and capable of stretching into a thin membrane has more usable strength than one that tears despite a high protein number. For a deeper explanation of how flour protein affects dough performance, see this guide to mastering flour protein content.
Start with a hydration level you can control
For strong bread flour, 75% hydration is a practical baseline for an open crumb. Doughs around 70% to 80% can produce open structure, and some expert guidance identifies 71% as sufficient in the right conditions, but the flour must absorb the water while retaining strength. Pantry Mama's hydration guidance makes the important distinction: hydration encourages openness, but flour strength, fermentation, and handling decide whether that openness is useful.
Hold back some water during mixing. Add it gradually only if the dough remains cohesive and strengthens during folds. If the dough spreads immediately, clings like paste, and refuses to develop a smooth surface, more water won't solve the problem. Reduce hydration in the next bake or use stronger flour.
| Flour Type | Typical Protein % | Beginner Hydration Range | Crumb Outcome |
|---|---|---|---|
| Strong bread flour | About 12% or higher | Around 70% to 75% | Open potential with manageable strength |
| High-protein bread flour | Higher than standard bread flour | Around 75% to 80% | More extensible, chewy, and open when fully fermented |
| Whole wheat flour | Varies by flour | Lower end of your workable range | More absorption, darker crumb, less openness |
| Mixed-grain flour | Varies by blend | Start conservatively | Flavorful, potentially heavier, with hydration-sensitive structure |
| Lower-protein flour | Varies by flour | Lower hydration | Tighter crumb and less gas retention |
Check the starter before mixing
Use a starter that has risen strongly, shows bubbles throughout, and has a surface that is domed or just beginning to flatten. A starter that has already collapsed may still leaven dough, but its timing will be harder to predict. Warm starter and dough temperatures commonly fall around 74°F to 78°F, or 23°C to 26°C, and feeding schedules may be as frequent as twice daily when you need strong activity, according to King Arthur Baking's fermentation guidance.
A 1:5:5 feeding can help you judge consistency because it gives the culture more fresh flour to work through. Look for a repeatable rise, a clean fermented aroma, and a gentle fall when the jar is tapped. Use water temperature to bring the mixed dough into your target range. Temperature acts like an ingredient because it changes fermentation speed, so weigh it into your process rather than treating the room as a fixed condition.
Building Strength Through Mixing and Folds
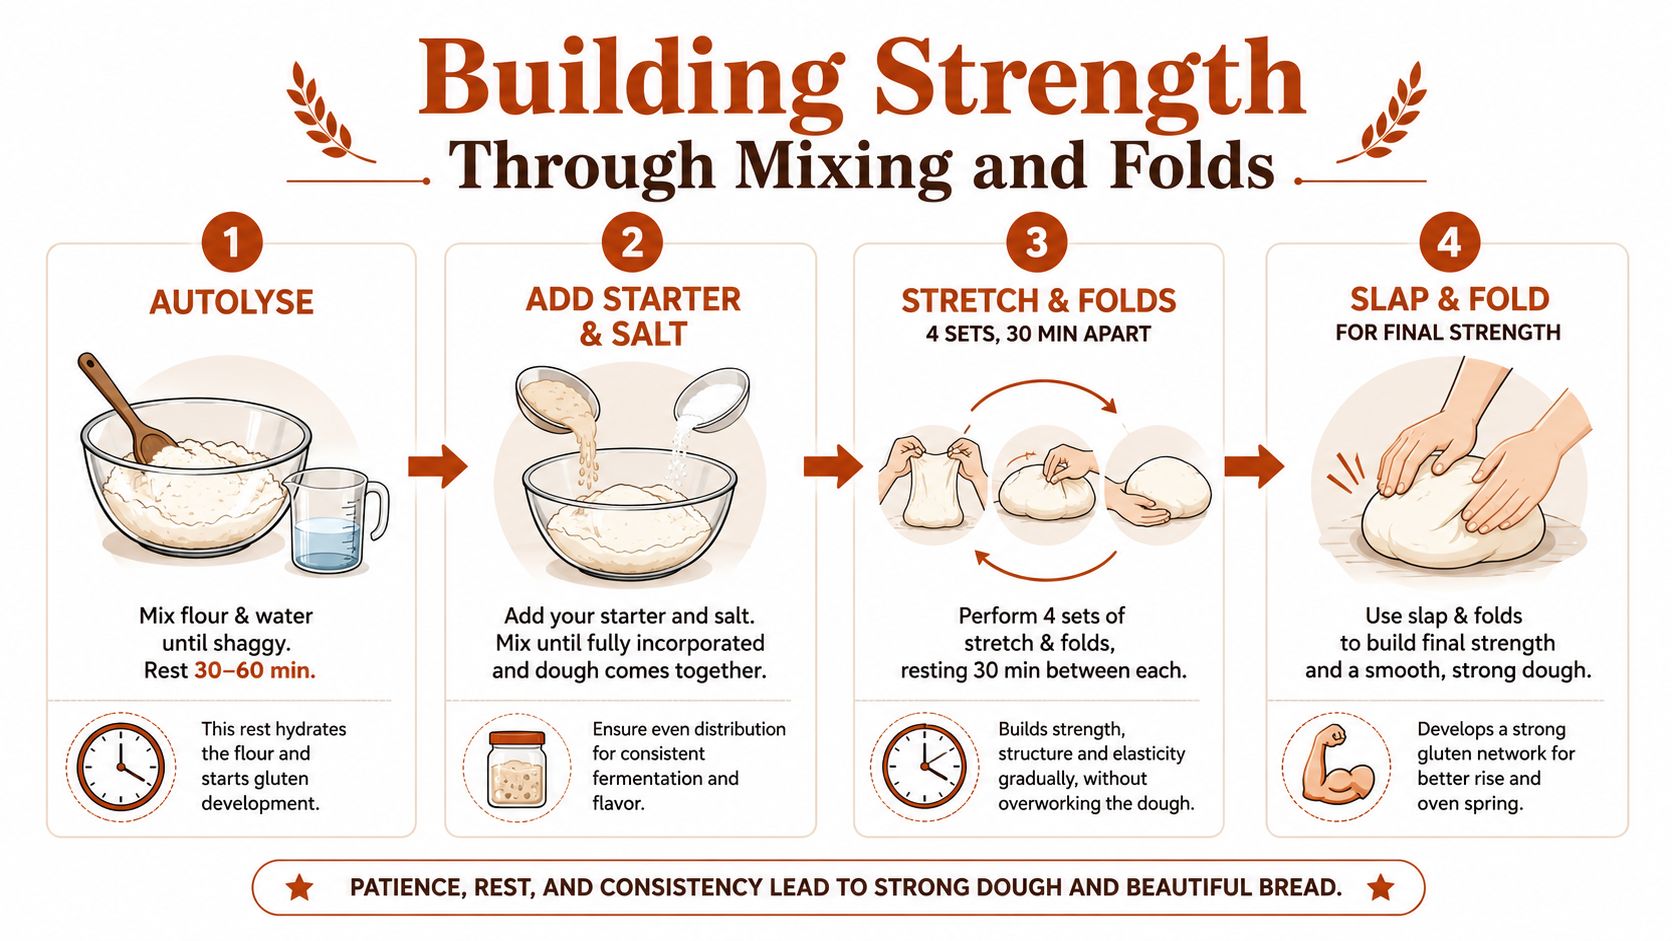
The strongest open crumb starts before the first fold. Mix flour and water until no dry flour remains, but don't knead aggressively at this stage. Rest the shaggy dough for 30 to 60 minutes so the flour hydrates and the gluten begins organizing with less mechanical effort.
Add starter and salt in separate stages
Work the ripe starter into the autolysed dough with wet hands. Pinch and fold until the mixture becomes uniform, then let it rest briefly before incorporating salt with a small amount of reserved water. Salt tightens gluten and slows fermentation, so separating its addition gives you more control over dough development and timing.
The dough may feel rough immediately after salt incorporation. Don't chase smoothness through endless mixing. The dough's real transformation happens through structured rests and folds, when the gluten network gains strength while fermentation begins to create internal pressure.
Use folds to build a gas-holding network
Start with stretch and folds while the dough is relatively firm. Lift one side until it resists, fold it across, rotate the bowl, and repeat around the dough. Aim for five to six sets at 30- to 45-minute intervals, adjusting to the dough rather than completing a rigid ritual.
Between sets, look for specific changes:
- Surface: The top becomes smoother and may develop a slight dome.
- Edges: The dough pulls away from the bowl more cleanly.
- Resistance: Each lift stretches farther before tearing.
- Layers: Lifted dough shows visible folds instead of flowing straight back into the bowl.
- Air: Small bubbles begin appearing near the sides and under the surface.
When the dough becomes airy and relaxed, switch to coil folds. Slide your hands underneath the center, lift gently, and allow the ends to fold beneath themselves. Coil folds strengthen the dough while disturbing fewer gas cells.
If the dough still spreads after several folds, use a short lamination. Stretch it carefully into a thin sheet, fold it back over itself, and leave it to rest. This can organize a weak dough, but overworking a fragile dough creates heat and tears the gluten. For further technique detail, this stretch-and-fold guide is a useful reference.
Practical rule: Build strength while the dough is young, then stop touching it once it can hold a rounded shape and visible gas.
A well-developed dough traps gas in thin, resilient membranes. Those membranes survive preshaping, final shaping, scoring, and oven spring. Weak dough loses gas before baking, which produces a dense interior even when hydration is high.
Reading Bulk Fermentation by Dough Cues
Clock time is a poor substitute for observation. Room temperature, dough temperature, starter activity, flour extraction, and inoculation all change the fermentation window, so judge bulk by how the dough looks and feels.
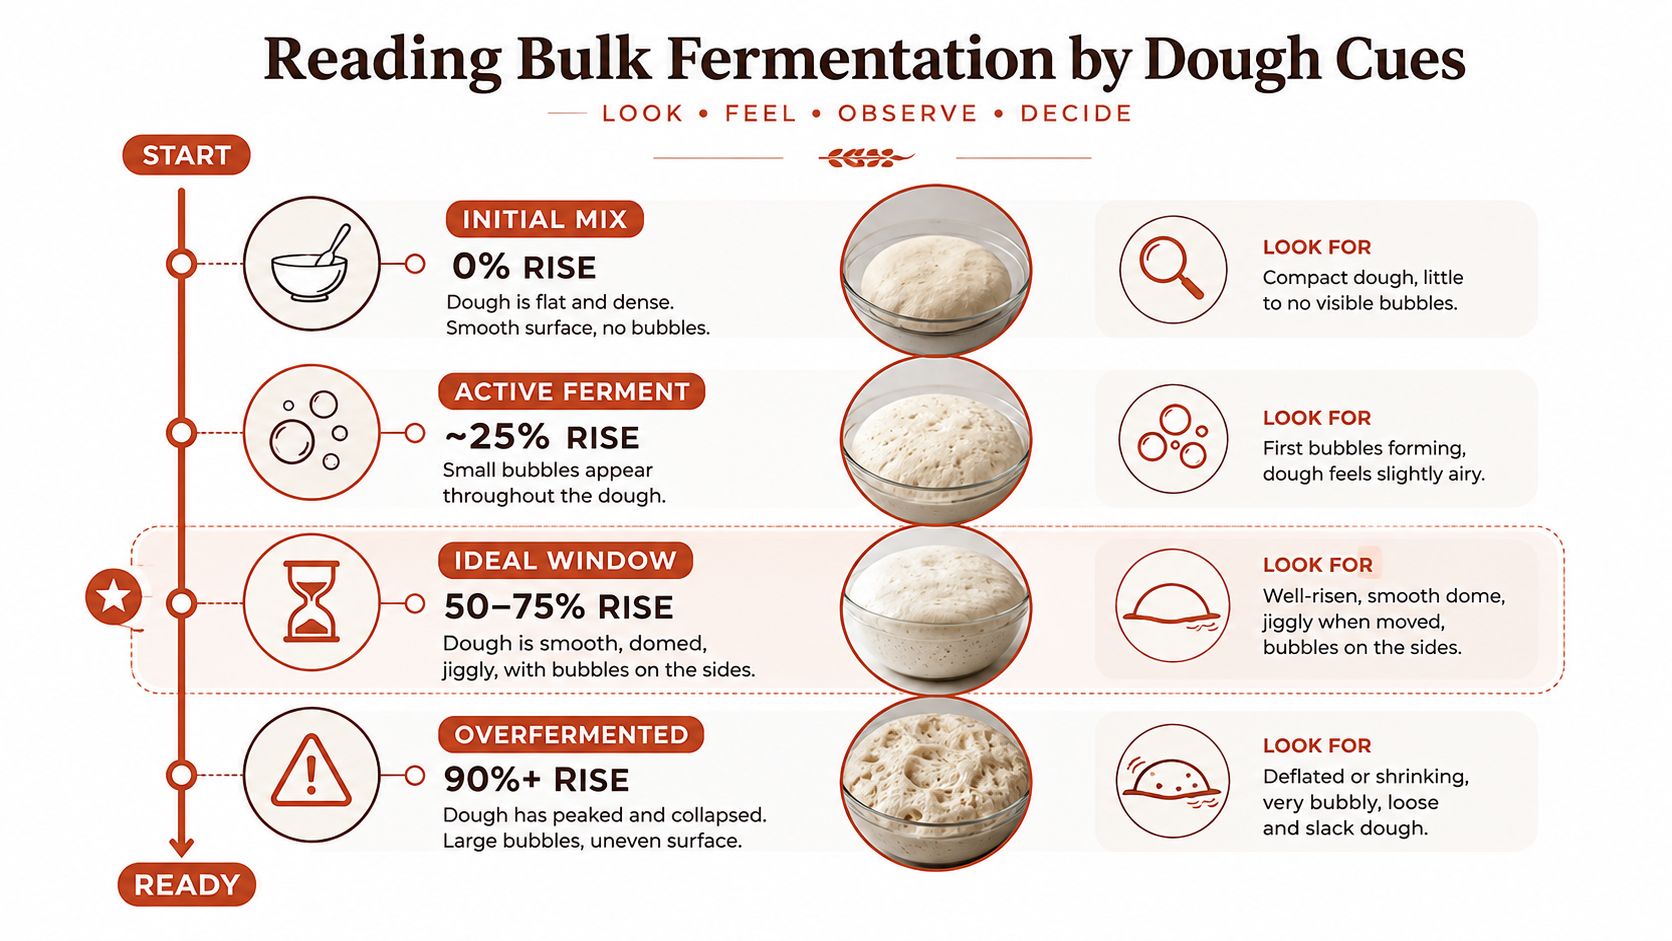
A useful target for many open-crumb doughs is a 50% to 75% rise, accompanied by a smooth or gently domed surface, a visible jiggle, and bubbles along the sides. Press a floured finger lightly into the dough. A ready dough should rebound slowly and partially. Fast spring-back points to insufficient fermentation, while an indentation that remains with a slack, fragile feel suggests the dough has gone too far.
Under-fermentation leaves the crumb behind
Under-fermented dough feels tight, elastic, and resistant. It may look smooth but lack bubbles at the edges, and it often springs back quickly after the poke test. In the oven, the crust can color before the interior expands enough, leaving a dense crumb with compressed areas.
Give the dough more time in a warm environment and watch for the surface to become aerated. Whole-grain and rye-rich doughs can change the timing because bran interferes with gluten development and different flour compositions ferment differently. A higher starter percentage can also shorten the window, so don't copy another baker's schedule without copying the variables that created it.
Over-fermentation weakens the structure
Over-fermented dough becomes spongy, slack, and difficult to tighten. It may show excessive bubbling but fail to hold a rounded form after preshaping. The baked loaf can collapse, develop a gummy or uneven crumb, and show little controlled bloom.
Add another fold only while the dough still benefits from strengthening. If the top has already domed and the dough jiggles with trapped gas, stop folding. Every additional manipulation at that point risks releasing the bubbles you're trying to preserve.
The distinction matters because oversized holes can indicate under-fermentation, poor shaping, or uneven gas distribution rather than quality. This discussion of the open-crumb ideal argues for balanced fermentation and structure instead of maximum openness.
If the dough falls flat at the end of bulk, don't try to rescue it with aggressive folds. Shape it with firmer tension, shorten the final proof, and expect a more compact loaf. Record the dough temperature and rise cues so the next bake can stop earlier.
Shaping, Proofing, Scoring, and Baking with Steam
The target crumb should guide shaping. A high-hydration batard can support a more open interior and dramatic expansion, while a moderately hydrated boule can produce clean, even slices. Both depend on preserving useful gas without leaving the dough too loose to hold tension.
Turn fermented dough out gently and preshape the batard with minimal compression. Let it relax, then fold the sides inward and roll it into a firm cylinder, building tension across the surface. Set it seam-side up in a floured banneton and close the seam securely. Move the dough smoothly, since dragging it across the bench can tear the outer skin.
Use more deliberate preshaping for a boule. Redistribute obvious oversized bubbles with your fingertips, then tighten the round until it has a stable surface. Do not flatten the dough. The result is usually a more uniform crumb, which is often the better choice for sandwiches and toast.
Proof according to the loaf you want
A room-temperature final proof gives lively expansion and a loaf that can be baked sooner. Cold retard makes scoring easier and offers a more flexible schedule, but the dough needs sufficient fermentation before refrigeration. Chilling cannot correct an under-fermented bulk.
Score with a sharp lame or razor. Use a deeper, angled cut for an ear and a defined expansion line. Choose a more controlled score when the boule needs an even bloom. The blade should open the surface cleanly rather than scrape across it.
Keep the crust flexible during oven spring
A Dutch oven provides a contained steam chamber. Bake covered for 20 to 25 minutes, then uncover and continue until the crust has the color and firmness you want. A tray of boiling water can also create steam, while lava rocks provide more evaporative surface. Each setup requires careful handling and a fully preheated oven.
Steam keeps the crust from setting too quickly, giving the loaf time to expand before the surface dries. It can support a thinner crust, stronger bloom, and better blistering. For setup details, see this guide to steam for crust formation.
Aim for an internal crumb temperature around 96°C to 98°C, or 205°F to 210°F, then cool the loaf for at least one hour before slicing. Cooling allows the crumb to finish setting. Cutting early compresses the interior and smears the starch, making a properly baked loaf seem gummy.
Troubleshooting Common Open Crumb Problems
A crumb problem is usually a process clue. Cut the loaf through the center, inspect the distribution of holes, and compare the interior with the dough cues you recorded during bulk. Large holes beside dense sections point to uneven gas distribution, while an evenly tight crumb points more often to fermentation, strength, hydration, or oven expansion.
| Problem | Likely Cause | Correction |
|---|---|---|
| Dense, tight crumb | Under-fermented bulk, weak gluten development, low hydration for the flour, or insufficient oven spring | Extend bulk in a warmer environment, strengthen the dough with better folds, extend the autolyse, and improve steam |
| Pale, soft crust | Insufficient steam, low bake temperature, or a short bake | Maintain steam during the opening stage, then bake longer and finish with a firm, well-colored crust |
| Flat loaf with little rise | Over-proofed final dough, under-fermented bulk, rough shaping, or an oven that wasn't fully heated | Shorten final proof, ferment bulk further, build surface tension, and preheat thoroughly |
| Oversized holes with gummy tunnels | Too much water for the flour, weak structure, under-fermentation, or insufficient preshape redistribution | Lower hydration slightly, build more strength, ferment fully, and press out only the largest bubbles |
Match the correction to the evidence
If the dough was tight and sprang back quickly, don't increase hydration first. Fermentation is the more likely issue. If it was slack and collapsed during shaping, reduce the water or shorten fermentation before adding more folds.
If the loaf has a dramatic side hole and a dense base, inspect preshaping. You likely preserved one large bubble while compressing the surrounding dough. Use selective degassing, which redistributes gas without flattening the whole piece.
A pale crust can hide a decent crumb, but it often indicates that the surface set without enough steam or bake time. If the loaf is gummy after full cooling, check fermentation and internal temperature together rather than blaming hydration alone.
A Repeatable Sourdough Checklist
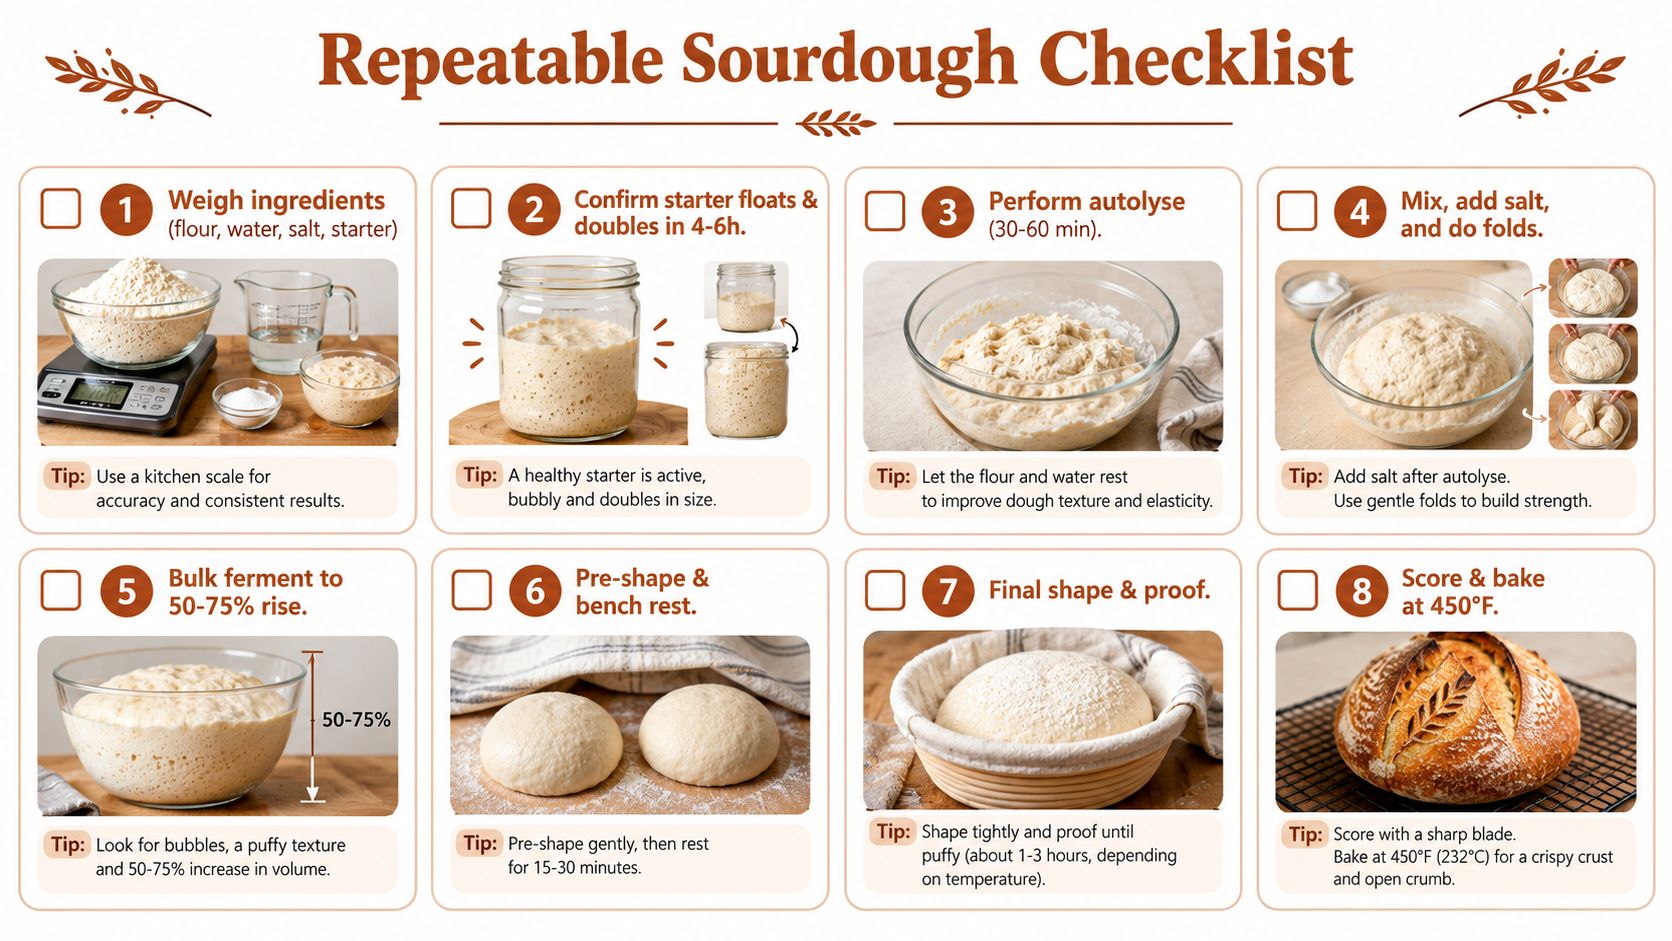
Open crumb becomes repeatable when you record conditions instead of chasing appearances. Weigh flour, water, salt, and ripe starter, then choose hydration based on flour strength. Bring the dough into the 24°C to 26°C range, perform an autolyse, add salt, and complete four to six folds at roughly 30-minute intervals while the dough still needs strength.
Use these cues in order:
- Weigh ingredients: Keep the formula consistent.
- Confirm starter activity: Use it when it has risen, bubbled, and remains lively.
- Autolyse: Rest flour and water for 30 to 60 minutes.
- Mix and fold: Stop once the dough holds shape.
- Finish bulk: Look for a 50% to 75% rise, dome, jiggle, and side bubbles.
- Preshape: Create structure without crushing the gas.
- Final shape and proof: Build tension and proof until the dough rebounds slowly.
- Score and bake: Use strong steam, then cool fully before slicing.
Balanced openness, even bloom, and a crust that shatters are better targets than Instagram-sized holes in every loaf. If you're also working with difficult high-protein doughs, D'BakerAid protein bread recipes offer a separate route to structured, sliceable bread, while the machine's controlled fermentation and proofing are designed to make temperature and timing more repeatable.
DBakerAid™ offers a precision bread-making appliance system with a fermentation bowl, a proofing bowl, and a temperature and time control hub for managing the biological stages that make open crumb difficult. Visit DBakerAid™ to review the system and choose a more controlled workflow for your next sourdough bake.