

Why does a loaf made with fast rising yeast still come out dense, bland, or oddly collapsed when the packet promised speed? The gap is usually not the yeast itself. It's control. Fast dough moves quickly, and high-protein dough fights back at every stage.
That matters if you want bread that fits a high-protein lifestyle. Most store protein bread lands in the 5 to 7g per slice range, while homemade formulas built with whey, pea, soy, or collagen isolate can push into the ~10 to 11g per slice range when the fermentation and proofing are handled properly. That's the difference between bread as a filler and bread as a meaningful part of a macro-driven meal.
Table of Contents
- The Baker's Dilemma Speed Versus Quality
- Understanding Fast Rising Yeast vs Instant and Active Dry
- The High Protein Bread Challenge Why Dough Fights Back
- How to Adjust Recipes and Proofing Schedules
- Troubleshooting Flavor Speed and Common Problems
- The DBakerAid Advantage for Perfect Protein Loaves
- Frequently Asked Questions About High Protein Baking
The Baker's Dilemma Speed Versus Quality
Bread is the food a lot of disciplined eaters still want. They'll skip dessert, trim snacks, and track every gram, then get stuck staring at bread labels that don't do much for their protein target.
That's why fast rising yeast keeps getting attention. On paper, it solves the biggest problem in home baking. Less waiting, less fuss, less chance of losing momentum on a weekday. In practice, speed only helps if the dough structure, temperature, and timing stay aligned.
For a home baker trying to make high-protein sandwich bread, the challenge is greater. Protein-heavy dough isn't forgiving. It's denser, a little tackier, and slower to develop a relaxed structure. If the yeast surges too early, the loaf can overexpand before the gluten is ready to hold it.
Bread that fits macros still has to behave like bread
The objective isn't “faster bread.” It's bread you'll keep making. That means fresh loaves, usable slices, repeatable fermentation, and enough protein per slice that the bread earns its place in the meal.
A lot of bakers also miss the practical side after the loaf is done. If you batch-bake for family meals, gifting, or weekend prep, details like slicing, storage, and presentation matter. Even small operations and serious home bakers end up caring about tools such as Disposable packaging for bakeries because once you have a loaf worth keeping, you need a clean way to store and move it.
Practical rule: Fast rising yeast is useful when you need speed. It isn't a shortcut around fermentation control.
Why this matters more in high-protein bread
Store options leave a lot of people underwhelmed. They're often expensive for what they deliver, and the texture usually tells you the formula was pushed hard. That's the opening for homemade protein bread done properly.
The hard part isn't mixing flour with protein powder. The hard part is getting a strong, even rise without losing flavor or ending up with a gummy center and a heavy crumb. That's where fast rising yeast can help, but only when the baker understands the trade-off between faster gas production and narrower process tolerance.
Understanding Fast Rising Yeast vs Instant and Active Dry
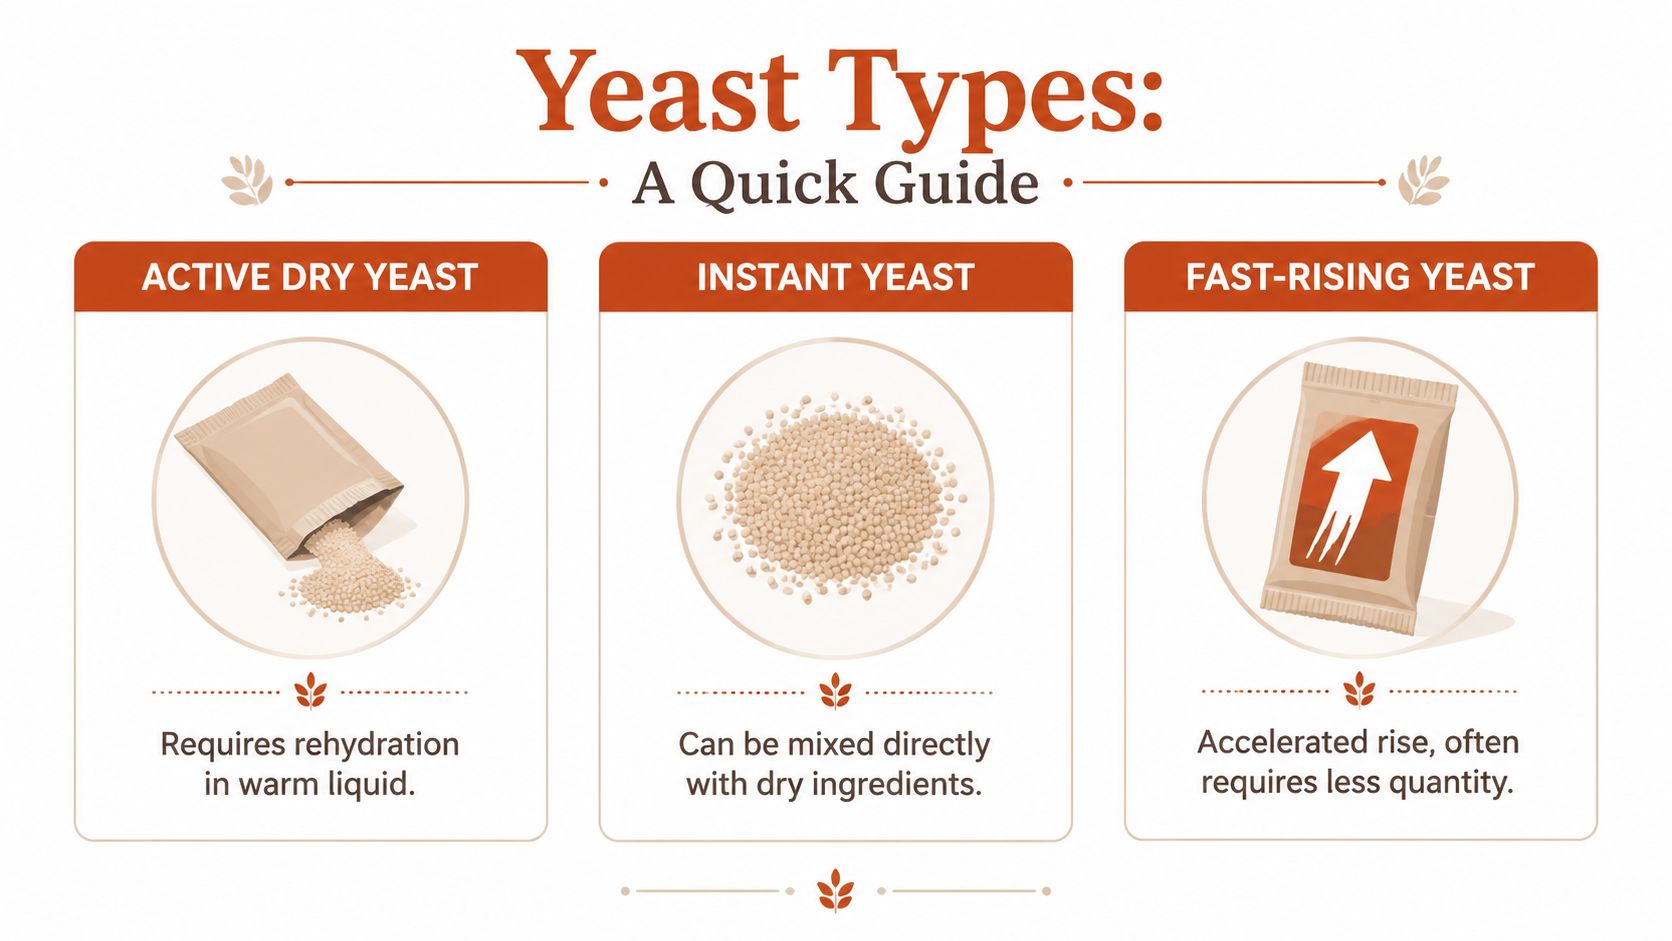
Most bakers treat these as minor variations. They're not. The granule structure changes how quickly the yeast hydrates, how it's mixed, and how much room for error you get.
What changes inside the granule
Active dry yeast has a protective outer layer, so it needs time in warm liquid before it reaches full activity.
Instant yeast, including fast rising forms, is processed differently. According to this breakdown of active dry versus instant yeast, fast-rising instant yeast is milled to a finer granule size with porous, tubular particles that lack the protective glycerol coating of active dry yeast. That allows full hydration and metabolic activation within 90 seconds, while active dry needs 5 to 15 minutes of pre-hydration at 105 to 115°F to hit peak CO₂ output.
That one difference changes your mixing method. Instant and fast rising yeast can go straight into the dry ingredients. Active dry usually performs best when it's hydrated first.
What that means on your bench
Think of active dry as a slower starter motor and fast rising yeast as a quick ignition. The quick one gets moving sooner, but it also punishes sloppy temperature handling faster.
A few practical distinctions matter:
- Mixing method: Fast rising yeast works directly in the flour mix. That removes the bloom step.
- Temperature sensitivity: As covered in the source above, instant-style yeast works best in a narrower mixing environment and can stall if your dough cools too much during mixing.
- Recipe fit: Lean sandwich doughs and enriched weekday doughs often benefit from fast rising yeast. Long-fermented breads built around flavor complexity usually don't.
If you want a more fermentation-focused angle on when quick yeast still benefits from slower handling, this note on why instant yeast likes pre-fermentation too is worth reading.
Fast rising yeast isn't “stronger” in every useful sense. It's simply ready sooner.
The High Protein Bread Challenge Why Dough Fights Back
High-protein bread looks simple from the ingredient list. Add protein, keep the loaf shape, bake as usual. That's not how the dough behaves.
Once you bring in whey, pea, soy, or collagen isolate, plus vital wheat gluten and wheat flour, the dough gets more demanding. It often feels denser and stiffer during mixing, and the rise is more restrained. You're not usually chasing a dramatic ballooned dough. You're looking for controlled expansion, clean structure, and enough gas retention to keep slices soft.
Why protein dough behaves differently
Protein ingredients change water competition inside the dough. Some absorb aggressively. Some tighten the mix. Some mute extensibility and make shaping less forgiving.
That's why high-protein sandwich dough often shows these traits:
- Rise pattern: It typically rises 50 to 75%, not a full doubling.
- Crumb: Expect a tighter, more uniform crumb.
- Handling: The dough can feel slightly tacky even when it's properly mixed.
- Appearance: Whey and collagen stay closer to a normal cream crumb, while pea can skew slightly grey-green, soy runs darker and tan, and whole-grain versions brown to a darker shade.
The flour side matters too. If you want to understand how flour strength affects gas retention in these heavier formulas, this guide to flour protein content helps connect the structure side of the problem.
What the numbers look like in a real loaf
The gap between store protein bread and a properly built homemade loaf is bigger than most labels suggest. NutriScan's overview of high-protein bread notes that store-bought protein bread typically delivers 5 to 7g per slice, with one standard 43g slice at 6.5g, versus roughly ~10.6g per slice in a precise whey-based recipe.
Here's what that looks like across the five D'BakerAid high-protein Pullman-style recipes, each based on ~800g dough, yielding ~704g baked and about ~16 slices.
| Recipe | Protein / loaf | Per 100g | Per slice | 3-slice meal |
|---|---|---|---|---|
| Whey + Sprouted Wheat (HERO) | ~170g | ~24g | ~10.6g | ~32g |
| Vegan Pea + Whole Grain | ~171g | ~24g | ~10.7g | ~32g |
| Soy Multigrain "Fitness" | ~170g | ~24g | ~10.7g | ~32g |
| Seeded Whey + Flax | ~163g | ~23g | ~10.2g | ~31g |
| Collagen + Whole Wheat | ~184g | ~26g | ~11.5g | ~34g |
That's why these loaves matter to macro-trackers. A 3-slice meal clears the familiar 30g protein target from the bread alone, depending on recipe, protein brand, and slice thickness.
How to Adjust Recipes and Proofing Schedules
The usual substitution advice for yeast is too blunt for high-protein dough. The dough is already less forgiving, and fast rising yeast narrows the window even more.
What to change first
When you swap in fast rising yeast, don't start by obsessing over quantity. Start with temperature and observation.
According to this yeast baking guide focused on temperature handling, fast-rising yeast is more sensitive to heat spikes. If liquid goes above 115°F, it can kill the yeast. If it's too warm without tight control, the yeast can grow too fast and cause the dough to collapse or develop off-flavors before the gluten sets. The same source places ideal liquid temperature at 105 to 115°F (40 to 46°C).
That means your process needs to tighten up:
- Use a thermometer: Guessing “warm” is where many fast-dough failures start.
- Watch the dough, not the clock: Especially in protein-enriched dough, visible expansion matters more than a generic rise time.
- Shorten expectations: Fast rising yeast compresses the schedule. If you wait for a dramatic double, you'll often overshoot.
- Measure liquids accurately: If you're converting between volume systems during recipe testing, it helps to master essential kitchen conversions so hydration adjustments stay consistent.
A practical schedule for fast dough
For standard home mixing, I use a simple sequence.
- Mix with warm liquid in the safe range. Don't go hotter just to force speed.
- Develop structure fully before chasing volume. Protein dough needs enough mixing to support the gas it's about to produce.
- Proof to clear signs, not maximum size. In these doughs, moderate lift is usually correct.
- Bake before the dough looks fragile. If the surface starts looking overinflated or weak, you're already close to the edge.
If you want a deeper reference on how temperature drives yeast behavior during fermentation, this guide to yeast fermentation temperature is a useful technical companion.
A fast yeast schedule only works when the dough enters the oven with strength still in reserve.
Troubleshooting Flavor Speed and Common Problems
Fast rising yeast solves one problem and creates another. It gets gas moving early, but flavor doesn't always keep up.
Why fast dough can taste flat
The trade-off is real. A technical discussion of instant and RapidRise behavior notes that instant yeast's 50% faster rise time comes with reduced enzymatic activity and flavor development. The same analysis also points out that RapidRise behaves basically like instant yeast in standard doughs, but can behave differently in cold doughs, where it often doesn't build the same flavor depth as slower fermentation.
That shows up clearly in high-protein bread because these formulas already have less margin for aromatic development. If you compress fermentation too far, the loaf can taste competent but one-note.
Give fast dough enough controlled time to build flavor, not just enough time to inflate.
How to diagnose the loaf in front of you
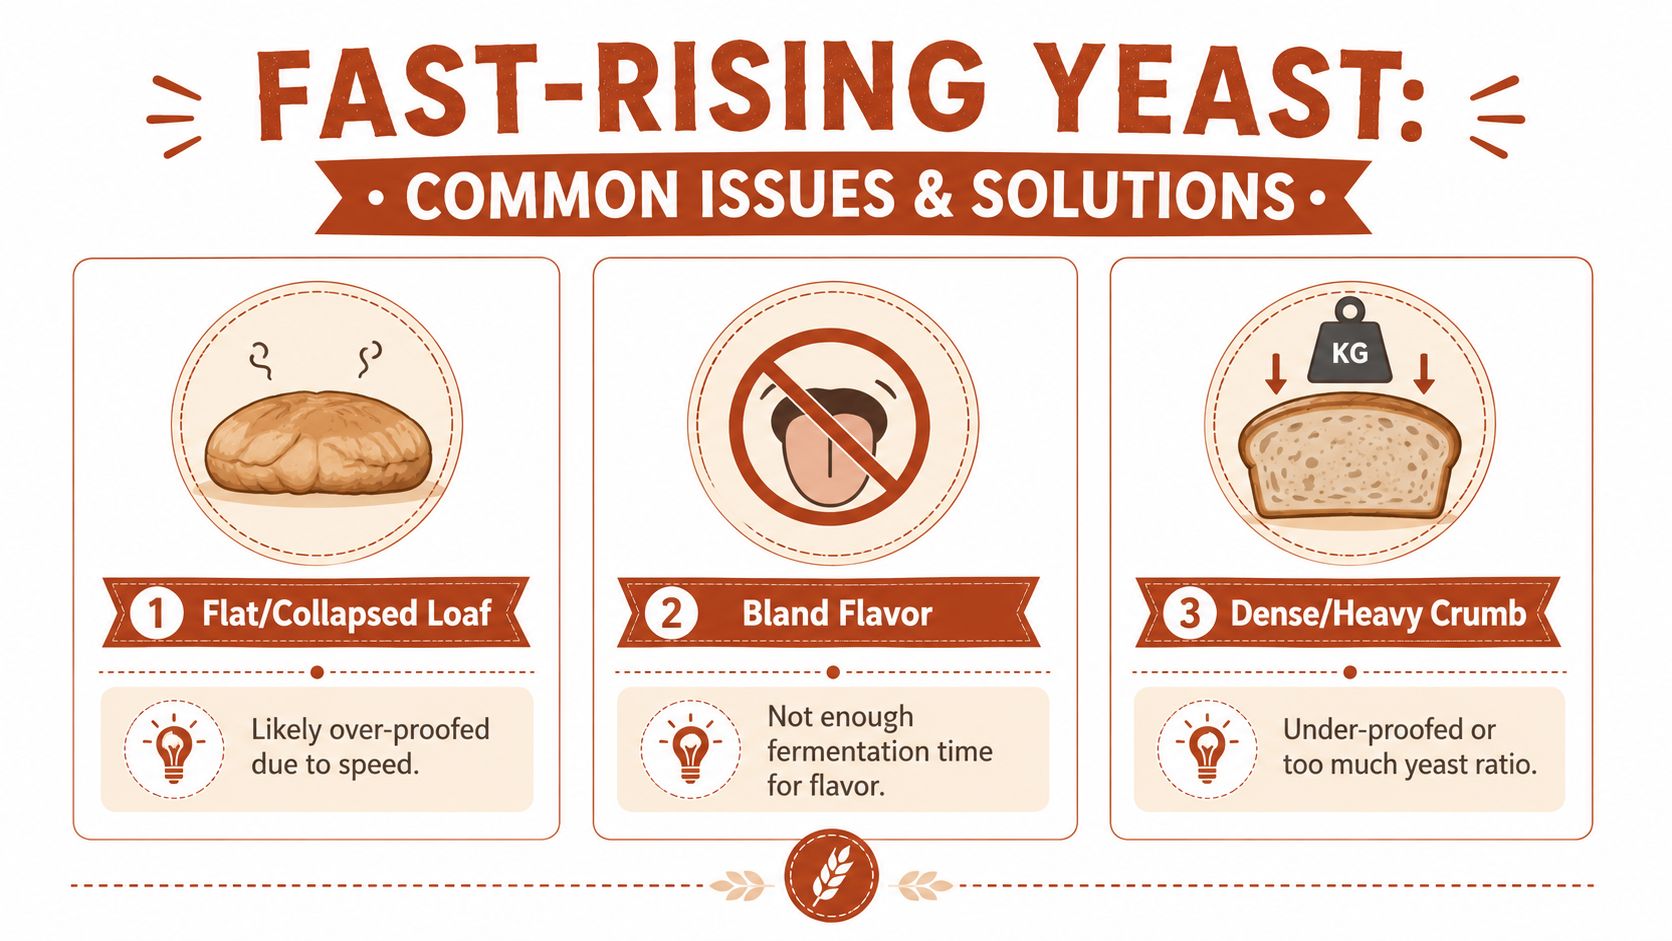
Most failures fall into three buckets.
- Collapsed top after baking: The dough likely expanded too fast and lost support before the gluten and starch structure set.
- Tight, heavy crumb: Usually underproofed, undermixed, or built with a yeast ratio that didn't match the dough strength.
- Bland flavor: Fermentation moved quickly, but not usefully. Gas happened. Flavor chemistry lagged.
There's also the money question. Homemade protein bread isn't cheap in absolute terms because protein powder drives ingredient cost. That's why I look at cost per gram of protein, not loaf price alone.
For the five D'BakerAid protein loaves, the cost to make runs about Soy ~$3.56, Pea ~$4.04, Whey ~$5.04, Collagen ~$6.81 per loaf, with ~$0.22 to 0.43 per slice and ~$0.67 to 1.28 per 3-slice meal. On a protein basis, that's about ~2 to 3¢ per gram versus roughly ~5.2¢ per gram for retail protein bread, or about 42 to 60% cheaper, roughly half.
That's the honest version. It's not pennies. It is strong value if your goal is meaningful protein from bread that also tastes fresh.
The DBakerAid Advantage for Perfect Protein Loaves
High-protein dough rewards control. Fast rising yeast can push these formulas past their sweet spot before the dough has built enough strength to hold the gas.

What matters with D'BakerAid is not convenience alone. It is the ability to run fermentation and proofing as separate, repeatable steps for a dough that is harder to handle than standard sandwich bread.
A high-protein loaf with whey, pea, soy, or collagen behaves differently from flour-water-yeast dough. Extra protein changes water absorption, tightens the mixing window, and narrows the proofing margin. Fast rising yeast increases that pressure because it produces gas quickly. If temperature runs a little high or proofing runs a little long, structure falls behind expansion. That is how you get a loaf that looks active in the bowl and still bakes short, tight, or weak at the crown.
D'BakerAid addresses that problem with a Stage 1 yeast fermentation bowl, a Stage 2 dough proofing bowl, and a control hub that manages time and temperature for each phase. That separation matters in practice. The yeast gets the conditions it needs to wake up and multiply, then the shaped dough gets a different environment to expand without being pushed too hard.
For home bakers chasing the no-guilt goal of a real sandwich loaf with about 10g of protein per slice, that control is the difference between theory and repeatable bread. You still need the right formula and decent mixing. You do not need to guess whether the room is too cool, the dough is lagging, or the fast rising yeast is about to outrun the gluten network.
The practical advantages are straightforward:
- Tighter fermentation control: Better timing for fast yeast in doughs that already have less tolerance.
- More reliable loaf volume: The dough has a better chance of expanding and setting in balance.
- Consistent protein bread results: Useful if you are baking the same loaf weekly and want the same slice height, crumb, and toast performance.
- Less waste: High-protein ingredients cost more, so fewer failed loaves matters.
That is the main advantage. D'BakerAid reduces the variable that causes the most trouble in protein bread, which is uncontrolled fermentation speed in a dough that does not forgive much.
Frequently Asked Questions About High Protein Baking
How much protein is in D'BakerAid protein bread
Want a loaf that pulls its weight nutritionally, not just one with a protein label on the bag? With the right formula, these loaves land at about 10 to 11g of protein per slice. Total protein per loaf and per 100g will shift with the recipe, the protein powder you choose, and how thick you cut the slices.
In practice, slice thickness matters more than bakers expect. Cut thinner, and the per-slice number drops fast.
Is it gluten-free
No. These loaves use wheat flour and vital wheat gluten, so they are built as high-gluten doughs. That extra gluten is part of what lets a high-protein formula hold gas, rise with some structure, and bake into a usable sandwich loaf instead of a squat brick.
There are gluten-free recipes in other baking categories, but they are a different project with different handling rules.
How much does it cost to make
Cost depends mainly on the protein source. Whey, pea, soy, and collagen do not price out the same, and premium protein powders can move the number quickly. Homemade high-protein bread usually compares well on protein yield, especially if you bake weekly and want consistent slices for meals, toast, or sandwiches.
The trade-off is ingredient cost versus control. Store-bought protein bread saves time. Home baking gives you better control over texture, flavor, and fermentation, which matters more in high-protein dough than in standard white bread.
What protein can I use
The core formulas are built around whey, pea, soy, and collagen. Each one behaves differently in dough.
Whey usually gives the softest crumb and a mild flavor, but it can tighten dough if hydration is too low. Pea and soy can make the dough feel heavier and need closer proof control. Collagen is mild in flavor, but it does not build dough structure the way gluten does, so the formula has to compensate elsewhere. Swapping proteins casually is one of the fastest ways to ruin loaf volume.
Will it taste like protein powder or be dense
Usually, no, if the formula is matched to the protein and the rise is controlled. Expect a loaf that is a bit tighter than a standard white sandwich bread, with a soft crumb that still slices cleanly.
Poor fermentation control is what makes protein bread taste flat and bake dense. That is one reason D'BakerAid™ is useful here. It helps keep yeast activity and dough expansion in a range the gluten network can still handle.
Do I need baking skill
You need basic bread habits. Mix thoroughly, watch dough temperature, and do not let proofing run long. The hard part is not shaping or scoring. It is managing a dough that rises fast but has less margin for error because of the extra protein load.
That is why controlled fermentation matters so much for the no-guilt goal of a real high-protein loaf with sandwich-worthy texture. Better control gives you a much better shot at repeatable results instead of one good loaf followed by two disappointing ones.