

You pull the loaf from the oven expecting a crisp, evenly browned crust. Instead, the bottom is mahogany, the top is pale, and the center still feels suspiciously heavy. Or the crust looks perfect until the first slice reveals a damp, underbaked middle. That's the familiar punishment for treating convection as nothing more than a temperature button.
Convection oven bread baking changes how heat and moisture reach the dough. The fan affects crust color, oven spring, scoring, rack placement, and even how quickly the oven recovers after you load the loaf. The standard adjustment is useful, but it's only the starting point. You'll get more reliable bread by watching airflow and steam as closely as you watch the temperature.
Table of Contents
- Why Your First Convection Loaf Probably Failed
- How Convection Heat Moves Around Your Loaf
- Converting a Conventional Recipe to Convection
- Artisan and Sourdough Bakes in Convection
- Steam, Humidity, and How to Fake a Combi Oven
- Troubleshooting the Three Most Common Convection Failures
- Your Convection Bread Baking Checklist
Why Your First Convection Loaf Probably Failed
The usual advice says to lower the oven temperature and shorten the bake. That works often enough to become gospel, but it doesn't explain why one convection oven produces a blistered, balanced crust while another scorches the base before the loaf has finished expanding.
The first variable is where the air is moving. A fan-driven oven pushes hot air directly across the dough surface. If the loaf sits too close to the top element, the exposed crown colors rapidly while the interior is still catching up. If the pan sits on a dark or highly conductive surface, the base can brown aggressively at the same time.
The second variable is moisture. A fan can strip moisture from the dough surface before the crust has stayed flexible long enough for strong expansion. That leaves you with a loaf that looks set early but hasn't completed its oven spring. Scoring may open weakly, seal over, or tear unpredictably because the surface has dried before the dough finishes stretching.
Start by testing the oven, not blaming the dough
Before changing flour, yeast, or hydration, establish how your oven behaves. Check the temperature with a reliable oven thermometer and compare its reading with the display during a full preheat. You can use this oven temperature testing guide to identify a temperature that runs hot, a slow recovery after loading, or a fan that creates a strong hot spot.
Then bake one familiar loaf and record three observations:
- Bottom color: If the base darkens first, move the pan higher or add insulation beneath it.
- Top color: If the top browns before the crumb sets, lower the fan if possible or shield the loaf.
- Crumb condition: If the center is gummy while the crust is dark, the loaf needs a gentler surface bake and more time to finish internally.
Practical rule: Treat the first convection bake as an oven audit. The timer tells you when to look. The loaf tells you when it's done.
Convection isn't automatically better or worse than conventional heat. It's less forgiving of a fixed recipe conversion. Once you understand how the fan transfers heat and moves moisture, you can make deliberate decisions instead of guessing at another temperature drop.
How Convection Heat Moves Around Your Loaf
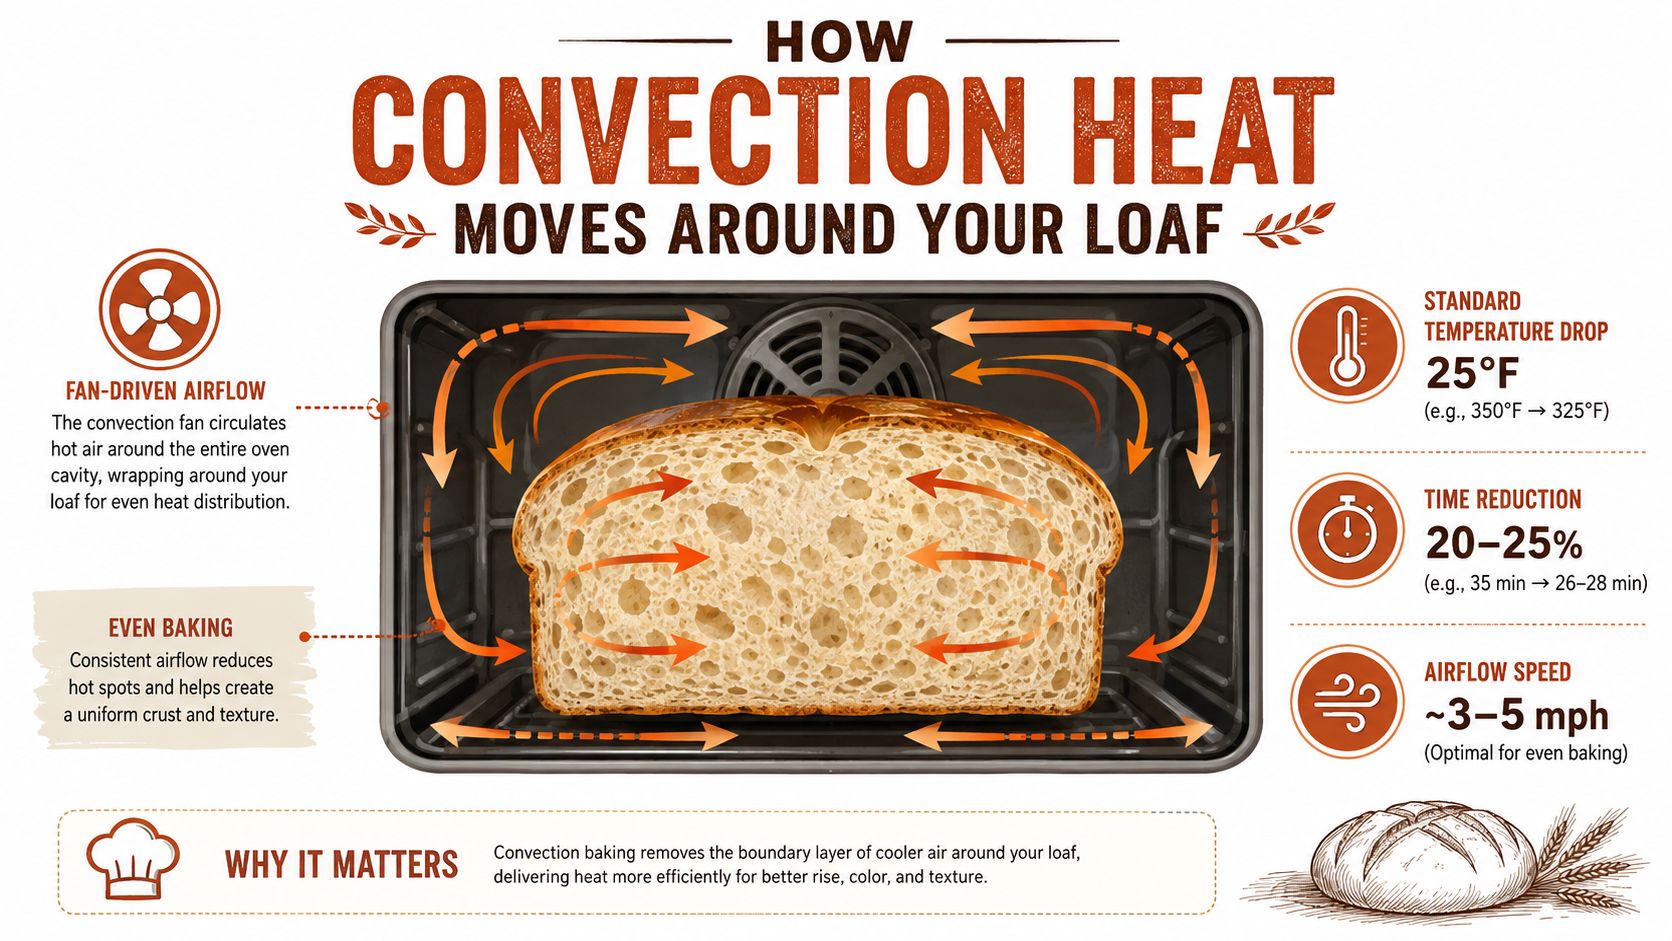
A conventional recipe often drops by about 25°F, or 15°C, in a convection oven, because moving air transfers heat to dough more efficiently. Many guides also suggest checking doneness 20–25% sooner than the original bake time. A conventional bake at 450°F may therefore start around 425°F, with an earlier first check. Treat those figures as a starting point, then watch how airflow changes the crust and crumb.
Air movement is the mechanism behind the faster bake. Independent baking-science coverage places convection airflow at roughly 1.2 to 3.5 meters per second, which increases heat transfer at the bread's surface, as discussed in this comparison of conventional and convection ovens. Faster air dries the surface sooner, promotes earlier browning, and can set the crust before the loaf has finished expanding.
Why two ovens can bake the same dough differently
A low-airflow convection oven may circulate heat gently. The loaf can brown slowly and show less dramatic scoring because the surface receives less rapid heat transfer. A high-airflow oven can darken the crust early, dry the score before it opens, and force a larger temperature adjustment than the standard rule suggests.
The display temperature says little about fan speed, fan direction, or how aggressively the heating elements cycle. Ovens also recover heat differently after the door opens and the dough goes in. Some baking guidance recommends reducing fan speed after loading when the initial airflow dries the dough faster than steam can protect it.
Airflow changes oven spring through the surface. A moist, flexible skin can stretch as the loaf expands. A dry skin restricts that movement, so the loaf may burst at the score or split at a weaker point. Scoring gives you a useful diagnostic: a clean opening suggests the surface remained workable long enough for expansion.
The same loaf can underperform in a gentle convection oven and over-brown in a forceful one, even when both displays show the same temperature.
Use the temperature drop and early check as a baseline. Then adjust for fan intensity, pan material, rack position, and steam retention. Those variables determine whether convection gives you an evenly browned loaf or a dark crust wrapped around an underdeveloped crumb.
Converting a Conventional Recipe to Convection
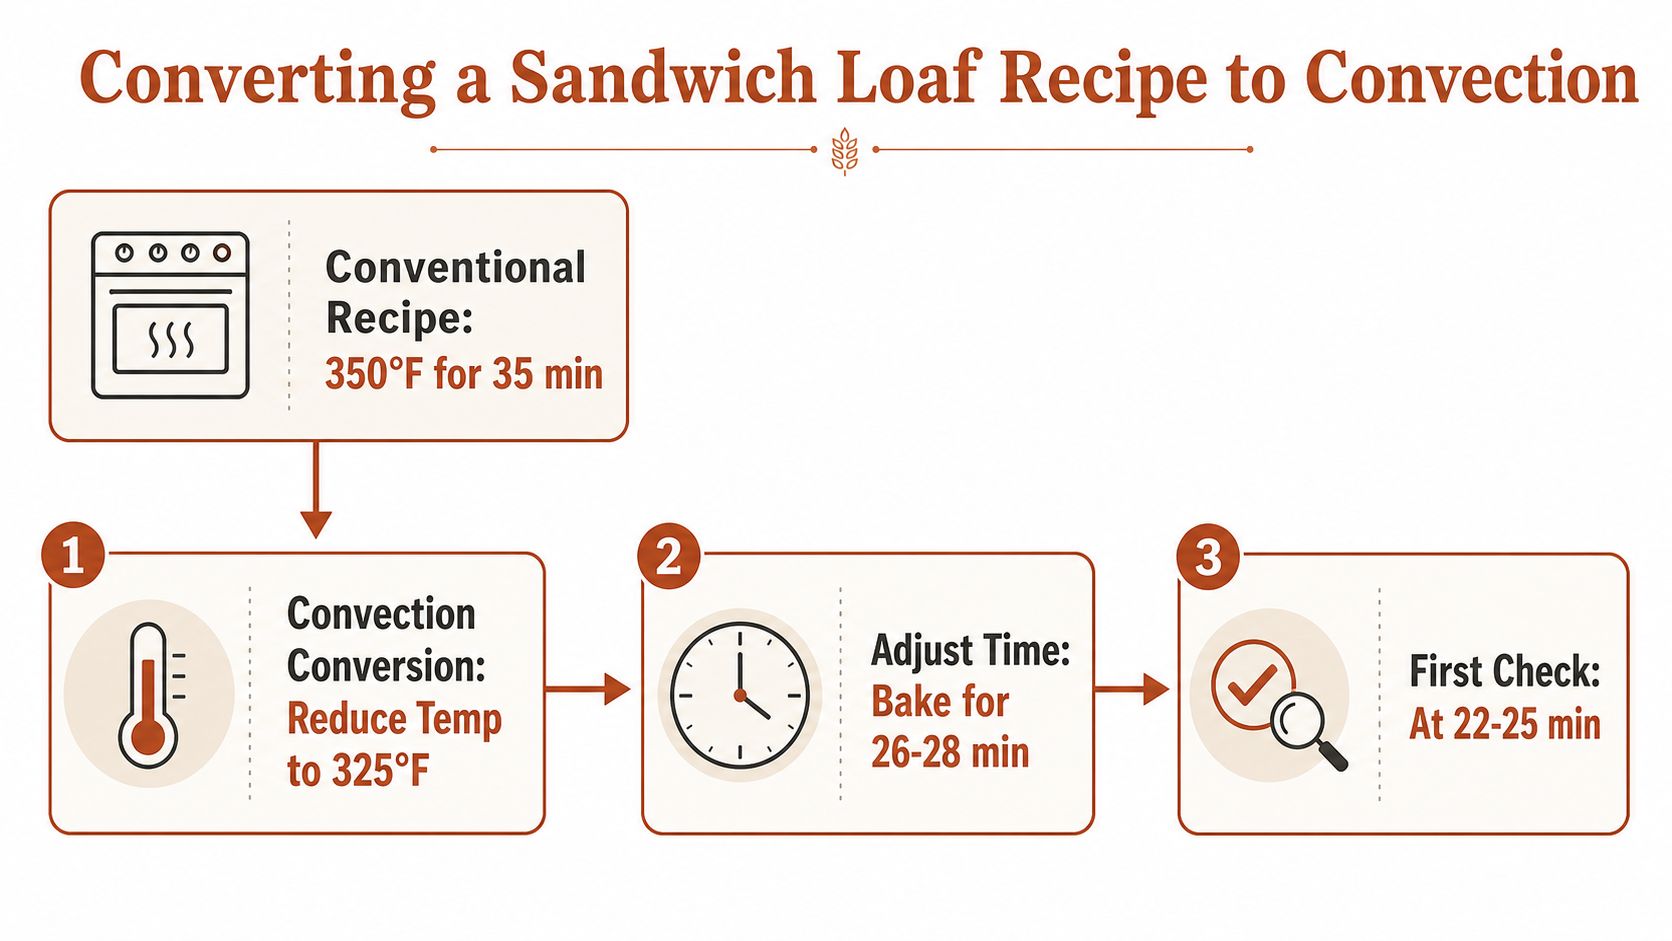
A sandwich loaf written for 350°F and 35 minutes gives you a useful test case. Set the convection oven to 325°F, then inspect the loaf around 26–28 minutes rather than waiting for the recipe's full bake time. This convection conversion guidance provides a starting point, not a fixed formula. Airflow and steam determine how far you need to adjust.
Use the pan and rack to control the result
For a standard sandwich loaf, begin on the center rack. It keeps the pan away from the strongest upper element while leaving space for air to move around the sides. A tall Pullman pan often does better in the lower third, where the top crust sits farther from direct overhead heat.
Pan color changes the conversion. A dark pan absorbs and radiates more heat than a light one, so the crust can brown before the center sets. With a dark pan and forceful airflow, start below the baseline temperature and check the loaf earlier. A light pan may need less adjustment, especially if the crust remains pale while the crumb finishes.
Fan settings matter too. Use low fan speed for enriched or delicate doughs that dry quickly. High speed can suit multiple pans, but it may set the surface before the loaf has finished expanding. If the top colors fast while the sides remain soft, lower the fan before cutting the temperature again. If the oven offers no fan control, move the pan slightly lower and shield the crust loosely with foil after it has developed enough color. Keep foil clear of the fan and heating elements.
Apply the conversion to any loaf
Use this sequence:
- Start 25°F lower than the conventional recipe, or about 15°C lower.
- Begin checking around 75–80% of the original bake time, then continue only if the loaf needs more heat.
- Judge color, structure, and internal doneness, not the timer alone.
- Change one variable at a time, such as fan speed, pan color, or rack height.
For the 350°F, 35-minute example, the practical first bake is 325°F with an inspection around 26–28 minutes. Do not make a large temperature and time reduction without watching the loaf. That combination can produce a pale crust and a center that has not set.
Artisan and Sourdough Bakes in Convection
Artisan loaves need a different approach from sandwich bread because crust development is part of the result. A high initial temperature encourages rapid expansion and strong surface browning, while a lower finishing temperature gives the crumb time to set without turning the crust bitter or burnt.
Professional guidance commonly uses an initial temperature around 230–240°C, followed by a reduction to 200–210°C after about 15 minutes. Country and sourdough loaves often bake for roughly 35–45 minutes, depending on dough size, shape, and oven hardware, as outlined in this technical bread-baking guide.
Build heat, then protect the crust
Preheat thoroughly with the baking surface in place. A Dutch oven, baking stone, or steel needs time to absorb heat, not just an oven cavity that has reached its displayed temperature. Load the dough quickly, score decisively, and introduce steam before the surface begins to dry.
Baking steels deserve caution. Modernist bread guidance specifically notes that convection's stronger heat flow can scorch bread on steels unless the oven setup moderates that energy. A steel transfers intense heat from below, while the fan accelerates browning from above. The combination can be excellent for thin, crisp products and too aggressive for a large country loaf.
If the top colors rapidly, lower the fan setting after the initial expansion phase. If your oven has only one fan speed, move the loaf away from the strongest airflow or use a foil tent during the finishing stage. Don't cover the loaf immediately after loading if you're relying on early surface heat for oven spring. Shield it only after the crust has taken on enough color.
Read the score as feedback
A well-executed score should open along the intended line. If it barely moves, the surface may have dried too quickly, the dough may be under-proofed, or the cut may not have been deep and clean enough. If the loaf bursts elsewhere, the score may have sealed before expansion finished.
Wet dough benefits from steam and moderated airflow because its surface stays flexible longer. A drier dough may brown faster and need less aggressive fan exposure. In both cases, convection rewards observation. The goal isn't to force every artisan loaf through the same temperature schedule. It's to create enough early expansion, then slow the crust before it outruns the crumb.
Steam, Humidity, and How to Fake a Combi Oven
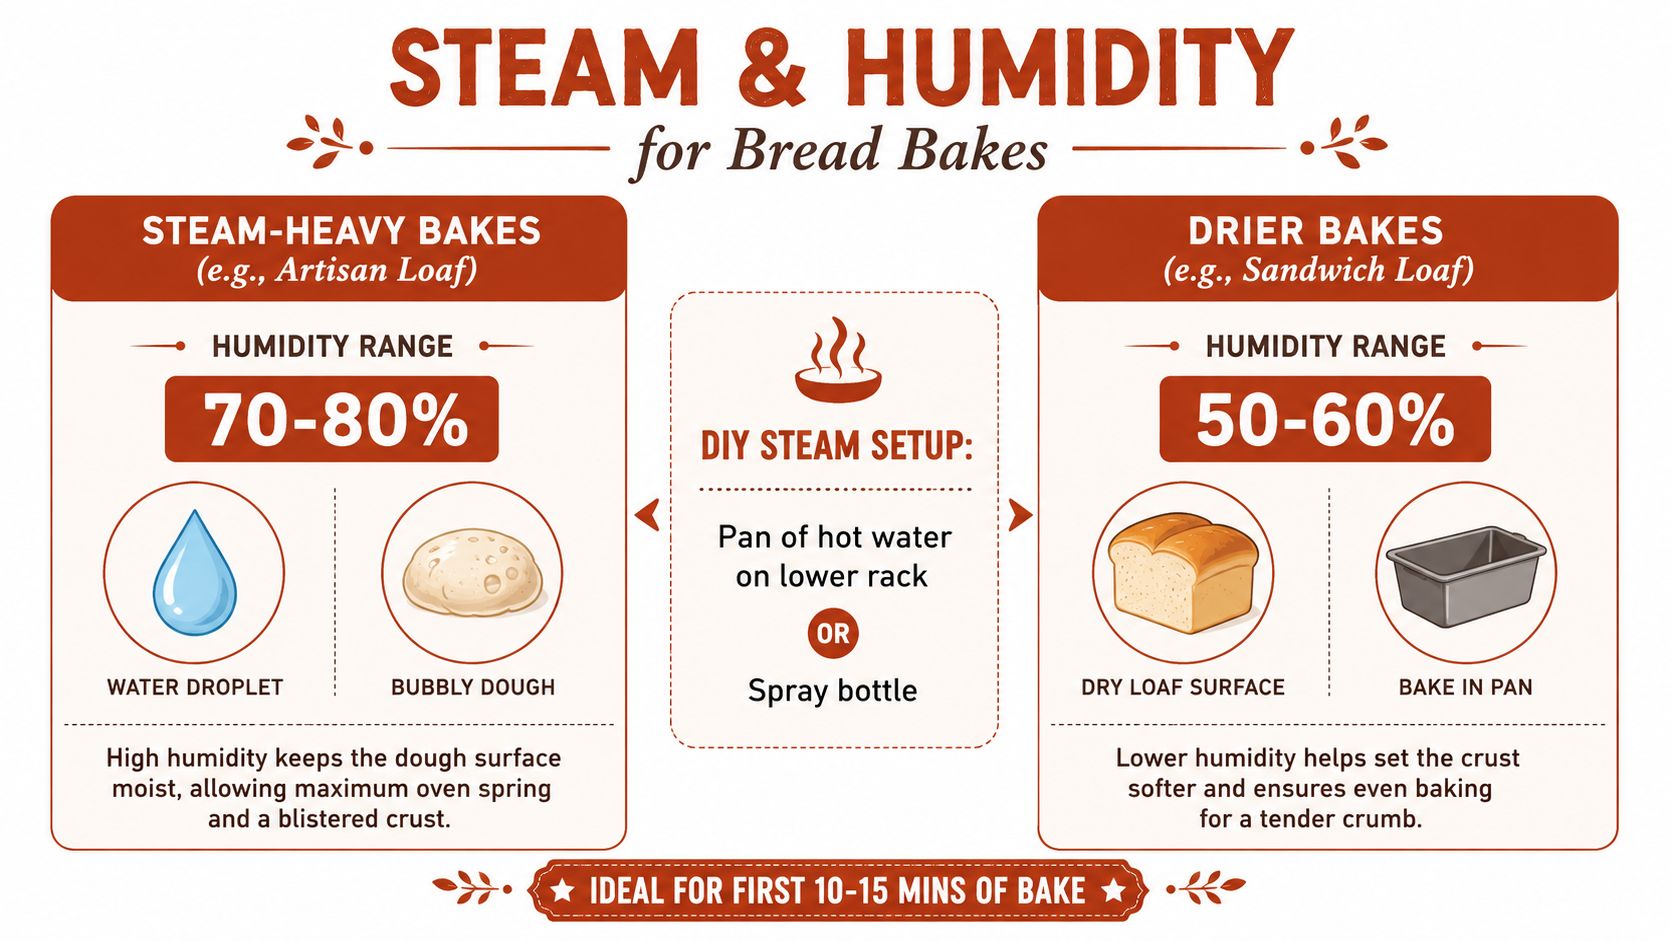
Steam changes the first stage of an artisan bake. When moisture condenses on the dough surface, it slows surface heating and helps create a glossy, thinner crust. Lower humidity tends to produce a tougher, denser crust, while higher humidity generally lengthens the bake because moisture evaporates more slowly and gluten coagulation takes longer, according to this analysis of humidity in convection baking.
For artisan bread, an early-bake humidity range of about 60–80% is commonly recommended. Forced-convection bakery systems are reported around 30–60% relative humidity, compared with 90–95% in natural-convection ovens. Those ranges aren't settings you can always reproduce at home, but they explain why a fan-assisted oven often needs more deliberate steam management.
DIY steam setups that actually work
A home oven doesn't need a built-in combi system to retain useful moisture. It needs a hot surface that can accept water safely and a way to keep steam near the loaf during the early bake.
- Cast-iron pan: Preheat a sturdy cast-iron pan on a lower rack, then add hot water after loading the dough. Stand to the side and protect your hands, because the water will produce an immediate burst of steam.
- Rimmed sheet pan with lava rocks: Heat the rocks in the pan and pour water over them after the loaf enters. The extra surface area helps the water vaporize quickly.
- Inverted sheet pan: Cover the loaf with an inverted sheet pan for the opening stage. This traps moisture released by the dough and avoids pouring water into a hot oven.
- Dedicated steam accessory: A purpose-built steam tool can make the process more controlled than spraying the oven walls or juggling a pan of water.
The fan complicates every setup because moving air pulls steam away from the dough. You may need a stronger initial steam load, a covered opening stage, or a lower fan setting. Spraying the dough surface can help, but repeated door opening usually costs more heat than it adds moisture.
Safety matters: Never pour cold water onto glass, a baking stone, or a hot oven element. Use heat-safe metal, stand clear of the steam, and follow the equipment manufacturer's instructions.
For a sandwich loaf, excessive steam can soften a crust you want tender but not rubbery. For a hearth loaf, insufficient steam can seal the score too early. Match humidity to the crust you want, and remember that convection usually requires faster decisions because the cavity dries quickly. More practical steam techniques are collected in this guide to baking bread with steam.
Troubleshooting the Three Most Common Convection Failures
A dense loaf isn't always a mixing problem. Under-proofed dough can enter a forceful convection oven with too little gas structure, while aggressive top heat dries the surface before the loaf completes its expansion. The result is a tight crumb with a crust that looks finished too soon.
Overbrowning has a different profile. High airflow, a dark pan, and a position near the top element can all accelerate surface color. Lowering the temperature helps, but moving the pan and moderating the fan often solves the underlying problem more cleanly.
Uneven baking usually points to the oven's airflow pattern rather than the formula. One side may sit in a hot stream while the other remains protected by the pan. A controlled rotation can help, but don't rotate during the fragile opening phase if the loaf hasn't established its structure.
Convection Bread Failure Quick-Fix Matrix
| Symptom | Root Cause | Fastest Fix |
|---|---|---|
| Dense crumb | Under-proofed dough, aggressive top heat, or a dried surface that limits oven spring | Proof until the dough has visibly expanded, add early steam, and lower fan intensity after loading |
| Overbrowning | Strong airflow, dark cookware, or a pan too close to the upper element | Move to the center or lower third, reduce the fan, and shield the crust once color is sufficient |
| Uneven bake | Hot-spot airflow, crowded rack space, or poor pan placement | Center the pan, leave air around it, and rotate carefully after the loaf has set |
Fix the cause, not just the color
If the crumb is dense and the crust is pale, don't automatically bake longer. Check proofing first, then assess whether the oven is losing heat when you load the dough. Yeast bread proofing is commonly managed around 90°–100°F, or 33°–38°C, in a draft-free, humid environment to prevent the dough surface from drying, according to this yeast bread production guide.
If the loaf browns unevenly, make one controlled change. Move the rack, lower the fan, or change the pan. Changing all three at once makes the next bake impossible to interpret. Convection rewards a baker who takes notes, not one who obeys a rigid timer after the crust has already given away the problem.
Your Convection Bread Baking Checklist
Print this beside the oven. Use it as a starting point, then adjust for your fan, pan, and loaf shape.
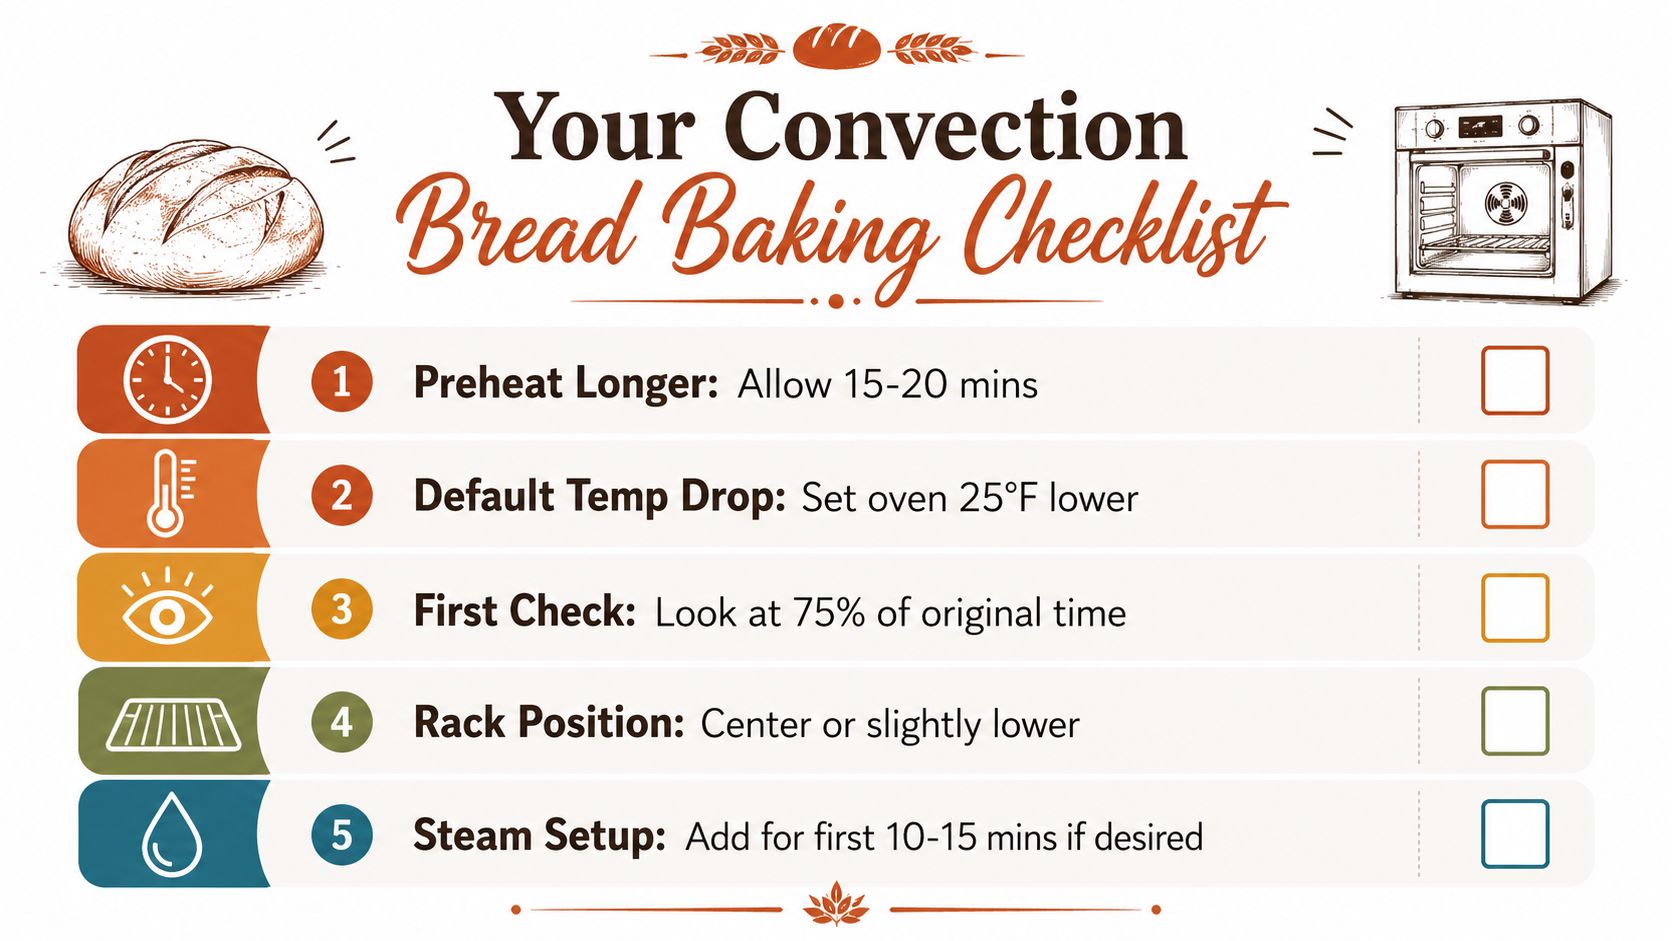
- Preheat thoroughly: Give the oven and baking surface a longer preheat than you'd use for a basic conventional bake.
- Lower the default temperature: Begin about 25°F lower, or 15°C lower, than the conventional recipe.
- Check early: Inspect the loaf around 20–25% sooner than the original bake time, following the standard guidance cited earlier.
- Place the pan deliberately: Use the center rack for sandwich loaves and the lower third for tall Pullman pans.
- Choose steam by crust goal: Add early steam for a glossy artisan crust. Keep sandwich loaves relatively drier unless the recipe calls for protection from surface drying.
- Watch the loaf: Look for an evenly colored crust, a set center, and a loaf that sounds hollow when tapped where that test suits the style.
When baking two loaves, leave space between the pans so the fan can move air around both. Convection can be especially useful for multiple loaves, but crowded pans still create sheltered zones and uneven color. Rotate only after the structure has firmed enough to handle the movement.
Controlled proofing makes the oven stage easier to repeat. A system such as DBakerAid™ controls fermentation and proofing conditions through a fermentation bowl, proofing bowl, and temperature and time hub, so the dough enters the convection oven at a more predictable stage. Its equipment range is described in this home bakery equipment guide.
DBakerAid™ is designed to control the fermentation and proofing half of bread making, while you manage the convection bake with the airflow and steam decisions above. Visit DBakerAid™ to review the system and see how its guided proofing tools can make difficult homemade bread more repeatable.