

You've sliced into a brioche loaf expecting a tender, buttery crumb, only to find a gummy center that compresses under one layer of filling. The problem usually isn't the recipe alone. Brioche sandwich bread asks you to control butter, gluten, fermentation, baking, and cooling more carefully than a lean white loaf.
Brioche is worth that attention because it brings a soft, fine crumb and enriched flavor to both savory and sweet builds. The same butter-and-egg richness that makes it luxurious also makes it difficult to mix and easy to underbake. This guide focuses on the failure points that matter most, from incorporating butter at the right temperature to waiting long enough before slicing.
Table of Contents
- Why Brioche Makes a Superior Sandwich Bread
- Ingredients and Dough Mixing Technique
- Fermentation, Shaping, and Proofing for Sandwich Loaves
- Baking and the Critical Cooling Window
- Building the Best Brioche Bread Sandwiches
- Troubleshooting Common Brioche Failures
Why Brioche Makes a Superior Sandwich Bread
Brioche has a long history as an enriched French bread. The first recorded use of the word in French dates to 1404, and reference works note that brioche had reached Paris by the 17th century (historical overview of brioche). It began as a richer bread associated with ingredients such as butter and eggs, then became a practical platform for loaf-style sandwiches, sliced buns, burgers, breakfast sandwiches, and French toast.
That history still shows up in the eating experience. Brioche is classified as an enriched dough, typically made with eggs, yeast, and butter, and its higher butter-and-egg ratio gives it a tender crumb and rich flavor (brioche definition and composition). Compared with lean sandwich bread, it feels softer and more indulgent without needing a complicated filling.
Practical rule: Brioche works best when the bread contributes flavor, not just structure.
A brioche bread sandwich can support savory ingredients, but it needs a little more planning than a firm lean loaf. The crumb is tender, so a wet tomato mixture, juicy meat, or generous sauce can overwhelm it. Lightly toasting the cut face creates a firmer surface and helps the bread resist moisture.
The major difficulty appears during production. Butter can interfere with gluten if you add it before the flour has developed enough strength. Butter that's too cold can remain in pieces, while butter that's too warm can smear through the dough and weaken its structure. A controlled process adds the fat gradually only after the dough has begun to develop gluten, then protects the loaf through a complete bake and a patient cooling period (controlled brioche sandwich loaf method).
The final trap is slicing. Brioche can look fully baked while the center is still setting. Cutting too early releases steam before the crumb has stabilized, leaving a gummy interior that collapses when filled. The reliable approach is to treat brioche as a technical sandwich loaf, not as a sweet bread shaped in a pan.
Ingredients and Dough Mixing Technique
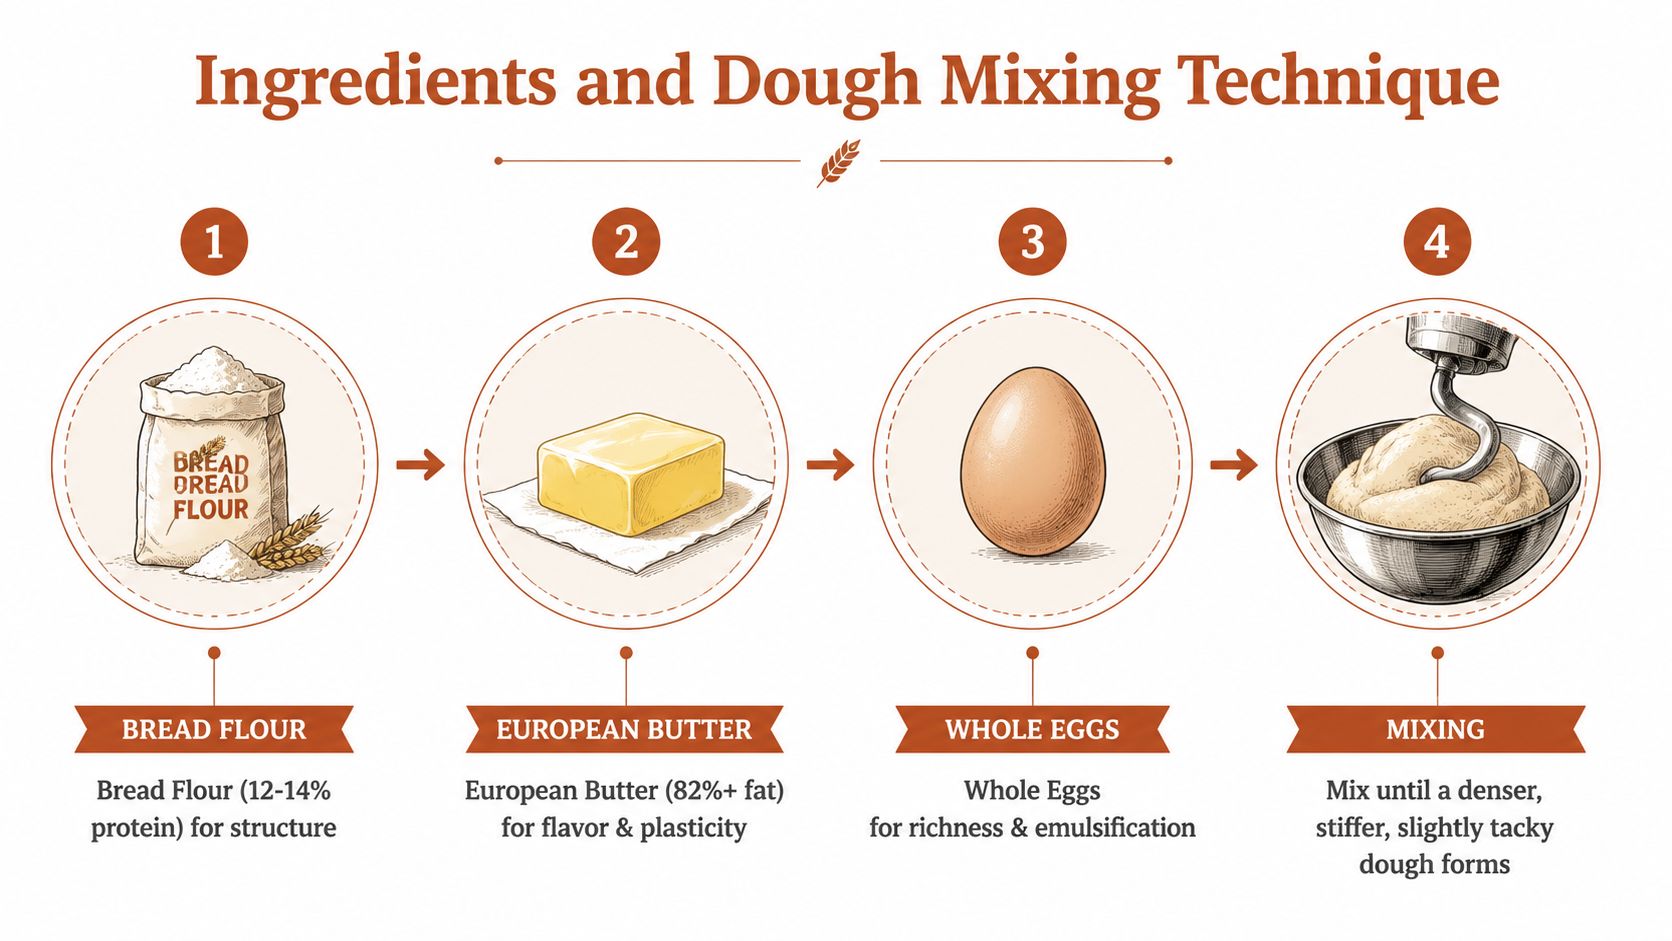
A sandwich loaf needs enough strength to slice cleanly, but it shouldn't become chewy. Use bread flour with roughly 12 to 14% protein for the gluten structure, European-style butter with at least 82% fat for flavor and plasticity, and whole eggs for richness, emulsification, and tenderness.
The mixing sequence matters more than the brand of flour. Begin with the flour, eggs, sugar, salt, and yeast. Mix until the dough develops a smooth, elastic network and can pass a windowpane test. Depending on the mixer and batch size, initial gluten development can take about 8 to 10 minutes at low to medium speed.
Develop the dough before adding butter
The dough should become cohesive before any butter goes in. It may still look firm and slightly tacky, but it shouldn't be a loose batter or a rough mass of flour. If you add butter while the gluten is undeveloped, the fat coats flour particles and makes it harder for the proteins to connect.
Soften the butter to roughly 65 to 68°F, then add it in small pieces over about 10 to 15 minutes. Give each addition time to disappear before adding the next. Cold butter can shatter into fragments and create greasy pockets. Warm butter can melt into the dough, producing a slick mixture that struggles to hold gas.
Keep the dough below 78°F during mixing. In a warm kitchen, use cooler ingredients or pause the mixer briefly if the dough temperature climbs. A dough conditioner such as DBakerAid SureDough™ can be considered when you need more extensibility and tolerance during butter incorporation, especially with warm kitchens or higher-hydration variations.
For a detailed formula and mixing reference, compare this brioche dough recipe. The finished dough should be denser, stiffer, and slightly tacky, not fluid. That texture is normal for a high-fat sandwich loaf and becomes easier to handle after fermentation or chilling.
Read the dough, not just the timer
A windowpane test gives you a better decision point than a fixed mixing schedule. Stretch a small piece gently. If it extends into a thin membrane before tearing, the gluten is ready for the butter phase. If it rips immediately, continue developing the base dough before adding fat.
Brioche doesn't reward rushing. The butter is an ingredient, but the order and temperature determine whether it enriches a strong dough or prevents one from forming.
Fermentation, Shaping, and Proofing for Sandwich Loaves
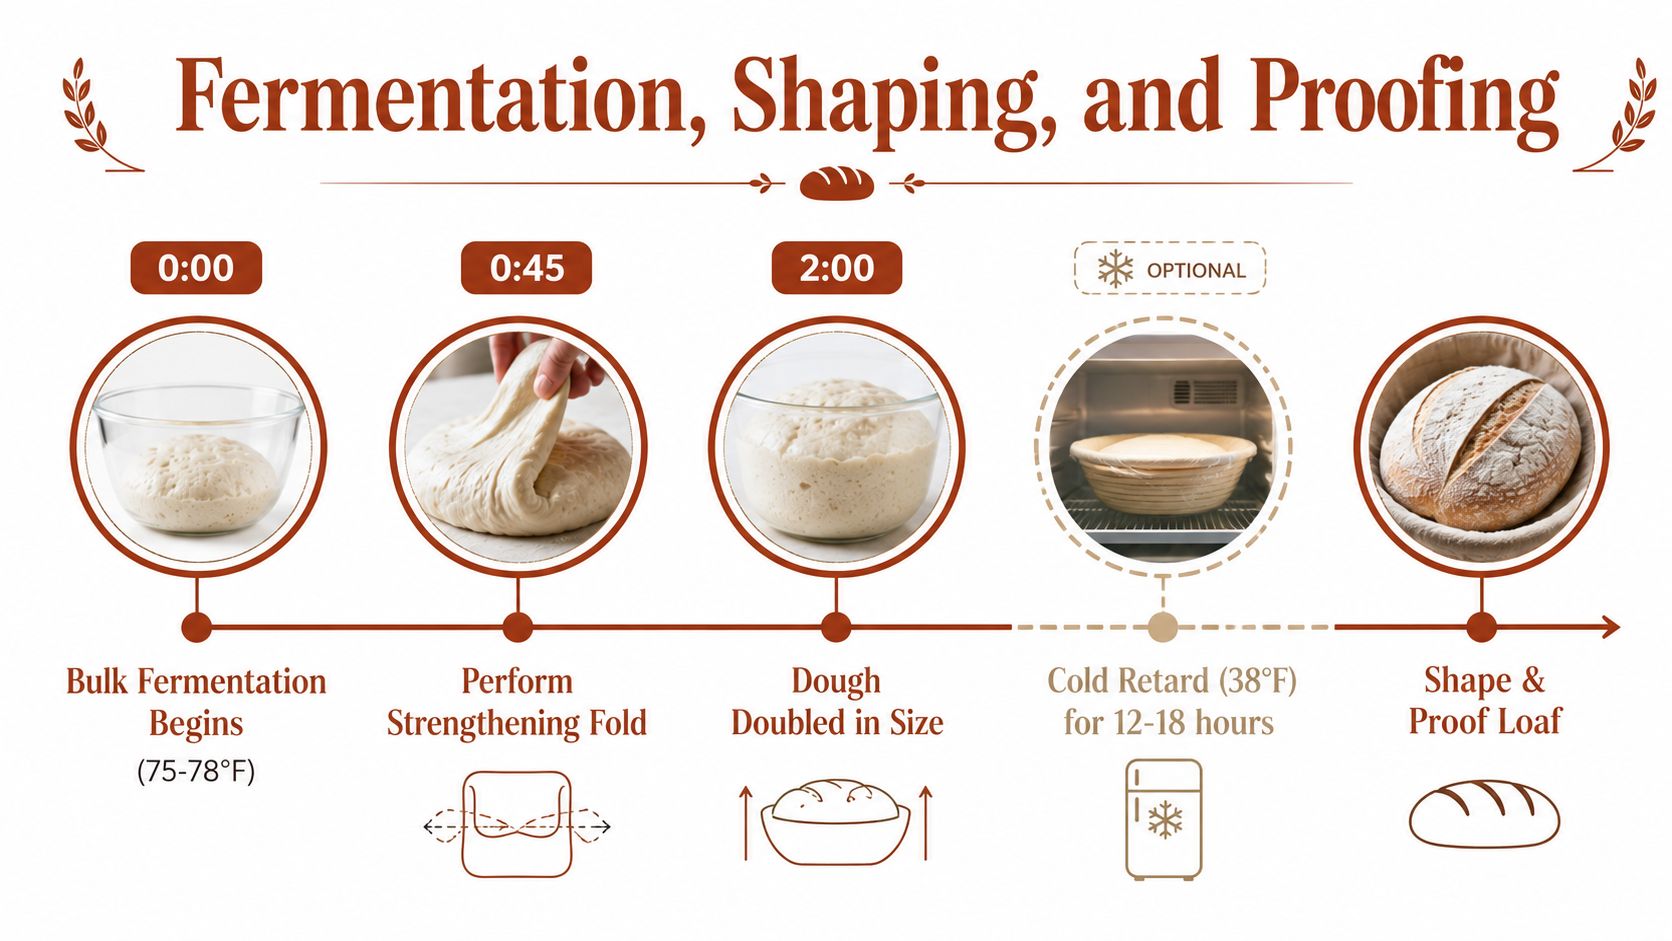
Once mixing is complete, transfer the dough to a lightly greased bowl and begin bulk fermentation at about 75 to 78°F. Allow roughly 1.5 to 2 hours, watching the dough rather than relying only on the clock. A fold around the 45-minute point strengthens the dough and redistributes temperature and yeast activity.
The dough should become visibly expanded and aerated. A colder room can slow fermentation, while an overly warm environment can soften the butter and make shaping difficult. If the dough feels greasy or slack, chill it before shaping rather than adding excessive flour.
Use cold fermentation strategically
A cold retard is optional, but it can improve handling and flavor. Refrigerate the covered dough at about 38°F for 12 to 18 hours, then shape it while it's firm. Cold dough gives you cleaner portions and makes it easier to build surface tension without tearing the enriched structure.
For a Pullman loaf, divide the dough into 3 or 4 equal pieces. Shape each piece into a tight cylinder, then place the cylinders seam-side down in a greased 9×4×4-inch pan. Even cylinders help the loaf rise evenly and produce slices without a large hollow through the center.
For a freeform sandwich loaf, shape one taut boule or batard. The outside should feel stretched and organized, not loose. Weak shaping tension allows the dough to spread sideways instead of rising upward.
Proof to the right visual cue
Proof at approximately 75 to 80°F with about 75% humidity. A Pullman loaf is ready when it rises about 1 inch above the pan rim. A freeform loaf should pass the poke test, springing back slowly while leaving a slight indentation.
Overproofing is a common misunderstanding. More expansion doesn't always mean a lighter loaf. Prolonged fermentation weakens the gluten network, and the dough can collapse in the oven. If you're using the Pullman loaf pan set, watch the dough's height and tension closely rather than extending proofing just because the scheduled time hasn't elapsed.
D'Steamer use changes the timing. Steam injection during the first 10 minutes of proofing can accelerate the rise and improve crust shine, so reduce the proofing time by approximately 15 to 20% and start checking earlier.
Baking and the Critical Cooling Window
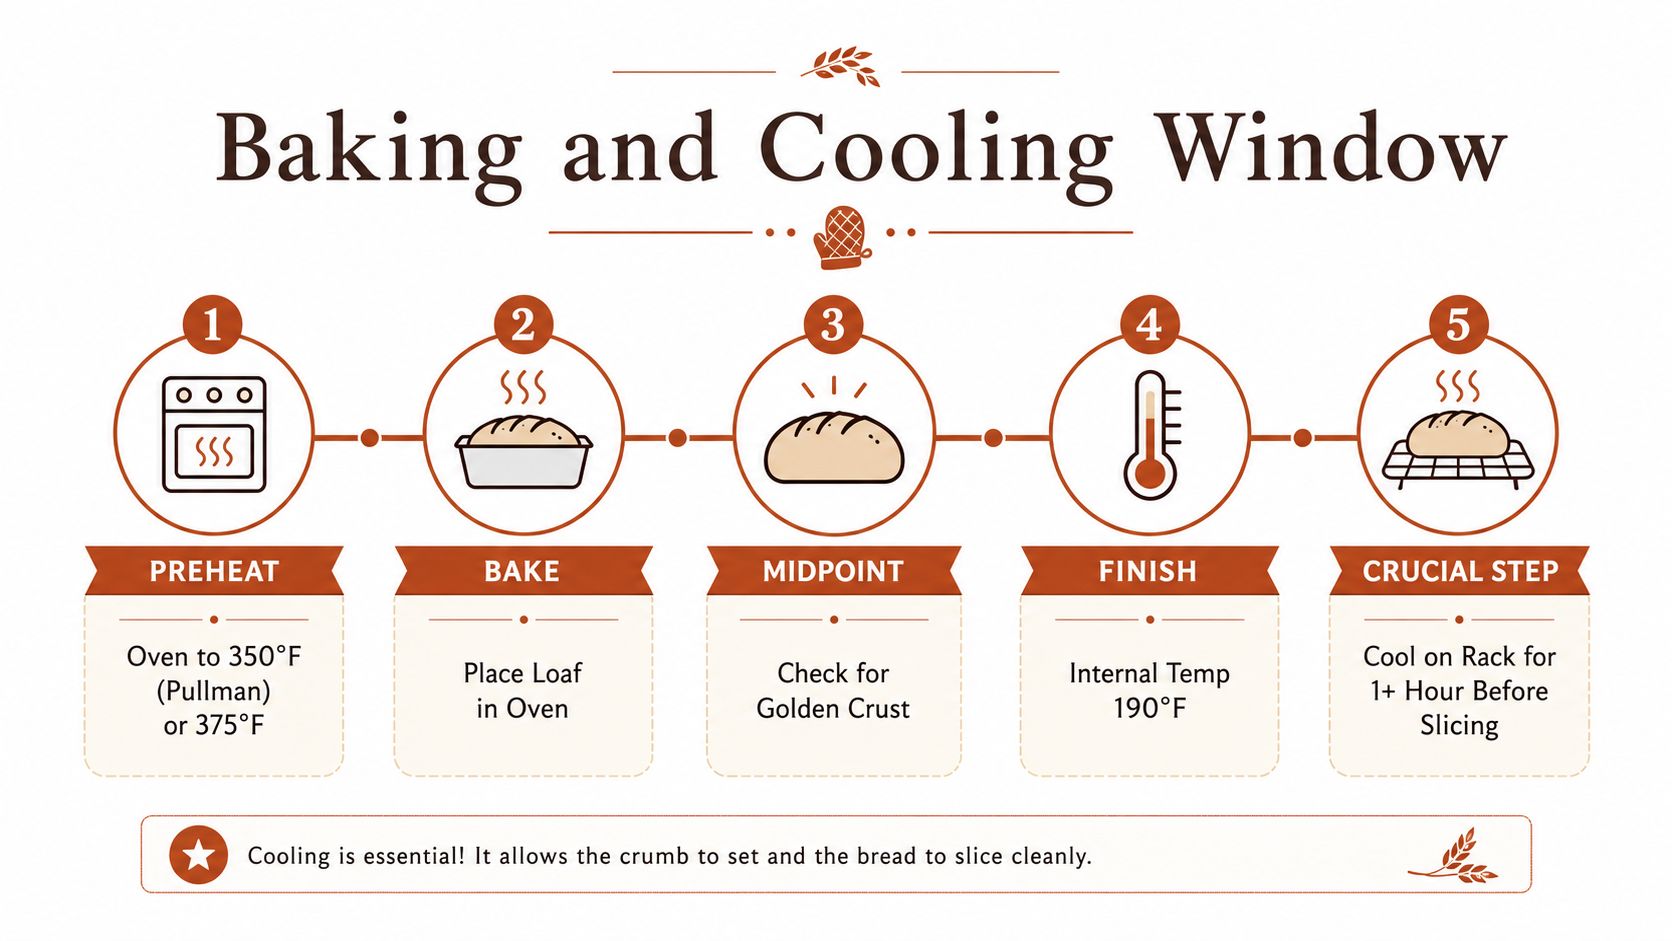
Brioche can look fully baked while its enriched center is still unset. For Pullman loaves, preheat the oven to 350°F, or about 175°C. Freeform shapes generally bake at 375°F, or about 190°C, because their exposed surface colors faster and more unevenly.
Steam during the first 10 minutes gives the dough time to expand before the crust firms. Use a D'Steamer or place a pan of boiling water on the oven floor. Steam supports oven spring and a thinner crust, but it cannot correct weak fermentation or poor gluten development.
Trust internal temperature over crust color
Butter and sugar push the crust toward browning before the crumb has finished setting. Check the center rather than judging by appearance, and aim for approximately 190 to 195°F, or 88 to 90°C.
Underbaking leaves more than a soft middle. As the loaf cools, the center can collapse, turn gummy, or smear against the knife. If the crust darkens early, tent the loaf and continue baking until the center reaches the target temperature.
Cooling is part of the bake
Remove the loaf from its pan and set it on a wire rack. Cool for at least 2 hours, with 4 hours preferable for a sandwich loaf. During this interval, the starch structure continues to set. Cutting early releases steam and leaves the interior unstable, which can make slices tacky and difficult to spread.
For cleaner sandwich slices, refrigerate the fully cooled loaf overnight. The crumb firms while retaining its tenderness. Slice with a serrated bread knife and a gentle sawing motion. Cut about 1/2 inch thick for standard sandwiches, or closer to 3/4 inch when the filling is hot, juicy, or substantial.
The best brioche sandwich starts the previous day, when the loaf has had time to cool completely.
Building the Best Brioche Bread Sandwiches
Brioche rewards fillings that need a soft, buttery carrier, but its tender crumb absorbs moisture quickly. Build each sandwich around the filling's temperature, juiciness, and weight rather than treating every loaf the same.
For juicy fillings, toast the cut face at about 300°F, or 150°C, for roughly 2.5 minutes. A dry skillet or broiler firms the surface and slows moisture migration, but watch closely because brioche's sugar and butter brown fast. Toasting also gives the sandwich enough structure to withstand sauces and warm ingredients.
Match the barrier to the filling
Spread mayonnaise, butter, or cream cheese over the bread before adding tomato sauces, dressed vegetables, or juicy proteins. A cheese slice, lettuce bed, or mashed avocado can create another layer between wet ingredients and the crumb. Keep spreads thin and even. Too much fat makes the sandwich slippery and masks brioche's flavor.
Drier fillings need less protection. Sliced turkey, sharp cheese, cured meat, pickled vegetables, and bitter greens allow the bread's softness to remain noticeable without becoming saturated. Salty, acidic, or bitter ingredients also balance brioche's buttery sweetness.
Breakfast sandwiches suit brioche particularly well. Eggs, bacon, sausage, and caramelized onions work with its slight sweetness, so a heavy sauce is rarely necessary. Keep the filling compact, and drain greasy ingredients before assembly.
Handle the loaf gently
Panini-style sandwiches need light pressure. Brioche compresses easily, and a heavy press can flatten the crumb while forcing moisture into the bread. Use enough heat to warm the filling and mark the surface, with only enough weight to hold the sandwich together.
Seafood fillings require the same restraint. A lightly toasted split bun and a measured amount of dressing help preserve the bread's shape. This brioche bun guide for New England-style lobster rolls offers a useful reference for rich, moist fillings.
Assemble close to serving time, especially with hot or dressed ingredients. Finish by cutting the sandwich diagonally. The angle exposes the layers, improves handling, and makes a clean bite easier without crushing the loaf.
Troubleshooting Common Brioche Failures
A dense brioche loaf isn't automatically a sign that the flour is wrong. The first question is whether the dough reached a strong windowpane before butter was introduced. If it didn't, the fat likely interrupted gluten development. Butter temperature is the next suspect, followed by mixing temperature and proofing control.
Gummy interiors usually indicate underbaking or premature slicing. Brioche's crust can brown before its center has set, so color alone isn't reliable. Check the internal temperature, then cool the loaf fully before judging the crumb.
Sideways spread points to either weak shaping tension or overproofing. A properly shaped loaf should feel taut and springy after final proof, not slack and excessively jiggly. Butter pooling at the base can mean the butter didn't emulsify because it was too cold, or that the dough became too hot during mixing and separated.
| Problem | Root Cause | Solution |
|---|---|---|
| Dense, heavy crumb | Gluten wasn't developed before butter, or the butter was too warm | Mix the base dough to a windowpane, then add softened butter gradually |
| Gummy interior | Underbaking or slicing before the crumb set | Bake to approximately 190 to 195°F and cool completely |
| Loaf spreads sideways | Overproofing or weak shaping tension | Shorten proofing and shape each piece into a taut cylinder |
| Butter pools in the pan | Butter didn't emulsify, or dough temperature became excessive | Use properly softened butter and keep the dough below the stated temperature limit |
| Tight, ordinary bread-like crumb | Butter was added too early, or flour lacked sufficient protein | Develop gluten first and choose flour formulated for stronger structure |
| Thick, hard crust | Overbaking or insufficient early steam | Monitor the center temperature and add steam during the opening stage |
The corrective action should address the root cause, not just the symptom. Adding flour to a greasy dough may make it easier to handle, but it won't rebuild gluten that was never developed. Likewise, slicing a gummy loaf thinner won't fix an underbaked center.
When the process is controlled, brioche becomes a dependable sandwich bread rather than a special-occasion gamble. The crumb stays tender, the slices hold their shape, and a light toast gives wet fillings somewhere to stop.
D'BakerAid™ controls fermentation and proofing with its Stage 1 yeast fermentation bowl, Stage 2 dough proofing bowl, and temperature-and-time hub, with an optional D'Steamer for humidity-assisted baking. Visit DBakerAid™ to see the system and start with the brioche recipes built for repeatable sandwich loaves.