

You mix the dough, shape it carefully, slide it into the oven, and then watch it bake into something that looks more like decent sandwich bread than real artisan bread. The crust stays pale or leathery. The score barely opens. The loaf spreads before it lifts. Most of the time, the problem isn't the recipe.
The problem is that artisan bread without a Dutch oven asks a standard home oven to do a job it isn't built to do on its own. A Dutch oven fixes that by trapping moisture and holding heat close to the loaf. Without it, you have to create those conditions yourself, and some workarounds do that far better than others.
That matters because artisan bread isn't some tiny niche anymore. One market report projects the artisan bakery market to grow from USD 3.67 billion in 2026 to USD 7.1 billion by 2035 at a 6.84% CAGR, and estimates more than 1.1 million artisan bakeries operated globally in 2024, producing over 15.6 million metric tons of artisan baked products annually, with fresh breads the largest product type at over 6.9 million metric tons consumed globally in 2024 (artisan bakery market report). Home bakers want that style of bread, but most are trying to get there in a regular oven with improvised steam.
There's also a commercial reason this matters. Another market source notes artisan breads are typically freshly made, often baked on site, and sold within two days. That same source says in-store bakery artisan and specialty bread purchases rose between 2023 and 2024, while perimeter bread dollar sales increased 1.4% and units increased 7.9% in January (artisanal bakery products market overview). Fresh crust, quick sale, strong oven spring. That's the standard you're trying to imitate at home.
Table of Contents
- Why Artisan Bread Without a Dutch Oven Is Harder Than It Looks
- Choosing Your Best Setup When You Do Not Have a Dutch Oven
- How to Create Steam and Bake for Open Crumb and Thin Crust
- Proofing Scoring and Loading Tips That Protect Oven Spring
- Troubleshooting Common Problems and How to Fix Them
- Baking Bakery Quality Bread at Home With More Consistency
Why Artisan Bread Without a Dutch Oven Is Harder Than It Looks
Most failed loaves share the same story. The dough was good enough. The fermentation was fine. But the loaf hit dry oven air too early, the surface set too fast, and expansion stopped before the crumb had a chance to open.
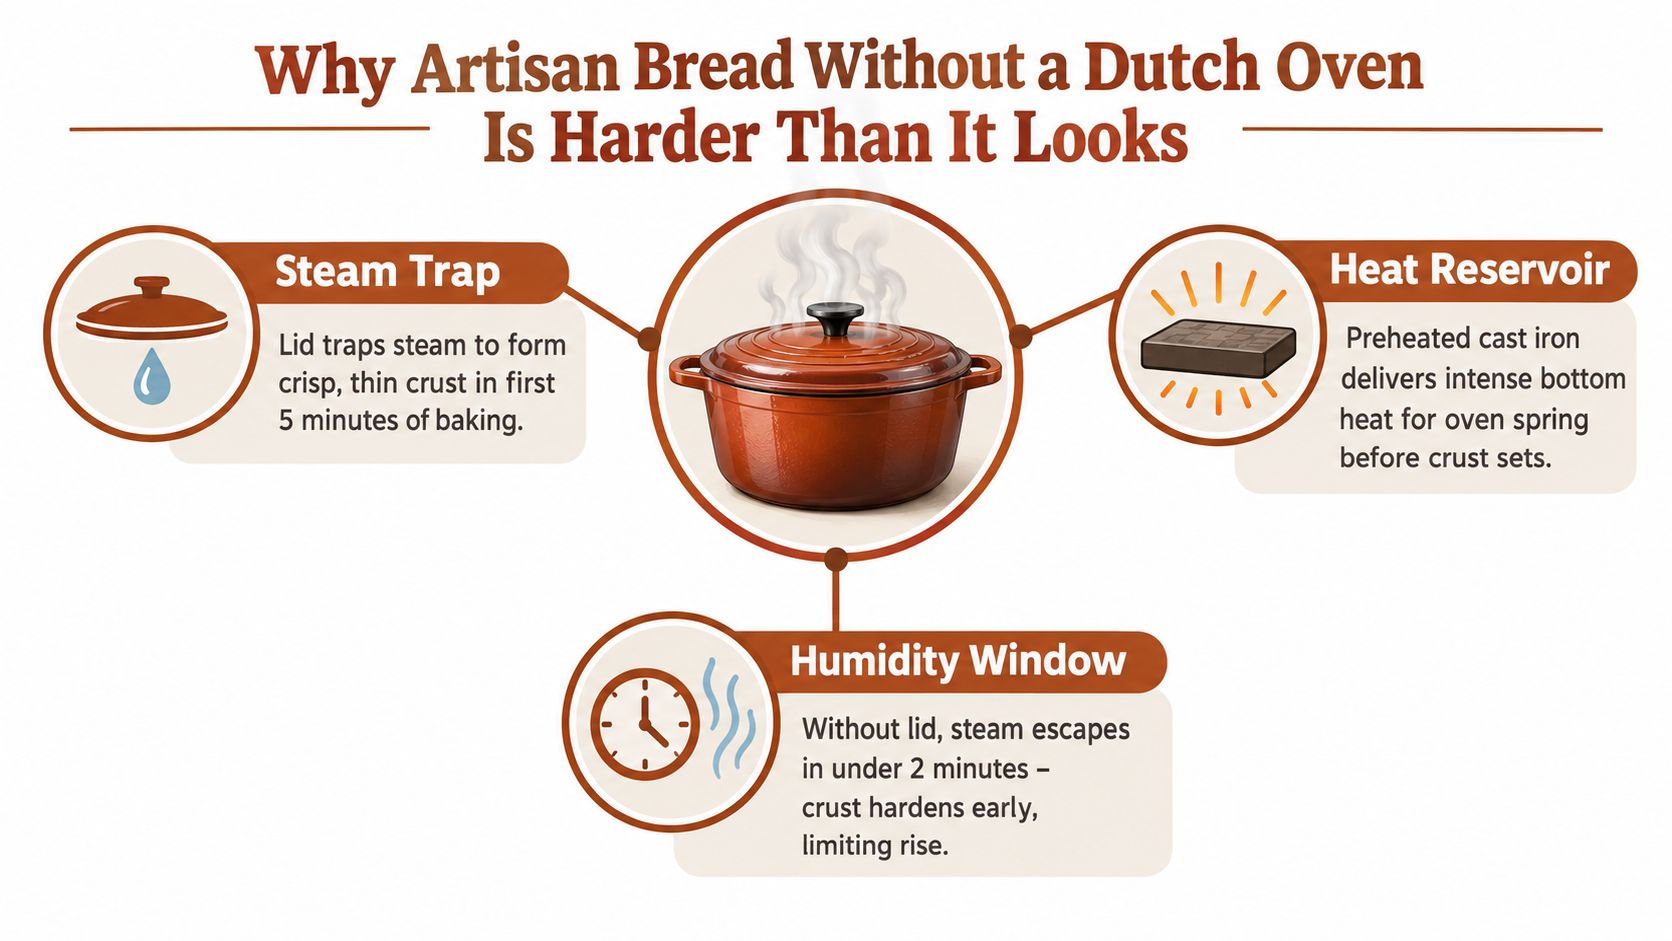
What the Dutch oven is really doing
A Dutch oven doesn't make bread better by magic. It does three practical things at once.
- It traps steam released by the dough during the first part of the bake.
- It stores heat in heavy preheated walls and floor.
- It delays crust set long enough for the loaf to expand before the exterior hardens.
Take away the pot, and none of those happen automatically. That's why so many "just put a pan of water in the oven" suggestions produce bread that's acceptable but not especially crusty.
Practical rule: If your setup can't give you high heat, steam in the first 15 minutes, and dry heat at the end, it won't give you bakery-style crust.
The real problem is the humidity window
In a commercial deck oven with steam injection, the baker loads the bread into a hot chamber and gets immediate humidity where it counts. In a home oven, steam disappears fast unless you trap it near the loaf. That short humidity window is why uncovered boules often come out dull, thick-crusted, and flatter than expected.
One guide on crusty artisan bread without a Dutch oven makes this point clearly. The issue isn't whether you replace the pot with any cover. It's whether your method controls heat, early steam, and final surface dehydration well enough to make a thin, shattering crust rather than just a baked loaf (crusty artisan bread method notes).
Why this matters even more with specialty doughs
This gets touchier when you move beyond a basic white lean dough. High-protein formulas are a good example. D'BakerAid makes those with controlled fermentation and proofing in a two-stage system. Its high-protein loaves are built around isolate proteins plus vital wheat gluten and can land at about ~10 to 11g protein per slice, versus plain white at about ~2.5g and many store protein breads around ~5 to 7g per slice, depending on the loaf. The trade-off is texture. These doughs run denser, stiffer, and usually rise ~50 to 75%, not double. They also brown faster and need cleaner control over proofing and bake conditions to avoid a heavy result.
For ordinary artisan bread and for specialty doughs, the lesson is the same. The pot isn't the goal. The conditions are.
Choosing Your Best Setup When You Do Not Have a Dutch Oven
If you don't own a Dutch oven, there are four setups worth using. Everything else tends to be a compromise that costs more crust than it's worth. I judge each one by three things only: heat retention, early steam trapping, and the quality of the final crust.
The setups that actually work
| No Dutch Oven Setups Compared for Crust and Spring | Heat Retention | Steam Method | Crust Result |
|---|---|---|---|
| Inverted sheet pan with deep roasting pan lid | Good | Partial enclosure over loaf | Usually the closest to a thin artisan crust if the cover seals reasonably well |
| Baking stone or steel with steam tray | Very good from below | Open-oven steam from preheated pan | Strong oven spring when timed right, but crust can run thicker if steam dissipates too fast |
| Cast-iron skillet plus foil tent or second pan cover | Moderate to good | Steam pan plus loose cover | Better than fully open baking, but less consistent because foil leaks and shifts |
| Loaf pans used as a cloche | Moderate | Pan-to-pan cover traps local steam | Good for bâtards or smaller loaves, less useful for larger boules |
Best choice for most bakers
If you have a baking steel or stone, start there. Preheated mass under the loaf matters more than people think. Bottom heat drives spring before the score line fully sets, and a steel especially helps with that first surge. If you're deciding between surfaces, this guide on bread baking steel basics is a useful reference.
The weakness of the stone-or-steel method is steam retention. It gives you excellent floor heat, but the oven cavity is still large and leaky compared with a covered pot. That means your steam setup has to be immediate and purposeful.
Best choice for the thinnest crust
The roasting-pan-over-loaf method gets closest to Dutch oven behavior without using one. Bake on a preheated steel or stone, then cover the loaf with a deep metal roasting pan or hotel pan for the first part of the bake. That creates a smaller humid chamber around the dough, which is what really matters.
This method beats the open steam-tray method when your priority is a thinner crust and better bloom. The cover doesn't need to be fancy. It does need enough height so it doesn't hit the loaf once it expands.
A loose cover placed over the loaf usually works better than flooding the whole oven with steam and hoping some of it stays where the bread is.
Setups I don't recommend unless it's all you have
A spray bottle is the classic example. It feels active, but it doesn't create enough sustained humidity. Opening the oven repeatedly to spray makes things worse by dumping heat right when the loaf needs it most.
A foil tent can help in a pinch, especially over a smaller bâtard, but it's flimsy. It shifts during loading, leaks steam, and can stick if the loaf rises aggressively. I use it only when the loaf shape or oven space rules out a hard cover.
For pan loaves, two loaf pans clipped or nested together can act like a mini cloche. It's simple and more effective than people expect. It just won't mimic the open expansion and ear you get from a freestanding hearth loaf.
How to Create Steam and Bake for Open Crumb and Thin Crust
The bake itself should feel almost mechanical. Once you stop improvising, your results get far more repeatable. The core method is a two-stage bake: humid first, dry second.
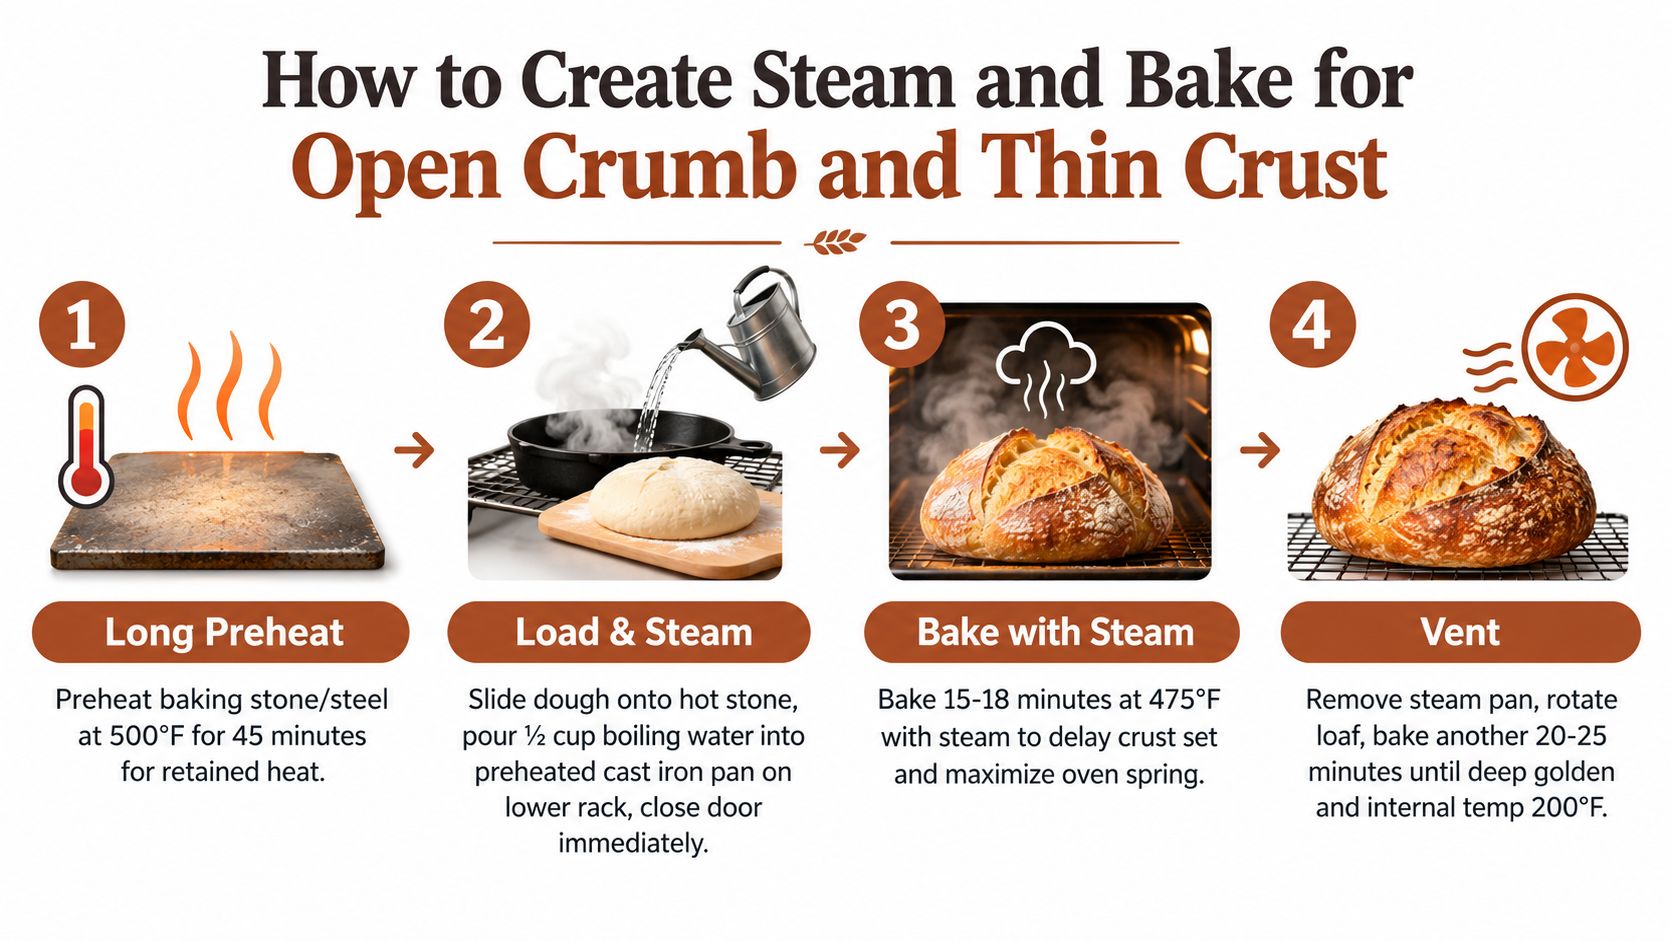
Stage one begins before the dough enters the oven
Preheat your baking stone or steel at 475 to 500°F (245 to 260°C) for at least 45 to 60 minutes, then load the loaf and add steam immediately. Keep the loaf in the humid phase for about 15 to 20 minutes before venting and finishing uncovered (two-stage bake method).
That long preheat isn't optional. A half-heated stone gives you a sluggish first lift, which often gets mistaken for overproofing. It wasn't overproofed. The baking surface wasn't hot enough to give the dough that early push.
The loading sequence has to be fast
This is the rhythm that works in a standard oven:
- Preheat fully with your stone or steel in place and your steam pan on a lower rack.
- Boil your water before loading so you're not wasting time once the dough is ready.
- Transfer the loaf quickly onto parchment, a peel, or directly onto the hot surface.
- Add steam immediately and shut the door at once.
- Leave the oven closed through the steam phase.
If you're using a hard cover like a roasting pan, put it over the loaf right after loading. If you're using open steam, pour the hot water into the preheated pan only after the loaf is in place.
For more on oven humidity timing, baking with steam in a home oven breaks down the logic well.
Steam is only useful if it arrives on time. Late steam doesn't rescue a loaf whose crust has already started setting.
When to vent and when to trust the loaf
A practical benchmark for bread baked without a Dutch oven is an internal temperature of 205 to 210°F (96 to 99°C). Several method guides also specify removing the steam source after roughly 20 minutes and continuing another 15 to 25 minutes. Common mistakes are opening the oven too early, under-preheating the baking surface, and using too little steam, all of which reduce crust quality and loaf expansion (artisan loaf doneness and steam timing).
What I watch in that second phase is color first, then feel. The loaf should move from blond to deep golden. The crust should dry and firm up rather than stay tacky. If you're pulling bread because you're nervous about overbaking, you're usually pulling it early.
What creates open crumb and what doesn't
Open crumb isn't just hydration. That's where many home bakers get stuck. You can mix a wet dough and still bake a tight loaf if the surface hardens too soon.
These are the habits that help most:
- Use strong bottom heat so the loaf rises before spreading.
- Score with intent so expansion has somewhere to go.
- Keep the first phase humid long enough to delay crust set.
- Finish in dry heat so the crust thins and crisps instead of staying chewy.
A loaf can be rustic without being randomly baked. The best no-Dutch-oven bread comes from repetition and strict timing, not from trying a different steam hack every weekend.
Proofing Scoring and Loading Tips That Protect Oven Spring
Even with a solid steam setup, you can lose most of your spring in the minute before the loaf bakes. A lot of flat bread starts.
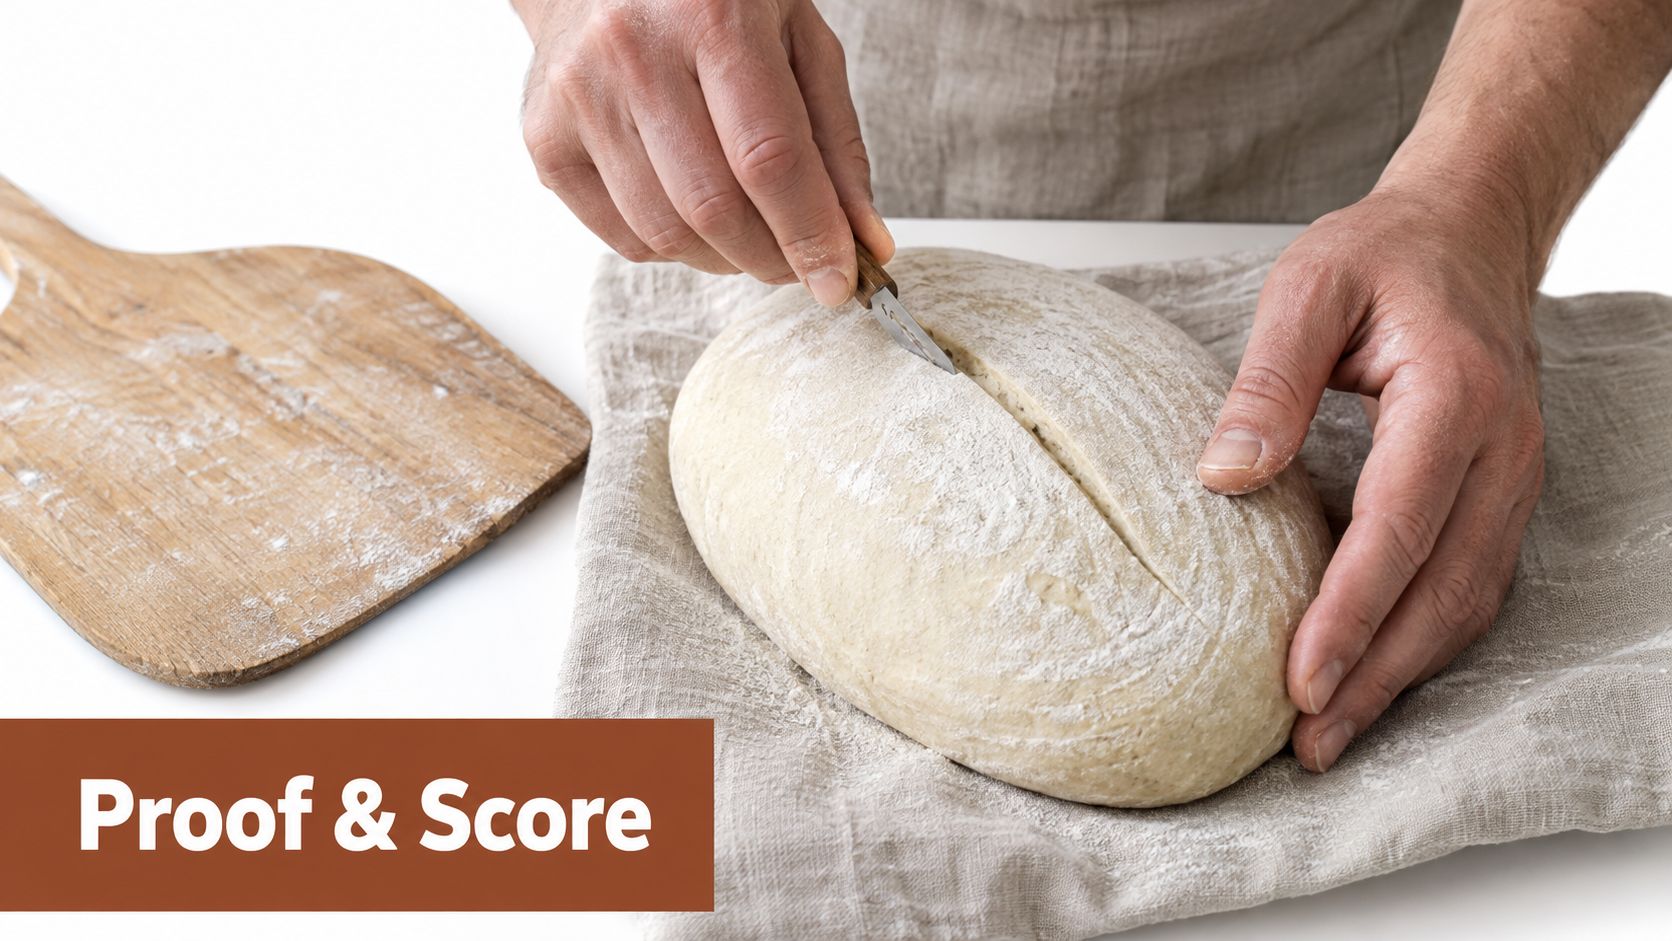
Proof by feel, not by the clock
Without a lid, the loaf has less margin for error. Slight overproofing shows up fast because there isn't a sealed humid chamber helping the dough stretch in those first minutes. I look for dough that feels aerated and alive but still has some pushback.
The poke test isn't perfect, but it's useful. A gentle poke should leave an impression that slowly eases back. If it springs right back, the dough is probably underproofed. If it collapses or stays dented, you've likely gone too far.
Shape for tension, then leave it alone
Surface tension matters more than people realize. A loose shape spreads sideways on the peel and bakes flatter, especially in an open setup. You don't need a dramatic boule. You need a taut outer skin that can hold gas and direct expansion upward.
A few habits help:
- Use light flour only so the seams can still grip and seal.
- Build tension during shaping without tearing the skin.
- Rest the shaped loaf on parchment if transfer is tricky.
- Keep the final proof controlled rather than waiting for a dramatic puff.
For scoring patterns and angle, this breakdown of bread scoring techniques is useful.
Score decisively and load faster than you think
Hesitant scoring leads to ragged cuts that don't open well. Use a sharp lame or razor and commit. One clean expansion line beats several shallow scratches.
The transfer matters just as much. If your loaf sticks to the banneton cloth, slumps while you're moving it, or sits on the counter while you fiddle with steam gear, you've already spent some of your oven spring.
One habit that saves loaves: Set the oven, steam pan, parchment sling, lame, and cover in place before you uncover the dough.
This short demo is worth watching before your next bake.
The cleanest loading method for most home bakers is parchment as a sling onto a hot stone or steel. It isn't glamorous, but it protects shape, limits deflation, and buys you speed. Speed is part of oven spring.
Troubleshooting Common Problems and How to Fix Them
Most no-Dutch-oven problems come back to one missed condition. Either the loaf didn't get enough heat, didn't get enough early steam, or never got the dry finish that sets a crisp crust.
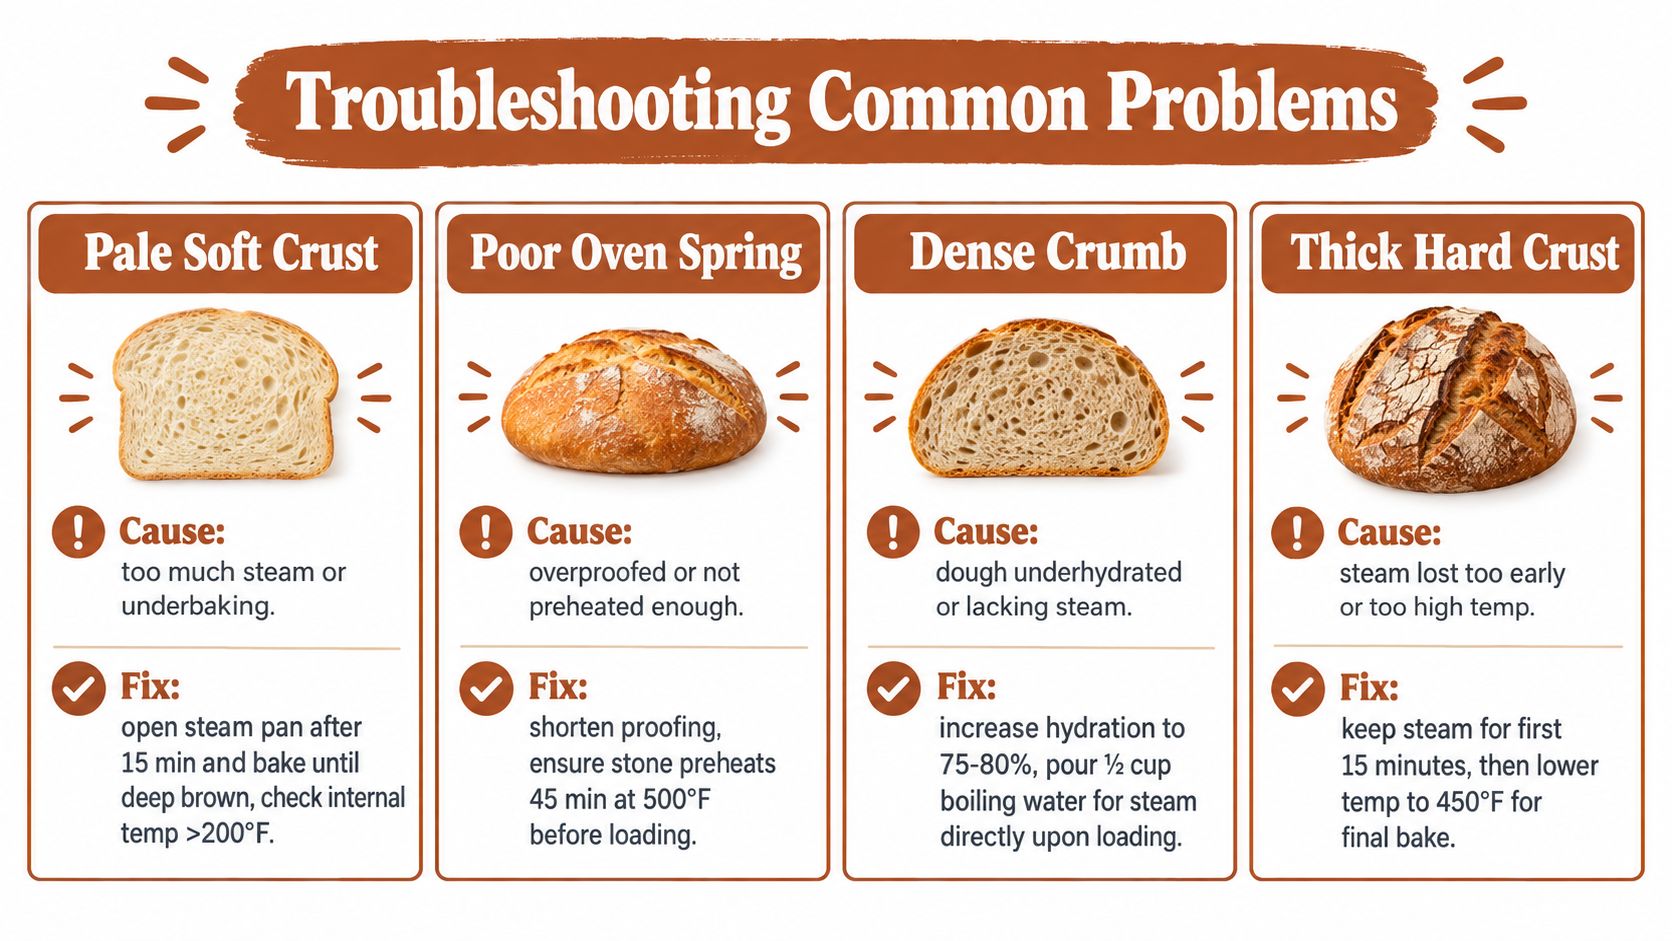
Pale crust and soft exterior
If the loaf looks baked but stays pale and soft, one of two things usually happened. You either kept the environment humid for too long, or you ended the bake before the crust had time to dry and brown.
Fix it by removing the steam source on time and letting the loaf finish uncovered until it takes on real color. If you're timid about dark crust, remember that undercolored bread often tastes underbaked too.
Poor oven spring and weak score opening
This usually points to under-preheating, slow loading, or overproofing. The loaf reaches the oven and doesn't get the immediate burst of heat it needs, so the cuts just drift apart instead of blooming.
Check these first:
- Preheat discipline: Give the stone or steel the full heat soak.
- Transfer speed: Load the loaf and add steam without delay.
- Proofing judgment: Don't wait for dramatic doubling on every artisan loaf.
- Scoring quality: Use one confident cut instead of several tentative ones.
Dense crumb with decent crust
This one confuses people because the exterior can look right while the interior stays tight. In most home ovens, that means the dough structure was fine but the loaf didn't have enough expansion time before the crust set.
The common cause is weak steam in the first phase. The second common cause is opening the oven door too early to check progress. That heat loss costs more than people think.
If you're troubleshooting, change one variable at a time. Otherwise you won't know whether the fix was more steam, more heat, or better proofing.
Thick or leathery crust
A thick crust usually comes from badly timed humidity. Either the loaf baked too dry from the start, or it stayed in a damp environment too long and then toughened as it cooled.
The fix is cleaner timing. Keep humidity during the opening phase, then vent decisively and finish in dry heat. Also confirm doneness. The practical benchmark remains 205 to 210°F (96 to 99°C) at the center for many artisan-style loaves baked without a Dutch oven, as noted in the earlier method guidance.
Baking Bakery Quality Bread at Home With More Consistency
The part that changes home baking isn't the pot. It's the moment you stop treating artisan bread as mysterious and start treating it as controlled heat and moisture. That's what separates random good loaves from repeatable ones.
If you remember only three things, remember these. High heat under the loaf. Steam during the first part of the bake. Dry heat at the end. Every workaround succeeds or fails based on how well it delivers those conditions.
That applies to simple lean doughs, enriched breads, and harder specialty formulas. The more demanding the dough, the less room you have for guesswork during fermentation, proofing, and oven humidity. That's why some bakers eventually move toward more controlled tools instead of relying on improvised setups forever. A system such as DBakerAid™ approaches the problem from the front of the process by controlling fermentation and proofing in dedicated stages, with an optional steamer for the oven phase, so you're not trying to fix unstable dough with bake tricks alone.
Consistency comes from repeatable decisions
The bakers who improve fastest usually stop chasing hacks and start standardizing their routine.
- Use one setup repeatedly until you know how it behaves.
- Keep your loading sequence identical from bake to bake.
- Judge dough by feel and response, not just by a timer.
- Write down what changed when a loaf improves or slips.
If you want another variation to test once your steam routine is solid, this Cartograph Coffee bread recipe is a fun way to see how flavor additions behave when the bake itself is already under control.
A good loaf without a Dutch oven isn't a compromise loaf. It's just a loaf made by someone who understands what the Dutch oven was doing in the first place.
If you want more repeatable bread results, DBakerAid™ gives you controlled fermentation and proofing, plus tools that support steam-assisted baking in a standard home oven. That matters even more when you're baking temperamental doughs or fresh high-protein loaves that need tighter control to rise and brown well. Explore the system and recipes at DBakerAid™.